Do-it-yourself kitchen cabinets for washing. How to make a sink cabinet with your own hands. Which sink cabinet to choose?
The kitchen sink cabinet has become such a familiar element of the interior that it is often not noticed. Not only the appearance of the kitchen, but also its functionality as a whole depends on it. Such a cabinet can be purchased at any furniture and plumbing store, but it is much cheaper and more enjoyable to assemble this kitchen element with your own hands, especially since it consists of a small number of parts and does not require skill.

The sink cabinet has become a familiar element of the kitchen interior
Exterior view and internal structure of the washing cabinet
The main difference between a washing cabinet and other kitchen cabinets is the absence of internal shelves and drawers, since the entire space is occupied by the sink and the communications connected to it. Some models of such cabinets try to be equipped with drawers, but the presence of a constant source of moisture does not allow storing many items in them, especially dishes and substances that are afraid of water.

Cabinet with drawer system
When making a cabinet with your own hands, it would be best to abandon the idea of arranging the interior space with shelves or drawers, since they greatly complicate the design, and their practical value is very questionable.
A standard sink cabinet consists of two side walls, a bottom, a back wall, fronts and a countertop with a cutout for the sink. If the kitchen is equipped with an overhead sink, the countertop is not installed. Also, the back wall is often excluded from the components for a kitchen sink, since it interferes with the normal supply of communications.

Cabinet design and standard dimensions
Standard cabinet dimensions are 85 cm high, 60 cm wide and 50 cm deep. Of all the parameters, it is recommended to change only the width, since this alone does not affect the ease of use of the sink and depends primarily on the width of the sink.
The optimal height of the sink is considered to be 84-87 cm, since with such parameters you can use the sink while washing dishes without bending over. Even small deviations from this height can cause discomfort and fatigue in people of average height.
Materials for the production of a sink cabinet
The kitchen is a constant source of high temperature and humidity. Therefore, all materials for the production of kitchen furniture must have increased moisture resistance. This requirement especially applies to cabinets for sinks, since the proximity of a water source quickly deteriorates wooden surfaces that do not have sufficient waterproofing.

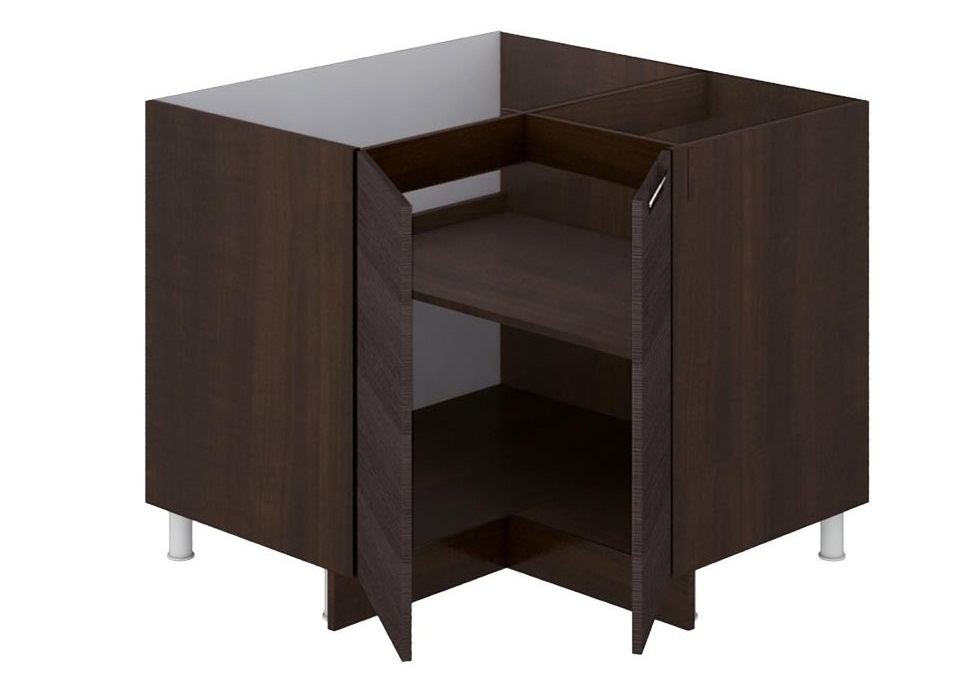
Corner sink cabinet made of natural wood
Modern kitchen furniture is made from the following materials:
- Chipboard (chipboard). This is the traditional material from which most kitchens in the lower price range are made. The main disadvantage is that even if there are minor coating defects (scratches, cracks), the slab quickly absorbs water and swells.
- MDF is a board made of fine wood impregnated with a binder. Compared to chipboard, it retains moisture much better, but requires no less reliable protection.
- Natural wood. Premium kitchen furniture and facades are produced from it. After high-quality treatment with waterproof varnishes, such a material becomes hydrophobic, but prolonged exposure to high humidity in combination with elevated temperature still negatively affects the properties of wood.
For the manufacture of most sink cabinets, chipboard or MDF is used, which is important to reliably protect from moisture penetration, especially in places of cuts and holes. Basic methods of protecting furniture boards:

Laminated chipboard cabinet
- Lamination is the most common type of coating for chipboard and MDF. Sheets for furniture production are covered with a special film when exposed to high temperature and pressure, after which a protective varnish is applied.
- Coating with polymer materials is used mainly to protect MDF boards. For this purpose, acrylic, plastic, and enamel are used. All these materials not only help protect furniture from moisture and physical influences, but also give the kitchen a beautiful and bright look.
Making a cabinet for a sink with your own hands
Before you start making a sink cabinet, you should choose the material from which it will be made, determine the appearance and dimensions. Since cabinet fronts are not easy to make, it is recommended to buy them separately and focus only on assembling the cabinet frame. This will give you the opportunity to make a product that will hardly differ in appearance and characteristics from store-bought analogues.

Sink cabinet assembly diagram
The whole process can be divided into several stages:
- Purchase of materials. The main components that you will need: chipboard or MDF boards (16-18 mm thick) for the cabinet walls, a plate (22-25 mm thick) for making the countertop (if the sink is mortise or under-mounted).
- Marking and cutting materials. If you do not have the skills to saw chipboard and MDF, it is best to entrust this important process to specialized companies that charge a relatively small fee for cutting and edging furniture boards.
- Assembly of component elements. At this stage, you may find the standard instructions for assembling a sink cabinet useful, but there is nothing particularly complicated at this stage, since there are few constituent elements, almost all of them are different and have a clearly defined purpose.
- Installation of a sink and connection of communications. At this stage, it is important to accurately determine the position of the drain neck and connect a siphon, drain pipe to it, and if there is a washing machine or dishwasher in the kitchen, additional drains for them. Reliable waterproofing of all connections is also very important, which will prevent the washing cabinet from getting wet in the future.
Selecting and assembling a sink cabinet is a responsible process that will allow you to preserve the beautiful appearance of your kitchen for a long time and provide comfortable conditions for using this integral element of the kitchen set.
We spend a lot of time in the kitchen when we are at home. Here we communicate with family and friends, prepare delicious dishes, and simply relax with a cup of delicious tea. That is why the interior and style of this room are given the greatest importance. After all, a kitchen should not only be convenient and comfortable, but also beautiful. In addition to high-quality repairs and the most modern household appliances, one of the main details of the kitchen interior is furniture.
What to do if one of the elements of the set, for example, a kitchen cabinet under the sink, has become unusable? But this particular piece of furniture is an important independent element and has specific design features. The kitchen sink cabinet is constantly exposed to the negative influence of moisture and therefore breaks down most often. If this happens, then there are several options to solve the problem.
The first is to completely change the headset. But this is very expensive and not always advisable. The second option would be to purchase only a cabinet, but you may not be able to find exactly the same one, especially if the furniture was purchased a long time ago. Another solution is to restore a broken cabinet or make a new one yourself. In order to accomplish this, you need desire and the most basic skills. And also an understanding of some of the special features of this element of kitchen furniture.
Designs and types of sink cabinets
The simplest basic version of a cabinet is an ordinary floor cabinet without a back wall and often without a bottom, hollow inside. Thanks to this solution, it is very easy to connect communications to the sink, and it is also possible to choose a sink of almost any depth and shape. A more complex version is equipped with special elements inside and allows rational use of the space under the sink. There are two types of placement of a cabinet under the sink in the kitchen - linear and angular.

With linear placement, the cabinet and other floor elements of the headset are installed in the same plane. The cabinet itself under the sink has a rectangular shape and a standard width of 60 cm. But the length of the bedside table can be different. It depends on the dimensions of the sink itself.
There are two types of corner sink cabinets - trapezoidal and L-shaped. The most common is the second option. Due to the shortened length of one of the side parts, easy access to the inside of the cabinet is provided. Such models are more ergonomic and fit very succinctly into almost any interior, especially in small kitchen spaces. In such cabinets it is better to install narrow doors with a maximum width of 30 cm.
The trapezoidal cabinet is a more complex design. Its frontal surface can be broken, rounded or linear. Due to the increased size of such cabinets, they can accommodate sinks of different sizes and shapes, for example, consisting of several bowls. Inside these kitchen cabinets under the sink there is a fairly large space where you can place not only a siphon, but also various storage systems - pull-out, swivel or roll-out.
What is needed to make a cabinet for a sink?

If you are planning to make a cabinet for a kitchen sink with your own hands, then first of all you need to decide on its design, shape, size and material from which it will be made. Kitchen furniture is most often made from chipboard, MDF or solid natural wood. Wood, especially valuable species, looks very beautiful in finished products and will make the interior elegant and rich, but it is also quite expensive. Modern MDF and chipboard are of high quality and, which is very important for a sink cabinet, are impregnated with special moisture-resistant compounds. If you choose one of these materials, then it is best to use laminated panels for the facade parts - they are higher quality, beautiful and durable.
The dimensions of the cabinet depend on the area of the entire room and the size of other kitchen furniture, as well as the dimensions and shape of the sink. The design of the sink with cabinet should match the overall interior of the kitchen and other elements of the furniture. And, of course, you need to choose the color of the panels identical to the rest of the furniture. Otherwise, the set will look disjointed. And this is not beautiful and not stylish.
Stages of making a bedside table
After you have decided on the material, shape and size, you need to make a drawing according to which the cabinet will be assembled. And also purchase all the necessary parts and materials for its manufacture:
- hinges for doors;
- special corners;
- self-tapping screws;
- primer;
- putty;
- varnish for opening a finished product;
- sandpaper.
To make and install a kitchen sink cabinet with your own hands, you will need the following tools:
- tape measure and ruler;
- hacksaw;
- screwdrivers;
- hexagon;
- putty knife;
- tassels.
When everything is ready, you can start working. First of all, we cut out the details of the future bedside table for the kitchen sink according to the drawings. This cabinet requires: 2 sides, a bottom, upper spacers, which depend on the width of the cabinet, one or two doors, a tabletop and a lower baseboard. For some models, for example, with a triangular sink, you will also need four legs.
Important: When cutting panels, you need to ensure that the chips are located at the bottom. A 16mm indentation must be made from the front edge.
Then you need to evenly distribute a layer of putty over all elements of the cabinet and carefully level it with a spatula. After the surfaces have dried, you need to sand them with sandpaper. After making sure that the dimensions of all structural parts correspond to the drawings, we proceed to assembly. Since in most cases the back wall is not installed, furniture corners should be used to increase the stability of the sink with a kitchen cabinet. When the cabinet is assembled, it needs to be painted or varnished.
Interesting: A special tint varnish is best suited. It must be applied in several layers and when working, use a brush with natural bristles.
When purchasing a new sink, you definitely need to worry about the cabinet for it. Of course, the easiest way is to purchase ready-made furniture, however, those who like to tinker can make it themselves, and this is not difficult to do. In this article we will look in detail at the main points of making such a cabinet.
General information
The sink cabinet is an extremely simple design, which, as a rule, consists of two side walls, a bottom and front doors. The walls can be fastened together with shelves or crossbars. , then the cabinet also has a tabletop.
Thanks to this simplicity of design, you can take on its manufacture even if you do not have such work experience. True, in order to “get your teeth into”, it is better to make the first cabinet for a summer house, and then, having the skill, start making home kitchen furniture.

Manufacturing
Project
Work should begin with the preparation of a project, which should indicate:
- Structural features of the product - these include the number of doors, shelves, the presence or absence of a table top, back wall and other points.
- Dimensions - depend on the size of the sink itself, as well as the optimal height for you at which it will be located. As a rule, the cabinet stands next to other kitchen furniture, so the height is chosen taking into account the size of existing products.
Do-it-yourself sink cabinet drawings do not need to be made extremely accurate to scale. The main thing is that they are understandable and contain all the necessary information.

Materials
Before making a sink cabinet with your own hands, you need to prepare the following materials:
All these materials can be purchased at any hardware store. Moreover, the total price will be an order of magnitude less than the cost of finished furniture.
Advice!
Laminated chipboard can be used as the main material for the structure.
Its cost is higher, however, in this case the finished product does not have to be painted.

Manufacturing of parts
When the project is ready and all the necessary materials have been purchased, you can begin making furniture.
The work begins with preparing all the details:
- First of all, you need to apply markings to the chipboards. Since the design is simple and usually consists of rectangles, this is not difficult to do. The only thing is that the work should be done carefully and slowly, so as not to make mistakes.
- Next you need to cut out the parts. It is best to use a jigsaw, however, if such a tool is not available, you can use a regular hacksaw for metal.
- Then you need to check the dimensions of the completed parts again. If necessary, they should be corrected and the sections trimmed.
When all the parts are ready, you can begin assembly.

Assembling the cabinet
The instructions on how to assemble a sink cabinet are quite simple:
- First of all, you need to connect the sides of the structure and the bottom. This is done using furniture corners and self-tapping screws. To do this, you need to join the two parts to be connected, attach the corners to them and mark with a pencil the locations of the screws.
- Then holes of a suitable diameter are drilled in the designated places..
- Next, the parts are again joined and fastened using corners and self-tapping screws..
- After this, the shelves and other crossbars that connect the sidewalls are attached in exactly the same way..
- If the structure has a tabletop, then it is attached last using the same fasteners.
This completes the main part of the work.

In the photo - putty for chipboard
Finishing
The chipboard structure itself is unattractive and resembles a wooden box.
To give it an attractive look, it is necessary to complete the finishing, which is carried out in this order:
- First of all, the product needs to be puttied. The putty should be applied in a thin layer and immediately leveled with a spatula. This will make the surface of the structure smooth.
- When the putty has dried, the surface must be coated with a primer.
- After some time, when the primer has dried, you can begin painting. For example, tinted varnish looks great when applied exclusively with a brush with natural bristles.
- Next, the same operations are performed with .
- After this, you need to attach handles to the doors and install hinges.
- Then the doors should be attached to the cabinet and the locations of the screws that will secure the hinges should be marked.
- After making the holes, the doors must be attached to the sides and their position adjusted.
Advice!
Wallpaper can be used as a finishing material for the cabinet.
You can glue them with PVA or another compound (depending on the type of wallpaper).
This completes the process of making the cabinet. Now you can begin installing the sink itself.
Conclusion
The sink cabinet is a simple design that even a novice home craftsman can complete. However, it should be borne in mind that the appearance of the product depends not only on the quality of the assembly, but also on its finishing. Therefore, high-quality painting is often the most difficult.
For more information on this topic, watch the video in this article.
The kitchen is an important element of home improvement. It carries an important functional load. This is where food is prepared, the process of procurement and preservation takes place. Most often, it also houses a dining area for daily meals. Therefore, a smartly planned space greatly optimizes all processes. This is especially true for small kitchens. The kitchen furniture set is the main forming element of this system. A corner cabinet for a kitchen sink, which will be discussed later, will help you rationally distribute your work space.
Before considering the main types of corner kitchen cabinets, we will determine for what purpose the corner segment serves and what functions it performs.
The meaning and functional loads of a corner sink cabinet:
- connecting - that is, thanks to this segment, the furniture set transitions from one wall to another;
- technical - it contains one of the important components, namely the sink and communications to it. This main purpose is to rationalize the space used. A corner sink is convenient because it can be equidistant from the work table and the hob. This goes a long way towards making cooking convenient. In addition, it can accommodate sinks of different configurations and sizes. Inside it, in addition to the communications drainage system, there may be water filters, a flow-through heater, garbage containers, retractable storage systems, most often household chemicals;
- aesthetic function - this element fits organically into the overall space.


Varieties
There are two types of corner kitchen sinks: L-shaped with an acute angle, these sections are also called attached, and a kitchen cabinet with a beveled corner. They differ in internal overall dimensions, design, quantity and method of opening the doors, and ease of use.
Corner cabinet for the kitchen under the sink, main overall dimensions.
Custom-made kitchens may have slightly different overall dimensions.

L-shaped

With beveled corners
Selecting size and shape
In order to make the right choice of corner cabinets, you need to know their features, advantages and disadvantages. In attached sections with an acute angle, the internal space is smaller than that of the second type of cabinets. They can be equipped with two doors or one that opens two sections at once (accordion door). The convenience of the second option is that access to the far corner inside the section is simplified. A corner cabinet for a kitchen sink with a beveled corner is more spacious, as it has a larger volume. It is possible to install a larger sink. In addition, they are convenient in terms of use, since the beveled corner makes it easier to access the sink. The disadvantage is that it only has one small door.
The problem area of corner sections under the sink is the countertop. The standard canvas has a width of 60 cm. In the case when postforming, a laminated tabletop is used, there is a seam on the corner segments. This point is not relevant for cast countertops made of artificial stone. Corner overhead sinks are sold that fully correspond to the dimensions of the working surface of the cabinet. Or, for this section, purchase a special postforming with a width of 120 cm.
What else needs to be taken into account when choosing a corner segment:
- kitchen area. A section with a beveled corner takes up more space;
- You should immediately decide on the size and shape of the kitchen sink.
You don’t have to purchase it right away, but you need to select a model and download the technical drawing on the Internet. When you purchase a cabinet, take it with you and show the sales consultant the drawing. This will help avoid possible mistakes;
- material used to make kitchen and countertops. Remember that laminated boards are most prone to swelling from moisture. Therefore, it is desirable that the surface of the tabletop be seamless;
- general style and interior design;
- decide whether additional elements will be located in the corner element: chopper, filters, flow-through heater. In this case, it is reasonable to give preference to a segment with a beveled corner.
Only by summing up all these points can you make your choice.


Manufacturing materials
When deciding on a cabinet, you need to navigate the materials from which it is made. Main types of materials:
- laminated board is an affordable option. This is essentially compressed glued wood chips covered with a layer of plastic. Please note that moisture must not get inside the slab. For these purposes, the ends, in the part where water can get in, are protected with an edge;
- cabinets made of laminated board with MDF facades. MDF is wood waste crushed to a dispersed state, vacuum-pressed under high pressure. On top, the slab is covered either with a thin layer of a special film, or with veneer (a thin cut of wood), veneered facades. The slab can be protected by painting. Painted MDF has a wide range of colors. Another advantage is that they can be embossed. The façade does not require edge finishing at the ends. The most popular and optimal option in terms of price and quality;
- natural wood - in the vast majority of cases, only facades are made from it. Wood, although the most environmentally friendly material, is also quite capricious. It must be well dried, expertly fitted and coated with special varnishes. These compounds protect it from moisture, temperature changes, and mechanical stress;
- facades made of plastic and glass - they are quite beautiful and expressive. But expensive, like wooden ones. They are framed with aluminum end tape. Susceptible to scratches, glass, chips and cracks;
- cabinets made of food grade metals. This is most often furniture for food production, where increased sanitary and hygienic requirements are imposed.
Washing plays an important role for ease of use.

Wooden

Options for corner segments
There is a wide range of sinks on the market, including corner sinks.
What types can be used:
- corner sinks - for cabinets with an acute angle, rectangular sinks are suitable. For the second type, with a beveled corner, the choice is wider, since the working surface is larger;
- round sinks 50, 60 cm, these are standard sizes. It should be remembered that a section with a sharp internal corner is also suitable for sink 50;
- direct washing - most often manufacturers produce them in lengths of 60 cm (600 mm) and 80 cm (800 mm). The depth depends on the type of sink (countertop or mortise) and shape.
A floor-mounted corner cabinet for a sink, its choice, is directly related to the size and shape of the sink.


Oval

Rectangular

Filling
Don't forget to take into account the interior contents of the cabinet. If technical components are concentrated there (chopper, water filter, flow-through heater), then it is wise to use a cabinet with a beveled corner, since it is more spacious. When you plan to use it for storage, both options are suitable. You just need to decide on the dimensions of the stored items. The height of the shelves will depend on this.
In an attached segment with an acute angle, it is possible to use special pull-out baskets and rotating shelves, this is quite convenient.
If a garbage container is located in the corner segment, then when planning the interior space, it is better to know its size in advance. Then you can rationally place additional shelves.


When deciding what the corner floor element for the sink will be, take into account the totality of the above factors. The best material for countertops is artificial stone. Then a sink made of the same material would be more suitable. If the work surface is covered with a countertop made of laminated slabs, then it is more correct to use overhead sinks.
A segment made entirely of laminated board is not much cheaper than a cabinet with an MDF facade. Therefore, from an aesthetic and practical point of view, preference should be given to the second option.
The main thing for the safety of the cabinet is maximum protection from water getting inside the stove. To do this, all possible joints are sealed with sealant, edges in contact with moisture are trimmed with protective tape, and furniture plinths are installed.


How to make it yourself
If you have certain skills, you can assemble the corner segment yourself. A laminated board is the best option for a DIY kitchen and is the easiest way to make one.
The sequence of actions is as follows:
- decide on the type of section. To do this, consider the size of the room and what will be located inside the segment;
- Check out the main types of sinks for corner cabinets. Both types are suitable for sink 50. Choose the best option and download the sink drawing;
- think over and sketch a drawing of the cabinet with detailed dimensions;
- With a drawing, contact a company that cuts laminated boards to size. They will also tell you where to buy components and end tape;
- When all the blanks are available, you can assemble the corner segment. To begin with, install the sidewalls and attach them to the bottom of the cabinet. Next, the connecting strips are installed and secured. Then the legs are screwed on. Mark and cut out recesses for door fastenings. They install them and hang the doors. Depending on the type of sink, overhead or mortise, prepare the countertop in order to mount the sink. To make a hole in the tabletop, use a jigsaw. First make markings on the countertop according to the shape of the sink. A mortise sink is installed only with sealant. It is important to follow the assembly sequence.
So, the floor corner segment for the sink is an important element of the kitchen furniture set. It carries a significant functional load. There are two main types of cabinets. Depending on a number of the above facts, they choose one of them. A significant element is the shape and size of the sink and internal filling. When choosing a material, the interior design plays a major role.
Thanks to the variety of design solutions of modern plumbing, a vanity unit is not a mandatory piece of furniture in a kitchen or bathroom. However, it is precisely this that allows you to hide communications that can significantly spoil the design of the room.
The consumer has several options for the development of events: buy a ready-made product at the nearest furniture store, order professionals to make a frame according to their own sketch (spending time and paying a considerable amount for the execution) or make a cabinet under the sink with their own hands.
For those who save their money and prefer exclusive items to serial products, we have prepared detailed instructions on how to independently manufacture this piece of furniture.
Design selection
The first thing the master needs to do is choose the type of frame. The choice of cabinet type depends on its location, the type of sink (over-mounted, mortise) and its shape, as well as the material from which it is made. For independent implementation, you can take as a basis one of three main design options: floor-mounted, suspended, corner. Next, we will consider the main advantages and disadvantages of each solution.
Floor stands
The easiest to manufacture and most functional options for the kitchen, which perform several tasks at once:
- Hide pipes from prying eyes
- Can be continued in the form of a countertop
- Acts as a sink stand
- Can be used as a place to install a miniature washing machine, place a trash can, a place to store household chemicals or other small things necessary for everyday life.
Suspended structures

Creating a hanging nightstand is rightfully considered the best option for saving space in bathrooms.
The main advantage of this type of cabinets is their visual lightness and the availability of free space on the floor, which is necessary when laying communications in the box.
Creating a hanging bedside table under the bathroom sink with your own hands is quite simple, especially since it does not require a large amount of materials, although it does require a competent approach to the installation work and subsequent operation of the product.
Corner cabinets

Corner cabinets can have both floor-mounted and suspended solutions. As a rule, corners in rooms are used extremely poorly, so corner structures are considered an excellent option for installation in small-sized kitchens, especially if the frame is to be installed under the kitchen countertop.
For the most part, the corner design creates a lot of free space under the sink, which a thrifty housewife can always use to store things needed in everyday life.
Washbasin type
Having chosen the location of the product, you should not think that the choice of the type of structure has already been completed. Before you make a cabinet under the sink with your own hands, you need to pay attention to the type of sink, which (as noted above) may have an overhead or mortise mounting method.
Cabinets with an overhead sink are made as simply as possible, since the surface of the sink is mounted on top of the frame. If you plan to use a sink with a mortise mounting method, then a hole should be provided in the countertop of the cabinet that corresponds to the size and shape of the bowl.
Design elements
Having decided on the type of cabinet and its design features, we move on to the next stage - creating a sketch with details of all elements. The sink base consists of:
- frame,
- side walls,
- doors,
- internal filling,
- accessories.
The frame can be made of wooden beams with a side section of 40x40 mm. To be fair, it is worth noting that you can make a cabinet under the kitchen sink with your own hands without a supporting wooden frame, connecting all the elements together using European screws (confirmations). 
Next, we will consider the frameless scheme, as the simplest for independent implementation.
Important! The following are the standard dimensions of the elements of the floor base made of laminated chipboard 16 mm thick for an overhead metal sink 500x500 mm. Details are provided for illustrative purposes only. You can change the dimensions of the elements based on your own needs and washing parameters.
- Side walls – 2 pcs. Standard size: 820x450 mm
- Spacers – 4 pcs. Size: 468x100 mm
- Door – 1 pc. Size: 620x500 mm
- Internal shelves – 2 pcs. Size: 468x450 mm
You should draw a sketch and proceed to the next stage of creating an underframe for the sink yourself - choosing the material.
Materials and tools
When choosing a material, you should take into account that the sink cabinet will be regularly exposed to moisture. The durability of the appearance of the entire structure depends on how wisely you choose. The following materials can be used for the underframe:
- Laminated chipboard is the most budget option.
Advantages: relatively low cost, highly decorative, huge selection of colors, ease of processing and assembly of the structure.
Disadvantages: laminated chipboard is afraid of moisture. When water gets into unprotected areas, the material swells and loses its strength characteristics.
- MDF – boards made from compressed wood fibers. Advantages: moisture resistance, ease of processing, relatively low cost. Disadvantage: low decorative effect.
Tip: To improve the appearance of the product, use factory-laminated MDF boards.
- Natural wood. The advantages and disadvantages can be listed in four words: beautiful, solid, expensive, massive. In this regard, wooden underframes are the least common among our compatriots as a frame for a sink.
- Plastic. An excellent material with a number of outstanding advantages: water resistance, strength, decorativeness, practicality. However, most plastics do not tolerate contact with aggressive detergents.
- Glass. Making a glass bedside table for a ceramic sink with your own hands is quite difficult, especially at home. To work, you will need skills in cutting and processing thick glass, special tools and fasteners for drilling the material. In some cases, it is necessary to use hydrofluoric acid to bond glass surfaces.
An alternative option is a combination of materials: the body is made of MDF or chipboard, the door and tabletop are frosted glass. Such a cabinet will become a decoration of the room and a source of your pride.
Despite a lot of shortcomings, most home craftsmen use laminated chipboard as the main material for self-assembling a sink base.
To cut laminated chipboards you will need:
- Hand-held (high-speed) circular saw. For a clean cut, it is necessary to provide a disk with pobedite tips.

A jigsaw is not suitable for this work, since it is almost impossible for it to make an even cut without chipping the surface of the laminated coating.
- Drill with a set of drill bits for wood. To tie the frame with confirmations, you need to stock up on a special drill of the required diameter.
- In addition, you will need: a tape measure, a pencil, a carpenter's corner, confirmations themselves, a PVC edge (1 mm thick) and an iron for gluing the ends of the blanks, furniture canopies and fittings.
Making your own vanity cabinet
The process of assembling a simple bedside table begins with cutting laminated chipboards. To do this, transfer all the frame elements to the material. Use a carpenter's angle to create the first right angle. Next, start from it, and not from the corner of the laminated chipboard, and carry out the process of cutting the slab into blanks.
Important! When marking, be sure to take into account the thickness of the cut, which can be determined experimentally or by measuring the distance between the teeth of the saw blade.
Second phase
Gluing the ends of PVC blanks with an edge with an adhesive layer. To do this, walk along the cut surface with an emery block (a wooden block with a flat surface on which a strip of sandpaper is glued), clean it from dust. 
Attach the edge to the end of the workpiece and run a heated iron over the surface, then remove excess material with a sharp knife.
Third stage
Assembling the body of the bedside table (connecting the side frames with the spacer bars). Drill holes with a confirmation drill at the joints of the workpieces. Attention! Consider the thickness of the chipboard. Make holes by stepping back 8 mm from the edge of the workpiece, then tighten the workpieces with confirmations using a hexagon bit.
Fourth stage
Installation of internal filling. For better reliability and fixation of the entire structure, it is also better to tighten the shelves with the sidewalls using confirmations.
Stage five
Installation of a sink on a cabinet. If the sink is overhead, then use the standard fasteners that come with the kit, or plastic corners for attaching the sink. If the sink is mortise, then prepare a hole in the countertop that follows the shape of the washbasin. You can’t do this without a jigsaw, since you won’t be able to make a curved cut with a circular saw.
Tip: To minimize chipping of the laminated coating when cutting with a jigsaw, it is recommended to stick paper tape (painting tape) on the cutting line. Carry out the cut “without swinging”. The T101B files without a reverse tooth, Bosch-123X, Bosch T 101 AIF (with a tooth without setting), Wilpu “Laminator” performed well.
Stage six
Preparing the door and installing fittings. You should make “cups” on the door - a sample for where the hinges will be attached. This is done with a drill with a loop cutter installed, 35 mm in diameter. 
Next, furniture hinges are installed in the prepared “cups”, after which the door is fixed to the side. The final touch is the installation of handles, magnets and other accessories. It is better not to hang the door until the sink is installed on the base. It may interfere with the installation of the structure in its original location.
For a more complete understanding of the underframe assembly process, we recommend watching the video:
As a conclusion
In this publication, we examined in as much detail as possible all the stages of creating a sink cabinet with our own hands, found out what material to choose and what tool to use. As you can see, there is nothing complicated about this. And you can do this using our recommendations.