How to prepare dough for decoration. How to make salt dough for crafts. Dough braid for decorating the pie
You have made dough for buns, pies and pretzels, but you don’t know how to cut the dough so that the baked goods turn out beautiful - see step-by-step photos.
Beautiful buns
Cutting "Orchid": roll out, cut out a square, fold into a triangle, make cuts along the sides, leave a section of dough without a cut, unfold the square, connect the cut strips in the center.

Cutting "Peony": roll out, cut out a square, fold into a triangle, make cuts along the sides, leave a section of dough without a cut, unfold the square, fold the triangle with other corners, make cuts. Unfold the square and connect the cut strips in the center. Place the filling into the flower petals.

Cutting "Curls": roll out the layer, season with filling, roll into rolls on both sides, cut across.
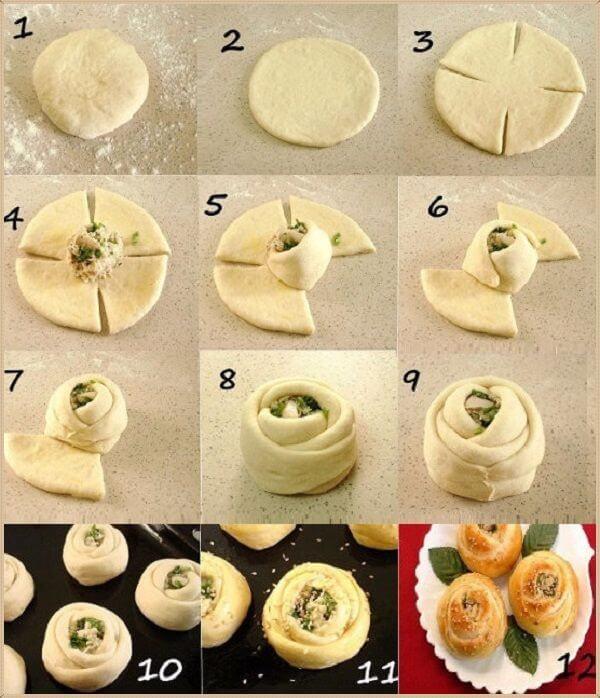
Baking cutter “Rose”: roll a bun, roll out a circle, make 4 cuts at equal intervals, put the filling in the middle, roll the rose petals one by one.

Butter “Bows”: roll into koloboks, roll out circles, fold the circle in half, make 4 external and 3 internal cuts.

A simple flower made from rich yeast dough: roll the sausages, connect them into rings, put the filling on the two walls inside the ring, connect them in the center, as shown in the photo.
Beautiful puff pastry Kalach: roll a bun out of it, roll out a circle, grease with filling, roll into a roll, cut the roll lengthwise, twist two puff ribbons together, connect the ends to make a roll.
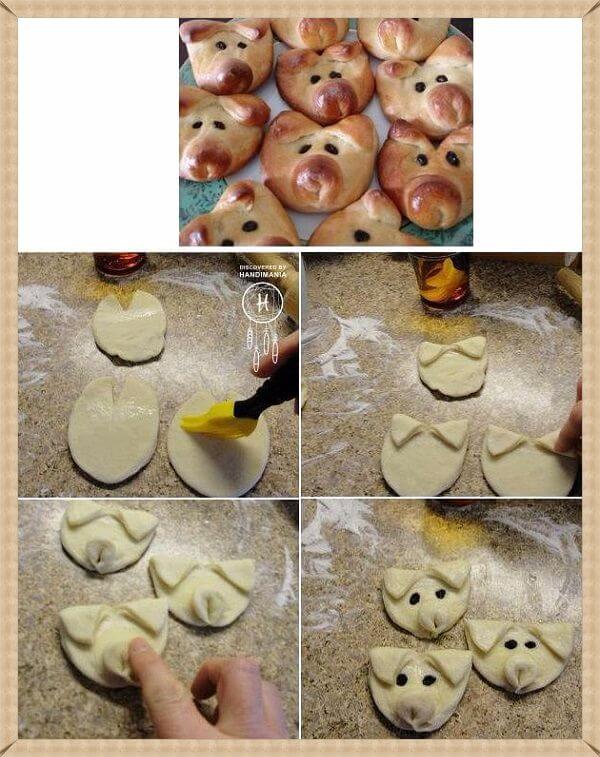
How to make “Piglets” from rich yeast dough. Roll out the circle, make a small cut on top, bend the corners - ears. We sculpt the piglet's piglet at the bottom, bending the edge and flattening it a little. The piglets' eyes are made of raisins.

Butter "Mushrooms": A circle is rolled out, which is then cut into pieces (see photo) and laid out in the shape of mushrooms.
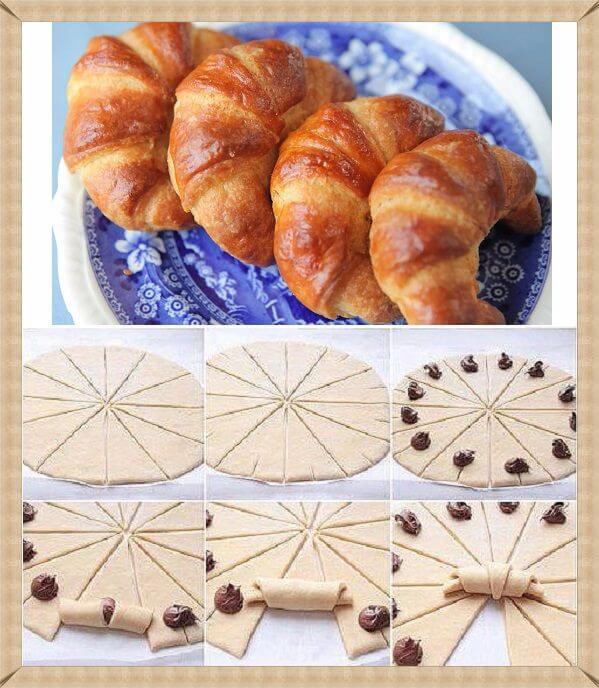
"Croissants". Roll out the circle and cut it into triangles, cutting from the center to the outer edge. A cut is made on the outer side of the triangle in the middle and the filling is laid out at its end. The croissant is rolled up from the outer edge to the center.

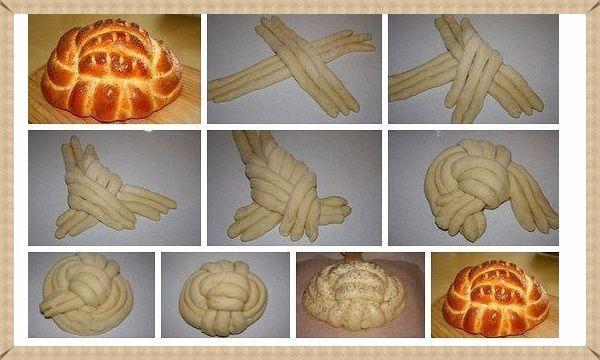
Bun “Bird”: Roll the sausage, wrap one edge around your index finger and thread it into the resulting ring. Using a small pinch, press the dough into a beak shape. The tail needs to be flattened and cuts made, giving the appearance of feathers. The eyes are the highlight.

Here are simple versions of beautiful buns made from sausages. By the way, even a child can make such forms. Involve the little ones in this fun baking process. At the same time, you will develop fine motor skills and imagination.
How to decorate pies
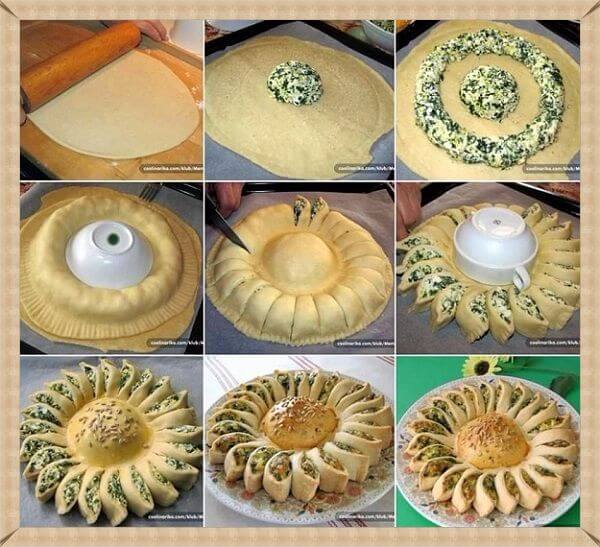
Flower cake decoration: Roll out the layer into a round shape, place a bun of filling in the center. Carefully distribute the rest of the filling around the circle, leaving space from the edges and the central bun. Cover the top with another layer of dough. Using a small bowl or tea cup, press the edges around the center filling. Trim the outer edges with an openwork knife. Then evenly cut the dough with the filling that goes along the outer ring. Turn each “petal” slightly so that the filling is facing up.
Cutting a loaf of bread. Roll the flagella into sausages and weave them into a loaf, as shown in the step-by-step instructions in the photo.
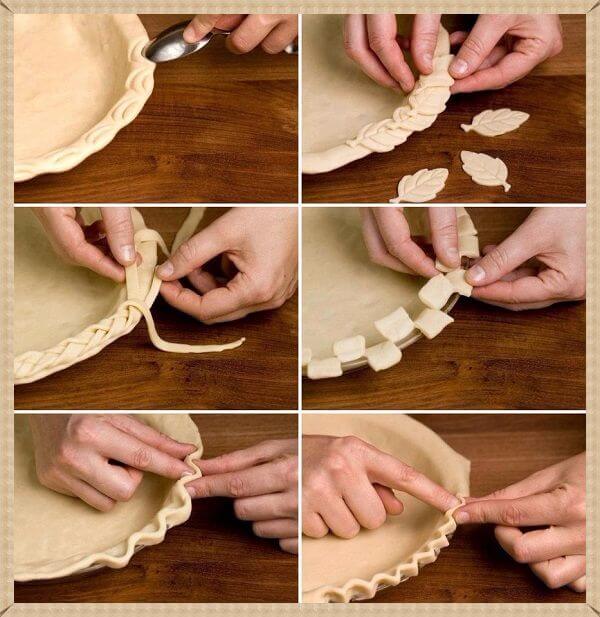
Here are the options for decorating the edge of the pie.
Cutting the dough “Pigtail” or “Spikelet”

The simplest version of “Pigtails”. A rectangle is cut out of the rolled out dough layer and a longitudinal cut is made in the center. Then, one edge is threaded through the resulting hole several times. This way the edges curl into a spiral. The filling is placed in the center.

"Pigtail with sausage". Three sausages are connected at the top edges. Then a slice of sausage is placed between them. Intertwined like a braid. The right harness is placed between the left and the center, then the left is placed between the right (which is now on the left) and the center (which is on the right). Again, a slice of sausage is placed and the braiding continues.
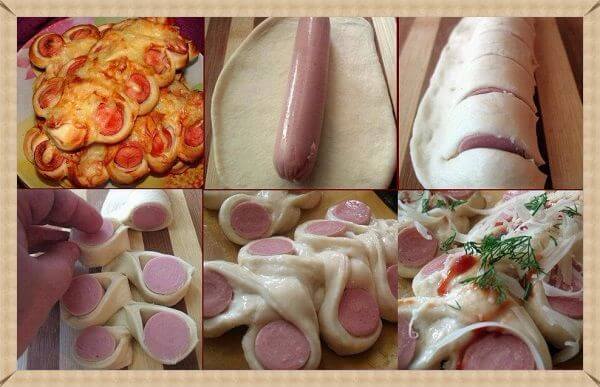
Sausage in “Pigtail” dough. This delicacy is sometimes called “Obzhorka” in culinary shops. The sausage is placed in the center of the dough cake. Then the edges are stuck to each other, and the sausage wrapped in dough is cut into equal parts. Each polka is turned sausage side up and placed one after another on different sides from the middle. Place in the oven when half cooked. Sprinkle cheese, herbs on top, grease with mayonnaise or ketchup (optional). And finish baking until ready.
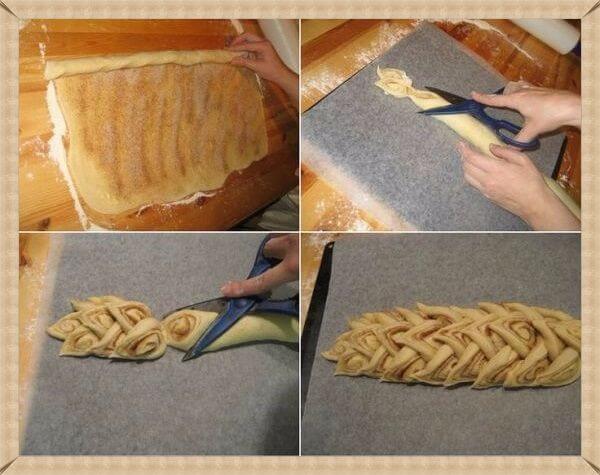
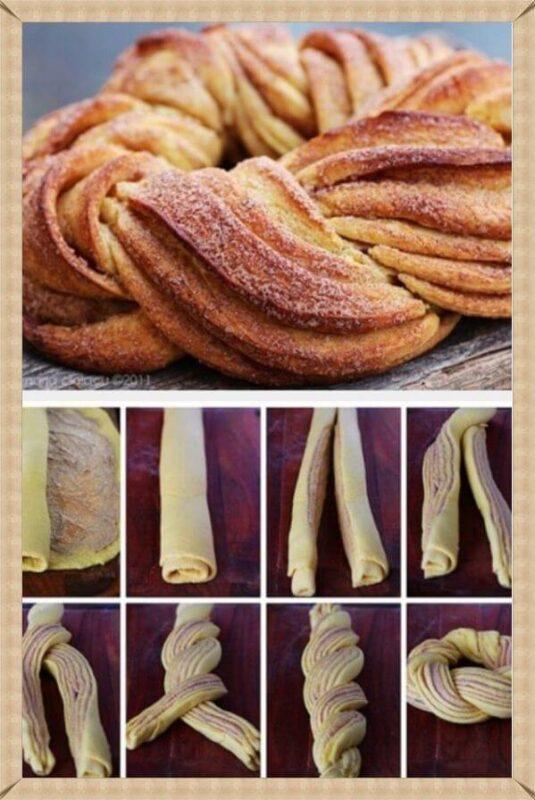
Beautiful bun “Spikelet”. This type of baking is simple to make and looks very beautiful. Roll out a thin layer, grease with vegetable oil or egg, sprinkle with sugar and cinnamon (poppy seeds). We roll the roll, which we then cut with scissors slightly obliquely, as shown in the photo. We spread the resulting “spikelets” into one large beautiful bun.

And this is a simple pigtail with poppy seeds. The sausage is covered with poppy seeds and cut with scissors, placing the petals on different sides.
Salt dough (for thin relief figures, for large products, for delicate works) - recipes and methods for sculpting...
Almost every master creates his own recipe. And also the name of his technique - testoplasty, hospitable, bioceramics, flour.
So, salt dough recipes
The recipes describe the volumetric proportions of ingredients. The most commonly used recipe is this simple one, which is used for simple models - without fine details and complex elaboration.
- 200 g = (1 cup) flour
- 200 g = (0.5 cup) salt (fine, NOT rock).
- 125 ml water
Please note that salt is heavier than flour, so they are the same in weight, but in terms of volume, salt takes up about half as much.
For thin relief figures, add your choice:
- 15-20 g (tablespoon) PVA glue or
- starch (tablespoon)
- wallpaper glue (mix it with a small amount of water first)
Strong dough for large products:
- 200 g flour
- 400 g salt
- 125 ml water
Dough for fine work:
- 300 g flour
- 200 g salt
- 4 tbsp. glycerin (can be purchased at a pharmacy)
- 2 tbsp. glue for simple wallpaper + 125-150 ml of water, pre-mix.
It is better to use a mixer for kneading - this will simplify the task, and the dough will turn out better.
Universal recipe for salt dough: 2 cups of flour; You can add dry starch to the flour without going beyond the norm of two glasses. For example, 1.5 cups flour + 1/2 tbsp. starch. With the addition of starch, the dough will become more elastic. This dough makes thin parts especially well, for example, flower petals.), 1 glass of salt, 1 half glass of water, approximately 180 g, you can add 2 tablespoons. spoons of PVA glue. Instead of water, you can cook a starch paste.
Mix all ingredients. Knead the dough until the mass becomes homogeneous And elastic If the dough turns out watery, then you can knead it further, adding a little flour until it becomes elastic.
Water can be replaced with starch jelly, then the mass will be much more plastic. Kissel do this:
Dissolve one tablespoon of starch in 1/2 cup of cold water. Heat another 1 cup of water in a small saucepan until it boils. Pour the starch solution into boiling water, stirring. When the contents of the pan thicken and become transparent, turn off the heat. Let the jelly cool and pour it into the flour and salt mixture instead of water.
Methods for coloring salt dough
You can tint the salt dough with food coloring, watercolor or gouache. You can also color when preparing the dough, adding dye during kneading, and the actual finished product - on the surface.
An excellent chocolate color is obtained by adding cocoa. You can experiment with other natural dyes - soot, beet juice, carrot juice, ocher, etc. You can brown the salt dough product in the oven for a natural color.
When tinting, you must take into account that after drying the color will become less saturated, but if you varnish the craft, it will become brighter again. What varnish can I use? Acrylic and artistic are very good. It is also possible to use ordinary water-based construction materials for breathable surfaces, i.e. for parquet or wood.
Dear ladies, if you want a new decoration or create original pendants for the New Year, then I advise you to remember the possibilities of salt dough and promote this idea to create an original decor :)

and this decor gains originality due to the openwork relief surface, which is achieved in various ways :) 
This is exactly what we will talk about here :)
3.
So, if you want to sculpt your own decor from salt dough, then I will remind you of its recipe, in which the main ingredients are fine salt - 1 part, flour - 2 parts and water - as much as you need.. Knead the plastic dough, gradually adding water But for strength add some PVA glue. Roll out the dough and use baking molds to press out the desired shapes.

5. And to create a fancy relief we use everything. whatever is at hand. And if you have been doing creative work for a long time, then everything you have in your storage room :)) As a rule, craftswomen have a huge number of homemade stamps :) this is the material that we apply to the rolled out surface :) 
6. A fragment of relief decoration was used on this tray. 
After the molds are ready, we send them to the oven to dry at low temperatures, and the time depends on the thickness of the product, so we check periodically :)
7.
8.After the decor has dried, you can begin painting it. In this case, metallic paints. 
9. Next, you can shade the relief using bitumen or diluted mascara and immediately wipe it with a cloth :) 
10. There are a lot of decorating ideas, so check out some of them. 
11. On the eve of the New Year holidays, we will use this idea to create New Year’s pendants :) 
12.
13.
14.
15. Ordinary silicone scrap stamps serve as excellent imprints for the relief texture. 
16.Yes, even with the help of structural contours you can make stamps, but first you need to cover the dried decor with acrylic varnish. 
17.
18. And what is not used to form the relief! If you are at a loss and don’t know what to use, then take a look at this useful page :)
For those who love to cook something delicious at home and will be discussed in this article of the News Portal “site”. The concept of “delicious” includes, of course, sweets: cakes and pastries, cookies and pies.
However, it is very important that the dish you prepare is not only incredibly tasty, but also beautiful and appetizing.
How to decorate a homemade pie?
 You can decorate a homemade pie using chocolate glaze, cream, dried fruits and nuts, special confectionery toppings in the form of multi-colored coconut flakes or edible beads, fresh fruit, mint leaves, jam, jam, etc. As you can see, there are an incredible variety of options.
 However, we decided to devote most of the article to how to decorate a pie with dough. This is not a difficult matter, but there are some subtleties and tricks.
Dough braid for decorating the pie
 The most famous and simple way to decorate a homemade pie is to braid a braid of dough and place it on top of the pie.
If you want this decoration to look less traditional, you can use food coloring or regular cocoa powder to give the dough part of the braid a different shade.
Dough roses for decorating the pie
 This decoration option looks very impressive, but it will be a little more difficult to make than the previous one.
Roll out the dough and use a glass to cut out circles of the same size. Each circle will be a separate petal of the future rosette made from dough. Place the dough circles together (see photo) and form a bud. Decorate the pie with prepared rosebuds from the dough.
During baking, the roses will increase in size and open slightly.
DIY flower shaped cake
 Now, looking at the finished version, making a homemade pie of this shape seems impossible. However, upon closer examination and delving into all the subtleties, you realize that not everything is as complicated as it seemed at first glance.
Roll out the dough into a small circle so that it can easily fit into the baking pan. Then roll 8 identical balls of dough and place them in a circle (see photo). Now use a sharp knife to make 4 cuts in the center of the composition (see photo). Fold the resulting petals over the dough balls.
The finished pie can be sprinkled with powdered sugar or decorated with fresh fruit.
Pie decorated with dough figures
 If you use ready-made dough molds, you can create the most incredible creations on your homemade pie: hearts and stars, Christmas trees and leaves, smiley faces and cats...


Pie decorated with dough ribbons
 This pie decoration is considered traditional. Roll out the dough and cut it into thin strips. Then place it on top of the filling (see photo).


Envelope Pie
 This version of homemade pie is not only very beautiful, but also incredibly tasty, as it turns out juicy and rich in filling.
Roll out the dough and use a glass to cut out round shapes, like dumplings or dumplings. Wrap the pie filling in each circle and fold it into an envelope shape (see photo). Use the envelopes with the filling to form the entire pie.
How to decorate the edge of a pie with your own hands?
 You can decorate the edge of the pie in different ways, largely depending on your imagination and accuracy. But we will tell you several options.
Pigtail


Squares