How to find out the Windows version? Let's figure out how to find out which Windows is on your computer
Currently, the most popular operating systems are: Windows 7, Windows 8, Windows XP, Windows Vista, Linux, Mac OS. Linux and Mac OS users usually know the name on their computer. But the large army of Windows users are often at a loss as to how to recognize the operating system on their computer.
This may be necessary before subscribing to a course or, moreover, purchasing an information product or installing new program or a game.
Unfortunately, the authors of paid (and free) courses do not always indicate which operating system they use to teach computer literacy and similar things. And if you have Windows computer XP, then a course on Windows 7 or Windows 8 is unlikely to help you. In addition, many programs and games are designed for a specific operating system.
To find out the computer system there are at least three ways:
- win team,
- right-click (right mouse button) on the “Start” button or on the “Computer” icon,
- Microsoft to help us.
The second and third methods provide more complete information about the operating system on the computer, but let’s start with the first method.
1. How to find out the operating system of a computer using the Winver command
How to enter the winver command? Fast way(we will talk about another method):
1) press two keys simultaneously: with the Windows logo + R,
Rice. 1. Two keys are highlighted in red: the bottom one with the Windows logo and the top one with the letter R
2) the “Run” window will appear, in which you should enter the “winver” command without errors and without quotes:

Rice. 2. The “Run” window in Windows 10 (the window looks the same in Win 7, 8.1, XP), where in the “Open” line we enter “winver”
3) then select OK (Fig. 2).
Don't have a Windows logo key on your keyboard? You can do without it; we will consider this separately for four different versions.
1.1.Windows 10 and the winver command
If the above option in Figures 1 and 2 is not suitable, for example, due to the absence of a key with the Windows logo, we will use the search system, which is available in all Windows systems.

Rice. 3. Search for the winver command in Windows 10
- 1 in Fig. 3 – click the magnifying glass icon, which opens Search on your computer,
- 2 – type in the search line that appears: winver,
- 3 in Fig. 3 – click on “winver Execute command”.
As a result, a window will appear describing the operating system on your device:

Rice. 4. Result of the Winver command: information about the operating system
The information provided in Fig. 4 is sometimes not enough. To learn more about the 10-ke system, see
1.2. winver for Windows 8 (8.1)
To use this command, you can use the Windows logo button + R, more details.
Another option that does not require commands is to use Windows 8 (8.1) search:

Rice. 5. Search for the winver command in Windows 8
- 1 in Fig. 5 – open Search,
- 2 – enter winver,
- 3 in Fig. 5 – click on winver.exe.
As a result, we get something like this:

Rice. 6. Winver execution summary - information about Windows 8
At one time, I updated Win 8 to 8.1 and everything was fine, until one unfortunate day after the update, the tablet with 8.1 suddenly stopped working. Samsung was disappointing: only the native Win 8, which was originally installed by the manufacturer of the tablet computer, and no updates to 8.1. Therefore, in Fig. 6 the inscription is with 8, not 8.1.
How to find out more about your 8, read
1.3. Windows 7 and the winver command
1.4. Windows XP and the winver command
If the Start button looks like in Fig. 9, then you probably have an operating room Windows system XP.

Rice. 9. Where is the Run command for Windows XP?
- Click on .
- In the menu that appears after this, click on the Run command (Fig. 9).
The “Launch the program” window appears (Fig. 10).

Rice. 10. Entering the Winver command for Windows XP
Enter the winver command, as shown in Fig. 10, and click on the “OK” button.
The "About" window appears. Windows program"(Fig. 11), where you can find out information about the operating system on your computer, including its version:
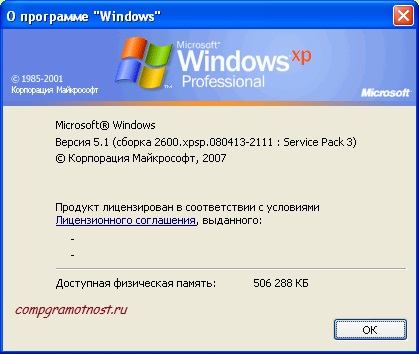
Rice. 11. Result of running the Winver command for Windows XP
You can also talk about the Windows XP system in the following way.
There is an easier way to find out more about your operating system, without entering any commands.
2. How to find out the operating system of your computer using RMB (right mouse button)
Briefly, the essence of this method is that you need to right-click (Right Mouse Button) on the “Computer” or “My Computer” or “Start” icon.
If the RMB method is not suitable, then enter “system” or “computer” into the Search bar without quotes. All that remains is to click on the option that will be found as a result of the search. Then a window will open with complete information on your computer’s operating system.
2.1. About Windows 10
To get more information about your operating system (volume random access memory, processor, 64 or 32-bit, etc.), you can
- right-click (right mouse button) on the “Start” button,
- or click on the magnifying glass icon (next to the Start button) and enter “system” in the search bar without quotes.

Rice. 12. Right-click on the Start icon
- 1 in Fig. 12 – click “Start” with the right mouse button,
- 2 in Fig. 12 – in the menu that appears, click the “System” option.
As a result, the “About System” window will open:

Rice. 13. Windows 10 system information
2.2. About Windows 8

Rice. 14. Search for the Computer application using Search
- 1 in Fig. 14 – click Search,
- 2 – enter “computer” into the search bar without quotes,
- 3 in Fig. 14 – click on the “Computer” application,
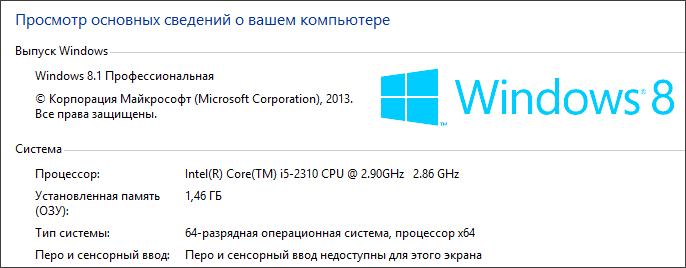
In the window that appears after this, click with the left (or right) mouse button on the “Properties” option. As a result, the “View basic information about your computer” window will open (Fig. 15):

Rice. 15 (click on the picture to enlarge it). Windows 8 Basics
2.3. About the system in Windows 7

Rice. 16. RMB (right mouse button) for the Computer option in Windows 7
If the Start button looks like in Fig. 16 (number 1), which means you have Windows 7.
- 1 in Fig. 16 – Click on the Start button.
- 2 – Then right-click (right mouse button) on the “Computer” icon.
- 3 in Fig. 16 – A context menu appears, in which we click on the “Properties” link.
The “View basic information about your computer” window will appear (Fig. 17), in which you can find out the operating system installed on your computer, as well as information about the processor, RAM, etc.

Rice. 17. Computer Basics for Windows 7
2.4. About the system in Windows XP
If there is a “My Computer” icon, as in Fig. 18, which means you have Windows XP operating system. Click on this RMB icon (right mouse button), and in the drop-down menu click on the “Properties” link (Fig. 18).

Rice. 18. Properties for the My Computer icon in Windows XP
The “System Properties” window appears (Fig. 19):

Rice. 19. System properties with Windows XP
In this window, on the “General” tab, you can find out the name of your operating system, as well as information about the processor and RAM (random access memory).
Microsoft to help us
1) To go to the official Microsoft website, click on the link
2) The window “How can I find out my version of the Windows operating system?” will open.

Rice. 20. Microsoft determines the version of Windows after going to the page on its official website
Here you will immediately see which Windows you have (if the system is licensed).
By clicking on the small triangle (framed in Fig. 20) and selecting the Windows version: 10, 8.1 or 7, you will see instructions from Microsoft on how to find out the computer’s operating system and get more information about it (how much RAM, what processor , 32 or 64 bit system).
Receive the latest articles on computer literacy directly to your Mailbox
.
Already more 3,000 subscribers
Many users do not know how to find out the Windows version.
And this is very important for those cases when it is necessary to understand, for example, whether the computer meets the system requirements for a particular game.
This is also necessary if the user wants to see some features of his system, the nuances of working with it, and so on.
Sometimes you need to find out not the version, but the bit depth - 32 or 64 bits.
In fact, finding out which version of Windows is installed on your computer is quite simple. Different versions have their own special methods for this, but there are also several universal ones.
Let's look at each way to find out the operating system version.
Using the My Computer shortcut
In fact, this is the simplest method that works in almost all versions of Windows, at least on one of the most popular ones now, Windows 7.
It consists of performing the following actions:
- Right-click on the “My Computer” shortcut.
- In the drop-down menu, select the item called “Properties” (highlighted in Figure “1”).
- In the window that opens, we can see all the operating system data, including its build version and other features. This window is shown in Figure 2.
There, the place where you can see the system version is highlighted in red (as we see, in our case it is Windows 7 Home Basic).
The assembly version is underlined in blue, the bit depth (32 or 64 bits) is in lilac, and the so-called performance index is highlighted in green. The latter involves rating the system on a scale from 1 to 10 depending on its performance.

Nuances
Advice! Actually, this method is applicable for a variety of versions of Windows. .
To put it there, you need to right-click on an empty space on the desktop, select “Personalization”, then in the window shown in Figure 3 go to the “Themes” tab (highlighted in green).
After this, all that remains is to click “OK” and restart the computer.


In Windows XP, the window shown in Figure No. 2 will look slightly different - as shown in Figure No. 5.

In Windows 8, this window looks like shown in Figure 6.

This method often does not work in Windows 10 and Windows 8.1, as well as RT 8.1. Therefore, let’s look at what users of these OSes should do.
For Windows 10
To find out which version of this operating system installed system, you need to do the following:
- Using the command line, launch the “Options” window. To do this, first press Win + R (without the plus sign) on your keyboard, enter “winver” in the input line and press Enter. After this, the window shown in Figure 7 will appear.
The version there is underlined in red.

- Press the keyboard shortcut Win + I. In the window that opens, open the “System” item and in the menu on the left go to the “About the system” tab. After this, the user will see the window shown in Figure 8.
It looks very similar to the corresponding window in previous versions of Windows.

By the way, the first method (using the command line) also works in most other versions of Windows.
For Windows 8.1
Here, to find out the version of the installed system, you need to do the following:
- In the menu that is located on the right (in most cases, for it to appear, you need to hover the mouse cursor over the right edge of the screen), you must select the so-called “Settings” charm button. Her appearance shown in Figure 9.

- In the window that opens, select the “Change computer settings” button (shown in Figure 10).

- In the next window, you need to select the “Computer and Devices” button, and then go to the “Computer Information” item (shown in Figure No. 11). There, in the “Windows” section, you can see the version of the installed operating system.
The “Computer” section shows the most basic parameters of the device.

No. 11. System Information item in the Computer and Devices menu
Sometimes there is an urgent need to know the characteristics of your computer. For example, in order to update drivers, upgrade some parts system unit or just show off to your peers, and in many cases you just need to find out the markings of a particular system component. There are only two ways to do this: and read the markings or check them using software.
The first method, although simple, in most cases may not be available due to a violation of the warranty (if the computer is under warranty). Therefore, let's take a closer look at the second method, how to find out the characteristics of your computer using programs, both built-in operating system tools and additional specialized software.
We look at the characteristics of the computer using the operating system
1. In order to find out the three main system parameters, just go to the “My Computer” tab in the “Start” menu. To do this, you need to hover the cursor over it and right-click on it; in the list that opens, select “Properties”.


This can also be done in one more way: from the “Control Panel” tab, select “System”. In the window that opens below, you can view the same parameters.
2. Find out what equipment is installed on the computer, but without detailed characteristics can be done through Device Manager.

To launch it, you can simply type the key combination “Win+Pause”. In Windows 7, in the window that opens, you will need to select the “Device Manager” tab. Now we can see what devices are installed on your computer and their names, for example, processor type and frequency, video card, sound card, network adapters, disks, etc. The Device Manager in XP can be launched using the key combination “Win+Pause” “, then at the top you need to click on the “Equipment” tab, and already launch “Device Manager” in it.
3. This method involves using the integrated “System Information” software. To launch it, you need to click on the “All Programs” drop-down list in the “Start” menu, then “Accessories”, open the “Utilities” tab and launch the “System Information” utility there. You can also do this faster by pressing the Win+R key combination. The program launch window will open. In the “Open” line you need to type “msinfo32.exe”. This is the same utility, only launched through the console.

Using this built-in software, you can obtain basic information about the system and components. But this utility is rather inconvenient due to the complexity of the branches of transitions along the tree. This software can be used in the absence of other software that is easier to understand and read.

4. You can also view system characteristics through the DirectX Diagnostic Tool. This utility is used mainly for testing both video and audio cards. The utilities window displays general information about the system and, more specifically, about the video card.

5. You can find out the characteristics of your computer from the BIOS. To do this, when booting the computer, you must press the F1, F2, Del or Esc key. It all depends on the version of the BIOS itself. Further, some knowledge of English is required.
Programs for viewing computer characteristics
For more detailed system performance diagnostics, you can use special programs. For example, AIDA64, ASTRA32, PC-Wizard programs are excellent software both for diagnostics and for testing all components separately.

To begin with, let's say that the AIDA64 (formerly Everest) application belongs to the paid category. However, it is possible to take advantage of the free 30-day period provided by the developers so that the user can familiarize himself with the capabilities of the program. This is quite enough for us. In our case, we will use the AIDA64 Extreme Edition to familiarize ourselves with the basic parameters of the computer. There is, of course, a business version of this application, but for our purposes the Extreme version will suffice. This application must be downloaded from the developer’s website () and installed on your computer.

AIDA is very simple and easy to use. The main application window is divided into two parts: the left side displays a tree of the main subsystems of the computer, and the right side displays detailed information about the subsystem selected on the left side. To view summary information on your computer, just expand the “Computer” section, and then select the “Summary Information” subsection.

Selecting this subsection will allow you to find out all the characteristics of your computer: the type of computer, information on the installed operating environment, information about the system board, available partitions, network, peripheral devices, etc.

You can view data on your computer's central processor by selecting the "CPU" subsection in the root "System Board" section. The right side of the application will display the parameters of all processors installed on the PC. This data will tell you about the type of processor installed, its model, clock speed, supported instructions, cache of different levels. You can also find information about the load on the microprocessor cores. If you need more detailed information about the functions supported by the system microprocessor, then feel free to click the “CPUID” subsection.

If you move a little further in your selection and select the “Motherboard” section, then detailed information on the motherboard will be displayed in the main application window. For a desktop PC, AIDA64 will display the properties of the board with its name, the properties of the system bus with its real and effective frequencies. Data on the properties of the memory bus with its width, frequencies, and bandwidth will also be demonstrated. No less important Technical information according to the physical parameters of the board: supported CPU socket, installed connectors for expansion cards, number of slots for RAM sticks, as well as the type of sticks themselves and the type of supported memory. In the same section, the application will show data on the form factor motherboard, about its physical dimensions and the chipset.

Selecting the “Memory” subsection in the “Motherboard” section will display summary information about the computer’s RAM. Here you can find out information about the RAM and virtual memory available in the system: how much has already been used and how much is currently available for use by the system and applications. Also, this section shows the path to the system swap file.

You can easily find out about the properties of installed RAM modules by clicking the “SPD” subsection. This action will allow the application to show all memory modules installed on the PC, which are displayed at the top of the main window area. Selecting one of the displayed modules will allow you to obtain data that is shown in the lower part of the main area of the program window. By default, when you go to the “SPD” subsection, this part displays the data of the first module displayed in the list. Here you can find the following data about the properties of the module: its type, the amount of memory it provides, the type of this memory, its speed. Also, the width and voltage of the module, timing characteristics and functions supported by it are displayed here.
Video card

In order to view data on the characteristics of the video adapter, you need to go to the root section “Display”. Among its subsections you need to find “Graphics Processor”. Selecting this subsection will allow you to display data about the video adapter installed on the PC in the main area of the program. Among them is information about the type of video chip, its BIOS version, the memory of the graphics card (volume, frequency, type), some characteristics of the graphics processor (frequency, technical process).

The “Monitor” subsection of the same root partition will allow the user to become familiar with the main characteristics of the system monitor. These include model, resolution, aspect ratio, vertical and horizontal scan.

AIDA64 allows you to get a wide range of information about hard drives computer. To view information about the HDD, click on the “Storage” subsection Windows data» root section “Data storage”. At the top of the main area of the application window, a list of all devices that are associated with data storage will be displayed. Hard disks will be displayed first, and at the bottom of the main area of the window information about the characteristics of the hard drive designated first in the list of devices will be displayed. Among the most useful characteristics: hard drive form factor, spindle rotation speed, read/write speed, etc.
Sensor data
It is necessary not only to be able to view data about the system, but also to analyze the current information provided about the system by its sensors. Sensor data can be found by going to the “Sensors” subsection of the “Computer” section in common tree subsystems

The main sensor information window displays data on the temperature of the microprocessor, as well as its cores. The “CPU” designation shows the temperature of the processor under its cover. Traditionally, this indicator is lower than the temperature indicators of the processor cores, displayed as: “CPU1”, “CPU2”. This is due to the fact that the cover is in direct contact with the heat sink of the heat sink unit. Do not be afraid of the high parameters of the “AUX” indicator, since it means practically nothing. If its values never change, then it is not used by the system. The GPU Diode sensor shows the temperature on the GPU.

Using the ASTRA32 program you can also find out the characteristics of your computer. Like the previous program, ASTRA32 is paid, but the demo version is enough for us. Its interface is similar to AIDA64, also so simple and clear. Download the program from the official website: www.astra32.com and install. By clicking on the link you will see two versions - one for regular installation, and the other is portable, that is, it does not require installation. I will use the second version of the program.

I run the program file astra32.exe as administrator.

In the window that opens, all information about my computer is immediately displayed (tab " general information"), namely:
- what processor is installed, its operating frequency, cache levels;
- brief information about the motherboard;
- information about RAM;
- what disks are installed and their capacity;
- information about the video card and sound card;
- information about the operating system, etc.
You can stop there, but for those who want to study the components of their computer in detail, you can select the appropriate section in the left column and study the data that is displayed in the right column.

For example, you need to find out more detailed information about the processor: what Socket it has, how many cores, what power consumption, dimensions, etc. Go to the “Processor” tab and then “CPU”. In the Right window we look detailed information about the processor.

Finally we have come to free programs. PC-Wizard is one of the best utilities for determining the characteristics, configuration and testing of a computer. It can be downloaded by following the link - http://www.cpuid.com.

The program interface is similar to the previously discussed utilities. The only difference is that instead of boring lists, icons are displayed in the right column, and there are also tips for almost every action.
Surely, you have heard something about the processor bit size and the operating system. Do you know what it is, what it affects and how it is determined? Today we'll deal with topical issues: how to find out the system bit depth in Windows XP, 7.8, 8.1 and 10 and what it is.
Nowadays there are two bit depths of Windows: x32 (or x86) and x64. What is she? The capacity of Windows is its ability to simultaneously process a given number of bits of information (32 or 64). The most important difference between 32-bit Windows and 64-bit Windows is the amount of address space that the OS can “see”. If in the first case this figure is theoretically equal to 2 32 bits - approximately 3.5 GB, and for 64-bit Windows this figure reaches 192 GB, which is more than enough for work and entertainment on a PC.
If we understand the concept of operating system bitness, let’s move on to practice. Let's start with the old XP. For those who do not know how to determine the system bitness in Windows XP, right-click on the computer (the icon is on the desktop) and select "Properties". Most likely you have 32-bit XP installed, and you will see an information window with similar data on the screen.
When using a 64-bit system, the information in the “System” line will be different, namely, it will be written that you have a 64-bit system.

Windows 7
For the entire “seven” the actions are similar. Go to “Properties” (by right-clicking on the computer located on the desktop).


At the bottom of this article there are other ways to help resolve this issue.
You can right-click on your computer (can be on your desktop) and select Properties. As you have already noticed, this procedure is similar to other systems, and it is quite difficult to get confused.
You can also click on the “Start” button (the button is displayed at the bottom left) and in the Metro menu you need to find the computer icon, then right-click on this image and click “Properties” in the menu that appears.

In the line “System type” we will find the information of interest.
Windows 10
Call “Start” (the button is displayed at the bottom left). Click “Options”.

Open the “System” section and go to the “About the system” tab (it will be at the very end).


The line called “System Type” indicates the bit size of the OS used.

You can also use other methods: go to “Control Panel” - “System and Security” - “System” or right-click on the computer and select “Properties” (in the window that opens you will find the version of your Windows). If you log in through the control panel, then you need to select “Category” in “View”. In this case, you will have something like ours in the picture below.

Alternative methods to find out the bitness of Windows
Classic methods of determination Windows bit depth considered. Now let's move on to searching for the same information using less popular methods.
Command line
The method is applicable to any edition of the desktop OS from Microsoft. Launch the command line - click on the “Search in Windows” button and enter “cmd” or “command line”. After this, the utility will be displayed; press “Enter” to launch it. You can also launch this program by pressing the “Windows” button (between “Ctrl” and “Alt”) + “R”. In the window that opens, type cmd and press Enter.

When the program is open, you need to enter “systeminfo” and press “Enter”. The program will start scanning the data and after that we find the line “System type” (14th).

Enter the “dxdiag” command into the search line (which is available in Windows) or the command interpreter line (“Win” + “R”) - we talked about it in the last paragraph. In the line “Operating system” there is necessary information about the bitness of Windows of any edition.

System Information Window
Another common method for determining Windows bit depth is to use the System Information tool. It is called by means of a request of the same name in the search line or by executing the command “msinfo32”.

We are interested in the “Type” line, located in the first tab of the application’s vertical frame, where the menu is located.
The last way to find out the Windows bit rate is to use utilities for collecting and visualizing data about your computer. These are AIDA, Speccy, CPUZ and other analogues. But these programs still need to be downloaded, installed, and only then you can view all the necessary information. Therefore, we recommend using the methods described above.
If you are asked what operating system you have, but you have no idea what it is, then this article is just for you!
Let's start, as always, with definitions. I don’t think it’s worth remembering this, but it could really be useful for someone.
An operating system is a computer shell that allows you to manage software, to perform the necessary tasks and work. There is a graphical operating system, or in other words, a simplified one, which allows you to control a computer mouse and visually present all the actions performed and the results of work, and there is a command operating system (all main actions are performed through the command line), which is most often used to organize servers, which provides to minimize all used computer resources.
Still not clear? I completely agree with you, because in general it is quite difficult to understand what an operating system is, what exactly it includes, and I personally was only able to understand it after reinstalling my OS. However, finding out exactly what it costs is much easier. There are quite a lot of ways to do this:
1). Let's first go to "My Computer", where all local disks. To do this, most often install a “Computer” or “My Computer” shortcut on the desktop. If there are no shortcuts on the desktop, you can go to “Start” (the farthest left bottom button in the corner) and click “My Computer”. If not here, try opening any folder at all and finding “This computer” in the list of folders on the left. You can try right-clicking on "Start" and selecting "System". You can also type “Computer” in the search (in the start or next to the start). Ultimately you should get something like this:
Here you need to right-click on the empty field and select “Properties”.

Then look for "Windows Edition". Your operating system is listed below. This is what programmers most often mean. The figure below shows an example of the Windows 10 Home operating system:

2). Another method appeared for Windows 10 with the advent of Computer Settings. Right-click on “Start” (bottom leftmost button) and select “Settings”. You will see the following window:

Here we select “System” and then “About”. In the "Windows Features" section, opposite the "Edition" item, your operating system is indicated ("Windows 10 Home"):

3). Another way is to go to Start>Control Panel. Or click "Start">"All Programs">"System">"Run". You can also use the hotkeys: Win (“Start” on the keyboard) + R and enter “control”, as in the next window and click “OK”.

The following control panel will appear, where you need to select “Large icons” and, scrolling below with the mouse wheel, click “System”:

4). You can use the search. To do this, next to the “Start” button, click on the magnifying glass image or on the search bar:


If you don’t have one, then go to “Start” and find the search field at the bottom, or (if there is one) click on the down arrow (bottom left) and find the search line there.
In the search bar you need to type “System” (without quotes). This will quickly take you to a window where you will need to find the current release of Windows.
5). You can open system properties even faster by using the hotkeys - WIN+Pause.
If you still haven’t been able to find your OS release, write in the comments. We will definitely try to solve your problem.