DIY cardboard castle: master class with photo diagrams. How to make a castle out of paper that everyone will like? DIY fortress made from cardboard drawings
Today, stores offer a huge range of toys, but they cost
quite expensive. For a child, try making them yourself. You can also invite your child to participate in the process, this will develop his imagination and logic, and in addition, you will get great pleasure from joint creativity. Below we tell you how to make a castle out of paper that both boys and girls will love. You can take the schemes described in this article as a basis, but this does not mean that you need to end there - use your imagination and create your own unique palace. Additionally, this product can be used as a decoration - a stand for confectionery products.
Tools for work
For a craft like a paper castle, you will need:
- cardboard box;
- sand;
- paints;
- textile;
- sawdust;
- chip cans;
- glue;
- scissors;
- pen.
Step-by-step instruction
To learn how to make a castle out of paper, you need to study the following information:

Now all you have to do is come up with an interesting story and please your beloved child with a new fairy tale.
How to make a castle out of paper
When you have children, it doesn’t matter at all whether it’s a boy or a girl, the main thing is that they all love fairy tales and believe in miracles. Any child will be happy with such a gift. To make a castle with your own hands as accurately as possible, you need to spend a lot of time and effort, but your beloved offspring deserve it.
To work you need to take the following accessories:

Instructions
In order for the castle, made with your own hands from paper, to be the most accurate copy of the original, adhere to the following rules:

Helpful information
A paper castle, the diagrams of which are presented in this article, will help you realize your child’s dreams and give him a piece of happiness. If the craft will be used not only as decoration, do not forget about its sustainability. For example, you can fix each part with tape, which must be secured on the inside. The same palace can be made for a little princess, simply by decorating it in bright fairy-tale colors. Now you know detailed instructions on how to make a castle out of paper. Go ahead, please yourself and your child.
Nothing is impossible for the resourceful and creative, right? Why spend personal savings on an expensive construction set if it can be made from waste material... and in just half an hour! Do not believe? Then see how easily cardboard rolls, trays and boxes are transformed into luxurious medieval castle, and you will want to make such a miracle yourself.
But the most interesting thing is that each time the fortress can be built differently - depending on the mood and circumstances of the game.
Please prepare:
- rolls of paper towels, foil, etc.,
- cardboard boxes and inserts,
- egg tray,
- cones, nuts,
- toothpicks,
- scissors,
- stationery knife,
- PVA glue (glue gun),
- stapler
Start working and don’t be afraid to fantasize, the main thing is passion and love for nature! Recycling of raw materials - another step towards preserving the Earth's natural resources.
At first let's make a dragon. This cute dinosaur will perfectly cope with his role. Cut out the silhouette of a dinosaur from a cardboard piece. Cut the kitchen towel roll in half and make two longitudinal cuts on both halves. These are dinosaur limbs. Glue gray spots on the back of the dragon, and colored ribbed spikes on top. There is very little left - to make the dinosaur’s eyes, draw a mouth and secure the body in the cuts of cardboard rolls. Ready!

Let's move on to making a paper castle. The courtyard towers will consist of rolls of different diameters and heights. Cut out windows and balconies with a stationery knife or nail scissors. It’s best to leave cutting the rolls to your mom or dad.
Trees are easy to make by hot glueing nuts and pinecones inside small cardboard cylinders.


To the narrowest and tallest towers, feel free to glue a cardboard base - a circle or a spool of decorative tape. Otherwise, the rolls will fall and destroy the structure.
Fairytale castle roofs are very easy to make! Grease the inside of a cell cut out from an egg carton and attach it to the tower. The sharp tops of the towers can be easily made from cardboard circles. All you have to do is cut out a small sector with a top in the center of the circle, roll the workpiece into a cone and fasten it with a stapler or PVA glue.
Make the walls and corridors of the palace from cardboard parts from household appliance packaging. They should be shaped like a brick.

The pride of every castle is its flag. Multi-colored flags (if, of course, you paint them) will decorate your fortress on toothpick mounts.

What is a palace without a princess? Place her in one of the fortress towers. And don’t forget about the courtiers, guards and other puppet people.

Add details: cut out an image of a crown - a symbol of royal power, make flower beds and an entrance to the fortress with a drawbridge.

Take out the old railway from the closet - and you already have a whole fairy-tale country with amazing inhabitants and medieval architecture. Have a fun game!

And after playing to your heart’s content, don’t forget to put the construction set into a box or plastic container. The fairytale castle will come in handy more than once.
If you have wondered how to create a castle out of paper and have decided to build a semblance of this medieval building in your room, then you need to have a lot of patience and try to maintain your creative passion. The work ahead will be painstaking, interesting, and very exciting.
In contact with
If you are an unrivaled romantic and love stories about valiant knights without fear or reproach, then you have every opportunity to completely recreate the atmosphere of the Middle Ages. Such a solution is how to create DIY castle, will not only allow you to make a castle indistinguishable from the real one with spiers, towers, defensive fortifications - embrasures and so on. Having experienced all the charm of handicraft, feeling like a creator, you can make an entire medieval city with knights, ladies, enemies and friends and develop a whole knightly world in your room!
Stages of work
Before you create a castle out of paper, you must first prepare the site for this and the “building” materials necessary for the work. We will let everyone choose the location of the castle on their own. And to create and construct the building itself we will need several work items:

Having selected and prepared all the necessary materials for work, we move on to such an important and absolutely necessary stage as creating diagrams of individual block modules our castle.
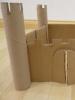
A castle made of cardboard, the diagrams of which must already be pre-drawn, must be created with your own hands from such an entourage element as jagged turrets. They are a mandatory element in our planned structure, since it is precisely such towers that make a castle from the Middle Ages recognizable. This is where a tube (from under towels or toilet paper) comes in handy.
Step one
At the top of the paper or cardboard sheet draw a line - this will be the base of the cloves.
Step back 1 cm
We draw 6 vertical lines at an equal distance from one another.
Let's paint over those elements that we will need to cut out, so as not to make a mistake and not spoil the material.
Cut out the teeth.
Important! If you use toilet paper tubes, then you can leave everything as is. If they are not found and towel tubes are used, before using them, they need to be shortened by 4-7 cm
Now you need to paint the towers; at the same stage we draw the loophole windows.
Stage two
 We devote this stage to the construction of the walls of our medieval knight's castle. A paper castle, the diagram of which you already have in stock - you can make it yourself or download it from the World Wide Web and print it out - will be more durable if the building material is not paper, but cardboard. From it we will need to cut out 4 rectangles with a width and height of 6.5 x 9 cm. We can start decorating - painting them with watercolors to resemble ancient stones.
Important! For decoration at this stage we use only 3 walls. Let's put the fourth one aside for now.
We apply gray watercolor to three selected walls, wait for it to dry, after which we draw stones of arbitrary size and shape with a felt-tip pen. To make it more convincing and believable, you can add cracks from being hit by battering guns.
Stage three
We continue to build a paper castle, the templates of which must already be prepared in advance, with our own hands as follows.
Using a previously created template, we cut out the borders of the gate on the 4th wall of the castle. They can be opened and closed. They can also be painted to resemble wood by adding forged ties, a lock and hinges.
We paint the wall itself framing the gate, just like the previous three walls.
Stage four
 Take the tube tower. We divide its circumference, armed with a ruler or tape measure, into four uniform sectors. We mark them with a simple pencil (you can then quickly erase it with an eraser). Cut two adjacent marks to a length of 6.5 cm. We will really need them at the stage when we connect the tower with two of the castle walls. In the same way, we make cuts on all other towers (we choose the number of them ourselves, depending on what kind of “tower” drawing you indicated on the preliminary diagram of the medieval building.
Now we connect the towers to the walls using PVA glue. Traditionally, they are made in the amount of four - one for each wall. You can add both the number of towers and the number of walls. This does not have to be a “stone pocket” of a standard square. You can also make a pentagon.
Now we connect 4 (or more) towers with walls already painted to look like stone, including the one on which the gate was “erected”.
Now our castle is ready!
But it’s too early to relax. We do not yet have a roof and other important elements of the building.
Stage five
- Using a previously prepared template from brown cardboard, we cut out the future roof.
- We take felt-tip pens and color it like the tiles (semicircular “pockets” or “tongues”).
- We attach the roof to the tower that turns out to be the tallest (this will depend on the tubes you choose).
 Important! According to the instructions, this ends arrangement of tower coverings. But what can stop you from decorating the rest of the towers with such decor?
You can also, if desired, cut out black (metal-like) narrow flags with two narrow tongues from cardboard and attach them to the towers with a match or toothpick. Here a long road opens up for your imagination.
The main part of the castle construction is finished!
Now you need to take care of attaching the lock to the foundation. The foundation can be any solid and flat material, from thick cardboard to plywood. This could be a wide board for modeling, a plastic mat for dishes, an old cabinet door, etc. Surely in your home you will find a surface that is unnecessary to others, but suitable for your business. It is especially worth thinking about sustainability if the craft will be used not only as decoration, but also as a play item or gift. In this case, ordinary PVA glue will not be able to provide the necessary stability. You will need some tape here, preferably wide.
Each building of the castle complex should be secured with tape separately. It should be fixed from the wrong side. However, if it is appropriate, you can “cover” the entire castle with tape. It will become shiny and will look great as a decorative element in a playroom.
 It is clear that optimization opportunities decorating and decorating your new castle there are no limits. But still, a few tips may give you some ideas on how to make a castle that is as similar to the real one as possible.
For a quick start, to save time and not have to do everything thoroughly with your own hands, you can stock up on a template and diagrams of the castle in advance, finding them by searching for “model of a medieval castle.”
To quickly decorate the castle, you can use spray paint. It will be very fast and beautiful.
If the castle is being created as a gift for a representative of the fair sex and your plans do not include creating a gloomy stone bag with gargoyles or villains inhabiting it, then you can move away from the traditional gray color and paint the castle in brighter colors. Any paint that is designed for coloring will do. paper products.
Various animals, trees, even a garden can be included with the castle model.
Next to the gate there may be guards armed to the teeth.
If you plan to deploy a large and fascinating story, then the interior space of the newly created castle can also be arranged: make a round table at which valiant knights will gather, a throne room, a king’s bedroom, a princess’s bedroom and more.
DIY cardboard crafts for children will most of all occupy the attention of parents and heirs if they meet the vital interests of the growing child. It almost always turns out that not a single family is able to buy all the desired Barbie houses, or castles for Disney princesses, or parking lots for cars.
Moreover! This is not necessary, as psychologists and conscious, successful parents advise us. The unwritten rule says the following: a child should get only half of what he wants easily - from the store shelf, and he needs to “earn” the other half. And here it is appropriate not so much to demand good behavior, promising an incentive purchase of a toy, as to captivate the child with the joint construction of an exclusive long-lasting model.
Cardboard opens up truly limitless spaces for you – for creativity and construction based on your children’s favorite characters. Let's look at two cardboard crafts that any parent can make with their own hands!
DIY cardboard crafts for children. Castle stage with cross-shaped structure
It is no coincidence that we introduce you to this idea. Evaluate it carefully to understand its main and wonderful advantage: you can play with such a building anywhere, because it quickly and completely disassembles! You will not have any difficulties transporting not only from room to room, but also to a picnic, cottage or kindergarten.
In addition, the very principle of a cross-shaped representation of walls allows you to create not only castles, but also shops, a school, a pharmacy and a cafe. In general, all those buildings and social circumstances in which your baby happens and in which he can become actively interested by the age of 2 or 3.
What do we need:
- Cardboard from boxes (household appliances, dishes, computer peripherals)
- A simple pencil, eraser and ruler
- Scissors and construction knife with replaceable blades
- Any means for wall decoration (pencils, paints, self-adhesive tapes of different colors, fabric, colored tape and paper, remnants of wallpaper after renovation)
How we build:
- We draw a template with a simple pencil, carefully correlating the sizes of those slots with which the walls will be connected into a full-fledged volumetric structure.
- We cut out the relief of the walls at the top and through doors on each wall. It is important here that the themed figures for games with crafts fit into the prepared holes.
- We paint and decorate – as you please!
- We insert the two halves into the grooves - and you can start the game!


DIY cardboard crafts for children. Simple big box lock

We suggest you build another option - from the most ordinary box of some small household appliance, akin to a vacuum cleaner or food processor. When choosing, the main thing is that the cardboard box is large enough for the baby.
The set of tools is the same as in the DIY craft above.
What we do in an effort to diversify everyday life for children:

We use our imagination by choosing a fairy tale or trusting a spontaneous story about a beautiful princess and valiant knights. And we are happy to devote more than one evening to playing together with a young lover of the Middle Ages!
We hope that the DIY gifts presented to you for the children we want to attract will bring a lot of joyful communication and joint creativity to your home!
Find suitable cardboard boxes. Cereal boxes, tissue boxes, toilet paper rolls, etc. work well. Just make sure to gather enough cardboard, depending on how big the castle needs to be.
Create a template. This step is optional, but it will help you get accurate measurements, a sophisticated design, and stocked up on material. For inspiration, look at photos or illustrations of real castles and make a template and design on paper. Cut out the templates you made to transfer them onto cardboard. In the example given in this article, the castle will be very simple, so you won't need a complex design: just four walls and four rolls as towers. If you are doing a more complex castle project, you may need:
- Make templates for the towers, which should be cut out separately and be able to stand on their own (insert small pieces of cardboard through the slots made in the base of each tower).
- Make the walls according to the traditional rampart design.
- Add a moat around the castle.
- Make one central high tower where the prince or princess is imprisoned, with a window through which the unfortunate royal can look.
Assemble the cardboard pieces. For the simple project shown here, you simply need to install four long rolls in each corner of the printing paper box (don't secure them at this stage; you'll need to do that later).
- At this stage also cut out the ramparts (defensive walls). To do this, you usually just need to cut evenly squares around the perimeter of the top of the box (which will be the top of the castle walls). It is recommended to use a ruler and measure out the squares evenly so that the wall does not look lopsided (unless, of course, the owner of the castle is a drunkard or a pirate).
Cover the entire lock and parts that will need to be attached later with foil. This will get rid of the cardboard look, and will create a smooth, shiny surface under the wall paneling that you will add later. At this stage, the lock should be very strong.
Wrap each side of the box with thick paper of a color suitable for the castle. The best colors for a castle are usually gray or silver, as they give the impression of weathered stone that is commonly seen on castle walls. Of course, if you prefer a pink castle, that's your prerogative!
- Once you've measured and cut out the shapes for each wall, use a black marker (such as Sharpie) to mark them with a pattern of old stone and brickwork to add dimension and realism.
- Then glue the front wall (right side out) to the base, followed by the other walls.
Attach to the walls any elements that are not already part of the castle. In our case, in this simple castle, we need to glue towers in each corner on the castle walls. You may have to cut gaps in things like towers to get a good fit. If you are inserting pieces inside the box, be sure to attach them tightly to the base so that they do not tip or fall out when you move the lock.
Cut a square piece of thick blue paper, larger than the castle, that looks like a lake or moat surrounding the castle. This will create the effect of having water on the castle.