Portable speakers for your phone. DIY portable speaker DIY portable speaker for dummies
Difficulty level: Not easy
What you will need:
- microcircuit TDA2003 or its analogues, K174UN14 - domestic analogue (price approximately 0.3 $)
- capacitors: a) 10 mf 16v - 1 pc. b) 100 mf 16 v - 2 pcs. c)0.1 mf 16v - 1 pc. d) 470 mf 16 v - 1 pc. (you can use capacitors larger than 16v, but as a rule they consume more energy)
- resistors: a)10 om - 1 piece b)1 om - 1 piece c)1kom - 1 piece
- speaker (more on that later)
- soldering iron, solder.
1 step
Chip TDA2003
We make a list of the components we need and go to the nearest radio store, where we will buy all the parts and assemble our MONO amplifier. I suggest choosing a mono amplifier for several reasons:
1) less energy consumption compared to a stereo amplifier.
2) from a portable speaker, in my opinion, such things as sound quality, volume, battery life are required.
Step 2
MONO amplifier circuit on TDA2003
After we have purchased all the components we need, we can proceed directly to assembling the amplifier. (diagram on the left) I have tested this circuit more than once, it has good sound quality, and it is quite simple to manufacture and does not require configuration.
—————————————————————————————-
It is recommended to assemble the amplifier on a printed circuit board, but if you don’t have the skills to make one, you can assemble it on cardboard (just pierce holes, insert parts into them and connect according to the diagram)
Step 3
An example of assembling an amplifier on cardboard
After we have safely completed the assembly, we need to take care of cooling the TDA2003. For this
I recommend using a small heatsink that is bolted to the hole on the chip; you can also use thermal paste for better heat transfer.
Step 4
Now we need to take care of the power supply to our amplifier, here are its power ranges - from 8 to 16 V. (recommended 14.4 c.). I used 3 batteries from mobile phones, which in total produced 11.1 V. which is quite enough to power our amplifier.
You can also use AAA or AA batteries, we need 8 pcs. , which will give a total of 12V.
Step 5
speaker selection. This amplifier is suitable for 2, 4, 8 ohm speakers.
2 ohm 10 watts
4 ohm 5 watt
8 ohm 2.5 W
but from my own experience I will say that I connected a 30 W PIONEER car speaker (4 ohm), and it played very loudly and with high quality
Step 6
Example of a wooden case
We can take the case from a broken computer speaker as the basis for the case for our portable speaker, but for high-quality sound we need to make a wooden case ourselves. It is made from 5-7-layer plywood, in such a case the speaker will have more low frequencies and clear sound at high frequencies.
- When soldering, do not solder the part for more than 3-4 seconds.
- organize your workplace well, there should be nothing superfluous in it
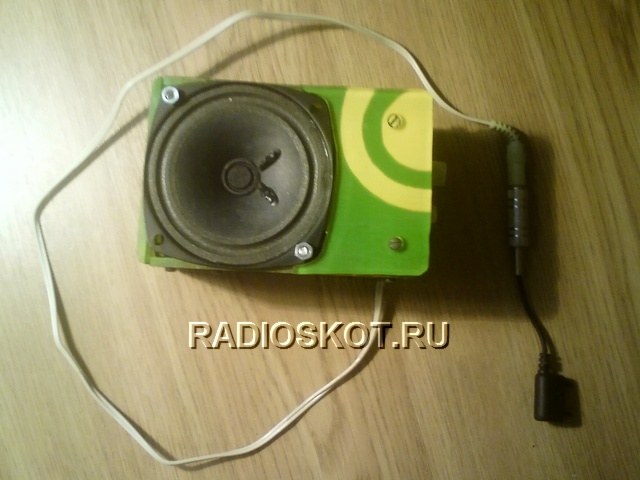
I’ll say right away that the device works great with both the phone and the player. It was decided, of course, to solder the amplifier on a microcircuit, finding the right one took a little time, I read reviews on the Internet and settled on tda2822m. The microcircuit has only 8 legs, designed in a deep package. Next, I downloaded the datasheet for this microcircuit, there were 2 options for connecting the microcircuit - in stereo mode and in bridge mode, the latter is interesting to us, since there will be only one speaker. In addition to wiring diagrams, there were also PCB layout options. Here is the diagram we need:
Diagram of a homemade portable speaker

Next, we print it as usual, transfer the design to the printed circuit board and etch it. Afterwards we tin the tracks, drill and start soldering. In order not to accidentally overheat the microcircuit, I did not solder it, but soldered it into a socket, and placed the microcircuit in this socket after soldering. The cost of a microcircuit in our city is only 15 rubles. Then I was faced with the task of how to make it possible to charge both batteries at once from a mobile charger, that is, so that they were connected in parallel, and later they could be switched on in series for a higher volume of the speaker. Then, using a 6-pin two-position toggle switch, a charge-work switching circuit was developed:

Power is supplied by connecting the charging plug to the speaker socket; with discharged batteries, you need to charge for an hour to an hour and a half. There is no overcharge protection circuit; you will have to monitor the charging time by eye. The volume is adjusted on the phone or on the player, if anyone wants to put a volume control on the speaker, then this can be done without problems, just apply a signal to the right contact of a variable resistor with a resistance of 10-50 KOhm, to the left contact to ground, and connect the central one to the film capacitor at the input.

To connect to the player, I used one channel of the cable from the headphones, and since the cores from that cable were very thin, I did not solder them directly to the board, but extended them with thinner flexible copper wires and soldered them into the board. These wires were fixed on the cable with electrical tape. The speaker took a power of 2 W with a resistance of 8 Ohms, wheezing and distortion are not observed except at maximum volume. On the player, it is enough to set a maximum of 10 divisions out of 32 to 3, and the volume will be sufficient. You can see a photo of the finished device and several photos taken at the assembly stage in the article.
At first the idea arose to buy a powerful mobile Bluetooth speaker, but branded JBL ones cost up to $300, and their power rarely exceeds 40 watts, so it was decided to start assembling my own. The “boombox speaker” was based on a TDA7492P UMZCH module with a power of 2x50 W and a Li-Ion battery with a total voltage of 21 V and a capacity of 3500 mAh (70 W).

Most of the parts were ordered from the well-known AliExpress website, including the speakers. While the batteries are charged with a separate IMax charger, in the future it will be necessary to make a ready-made charger in the case itself.

The speakers are two broadband speakers with a power of 25 W each and two high-frequency speakers with a power of 10 W each, which gives us a total of 70 W, but in peaks they can handle 100 W. The manufacturer of these speakers is the little-known Aiyima, but the quality of their performance and sound quality was a pleasant surprise, which allows us to recommend it for assembling small speakers. Their parameters are as follows:
- Frequency range range: 81 – 5400 Hz
- Sensitivity: 87 dB
- F res. about 115 Hz
A USB module has been added as a Power-Bank. The body is made from 10mm thick MDF and measures 12x12x27cm. It was glued together with wood glue and also reinforced with screws on each side, except for the plate on the back which was glued in place with hot glue in case any repairs or modifications were needed.
Testing a homemade speaker
Tests have shown that these two full-range speakers, unfortunately, are not fully capable of reproducing the entire frequency range, so 10 W tweeters were installed along with them. The HF speakers were connected in series with film capacitors.

As for the bass amplifier on the TDA7492 (the sound is received by the bluetooth 4.1 module), the sound quality is very good and clear. The only problem with this board is that the speakers are slightly noisy when listening to music quietly. There is a solution to this problem on the Internet; only a slight modification of the board is required, but this is not particularly disturbing.

The housing must be very sealed, otherwise the pressure inside the speaker causes air to escape through small holes, which causes unpleasant “farts” from the speaker.

Cost of all assembly costs
- TDA7492P 2x50w 10$
- USB converter 0.8$
- Bluetooth receiver $2
- 5S Lithium-Ion battery $2.5
- MDF 10mm approx. 1$
- Speakers 3″ ShP $36
- Speakers 1.5″ HF 12$
- Battery 18650 packaging Panasonic 3400 mAh 5x4$
- Plus wires, switches, capacitors: $70 total


The TDA7492 chip is, the circuit operates in the range of 8-25 V, so 21 V is not the limit - you can supply 6 cans. According to the specification per m/s at THD 10%, the total is almost 100 watts of power.
Probably not a single person can do without music. And when music is always with you, it really lifts your spirits. In this article I will tell you how to make your own music speaker.
To create our column you will need:
The amplifier, I purchased it at a radio store for 100 rubles. It is assembled on a high-quality PAM8403 chip
Speaker(3w, 4 Ohm)
A few wires
Phone battery
Switch.
The soldering iron is small.
Housing, purchased at a radio store for 60 rubles
3.5mm plug from broken headphones
Protective mesh for the speaker, taken from a broken speaker
Hot melt adhesive
Charging socket.
Stationery knife.
When all the components are available, you can begin.
First of all, carefully cut out a hole for the switch using a utility knife.


We put the switch in this place. It will be held in place by its own clamps. It looked like it came out of a box.


This switch differs from the usual size, it is about 1.5 times smaller than usual, it looks stylish and solid.

Next step. We make a hole in the front part of the case, using the same knife, our speaker will be located there, it will stand at the top and be placed outside.


Let's check if the speaker fits there well. If everything is fine, then you can fill it with hot glue.


Now let's start studying the amplifier.

In the photo I conveyed brief information about the amplifier assembly as quickly as possible.
First of all, we will solder the sound input, this is a 3.5 mm jack, for example from old or broken headphones. The basic one is a white wire, green and blue, right and left audio input to the amplifier.

Then we solder the amplifier output to the speaker, since I only have one speaker, I will not implement the amplifier a second time.

Immediately solder the power supply to the amplifier to the plus of the battery through the switch. We'll make a USB socket for charging.


After placing the nest on the side panel, you can begin assembling the box. There are no difficulties, all you have to do is close the rear roof and install protection from physical impact at the front. One fine day I decided that the sound of the headphones was too weak and I wanted to make a portable, compact speaker for my mobile phone. I made a trial version in a cardboard box - I took apart the old Chinese speakers and used a crown instead of a transformer power supply for the amplifier. The circuit of the amplifier itself is shown in the figure below.
If you don’t have a ready-made board with ULF, just solder it according to this scheme. You can read it here. I checked - everything worked perfectly.

The power output is about a watt. Therefore, I took on a more reliable design of the structure. But first things first...

1. Introduction. I had Chinese speakers - genius. But they bought me a subwoofer and powerful speakers, and threw these geniuses into a drawer.
But one day, after watching a video on YouTube of how people make speakers in a cardboard box, I decided to make a portable speaker for my mp3 player myself.
2. Dad taught. Everything is fine with the electronics and I figured out what to do to make the speaker portable - exclude the transformer that converts 220V to 9V from the power supply circuit of the speaker amplifier. And directly connect the crown battery.
3. Ololo. I made a demo version, assembled on the table: HURRAY EVERYTHING WORKS! But a problem arose: after three hours of operation, the speaker began to wheeze and grumble (as it turned out, there was not enough current). Almost the entire forum helped me solve this problem - thank you all very much! In fact, you just had to connect the second crown in a direct connection (not in series). When turned on in this way, the current increases, but the voltage remains the same.
4. Design options. When I watched a video on YouTube about mobile speakers, I was ashamed. Because quite good inventors made the housing for the speaker out of cardboard. I decided not to embarrass myself and assemble a decent plexiglass case. This decision was made for several reasons:
A) plexiglass is transparent and paint can be applied from inside the case, then it will not be scratched.
B) this is the only material I had (except cardboard).
5. Frame. I had a piece of plexiglass stained with paint. I had to scrape off the paint, which left scratches, but I found a way out: clean the plexiglass with scratch pad (sandpaper). And make it matte. Having completed these operations, I marked the body on a sheet of cardboard, where, as always, I made mistakes: I did not take into account the thickness of the plexiglass. Having cut the plexiglass into pieces, I trudged into the garage to finish the parts on the grinder. The next day, having previously assembled the case and tried on the speaker, I took into account all my mistakes and... again trudged to the garage... Finally, the case was assembled!
6. Painting works. Having disassembled the body for painting, I degreased the inner surface of the body and applied masking tape. Carefully, using an office knife, I cut out semicircles on the tape and “removed everything unnecessary.” Next I painted the surface.

7. Assembly. The painted body was assembled like this: first I taped all the junctions of the corners with masking tape from the inside. Then he began to twist the sides. Having assembled the box, I placed a rubber “mat” on its bottom so that the amplifier contacts did not short out to the bolts. Next I installed the amplifier itself. I didn’t want to think about fastening the speaker, so it is attached to the bottom of the box with two studs standing diagonally. The wire came out from the side.
8. Characteristics. Dimensions of the finished speaker: height 6.5cm, length 11.5cm, width 8cm. Weight 200+/-10g. It is powered by two “crown” batteries with a total cost of 35 rubles. It is advisable to remove the batteries after each use of the speaker. Access to the insides of the speaker is gained by removing the speaker.
9. Manufacturing Features. Replaced two capacitors on the amplifier. One wall of the case cracked after falling from a workbench in the garage into an inspection hole. I was fiddling with the output contacts (the sound was distorted). Nevertheless, I was pleasantly pleased with the result - they play no worse than store-bought ones, plus pride in the device I assembled with my own hands :)

A video clearly showing the speaker assembly process and the final result.
Of course, speakers housed in a wooden case will have a much more pleasant sound, but with such a low power of the speakers this is not critical. Author of the design: Romanenka
Discuss the article HOMEMADE PHONE SPEAKERS


