The main reasons why LED lamps burn out. Reasons for frequent burnout of LED lamps LED bulb has burned out, what to do
We had no idea that the topic would cause such a resonance. Some of our readers simply stated that we time, saying that by changing incandescent lamps to LED, you can save money, somebody doubted the prices on them, but most said that lamps burn out for various reasons earlier than the service life declared by the manufacturers. Here are some of your comments, dear readers:

 LED lamp design
First, a little theory: let's tell you how an LED lamp works.
 LED lamp device
 As you know, the main disadvantage of any LED is that it produces much less light than heat Therefore, this heat must be removed somehow. Actually, the design of the lamp primarily solves this problem.
At the very bottom of our diagram is standard plinth, which ideally should be made from a non-oxidizing and not particularly heating material, for example, special plastic. In this case, the base part is often retracted into polymer base, which provides more reliable protection.
If such protection exists, it must include ventilation holes, since, as we have already said, cooling is an indispensable condition for the long life of such a lamp. The same task is performed by radiator, which occupies at least half the area of the lamp and is made of anodized aluminum alloy.
Inside the lamp, under the protection of the base, there is a so-called driver- the brain of the lamp, which serves to convert alternating current into direct current. Ideally it should be equipped several stabilizers, since electrical networks are rarely ideal and the voltage in them can fluctuate.
Built directly onto the radiator circuit board. Essentially, it is an aluminum plate with several LEDs, and on the lower part facing the radiator is applied thermal paste. Actually, it is the circuit board that accounts for almost 90% heat, emitted by LEDs.
Finally, at the top of the diagram is glass flask, she's the same light beam diffuser. This part practically does not heat up, but in many respects it depends on its design that the lamp shines evenly and brightly.
So why do LED bulbs burn out?
There may be several reasons, and almost all of them are a consequence of savings by the manufacturer.
Save on drivers
High-quality electronic drivers for LED lamps are not cheap. But well-known brands use only such drivers: they have good stabilization capabilities. There are devices of another type, based on capacitors. These are much cheaper, and they are used in most cheap lamps. There is practically no stabilization here, the pulsation during operation is huge - LEDs in such modes cannot withstand long and burn out.

Save on radiators
LEDs do not like to overheat. Therefore, almost every lamp uses a radiator, ceramic or aluminum. But these are also expenses. They skimp on radiator materials; heat removal efficiency is extremely low. As a result, for example, in closed lampshades where there is practically no ventilation, LED lamps quickly overheat and burn out.
Save on LEDs
Of course, they can save money on the LEDs themselves. We cannot check the quality of these elements in any way, so we can only rely on the conscience of the lamp manufacturer.
Which lamps will last long?
Certainly not a cheap Chinese noname. We did not conduct tests of LED lamps, but analyzed similar tests on other resources and compiled the Top 5 brands that occupy leading positions. Here they are (just listing them, without ranking by place):
You have a problem with your electrical wiring. Check the condition of the wire connections in the junction box and in the lamps themselves.
The contacts in the cartridges have oxidized or rusted. This often happens in dachas and country houses.
You are using too powerful lamps. For example, a 10-watt LED lamp in a closed shade is likely to overheat. Try using less powerful ones.
And remember: lamps, like any other product, have a warranty period. If your lamp burns out for no apparent reason, you can contact the seller or manufacturer with a request to replace it with a new one. To confirm the date of purchase, do not forget to save receipts from stores.
Content:Each manufacturer of LED lamps advertises their products as the highest quality and most durable. Such advertising is quite justified, since semiconductors consume very little current. As a result, the wear of LED lamps is significantly reduced during operation, and the use of such lamps becomes very profitable from an economic point of view, despite the relatively high price. Therefore, their failure becomes completely unexpected, and consumers have a completely natural question about why LED lamps burn out.
As practice shows, it may not only be a matter of the quality and parameters of the supply voltage. Lighting fixtures of this type often burn out for other reasons.
Faults and wiring defects
It should be noted right away that no electrical engineer can determine the cause of an LED lamp failure just by describing the situation. In such cases, a mandatory visual examination and advanced diagnostics are required.
One of the most likely reasons is the unsatisfactory condition of the wires in the electrical network. Characteristic signs of this condition are considered to be a condition in which LED lamps in an apartment regularly burn out in one area, depending on the current power supply scheme. Therefore, before assuming a malfunction of the lamp itself, you need to carefully check all the lines. At the same time, it is recommended to perform network audit and maintenance.
First of all, the junction box is opened and the quality of all connections is checked. If there are twisted wires, especially, they need to be removed, and instead use special adapters, terminal blocks, mini-blocks and other devices. At their low cost, they are effective and in the future will provide protection against sparking, burning of wires, insulation damage and other troubles that can cause LED lamps to burn out.
Checking the chandelier, identifying defects
If the wires are in good condition as a result of the test, you should check why the LED bulbs in the chandelier burn out. It is quite possible that the reason lies precisely in the unsatisfactory technical condition of the lamp. Since LED light bulbs are highly sensitive to voltage changes, you must first check the quality of the connection of the chandelier to the wires of your home network.

After this, you need to check the lamp itself. The design and electrical circuits of most chandeliers are quite simple, which makes it easy to understand the problem and identify a possible malfunction. At the very beginning of the audit, it is recommended to check the contacts located in. They should not only be inspected, but also be cleaned. Particular attention should be paid to the central contact, commonly called the tongue. If necessary, it bends upward, which significantly increases the reliability of the connection between the contacts and the light bulb.
Next, you should check how securely the wires are fixed at the connection points, especially in the sockets. Insufficiently tightened mounting screws can cause sparking and burning. While conventional incandescent lamps can withstand such overloads, such failures are extremely dangerous for LED lamps. It has been established that burnt contacts change the resistance in these places, as a result, the current becomes unstable and does not allow LED devices to function normally.
Poor quality LED lamps
If during the checks no external negative factors are identified, it can be said with a high probability that the LED lamp burned out due to the poor quality of the product itself. This is especially true for Chinese-made products, the electrical circuits of which do not contain special devices - the so-called drivers. It is the drivers that protect semiconductor elements from voltage surges.

As a rule, drivers are absent in budget versions of LED lamps, and instead of them a ballast is installed, which is absolutely useless during switching on and off, when the magnitude of current surges reaches its maximum.
When purchasing light bulbs, they are checked at a stand. At this moment they shine with a good, even light. However, in practice, many of them cannot withstand the load and burn out. Due to wiring defects, twists, sparking and other faults, low-quality LED light bulbs fail most quickly, whereas for good, proven lamps this is not at all critical.
One of the reasons is the voltage converter
Many high-quality LED lamps produced by well-known companies are equipped with quite complex electronic circuits. The main function of these devices is to convert AC mains voltage into DC voltage, the value of which is required for this type of LED. In addition, they qualitatively smooth out the resulting pulsations.

A standard board usually consists of 1 or 2 chips and other elements. This design significantly increases the life of the lamps, but at the same time increases their cost. Therefore, in order to increase product sales, unscrupulous manufacturers replace normal complex circuits with so-called ballast, which was already mentioned earlier. In this regard, many consumers during operation have a logical question about why LED light bulbs quickly burn out.
The main reason is current surges, which cannot be leveled out with simple ballast. As a result, the structure of the semiconductor is disrupted, and the luminous layer - the phosphor - becomes inoperative. Therefore, it is recommended to buy products only from well-known manufacturers that are reliable and of high quality.
Hello! Today I want to talk about how to correctly connect and properly operate spotlights, chandeliers, sconces, etc.
I will also try to explain clearly why light bulbs burn out quickly. Today, due to violations during the installation of electrical wiring for lighting, the issue of quickly burning light bulbs is becoming more and more acute.
I’ll probably start with spotlights
since this is the most popular method of lighting in modern apartments, and spotlights are placed not only on the ceilings to illuminate the apartment itself, but they are also installed in various furniture for lighting - cabinets, sideboards, kitchen units. The list can be endless.
Why do light bulbs in dots burn out so often?
And there can be many reasons for this disease, especially if you have halogen light bulbs. Such lamps are especially capricious if installed incorrectly.


1) First reason This is an incorrect connection diagram for spotlights. When all points are connected to one wire one after another. With this scheme, the load of each subsequent lamp falls on the connection of the previous one. And the total load of all lamps falls on one wire. This can be seen in the diagram.

This connection diagram is not correct, and often leads to rapid burnout of conventional incandescent and halogen lamps. But nevertheless, this scheme is used everywhere and by everyone, from lighting in cabinets to room lighting.
What happens with such a connection? And this is what happens: Let’s say that on the first light bulb on the side of the distribution box, the contacts of the socket have oxidized due to the strong heating of the halogen lamp (the temperature there is very high, and the socket is naturally Chinese - overheating cannot be avoided), then a chain reaction begins, the wires coming from the socket gradually begin to heat up, then the connection to the common wire heats up. And when the connection heats up, oxidation of the wires connected to each other will not take long to occur. Here the following lamps also put a large load on the already heating connection. Accordingly, due to heating and subsequent oxidation of the connection, the resistance between the connected wires increases, voltage drops occur on this line, which lead to frequent burnout of light bulbs.
And with the correct connection diagram, a separate wire goes from the junction box to each lamp. In this case, the load is distributed evenly. Seen in the diagram below

But if you have completed a version of the first scheme and there is no way to fix it, then I recommend this procedure to my clients: I remove the spotlights from the ceiling (cabinet, headset), cut off the oxidized part of the wire and throw out the old sockets from all points, install new ones cartridges and connect the chain. But I advise you to abandon halogen and incandescent lamps, otherwise the problem of burnout with such a connection scheme will not be long in coming again. And I install LED lamps instead of halogens.

They are not afraid of voltage surges, although surges will not occur, since LED lamps are slightly above room temperature, even with prolonged use. And they work for up to five years. The average price of such a lamp in Ufa is 200 rubles, which will easily pay for itself over a given period of operation. At the same time, you will save on electricity, since LEDs consume significantly less incandescent and halogen lamps (virtually none at all). So you are saved. Everything is easy and simple to treat.
The most important thing is that LEDs come in a variety of shapes, so you can easily match them to your old fittings from spotlights.

This is another savings.
And we move on to the second reason for frequent lamp burnouts.
2) The second reason, is caused by poor connection of spotlights to the supply wires. These are the so-called twists (this is usually always done). If you simply twist the wires, even the correct connection diagram will not help; the light bulbs will still burn out (halogen, incandescent lamps).
What happens when twisted? I'll try to explain now. The first thing that comes to mind is the natural oxidation of twisted wires; even with very tight twisting, darkening of the copper is always visible; the wires literally turn dark over time. This is not visible to the naked eye. And oxidation leads to an increase in the transition resistance at the junction of the wires. Again, this all leads to a voltage drop and rapid destruction of the lamp.
But there is another reason not to put wires on twists, and this reason is called “Eddy currents” that arise in our twist, since it is something like an “inductance coil,” roughly speaking. Well, as always, this leads to interference and further, further, further to consequences that you already guessed.
Well, it’s also not difficult to treat. The lamp is removed from the ceiling, the socket is replaced, the twists are cut off, and the wires are reconnected, but already tightened through the immortal terminal block.

Well, when you combine these two rules (circuit and correct connection), even halogen lights will work for a long time. Although they usually combine not two rules, but these two errors. Brrrrr, this paradoxicality even makes it unpleasant.
And now I’ll move a little away from the topic of burning light bulbs, and come to the case when the light disappears simultaneously in all lamps. Usually this happens quite often, but don’t rush to buy new light bulbs, because most likely it’s not them.
Usually the reason for the simultaneous shutdown of the lamps is either a break in the power cable, or most likely your step-down transformer has malfunctioned.

Such a transformer is installed if the fittings and halogen or LED lamp are designed for a voltage of 12 V. And since transformers are usually selected mainly at the lowest price, they often fail. Over and over again, after each breakdown, owners have to call a technician to replace the step-down transformer. In this case, I suggest that the owners replace the torment with the transformer by completely removing it and connecting the lamps directly. But at the same time it is necessary to replace 12-volt light bulbs with 220-volt ones.
Let's move directly to the chandeliers
Namely, let’s first consider Chinese budget chandeliers with LED lighting, halogen bulbs and a seductive control panel.

Such a filling at a low price naturally gives rise to a lot of problems regarding the quality of the product. And in the first place we have burnt out halogens (light bulbs), this problem is the first symptom of a complete breakdown of the chandelier. The reasons are basically the same - first, due to severe overheating from the lamps, the contacts of the sockets lose their elasticity (this is due to the quality of the metal of the contacts), when elasticity is lost, the contacts weakly compress the pins of our halogen lamps. Which leads to poor contact and further, constant burning of the lamps. You can come to terms with all this, and light bulbs, in principle, are not so expensive, you can buy them, but the harmless combustion of light bulbs is being replaced by another, more serious one. After this stage, the electrical wiring in the chandelier begins to get very hot, and since the wiring in it is very thin, they literally smolder. And when the time comes for the insulation to melt, the entire bundle of wires fuses together, thereby causing a short circuit. In some cases, the chandelier completely stops working because the step-down transformer fails; in some situations, several lamps remain working, or only the backlight works. In this case, it is necessary to change all the wiring of the chandelier, as well as the sockets and the transformer with the control unit. But this process is quite labor-intensive, and most often it is not possible to remove the cartridges.
Despite the diversity on the country's shelves, they remain unrivaled due to their cost-effectiveness and durability. However, a quality product is not always purchased, because in a store you cannot take the product apart for inspection. And even in this case, it is not a fact that everyone will determine from what parts it is assembled. burn out, and buying new ones becomes expensive. The solution is to repair LED lamps yourself. Even a novice home craftsman can do this work, and the parts are inexpensive. Today we will figure out how to check in what cases the product is repaired and how to do it.
It is known that LEDs cannot operate directly from a 220 V network. To do this, they need additional equipment, which, most often, fails. We'll talk about it today. Let's consider the circuit, without which the operation of the lighting device is impossible. At the same time, we will conduct an educational program for those who do not understand anything about radio electronics.

driver gauss 12w
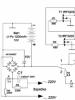
The 220 V LED lamp driver circuit consists of:
- diode bridge;
- resistance;
- resistors.
The diode bridge serves to rectify the current (converts it from alternating to direct). On the graph it looks like cutting off a half-wave of a sine wave. Resistors limit the current, and capacitors store energy, increasing the frequency. Let's look at the operating principle of a 220 V LED lamp.
The principle of operation of the driver in an LED lamp
| View on the diagram | Operating procedure |
 | A voltage of 220 V is supplied to the driver and passes through a smoothing capacitor and a current-limiting resistor. This is necessary in order to protect the diode bridge. |
 | Voltage is supplied to a diode bridge, consisting of four differently directed diodes, which cut off the half-wave of the sine wave. The output current is constant. |
 | Now, by means of a resistance and a capacitor, the current is again limited and the desired frequency is set. |
 | Voltage with the necessary parameters is supplied to unidirectional light diodes, which also serve as a current limiter. Those. when one of them burns out, the voltage increases, which leads to failure of the capacitor if it is not powerful enough. This happens in Chinese products. High-quality devices are protected from this. |
Having understood the principle of operation and the driver circuit, the decision on how to repair a 220V LED lamp will no longer seem difficult. If we talk about quality products, then you shouldn’t expect any troubles from them. They work for the entire prescribed period and do not fade, although there are “diseases” to which they are also susceptible. Let's talk about how to deal with them now.
Reasons for failure of LED lighting devices
To make it easier to understand the reasons, let’s summarize all the data in one common table.
| Cause of failure | Description | Solution |
| Voltage drops | Such lamps are less susceptible to breakdowns due to voltage surges, however, sensitive surges can “break through” the diode bridge. As a result, the LED elements burn out. | If surges are sensitive, you need to install one, which will significantly extend the life of the lighting equipment, but also other household appliances. |
| Incorrectly selected lamp | Lack of proper ventilation affects the driver. The heat it generates is not removed. The result is overheating. | Choose one with good ventilation that will provide the necessary heat exchange. |
| Installation errors | Incorrectly selected lighting system and its connection. Incorrectly calculated electrical wiring cross-section. | Here the solution would be to unload the lighting line or replace lighting fixtures with devices that consume less power. |
| External factor | Increased humidity, vibration, shock or dust if the IP is incorrectly selected. | Correct selection or elimination of negative factors. |
Good to know! Repair of LED lamps cannot be carried out indefinitely. It is much easier to eliminate negative factors that affect durability and not purchase cheap products. Savings today will result in costs tomorrow. As economist Adam Smith said, “I am not rich enough to buy cheap things.”

Repairing a 220 V LED lamp with your own hands: nuances of the work
Before you repair an LED lamp with your own hands, pay attention to some details that require less labor. Checking the cartridge and the voltage in it is the first thing to do.
Important! Repairing LED lamps requires a multimeter - without it you will not be able to ring the driver elements. You will also need a soldering station.
household multimeters
A soldering station is necessary for repairing LED chandeliers and lamps. After all, overheating of their elements leads to failure. The heating temperature when soldering should be no higher than 2600, while the soldering iron heats up more. But there is a way out. We use a piece of copper wire with a cross-section of 4 mm, which is wound onto the soldering iron tip in a tight spiral. The more you lengthen the tip, the lower its temperature. It is convenient if the multimeter has a thermometer function. In this case, it can be adjusted more accurately.

Soldering Station
But before you repair LED spotlights, chandeliers or lamps, you need to determine the cause of the failure.
How to disassemble an LED light bulb
One of the problems that a novice home DIYer faces is how to disassemble an LED light bulb. To do this you will need an awl, solvent and a syringe with a needle. The LED lamp diffuser is glued to the body with sealant, which needs to be removed. Carefully running an awl along the edge of the diffuser, inject the solvent with a syringe. After 2-3 minutes, easily twisting, the diffuser is removed.

Some lighting fixtures are made without sealant. In this case, it is enough to rotate the diffuser and remove it from the body.
Determining the cause of failure of an LED light bulb
After disassembling the lighting fixture, pay attention to the LED elements. Burnt is often identified visually: it has scorch marks or black dots. Then we replace the faulty part and check its functionality. We will tell you in detail about the replacement in step-by-step instructions.
If the LED elements are in order, move on to the driver. To check the functionality of its parts, you need to remove them from the printed circuit board. The value of resistors (resistance) is indicated on the board, and the parameters of the capacitor are indicated on the case. When testing with a multimeter in the appropriate modes, there should be no deviations. However, often failed capacitors are identified visually - they swell or burst. The solution is to replace it with suitable technical parameters.

Replacing capacitors and resistances, unlike LEDs, is often done with a regular soldering iron. In this case, care should be taken not to overheat nearby contacts and elements.
Replacing light bulb LEDs: how difficult is it?
If you have a soldering station or hair dryer, this work is simple. It is more difficult to work with a soldering iron, but it is also possible.
Good to know! If you don’t have working LED elements at hand, you can install a jumper instead of the burnt one. Such a lamp will not work for a long time, but it will be possible to gain some time. However, such repairs are carried out only if the number of elements is more than six. Otherwise, a day is the maximum work of the repair product.
Modern lamps operate on SMD LED elements, which can be desoldered from the LED strip. But it is worth choosing the ones that are suitable according to technical characteristics. If there are none, it is better to change everything.

Related article:
To choose the right LED devices, you need to know not only the general ones. Information about modern models and electrical diagrams of working devices will be useful. In this article you will find answers to these and other practical questions.
Repairing an LED lamp driver if you have an electrical diagram of the device
If the driver consists of SMD components that are smaller in size, we will use a soldering iron with copper wire on the tip. A visual inspection revealed a burnt element - unsolder it and select the appropriate one according to the markings. There are no visible damages - this is more difficult. You will have to solder all the parts and ring them separately. Having found a burnt one, we replace it with a functional one. It is convenient to use tweezers for this.
Helpful advice! You should not remove all elements from the printed circuit board at the same time. They are similar in appearance, you can later confuse the location. It is better to unsolder the elements one by one and, after checking, mount them in place.

How to check and replace the power supply of LED lamps
When installing lighting in rooms with high humidity (or), stabilizing ones are used, which reduce the voltage to a safe one (12 or 24 volts). The stabilizer can fail for several reasons. The main ones are excessive load (power consumption of luminaires) or incorrect selection of the unit’s degree of protection. Such devices are repaired in specialized services. At home, this is unrealistic without equipment and knowledge in the field of radio electronics. In this case, the power supply will have to be replaced.

LED power supply
Very important! All work to replace the stabilizing LED power supply is carried out with the voltage removed. Don't rely on the switch - it may not be connected correctly. The voltage is turned off in the apartment's distribution panel. Remember that touching live parts with your hand is dangerous.
You need to pay attention to the technical characteristics of the device - the power must exceed the parameters of the lamps that are powered from it. Having disconnected the failed unit, we connect a new one according to the diagram. It is located in the technical documentation of the device. This does not present any difficulties - all wires are color-coded, and the contacts are labeled with letters.

The degree of protection of the device (IP) also plays a role. For a bathroom, the device must be marked at least IP45.
Article
LED lamps are well-deservedly popular for many reasons. LED light sources are characterized by long service life, economical power consumption and reliability. However, in addition to the advantages, LED bulbs also have disadvantages. The most common problem consumers encounter is when the LED lamp glows when the switch is off.
Features of LED lamps
LED bulbs have a slightly more complex internal structure compared to conventional incandescent bulbs.
Main elements of an LED lamp:
- Nickel-plated brass base. These materials avoid corrosion processes and also ensure good contact with the cartridge.
- The base of the plinth is made of polymer (polyethylene terephthalate). The material protects the device body from electricity.
- The driver is based on a galvanically isolated current stabilizer modulator circuit. The driver's task is to create conditions for stable operation of the light source even in the event of power surges.
- The radiator is made of anodized aluminum alloy. The coating allows heat to be removed from those surfaces of the lamp that are not allowed to overheat.
- Aluminum printed circuit board. The component guarantees the desired temperature regime for the chips by dissipating heat to the radiator.
- Chips. They represent a key element of the system. They are also called diodes.
- Diffuser. It is a glass hemisphere with the highest level of light dispersion achievable within the technology.

The operating principle of LED lamps is based on the release of photons. This occurs as a result of permanent change and the appearance of multiple combinations of electrons. Uninterrupted changes are ensured by the presence of conductors. To optimize the process, resistors or current limiting devices are used.
Recently, more advanced systems have appeared that provide high consumer performance. These bulbs use diode bridges. However, the prices for such lamps are much higher than for old-style products.
Why does the LED lamp glow when the switch is off?
There are several common reasons why LED bulbs glow when the switch is off:
- Low quality insulating materials.
- Using an illuminated switch.
- Low quality light bulb.
- Problems with electrical wiring.
- Features of the power supply circuit.
Poor quality insulation
Insufficient quality insulation in any part of the electrical circuit often causes problems with light. This malfunction has the most serious consequences, because to correct it you will need to disturb the finishing layer on the walls in order to replace the insulation.

To check the insulation for current leakage, apply high voltage to the network for 1 minute. This is necessary to simulate the conditions under which breakdowns occur in the electrical circuit.
Using Illuminated Switches
The answer to the question of why an LED lamp glows when the switch is off lies in the use of an illuminated switch. The inside of such a device contains a light diode with a current-limiting resistor. The reason the lamp glows is that even when the contact is disconnected, voltage still passes through them. However, the light bulb does not glow at full power, since the circuit contains a current-limiting resistor.
The lamp shines either constantly (if the current is sufficient) or intermittently (flashes because the current is too weak). However, even in the latter case, the current is sufficient to recharge the capacitor. As soon as sufficient voltage accumulates in the capacitor, the stabilizer chip turns on, and the light bulb immediately lights up. Operating the lamp in this mode leads to its rapid wear, since the number of operation cycles for microcircuits is finite.

In this case, there are several methods to eliminate the problem of the luminous light bulb. The easiest way is to remove the backlight from the switch. To do this, dismantle the housing and remove the wire directed to the resistor or light diode. It is also possible to replace the switch with another one that does not have a backlight function.
Another way to solve the problem involves soldering a shunt resistor parallel to the light bulb. You will need a 2 watt resistor with a resistance of up to 50 kOhm. If you do this, the current will flow through this resistor, and not through the light bulb power driver. Installing the resistor is not difficult. You just need to remove the lampshade and secure the resistance legs in the terminal block for connecting the network conductors.
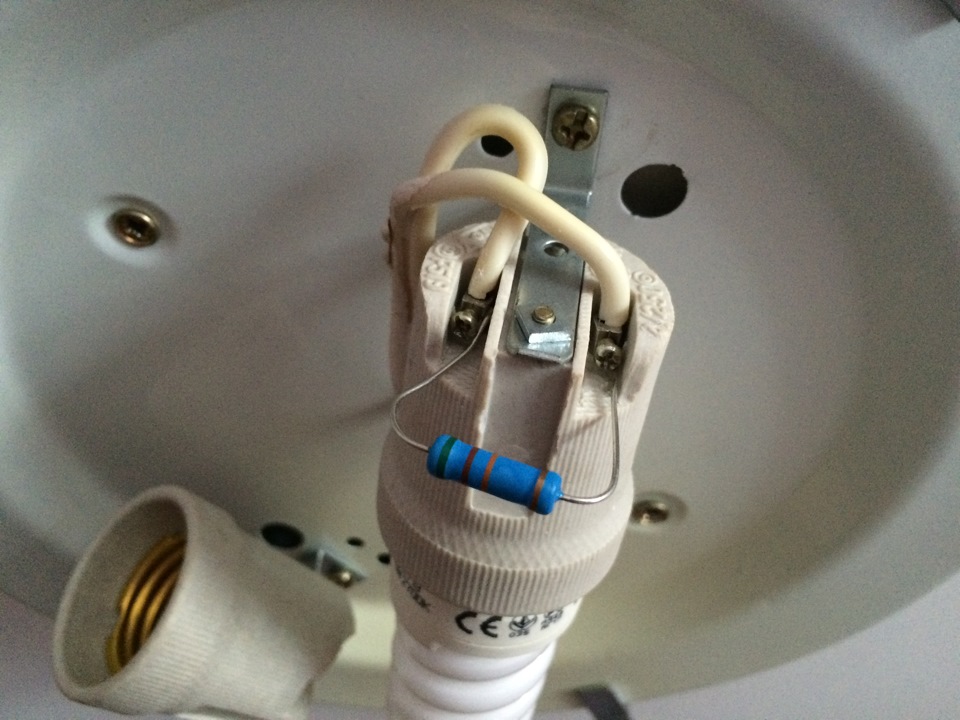
It is enough to connect one resistor to the switch, there is no need to hang them on each lamp.
If you do not have sufficient knowledge of electrical engineering, you can do something simpler. To do this, place a regular incandescent lamp in the lighting fixture. The spiral of the light bulb will serve as a shunt resistor when turned off. However, this option is only suitable if there are several cartridges in the lighting fixture.
Low quality light bulb
Often the cause of a malfunction is an insufficiently high-quality lamp. In this case, there is only one way to solve the problem - replacing the product with a better one.
Electrical wiring problems
If errors are made during the installation of electrical wiring, one of the consequences of this may be the lamp glowing when the switch is already turned off. This situation happens when the zero is confused with the phase, and even after disconnecting the wires remain under the phase.

The situation should be corrected not only to get rid of the unnecessarily shining light bulb. This is also to avoid electric shock when replacing the lamp.
Features of the power supply circuit
To provide a brighter glow and reduce light ripple, a high-capacitance capacitor is sometimes added to the power supply circuit. This results in the fact that even when the switch is turned off, there is still enough charge in it to allow the LEDs to glow.
- Carefully read the instructions that come with the LED lamps. It specifies the rules for using the product.
- Some convenient lighting features are not easily compatible with LED bulbs. Timers, light intensity controllers, photovoltaic elements, and backlighting often cause failures in the normal operation of LEDs.
- Pay attention to the dimensions of the radiator. This element is responsible for removing a sufficient amount of thermal energy that is released when the light is on. The dimensions of the radiator and the power of the lamp must be consistent with each other.
- Radiator material. The best choice is an aluminum radiator. Ceramic and graphite products have proven themselves to be excellent.
- The quality of the joint between the light bulb body and the base. If there are obvious mechanical defects at the junction, the likelihood of problems with the lamp glowing when the switch is off increases. The base must be securely fixed to the body without play.
- Ripple level. The correct glow is uniform, without any flicker. However, it is quite difficult to notice irregularities in the light. This is where a mobile phone video camera comes in handy - it makes it much easier to spot flickering.