We make a shower cabin with our own hands. Do-it-yourself shower cabin: the order of construction and connection to communications. We are planning next steps
The advantage of a shower cabin in an apartment is that it is not necessary to prepare a specially equipped place. A shower cabin, which is equipped with your own hands in the house, can be located in the room adjacent to the bathroom. The main thing is to have access to a common riser of water supply and sewerage.
The described device has a compact and somewhat autonomous design, built in the house in compliance with the requirements and current sanitary standards. Moving the cubicle to a new location allows you to free up some of the space in the bathroom for other purposes, as well as save the area occupied by plumbing.
The main reason that homemade shower cabins have become popular is the savings on their construction. Prices for sample products with a set of additional features (including a power shower) simply shock buyers. It seems that manufacturers do not take into account the capabilities of the average user and make booths only "for the rich."
Most of the craftsmen who have already tried to build such a structure did not notice any significant financial savings.
The option considered here is beneficial for those people who plan to assemble a simple shower stall, designed only for washing and replacing a cast-iron bath.
Another reason for making a shower cabin from a bath with your own hands is the ability to install it in any living compartment of the apartment.
Before you make a shower cabin with your own hands, calculate the costs of the following structural elements:
- Reliable waterproofing, lined with a protective film used for finishing pools.
- Convenient drain built into the floor and requiring its dismantling and strengthening.
- To finish the flooring, you will need tiles with a ribbed (non-slip) surface, as well as a water-repellent adhesive.
- To this is added material for the walls (polycarbonate or fiberglass with a set of guides), a ready-made pallet that you have to buy in a store.
Regarding the last point - you can make a pallet yourself (from brick, for example).
In order to save money, instead of sliding doors, they manage with a curtain. This option is suitable when the main structure in the apartment was replaced with a temporary one.
For those who plan to further reduce the cost, experts advise making the simplest version of a shower cabin. It is understood as an ordinary corner (its appearance is shown in the picture on the left and above).
But in any case, the contractor will first need to familiarize himself with the simplest technical solutions that will not exceed the costs included in the estimate.
Sump and drain selection

An easy way to make this part of the structure is to use a ready-made pallet mounted on a brick pedestal or base, which is laid out from lightweight foam blocks.
If this option is not suitable, use an elevation, which is laid out from the same brick or poured concrete (photo on the left).
When choosing this method, it is better to veneer the finished elevation with a pallet with ceramic tiles, which is technically easy to do.
When making a drain with a pallet in an apartment building, you should think about reliable waterproofing of the subfloor in the place where the construction of the shower cabin is planned.
There is another option (intermediate). First, a “trough” of the required size is constructed from metal by welding, which is then protected with an anti-corrosion coating. Later, it is installed on an already prepared brick podium with a pre-equipped drain and lined with the same material on the outside. To prevent slippage inside, this container is finished with mosaic tiles.
From the considered examples, you can choose for yourself the option of manufacturing a shower structure.
After you have decided on the choice of the design of the pallet, it is worth sorting out the dimensions of the homemade shower cabin from the base. Of the possible options, a standard size of 100 x 100 cm or more is suitable.
Regardless of where the shower will be - in the bathroom or in an adjacent room, it is better to choose a size slightly larger than required for the average person.
It is equally important to think in advance how the drain will take place in the place where the booth is supposed to be located.
When choosing the design of this element for the shower, we will proceed from the following options:
- The classic siphon shown in the photo below.
- Drain of the simplest design, called a ladder.

The siphon is cheaper, but when it is used, the question of repair work arises. Therefore, before making a shower siphon, it is worth providing a reserve place, which under normal conditions is closed by a door.
The ladder costs a little more, but it does not take up much space and is more reliable than a siphon. So in the manufacture of a pallet, it is boldly poured with concrete, which is usually done after choosing a design.
In addition to these points, it is important to foresee, and later to correctly organize the slopes with which the pipes extending from the ladder are laid towards the sewer receiver. They are selected in such a way that for 1 meter of length the difference in height is 4–5 cm (4–5%). The same slope is made at the subfloor in the cab.
Self-made pallet
Before you assemble the shower cabin yourself, you will need to thoroughly prepare the floor and walls in the place that is determined for the pallet. To do this, perform the following operations:
- They make the markup of the future structure, bring water pipes.
- The surface of the wall is leveled, under which the communications supplying water are hidden (a watering can and outlets for the mixer are left outside).
- At the next step, the base of the pallet is laid, performed by one of the methods described. With any of these options, it is necessary to provide for its reinforcement with a metal mesh and places for laying a drain to the sewer and installing a ladder.
To make a pallet with your own hands, follow the construction technologies for screeds when work begins with the installation of lighthouses.
At this stage, make a slight slope of the base and pipes towards the drain.
Further work is carried out in the following order:
- When the brick pallet and drains are ready, they proceed to their waterproofing, capturing at the same time the adjacent walls.
- For this, a film or ready-made acrylic primers are used, applied on the pallet with a layer of 1 mm (on the walls - 0.8 mm).
- Next comes the tiling. It is laid using moisture-resistant adhesive mixtures used for ceramic tiles.
At the final stage of work on the manufacture of the base of the future product, we make the final touch - we mount the attachments of the booth, followed by sealing the formed joints and joints.
Wall material
To make a comfortable and not too dark shower cubicle, you need a transparent, but hiding the details of the cladding. Transparent plastic or polycarbonate is best suited for this. Plastic fencing is disadvantageous in that it becomes cloudy and can crack (crack) under heavy loads.
In contrast, a polycarbonate shower cabin is better suited for apartment conditions. Its impact strength is an order of magnitude higher, and it weighs even lighter than wood.
For a do-it-yourself cabin installed in the bathroom, monolithic rather than cellular polycarbonate is suitable.
There are reviews of people in which preference is given to cellular material as lighter and more durable. However, the vast majority of users believe that the monolith looks prettier and is also suitable for decorating the cubicle door. In addition, it is quite durable and easy to handle (this is especially noticeable when cutting and installing it).
Ventilation
In the absence of fresh air entering the area where damp vapors accumulate, the walls and ceiling adjacent to the booth may become moldy over time. The easiest way to prevent this unpleasant phenomenon is to provide forced ventilation near the open part of the cabin. For this, any low-power fan mounted on a false ceiling, for example, can be used.

However, its use does not exclude the need for constant ventilation of the room selected for the installation of the booth. Therefore, before attempting to wire the fan installation site, make sure that natural ventilation is in good condition and that air exchange is good, without forced intervention.
When choosing an electrical appliance suitable for the specified needs, the requirements are taken into account:
- Firstly, when organizing the ventilation of the cabin and the bathroom as a whole, attention is paid to the safety of its operation, which is possible only if it is waterproof.
- Secondly, this device must provide enough power for long-term rotation of the actuating part without overheating and excessive energy consumption.
An overly powerful fan in this case is just as undesirable as a low-power model of the device.
In the first case, you will have to pay more for electricity all the time, and in the second, the removal of moist air will be slow and inefficient. The importance of the issue of airing the premises when installing a booth in a private house.
Features of arrangement in a private house
When considering the issue of self-manufacturing a cabin in a country house, it is necessary to take into account such moments.
A do-it-yourself shower stall will not only make your stay more comfortable, but will also save you money. Homemade boxing will save you from the cost of attracting third-party and not always conscientious workers. Equally important is the moral satisfaction received from the results of their work. Is it true?
We will tell you how a shower cabin should be built in a private house with your own hands, we will help you in choosing the best plumbing fixture. We will show you how to develop a project and bring the idea of \u200b\u200bbuilding a hygienic homemade product into reality.
In the article presented by us, the process of building and arranging a shower is described step by step. The technology for installing the booth and connecting it to the sewer largely depends on the chosen modification of the pallet.
Before proceeding directly to the description of the assembly process, we will briefly consider the main types of shower stalls available for sale, the criteria for their selection.
Variety of models: what is better to choose
A shower enclosure is a simple construction of a pallet and curtains. Instead of the walls that are typical for a full-fledged shower stall, the walls of the room are used. There is no ceiling in the shower area. Its main advantages are low cost and compactness.
Shower enclosure - one of the simplest, most convenient and cheapest models of shower cabins, takes up minimal space and is suitable for self-assembly
More "fancy" models have a roof and walls. Expensive multifunctional units have rich technical equipment: Turkish bath or Charcot shower, flavored steam mode, different types of hydromassage, additional functions, various lighting.

An expensive model of a shower cabin with a hydromassage function, lighting and a deep tray. Requires not only sufficient space for installation, but also the necessary pressure in the water supply
The control of such booths is carried out by a complex electronic system. Before buying an expensive cabin equipped with a hydromassage function, you first need to find out the level of water pressure in the pipes.
Combined showers are a kind of compromise for those who like to take a bath with a hydromassage and have a full-fledged shower at home. Combined models are distinguished by an original and stylish design - they are often positioned on the market as home SPA centers.
It is to the pallet that the products impose increased requirements. A high-quality pallet must withstand a large load, and at the maximum allowable weight of the user, it must not crack, bend or deform.
Shower trays are made from different materials.
Most popular models:
- faience;
- from artificial stone;
- enamelled;
- acrylic.
Faience. Everyone knows the material used in the manufacture of toilet bowls. The earthenware tray is completely hygienic, easy to clean and can withstand a lot of weight.

The disadvantage of faience is the strong “causticity” of the material: the surface of the pallet can be damaged even if, for example, a glass cup falls
Fake diamond- reliable and durable material, beautiful and hygienic, but expensive.
Enamelled pallets for shower stalls are cheap and durable. Of the shortcomings, only the fragility of the enamel should be noted. However, the enamel coating can be easily restored or replaced with acrylic. An additional minus is the roar of falling water on the metal surface of the pallet.
Acrylic pallets are the most popular. The acrylic surface does not absorb dirt at all, warms up instantly, does not darken over time.

Scratches on acrylic are completely invisible - this is an important point, since trays are often scratched when a shower cabin is assembled by hand, especially for the first time.
The disadvantage of acrylic pallets is the inconvenience in installation, since the installation of a special frame is required. As such, an aluminum structure with adjusting screws is used, with which you can select the desired height of the pallet.
A comparative overview of different types of shower trays is presented in.
What are curtains?
The second most important element is the cabin curtains, which can be hinged and sliding. Swing doors require more space. They are single-sided and double-sided.
As for sliding curtains, they have from two to six wings, which are held by a rubber magnetic tape. The curtains move on rollers hidden inside the frame of the shower cabin. High-quality curtains should open and close almost silently.

Corner shower cubicle with sliding doors. In addition to models with transparent plastic (glass), there are options with frosted curtains.
Shower curtains are made of polystyrene or high quality tempered glass. Products made of polystyrene are quite cheap and have a small weight, but they quickly lose their transparency, stains remain on them.
Glass curtains are expensive high-quality products.

Hinged doors made of tempered frosted glass. In their manufacture, specially processed safety glass is used, which surpasses even automotive glass in strength.
Water and dirt are very easily washed off the glass surface - the material does not absorb anything and does not fade over the years. You can also buy a booth with curtains made of classic transparent, tinted, colored and rough glass.
Shower project development
With apparent technical complexity, the independent construction of a shower cabin is, in fact, quite a feasible procedure for a simple layman, especially for a hard-working owner.
Just as the construction of any capital structure begins with the development of a project, it is necessary to think over before starting work on equipping a shower in a private house with your own hands.
It is advisable to mark on paper the main plans and schemes, for example:
- a plan for placing a shower cabin in a designated room;
- schemes for connecting to power supply networks, water supply and sewerage;
- the procedure for equipping the shower room with a ventilation system.
The preparation of the room for the shower and the direct arrangement of the cabin in it are carried out in several stages.
Increasingly, owners of apartments and suburban real estate are abandoning a full-fledged bath in favor of small and comfortable showers. Such a solution allows you to rationally use the living space, save water and energy, without limiting yourself.
Buying a ready-made cabin is not difficult, but you can make it yourself. Of course, before you make a shower cabin with your own hands, you need to choose the optimal configuration for it, prepare tools and material.
Shower cabin: pros and cons
The main advantage of the booth is that it can be installed in almost any room of a house or apartment, the only condition is that it is necessary to bring a water supply system and drainage system. A properly selected and well-installed booth will not only not spoil the interior of the room, but will also add originality to it.
Note! A shower cabin is the best solution for a small apartment, studio or loft-style interior.
Design is good, but saving water is just as important. To take a bath, you will need to use it at a time in the amount of 300-700 liters. With ever-increasing water and energy prices, a bath can be a luxury, especially since 50-100 liters is more than enough for a full shower.
As the disadvantages of the shower cabin, one can only mention its high cost. To a greater extent, this is true for branded models, the price of which corresponds to the quality. Cheap models can suit the buyer in all respects, but quickly fail.
The high price is a minus, but it can be circumvented. A simple and functional shower cabin is easy to make with your own hands. It is guaranteed to be cheaper than a purchased counterpart, and a well-made one will pamper the owners with a warm shower for a long time and delight with the original design.
The choice of design for do-it-yourself manufacturing
In the case of a cabin that will be made at home, you will have to abandon a large number of moving parts, it is difficult to make them yourself, it is better if the cabin itself is stationary. From this we can conclude that the most suitable for self-production is a tile shower, in fact, this is a part of the room separated by partitions in which the shower is equipped.
The easiest way is to install a cabin in the corner of the room, this allows you to save on walls, to create it you need to build only one fence and install a door. A partition or fence is easy to make from waterproof drywall.
The advantages of such a design are obvious:
- relative ease of operation;
- low cost of the material;
- smooth surface that does not accumulate dirt;
- high coating strength, scratch resistance;
- aesthetic appearance of the structure as a whole;
- the cabin can be squeezed into any corner of the apartment;
- abundance of design options.
A homemade shower cabin made using durable materials will obviously have a longer service life compared to factory models, the design of which is dominated by plastic.
These are all pros, but there are also cons. You need to understand that a shower stall made with your own hands will be simple, you will have to limit yourself to just a watering can. It is unlikely that you will be able to make a device on your own that has all the functionality of a modern cabin, including various options for hydromassage. Another obvious disadvantage is the difficulty of its dismantling.
Of course, you should not be limited only to tiles. A cabin with glass block walls will look beautiful and spectacular. In a wooden house, it is possible and necessary to install a shower made of wood, while it is important not to forget about protecting the wood from moisture.
Functionality and dimensions
Before getting down to work, you need to decide on the functions that the cabin should perform and its dimensions. Regarding the functionality, it would seem that everything is simple - they take a shower in the booth. This is so, but not only. Often, especially if the cabin replaces the bathtub, its tray is used to soak heavy items that cannot be washed in the machine.
A special approach is also required when you need to squeeze a shower room into a narrow space, a niche in the wall or a cramped bathroom. Before undertaking the manufacture of such a cabin, it is worth carefully measuring the available space, choosing the optimal place for attaching the shower and mixer, and the door attachment points.
A homemade cabin is not tied to standard sizes, so its dimensions are chosen based on your own preferences. In any case, you should not make a shower with dimensions less than 100 x 100 cm. The height of the cabin may be equal to the height of the room, in which case it is additionally necessary to install ventilation or not reach the ceiling, then ventilation will be carried out through the open "roof".
Selecting an installation location
Having decided on the dimensions of the cabin, you need to find the best place for it. It is easier and cheaper to install a cabin in the bathroom. The benefit is obvious - the bathroom already has all the necessary communications, they just need to be slightly modified.
If this option is not suitable, then the installation site must be chosen based on the availability of communications. At the same time, do not forget that the shower is not only hot water, but also evaporation. If a well-made cabin will protect against splashes, then it will not be able to prevent the free exit of steam. The room must have good ventilation.
Doors or curtain
The entrance to the shower must be closed, otherwise puddles on the floor are provided. You can close the entrance with a light curtain or door. The curtain is simple, but ineffective. It is possible to use a curtain only if a shower is installed in the bathroom or when creating a summer shower in the yard.
The doors provide sufficient tightness, which allows you to install the cabin anywhere in the apartment. There are several options for their execution: swing, retractable, folding.
Perhaps the best option for a booth is a retractable door, it looks spectacular, does not take up much space, but making it at home is problematic. You will need accessories that you definitely won’t be able to make yourself.
Swing doors are easy to make, this is the best option for a homemade cabin. Of course, when designing a shower with a swing door, it is necessary to take into account the radius of its opening. The material can be used almost any sheet, but it is better to stop at one of the following options:
- silicate glass;
- plexiglass;
- acrylic glass;
- polycarbonate.
The glass door is practical and looks beautiful, but it will have to be bought ready-made.
You definitely won’t be able to do it yourself, you need special glass for it, a simple window glass is too fragile, which can cause an accident. It is easier to work with its acrylic substitute, polycarbonate or plexiglass (plexiglass). Each of these materials is characterized by ease of processing, sufficient strength and durability.
Acrylic glass is completely transparent, has a small mass, it is easy to work with, it is enough to heat the sheet to a temperature of 120 degrees, and it can be bent by hand, of course, to get an accurate bend, you will need special equipment and skills to work with the material.
When choosing the material for the door, you should also pay attention to the price. Acrylic glass is expensive, its cost is comparable to silicate glass, and often more expensive. Therefore, if absolute transparency is not required, it is worth paying attention to other similar materials.
Advice! Polycarbonate is great for home showers. Monolithic and cellular varieties of it go on sale.
From the buyer's point of view, the only significant difference is the level of transparency. Monolithic is relatively transparent, while only blurry contours are visible through the honeycomb, which is even more preferable for the shower. The translucency of cellular polycarbonate is due to internal voids - "honeycombs". They also caused the need to protect the ends from moisture.
With or without pallet
Another question that will have to be answered when designing a homemade booth is whether it will be on a pallet. In essence, the pallet is the floor of the booth. Of course, the floor is needed in any case, but it can be a steel or acrylic bath, which is purchased separately, or be formed from a screed during the manufacture of the booth.
The use of a pallet allows you to significantly simplify your work, such a cabin is easy to repair and maintain. But a cabin without a pallet is not limited by its shape and dimensions.
It is easy to create a tile shower enclosure with a drain in the floor, which will be installed flush with the general level of the floor. It will perfectly fit into a modern interior, especially emphasized by transparent walls. At the same time, one must be aware of the complexity of creating a cast floor and the difficulties that will certainly arise in the event of dismantling or repairing the drain.
Stages of making a homemade cabin
After analyzing all of the above, we can safely say that a shower stall on a pallet with a partition made of plasterboard, sheathed with tiles, with a plexiglass swing door is best suited for making on your own. This is a fairly simple option, however, to begin with, it is worth sketching a drawing indicating the main dimensions. A simple sketch will make it easier to work and help avoid mistakes.
Pallet
You need to start work on the manufacture of the cabin from the bottom, namely from the pallet. As already mentioned, it is easier to use a purchased part, but you can create a base from scratch. Using a ready-made base will help to significantly reduce the amount of work performed, both construction and plumbing.
Pallets come on sale, differing in shape, material and price, acrylic on legs seems to be the best. It is easy to install, it is undemanding to the quality of the floor, you do not need to mess with concrete, build in a ladder to drain water, it is enough to fix the siphon on the drain hole and lay pipelines.
If you decide to do everything manually, you need to start by protecting the room from moisture. Depending on the floor material, roll waterproofing or mastic is used. The treated surface must be completely protected from water penetration, this applies not only to the floor, but also to the lower part of the walls.
Pouring concrete. The surface should have a slope towards the drain of the order of 2-3 cm per meter. If the layer thickness exceeds 50 mm, then it is imperative to use a reinforcing corner or profile, otherwise the screed will simply crack. Of course, before pouring, you need to lay drainage pipes and fix the drain.
Drainage
Since the flow of water from a homemade shower stall is in a hard-to-reach place, and in the case of a monolithic pallet it is completely filled with concrete, high requirements are placed on its organization. Pipe connections must be reliable, while trying to collect the drain with a minimum of bends. This is especially true for pipes embedded in the floor. Joints can become a place for the formation of blockages that are difficult to deal with.
A purchased pallet makes it easy to organize access to a drain, cleaning and replacing parts if necessary, but even in this case it is important to create a system with a minimum of joints and without sharp turns. When using a flexible corrugated pipeline, care must be taken that it does not bend or wrap.
Walls
To simplify the task, the booth is placed in the corner. This solution allows you to save yourself from the need to select material for partitions, it is enough to protect the walls from moisture and veneer. A door will be used as the front wall, therefore, only one partition needs to be made.
There are two options for constructing a shower partition: you can put a blank wall to the entire height of the booth or combine an opaque material with a transparent one. The opaque part is easiest to make from drywall. First of all, a three-dimensional frame is created from a metal profile. It is sheathed with a waterproof sheet. The surface is puttied.
If brick or cinder blocks remain after a recent repair, the partition can also be made from this material. Of course, in order for the wall to turn out to be even and of high quality, you will have to try. The finished wall is tiled, beautiful masonry can be left as is, especially if it fits into the overall design of the room.
Tiling
Due to the relative ease of work, the abundance of colors and textures, tile is the best material for finishing a homemade shower cabin. Colors can be chosen for any interior, to realize the most daring design idea.
Tiles are glued to the walls using special compounds; it is preferable to use a sealant for fixing to drywall. Working with it does not require special skills, the coating will gain maximum strength in just a few hours.
Water connection
A shower looks much more aesthetically pleasing, the supply pipes of which are hidden in the wall.
In a room sheathed with drywall or panels, this is not difficult to do; if the wall is brick or concrete, you will have to hollow out the channel. In the niche in which the pipes are laid, mineral wool or other insulation is laid, this will avoid heat loss and condensation. For the same reason, it is recommended to use modern plastic pipes, besides, they are easier to connect, and welding equipment is not required.
The pipes are inserted into the booth, cut off, leaving 10-15 mm ends for installing the mixer. The conclusions are closed with regular cones, the surface of the wall is puttied.
Door installation
Doors are easy to buy ready-made, but if the task is to do the maximum work with your own hands, they can be made from polycarbonate sheet. When using its honeycomb variety, it is important not to forget to close the honeycomb with a decorative profile, for example, stainless steel. To give greater strength to the door, the profile can be glued to the remaining edges of the sheet.
Loops are required to fasten the canvas. The industry offers a wide range of models of such fittings, you can buy simple and functional devices or truly unique products. In any case, the loops must be fixed. They will hold the door in the closed position, so there is no need to install additional latches.
There are angled and straight hinges. This must be taken into account when buying, it will also be useful to make sure that they can handle the load, if thick polycarbonate is used, it is necessary to choose reinforced models.
A good shower stall is expensive. Significantly save money is easy, you just need to make it yourself. This is economy, originality and practicality. To make it work, you should not take on too complex projects, but this is not the main thing.
The main thing is to soberly assess your strengths, because the manufacture of a shower stall is not so much construction as plumbing. This is a responsible job, and in case of poor quality performance, instead of comfort, you can get only a lot of problems.
The rapid rhythm of our life has made the shower the most popular water procedure. Every day, basking in a warm bath is an unaffordable luxury. Invigorating "rain" in the morning and warm relaxing streams before going to bed have become familiar to millions of Russians.
The abundance of showers and hydromassage boxes does not satisfy home craftsmen who seek to realize their creative potential. The field for independent search here is very large. Looking at the range of sanitary ware offered, you notice that only brands and designs change, and the dimensions of most shower cabins remain quite modest. But you can't say the same about prices. They are very solid, if we take into account the amount of material and labor costs.
Considering the fact that a shower cabin for a summer residence is not a very complicated structure, there is a desire to make it with your own hands. Variants of implemented designs, the possibility of combining different materials and important nuances of installation, we will consider in this article.
Examples of homemade showers
Nothing stimulates folk creativity like a good example. Therefore, we will consider the most interesting options for do-it-yourself shower cabins and briefly describe the nuances of their manufacture.
Before starting work, the home master must make the following choice:
- Use the factory shower tray, and make the walls and ceiling of the cabin yourself.
- Build a shower tray with your own hands, and buy ready-made walls and a door.
- Assemble the entire structure from start to finish according to your own project.
Buying a ready-made pallet will save you from the work of waterproofing the floor, but will limit you in choosing the dimensions of the cabin.
By building a pallet yourself from brick, concrete or drywall, you will save money, and by purchasing a ready-made fence and doors, simplify assembly. Unfortunately, the dimensions of the structure in this case will also be limited by the factory standard.

In the third case, you will get what you want. A homemade shower cabin will become not only a place for washing, but also a comfortable corner for relaxation.

The first thing that comes to mind when thinking about finishing this design is ceramic tiles and mosaics. These materials are not difficult to install, durable and fit perfectly into the interior. The basis for tiled cladding can be brick, moisture-resistant drywall, and on the floor - cement screed.

Photos No. 4 and No. 5 show that a shower cabin in a private house can be placed anywhere. Even in the kitchen there was a place for her in the gap between the stove and the main wall. This design does not have a finished steel pallet. It was replaced by ceramic tiles laid out with a slope towards the gutter.
The floor level in the considered cabin is higher than the floor mark in the kitchen. This was done to accommodate the intake funnel without dismantling the main floor. To eliminate the risk of flooding due to clogging, the shower floor is separated from the room by a two-stage threshold.
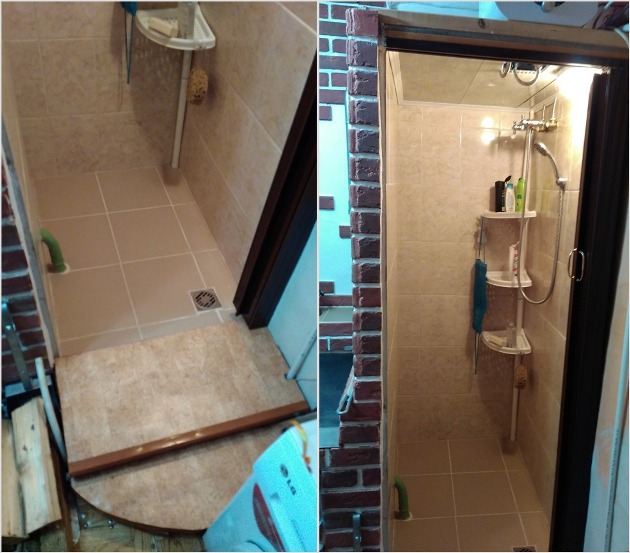
Photo No. 4 Appearance of the threshold and floor of the shower cabin

Photo No. 5 A brick partition and an accordion sliding door separate the shower cabin from the kitchen
To create this design, the author needed brick, tile and moisture-resistant drywall (as a leveling base for facing). The ceiling was covered with seamless plastic panels. The heating stove naturally fit into the overall composition, since it, together with the shower wall, was lined with decorative brick-like tiles.
Here is organized from the well with the help of a pumping station. Plus, a small water heater is connected to the water supply system. As a result, the owners of a private house got a compact and comfortable shower with hot water.
A homemade shower cabin made of glass blocks looks original. This material combines the strength of brick and the decorative properties of glass. Masonry of glass blocks is mastered quickly and allows you to create any shape, from a straight wall to a rounded spiral. In photo No. 6, we see an example of combining glass blocks with decorative tiles imitating natural stone.

Photo No. 6 Glass block is an excellent material for the shower cabin wall
The floor of this homemade structure is a concrete screed lined with porcelain stoneware. The walls, as in the first case, are finished with ceramic tiles with a decorative stone-like insert.
Not everyone likes it when, instead of a transparent screen, a shower cabin is separated from the bathroom by a film curtain. The option presented in photo No. 7 refutes this opinion.

Photo No. 7 Option to finish the shower enclosure with mosaics
Mosaic cladding, waterproof fabric, flowing in smooth folds and suspended on a chrome arc, turn an ordinary shower into a work of design art.
When thinking about what to make a shower cabin on your own, do not forget about such an interesting material as cellular polycarbonate. It is durable, moisture resistant and decorative. From it you can make translucent walls of the shower cabin and the front door.
For edging this material, an aluminum or plastic profile is used. The design of the door can be made not only rotary, but also sliding. To do this, you need to attach fittings from the wardrobe (wheels) to the bottom of the polycarbonate sheet and insert it into the guide profile.

Photo No. 8 Polycarbonate partition - a simple and reliable solution for isolating the shower from the bathroom
Since cellular polycarbonate is a fairly flexible material, the walls of the shower cabin can be given the most unusual shape (photo No. 9).

Photo No. 9 An example of a shower stall that can be made of polycarbonate
Plexiglas is another popular shower enclosure material. Compared to cellular polycarbonate, it is less durable, therefore, it needs a frame made of stainless metal (pipe or corner).
The tempered glass screen protector shown in photo No. 10 attracts attention with its elegance and lightness.

Photo No. 10 Shower cabin with acrylic plastic railing on a steel frame
The glass railing goes well with the ceramic tiles that lined the walls of the cabin and the mosaics laid on the bottom of the pallet.
Another advantageous cladding material is seamless plastic lining. It is easily and quickly connected into waterproof panels for walls and ceilings. You can attach them to any material - brick, aerated concrete, wooden crate or steel frame (photo No. 11).

Photo No. 11 Plastic lining - a practical solution for finishing the walls and ceiling of the shower cabin
The walls of the shower can be made from one material, or they can be assembled from several. In photo No. 12, we see that the combination of brick, tile and tempered glass looks aesthetically pleasing and original.

Photo No. 12 The shower cabin is built of brick at half its height. The upper part of the railing is tempered glass
A little imagination, a sheet of durable plastic and the shower cabin turns into a comfortable corner. Here you can not only wash, but also relax, sitting on a seat (photo No. 13).

Photo No. 13 Original shower cabin with a seat
The cabin frame can be made from a plasterboard profile, sheathed with moisture-resistant drywall and tiled. The advantages of this design are the low cost of materials and ease of assembly (photo No. 14).

Photo No. 14 Plasterboard metal profile - an inexpensive frame for facing with plasterboard and tiles
Tray - the basis of the shower cabin
Making your own shower tray is easy. We will consider the main stages of its manufacture.
The idea of \u200b\u200bthis design is very simple - having fenced off part of the floor with formwork or brickwork, sewer pipes, a water intake funnel and a ladder are laid on it (scheme No. 1).
The height of the enclosing wall of a home-made pallet should be such that a drain elbow fits under the lining, there is room left for pouring a concrete screed and creating a slope. Adding the dimensions of all parts of the structure, we get 20-25 cm.

Scheme No. 1 Construction of a concrete shower tray
There are two important points when it comes to installing a shower tray:
- Reliable waterproofing of the base under the screed
- Exact installation of the ladder (under the cladding)
The comfort, durability and appearance of the cabin depend on the quality of the bowl and the drainage ladder. If the drip tray and drain funnel are not airtight, then mold will appear in the shower and an unpleasant smell of stagnant water will be felt. Therefore, having put up a formwork from a board or a brick side, it is necessary to coat with waterproofing mastic not only the floor surface, but also the walls to the height of the future screed (photo No. 15 ) .

Photo No. 15 coating waterproofing of the pallet
After the mastic has dried, you can lay the sewer pipe and expose the ladder. Its mark must be calculated so that after pouring the concrete and laying the tiles, it is on the same level with the cladding (photo No. 16). The pouring of the screed must be done after the completion of the wall tiling.

Photo No. 16 Pallet with a side made of bricks and a ladder
If the tiled shower cabin is enclosed by a screen on a metal frame, then do not forget to lay fasteners for its racks in the brickwork.
After setting the concrete screed, you can start tiling the side and floor of the pallet. A slope for water flow into the ladder (1.5-2 cm per 1 meter of length) can be made during the laying of the screed. Another option is to create a drain due to a tiled solution, the thickness of which is reduced as it approaches the funnel.
A do-it-yourself shower cabin in a private house saves on a hot day, which is especially critical for hot weather in the summer in our country. Often the cost of ready-made options exceeds all acceptable limits. It is difficult to take into account all the rules when creating such a design. An amateurish approach leads to mistakes and restructuring.
The article contains information:
- what types of cabins are there, their device and materials of manufacture;
- basic approaches to waterproofing methods, summing up communications;
- how to make a cabin without the use of expensive materials or purchased parts;
- features of the selection of doors for the dimensions of the cab.
Shower cabin device
A do-it-yourself shower cabin in a private house allows you to save space and time when taking a shower. It has a large number of additional features that are not available in conventional baths - hydromassage, tropical shower.
Device cabin consists of:
- the pallet in which the drain is located;
- walls;
- doors or curtains;
- shower system - watering cans, taps and others;
- optional - ceiling, if you want to limit the drain.
The tray performs the function of a drain and a “floor” for a shower cabin - this will be discussed in detail below, in the two corresponding paragraphs.
The walls limit the space - they do not allow water to enter the rest of the room from the cabin. They are made both transparent and opaque, creating a backlight. The walls are made of different materials - glass, plastic or acrylic. Sometimes they are replaced with curtains, like a door.
 A similar design is often installed in saunas and baths.
 The shower system is diverse - it includes an ordinary hand shower, a ceiling-mounted, “tropical” shower, and various types of hydromassages. A common occurrence is a ceiling shower and a hand shower with additional points and conventional control knobs on the same panel.
The presence of a ceiling depends on the height of the ceiling in the room itself and the installation of various elements of the shower system in it. If necessary, a second, “false” ceiling is created, in which there are cranes or pipes, or the cabin is limited from above by panels.
with pallet
Shower cabins with a pallet are a classic version of the device. Sold in stores, in the form of finished products. The tray has a water drain and other equipment that increases the comfort of use, such as underfloor heating.
Do-it-yourself shower cabins with a pallet are easy to make from acrylic, plastic - any materials that are resistant to water. Creating a cabin bottom from the floor is not.

Some pallets produced by the manufacturer for self-creation of the finished structure have a serious disadvantage - incorrect calculation of the legs or savings in production lead to low stability. A plus is the ability to move the cabin in the future.
without pallet
Options without a pallet are distinguished by installation directly on the floor of the room. The space is pre-prepared - tiled and drained. Such a solution has both positive sides (greater strength and complete stability) and negative ones (the inability to move the shower cabin if necessary).
To prepare the floor, several successive processes are carried out:
- Prepare a sewer to drain water falling onto a niche.
- Make a waterproofing and place the trim over the insulation.
It is not possible to create a floor for a shower cabin on every foundation - wooden, using wood trim, will simply rot.
 Creates an effect of smoothness and elegance
 Table: the main differences between showers with and without a tray
| Characteristic | with pallet | without pallet |
|---|---|---|
| tightness | High | Low |
| Injury hazard | High | Low |
| Sustainability | Low (depending on pallet height) | Complete |
| Strength | Low | High |
| Mobility | High | Absent |
| Difficulty in creating | Low (more often bought in a store) | High |
| Price | High | Low |
Choosing a place to install a shower cabin with your own hands
The installation location depends on:
- weight of the cabin and materials of manufacture;
- ease of use;
- bringing communications to the place.
The weight of the cabin is important when choosing a location in that a large cabin acts on the foundation. If the type of foundation under the bathroom is not previously known, it is advisable to additionally check before starting the design. The floor will not collapse under the cab instantly, but the heavy structure will exert constant pressure, which will sooner or later lead to a subsidence.
 The sides act as limiters so that water does not flood everything around.
 Cabins without a pallet lead to increased dampness in the foundation. For this reason, the use of cabins without a pallet on wooden foundations or foundations with little waterproofing should be avoided. Under the constant influence of moisture, cracks and mold will occur in concrete.
Ease of use lies in the ability to freely enter the cab. It all depends on the type of doors installed - sliding doors require less space, swing doors - more. Sliding doors require a suitable distance in the walls.
When positioned relative to the place in the room, everything depends on the size and type of the cabin. With a small size of the room, a reasonable solution is the location in the corner. With a large one, you should either occupy part of the room, against the wall, saving on creating walls, or placing it in the center, creating a unique interior.
The closer the cabin is to the wall, the easier it is to create a convenient communication system in it. Communications are usually carried out in the walls and floor. If the cabin is created after the completion of the design of the room, you should calculate the connection points and make the cabin as close to them as possible. Otherwise, installing a shower cabin with your own hands is associated with the need to disassemble the finished coating and additionally conduct communications.
 The most suitable option is to build pipes into the wall
 Calculation of the dimensions of the shower cabin
The calculation is related to the minimum adequate dimensions and strength of the material used to create the walls. The minimum dimensions are 80x80 or 90x90 centimeters - it is uncomfortable to wash in a smaller room. The minimum height is 1900 mm with the installation of a rain shower and 1850 mm without it, but the indicators are already inconvenient - it is difficult to raise your hands in the cabin.
If desired, the dimensions of the cabin increase in different directions, laying the size of the shower panel or other communications. When creating a cabin with a larger width, add a distance and increase by the size of the maximum protruding element.

For an accurate calculation of indicators, count on the height and size of the people using them. Add 300–500 mm to the approximate height, so during washing there will be enough space for raising your hands. Additionally increase the distance if you plan to install a rain shower.
It is convenient to work with materials when they are immediately ready for use. When creating the walls, glass, plastic, or polycarbonate, and acrylic are used. Glass has an optimal width when bending strength and thickness are combined. The distance is taken equal to 1200mm - in this case it is convenient to make walls 1200mm wide, which eliminates the need to cut glass.
When creating a glass cabin, take the width and length with a size of 1200 mm and a height of 2000 mm as the minimum values, and choose the maximum based on the possibilities and your own desire. Cabins with a size of 120x80 are considered comfortable.
Waterproofing
Sealing is used to protect the foundation and walls from the development of mold due to high humidity. Waterproofing is necessary for all types of cabins with and without a pallet. The process is conditionally divided into two subspecies:
- cabin insulation;
- bathroom insulation.
 The surface is pre-filled with bituminous mastic
 Cabin waterproofing depends on the presence of a pallet and doors. Cabins with tight doors and a pallet are considered protected by the installation of airtight rubber bands in them. Depending on the type of door, the level of waterproofing varies - sliding doors are easier to make airtight than swing doors.
Assembling a shower cabin with your own hands involves creating insulation yourself, which imposes increased requirements on the selection of the size of the doors and their fit. It is necessary to lay the thickness of the gasket in the size of the doors. This problem does not arise with purchased doors, since assembly is simplified in them.
Insulation is not technically possible for options with curtains and without a pallet. Water will get outside of it, so you should resort to sealing the bathroom.
In this case, tightness is achieved in the entire bathroom. After hitting the floor or walls, the water evaporates, and the steam is removed into the ventilation system. This method is more reliable, but requires a number of additional preparation processes.
First of all, a complete floor screed is performed using a waterproofing substrate. To do this, the floor is released and filled with a special solution. Wait until it dries evenly.

The walls are not insulated (except for joints - they are additionally treated with a screed or putty), but they require hydrophobic materials - tiles or various polymeric plates suitable for drying water. Ordinary concrete walls absorb water and crumble over time - the bonds between cement and sand are destroyed by hydration.
All joints in tiles or panels are treated with antiseptic agents that prevent mold from developing. Otherwise, in a few years it will be more difficult to remove the fungus and bacteria - this is especially critical for a shower cabin in a wooden house or in a country house, in a bathhouse.
Communications
Communications refers to the supply of water and the disposal of sewage. In a private house, the moment should be thought out in advance, since it is necessary to bring pipes to the place of the intended location even at the stage of laying the primary communications of the building.
 We recommend using plastic pipes to prolong the service life
 Sewer connection
Do-it-yourself connection of a shower cabin to the sewer for pallet and bottomless options is carried out in different ways. Pallets are connected through a coupling of the required size using a thread or soldering. The sewer outlet is located under the cab, but adapters with a knee are used to solve the problem - they relieve the cab of unpleasant odors.

Cabins without a pallet require the preliminary creation of a drain system. The collection is carried out by means of a slight inclination towards the drain point into which water is collected. The drain is fixed in the floor and connected to the general sewer through the knee, hiding in the podium.
Water connection
Connecting a shower cabin to the water supply with your own hands is easier than connecting it to the sewer. To effectively drain water without visible pipe elements, mark the location of the shower panel or faucet in advance. The adapter for hot / cold water from the pipe is located at a distance of 100–150 mm - otherwise hot water will heat cold water.
Regarding the diameter, it all depends on the pressure of the system. Universal is the size of 27-30mm, which will provide enough pressure to use both conventional watering cans and a tropical mixer. Make the pipes the same in width and direction - so the mixing of cold and hot water will be optimal.

Connection to the water supply is carried out by adapters for the selected mixing system. To increase the tightness, either water and temperature resistant silicone sealants or plumbing thread are used.
Tools and materials
Manufacturing materials are varied. To create the walls of the cabin are used:
- glass;
- acrylic;
- plastic;
- concrete partitions;
- drywall followed by tiling.
All materials look great as walls. Concrete partitions and walls made of concrete are not quite classical in understanding, but they will help to separate the room and cabin, dividing the space. Acrylic or plastic is suitable for a cabin with a pallet due to its low weight, concrete and glass are used for palletless cabins. Additionally, polycarbonate options are popular. .
The pallet is created from dense plastic or concrete, followed by lining with a suitable finishing material. Plastic ones are already made in the desired shape, with niches for installing walls. Making a plastic pallet on your own is difficult, so you have to turn to purchased options.
 The lower part of the pallet with a supply of a sewer pipe
 Set of tools depends on the materials used. The most required are:
- gun for liquid nails or sealant;
- corner;
- meter.
All other tools are used as needed. For plastic pipes additionally needed:
- soldering iron;
- screwdriver for attaching clips to walls;
- hacksaw or knife for cutting plastic pipes.
To create a niche for a cabin made of concrete you will need the following tools:
- construction mixer (for large volumes);
- nozzle for a drill or screwdriver for kneading;
- Master OK.
When working with concrete, it must be subsequently finished. Tile work may require a tile cutter to cut the tile to size without splitting.

To work with a plastic pallet and create walls made of plastic or acrylic, you will need a screwdriver and sealant. All fastening of parts takes place on special clips - sheets can split from a different type of impact.
Glass will require a good glass cutter, and the thicker the sheet, the more difficult it is to cut it. It is advisable to pre-order glass prepared in size, since there is a risk of splitting the entire canvas during cutting or installation. When working with already finished and hardened sheets, this will not happen.
Do-it-yourself shower cabin in a private house: a step-by-step master class
We propose to consider step-by-step instructions on how to create a shower cabin with your own hands in a private house from a plasterboard frame with a tile lining. In addition, the process of how to install the simplest cabin is disassembled.
To create a cabin you will need:
- drywall;
- profiles;
- bricks to create a pallet;
- tile;
- drain;
- masonry mix or cement;
- coupler;
- liquid latex waterproofing;
- tile adhesive.
Despite the use of waterproofing, it is necessary to buy screed, glue and masonry mixture marked “Waterproof”. Otherwise, after using the shower, water will seep through the structure, destroying the strength of the joints.
Creation of a pallet
We create a pallet from bricks. Such homemade pallets are convenient for possible repairs.
 | 1. Mix the masonry mix according to package instructions. Knead with a mixer or a regular spatula. |
 | 2. Bricks are laid directly on the old tiles, so dismantling is missed. In this case, this is not critical, since in the future the extra tile will be removed and a new one will be laid. A drain is installed on the second level of bricks. Assemble it according to the instructions. The drain rests on the bricks, with the installation of a drain at an angle of 5-7 degrees - so the water drain will get rid of excess odors without using a knee. |
 | 3. After installing the drain, finish laying the bricks. Along the edges of the masonry, a side one brick high is laid out. It serves as the basis for future drywall walls. |
 | 4. A floor screed is poured onto the brickwork, which creates a flat surface. It should be poured with a layer of 3-4 mm, maintaining the level throughout the pan. The screed dries for about a day. |
 | 5. At the end, we clean the surface with sandpaper. |
Frame erection
The frame is created from metal profiles - plasterboard sheets will be attached on top. The profile is used in two types - guides and rails. The profiles are screwed onto the dowels into the walls and brickwork.
 | 6. Drill a hole with a drill or puncher. A dowel is inserted and a screw is screwed on top. |
 | 7. Place the profile on the wall, lay the slab. Under it, place pipes for supplying hot and cold water. Installation takes place after the complete assembly of the frame. |
 | 8. After installing the frame, start preparing the drywall. A solid sheet is installed on the side with the mixer. Holes for hot and cold water are pre-drilled in it. |
 | 9. Sheathe the frame with drywall. |
 | 10. Screw the sheets onto the screws. |
 | 11. For the durability of the pallet, go over the entire surface with waterproofing. In order not to make a mistake with the choice, buy waterproofing for residential and non-residential premises, with a scope in showers. |
 | 12. Treat the surface with a brush. |
tiling
 | 13. Cut the tiles into the required pieces with a tile cutter. For work, it is not necessary to buy it - just take it from friends or rent it. |
 | 14. Lay tiles from the corner. It is better to start from the floor. Install a plastic corner between each individual tile to help maintain the distance. |
 | 15. After all tiles are installed, grout the gaps. It is applied in the gap between the tiles. |
 | 16. After setting, wipe off excess grout residue. Dampen the sponge with water and quickly wipe off the excess. You need to wash it quickly - it will be problematic to remove it later. |
The shower cubicle is finished. If necessary, install a swing door or a regular curtain in it.
Video: do-it-yourself shower installation
More information on how to create and install a shower cabin with your own hands in the video below.
Mixer selection
How to choose the right mixer only the owner will answer. The choice is mediated by two important points:
- cab dimensions;
- requirements for appearance and functionality.
If the second point falls entirely on the shoulders of the owner, the first should be discussed separately. A shower cabin is a limited space where every extra centimeter is valuable. The large size of the panel or faucet can make a small cabin uncomfortable.
Regardless of size, faucets with hidden elements - pipes, the main system - are considered an excellent option to save space and improve ergonomics. Only control levers and a watering can protrude to the surface of the cabin, the rest is in the wall.
A rain shower for full use requires 100-300mm above a person's head - a smaller distance makes it uncomfortable.
Swing or sliding doors?
The choice of doors depends on the type of cabin and the location in the bathroom. In a small bathroom, sliding doors are considered more convenient, in a large one - swing doors. It should be noted that special niches and fasteners are required for the installation of sliding doors.

We offer you more a few practical tips when building a structure:
- We recommend creating a cabin design in advance, before installing the first elements of water supply and sewerage. This factor will avoid problems with eyeliner in the future.
- If there are no thoughts on the appearance of the cabin, a photo of finished products will come to the rescue - both serial and home-made. Borrowing is not allowed.
- The corner cabin, although it is the smallest in size, its independent creation is difficult. If you decide to create it yourself, you should purchase at least full-fledged doors that ensure the tightness of the structure.
- When creating a brick pallet, buy a new brick, even if the cabin is created on the street and there are no requirements for its quality. Over time, the old brick will crack, causing the pallet to collapse.
- When choosing a tile, focus on large individual slab sizes. Smaller ones require more handling experience as they are more difficult to align with each other.


