How to make a do-it-yourself railroad layout. Garden train: landscape decoration and household helper. Questionnaire for research work
The New Year is coming soon, and it's better to prepare for it in advance - including on the layout :) Therefore, I made a New Year's diorama for myself in my favorite scale - TT.
The diorama turned out to be 20*20 cm in size. The diorama is made on a self-made "box" made of plastic.
The Christmas tree is made of brass tubing with soldered wire branches. Needles - the usual HOH-ovsky tinted flock.
The height of the Christmas tree without a star is 13 cm. Christmas decorations are different beads. Rain - real rain, a little clipped. The star is cut out of a piece of plastic and sprinkled with glitter powder. On the Christmas tree there are four luminous garlands of SMD LEDs in the 0603 case, 11 in each. The garlands can blink (a primitive circuit on a transistor and a capacitor), there are two modes: normal - a simple glow, and blinking.
Snow is made from ordinary baking soda mixed with diluted PVA glue. Paving stones on the square - from Auchagen.
Icy glowing cubes - molded from plasticine and copied from CrystalLine 940 transparent resin. Blue and white LEDs are "poured" into the resin.
Figures - Preiser, self-painted. There are not enough figurines - in the TT "winter" there are few produced at all. I think that I will remake more from the "summer" figures ...
Decorative gifts under the Christmas tree - cut out of cardboard and pasted over with paper from candy wrappers.
Machine - "Moskvich" from Herpa. Snowman - made of foam balls.
In general, the process of creating the square took a month - mainly in the evenings and weekends. If only I didn't have to go to work... :)
The houses in the photo are not part of the diorama - they are simply placed for the background.
Square during the day
Tree from four sides:


And here is Ippolit Georgievich :)


Square at night
The photos were taken with different exposures.


Process photo
 Christmas tree frame. After soldering, I painted the frame green.
 Christmas tree with flock. The flock has not yet been dyed in the desired color.
Toy railroads are inherently associated with childhood. Many of us at a young age once had a plastic or iron prefabricated model railroad. And those who could boast of a foreign-made model were considered lucky.
In modern times, the hobby of toy railroads has grown into a major modeling industry. Moreover, this business is already more focused on an adult audience than on children.
Trees, houses, roads, cars, relief surroundings were added to the main attributes - a track and a locomotive with wagons. And a table with a full-fledged model of the railway, with many details and trifles, is already a real art.
Abroad, such products cost from 2 thousand dollars, but in this article I will tell you how to make a full-fledged model of a toy railway with your own hands.
Table
You will need space for the layout. Ideally, this should be a separate table, but you can get by with a small table, or just a fenced-off area on any suitable surface. It all depends on your desire and scope. I recommend starting with a small area, like part of a table, and then, if inspired, make a large layout. It is better to start small than to immediately take on a large amount of work and throw it halfway.
starter kit
The thing without which it will not be possible to make a model of the railway is the railway itself. Or rather, a set of rails, a train and a power system for it. Here, alas, there are no alternatives - it's all you need to buy. It's good that there are plenty to choose from in the market today.
sketch
To know what you are moving towards, you need to have a goal in front of your eyes. Make a rough sketch on paper - where everything should be, and what the general look of your layout will be. Surf the Internet, look at the numerous models of railways and take note of what you like - bridges, crossings, houses, stations. You can make a model of a station in the Wild West, or you can make a station in the center of a modern city. But be sure to decide before you get to work. And make markings on the table so as not to suddenly discover that the track goes beyond the boundaries of the table, or that the barrier will cling to a passing train.
Mountains
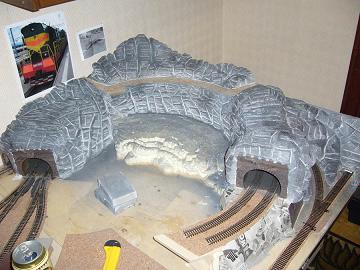
The presence of a mountain, with a tunnel through which the train will pass, will be the decoration of the layout. To create a small mountain, you will need mounting foam, plywood, a knife, alabaster and sandpaper.
First, think over and, if possible, draw a sketch of the future mountain. Then knock down a small box of plywood or other suitable material above the rails. Make sure that the size of the box will allow your train to pass freely through the tunnel. Then start applying foam around the box, with pauses of one and a half to two hours, to allow the layers to dry and not sag under their weight. After you apply the foam of the desired volume, leave it to dry for a day, no less.
In a day, pick up a knife (more convenient - a clerical one), and start picking the mountain - cut off the extra pieces, giving it the shape you intended. Cut out hollows, crevices, try to make it as natural as possible.

Then you will need alabaster. Dilute it with water, and cover the entire mountain with a thin layer up to 3 mm. It dries quickly, so dilute it in small portions. Then again wait a few hours until everything hardens - it is better not to use a hair dryer.
Now you need to paint over the mountain in gray. To do this, buy a can of primer in any auto shop, the color of a gray stone, and you can paint your mountain. Just test the paint on something else first to make sure it's the right color for you.

Next, use sandpaper and rub the mountain in places to remove layers of primer in some places. This will give the mountain a more naturalistic look, so that it is not a uniform color, but a shade from light to dark gray. You can repeat painting and sanding several times until you get something that suits you. You can also paint individual pieces of the mountain white or black for more believability.
Finally, take green paint and tint the pieces of the mountain also in the color of greenery - this way it will be even more naturalistic. Only the paint should be a believable, "mossy" color.

Your mountain (or slide) is ready. Congratulations, you've already done a lot of work. Next in line are the rest of the relief details.
Here everything depends on your imagination, the size of the free space and the suitable details that you have. Fill in the unoccupied tabletop with, for example, fake turf that is sold in stores. Toy houses, figures of people, transport, railway crossing, train station, bridge, trees - these are all the details that will decorate your layout. Many of them can be found in Lego bricks, or just individually in toy stores. Train modeling firms also sell great kits, but be prepared to spend a lot of money if you do.
You can make a layout on a large table, with lots of details, terrain, electric movement and a real miniature town. But you can also make a small model - a battery train, with a small piece of landscape and a few decorative elements.
Whatever option you choose, the model you made will be an adornment of any home and will be of interest to any company - both children and adults.
Modeling is a very interesting activity.
Since childhood, I have always dreamed of making a mock-up of the railway, in reality, I only made a few spans of experimental tracks. Unfortunately, during my work, I encountered many problems and scarce details, in this article I want to discuss with you the most common questions when creating a model of a railway track and transport.
In the second issue of ModelMen magazine, I published an article and some photos from the website of an experienced modeller who builds models of railways and participates in exhibitions with his creations. Even looking at the photos of the layout, you can already determine the amount of work for yourself, make a list of tools and materials. I will not immediately give the entire list of what is necessary because it may not be complete, let's better analyze together what is made of what.
Base
The layout of the railroad track must stand on something, so at the very beginning it is necessary to construct a base (table) for the layout. The base can be solid and collapsible. It is easier to make a solid base, but then you need to decide in advance on the room for the layout, it should be a spacious room in case of expansion.
For the base you will need legs; you can take them from old school desks or make them yourself. The whole structure can be easily made from plywood and wooden blocks. For fasteners you will need screws, metal corners. To make a collapsible layout, you will have to rack your brains over the base device and how to transport it.
Tool
To work, you will need many different tools:
Hammer
- screwdrivers
- nippers and pliers
- chisels
- files
- spatulas
- scissors
- knives
- brushes
- soldering iron
- and etc.
railroad tracks
In order for the trains to move in the right direction, we need rails, they can be purchased ready-made in specialized shops for modellers. If you, like me, do not have such stores in your city, then you can buy them through online stores or go for them yourself. In extreme cases, the rails will have to do it yourself.
The easiest construction option is to use rails, they are glued or nailed to the base with small nails, the joints can be soldered and cleaned with a file.
If there are no ready-made rails, then you need to think about how to make them yourself, you can take the dimensions of the rails that are sold in stores and make your own. For sleepers, you will need to cut a lot of thin bars, this can be done on a small machine. The rail itself must conduct current, so it is advisable to make it from thick copper wire, which can be rolled on a manual machine to a rectangular section. You can attach the rail to the sleepers with a good glue or solder it to the nails driven into the sleepers, this can be done after 3-4 sleepers.
electrical equipment
For the movement of the train, an electric current is required, unless of course you are making a steam locomotive. Factory and home-made power supplies are used as a power source (see diagrams, radio engineering), the output voltage should not be dangerous, they usually use power supplies up to 16 volts, for small models 6-9 volts are enough.
The train moves with the help of an electric motor, it can be taken from broken toys or purchased at a radio store. Electricity is supplied to the engine from two rails, voltage is removed from them using two or more counters or from the metal wheels of the train itself.
To distribute electricity along the layout (base), you will need copper wires and connectors.
In addition to the trains themselves, the layout may contain traffic lights, barriers, lights and other elements that need electricity. Before wiring, carefully consider every detail, after installation it will be too late to wire, you will have to change the layout.
Landscape
An integral part of a good layout is the design of the landscape, this should be given special attention. For similarity with reality, you need to work hard on simulating hills, vegetation, buildings, men, vehicles, etc.
Many parts can be used in finished form, i.e. take toy cars, figures of people, also in children's stores you can buy figures of animals, trees ...
To imitate hills, mountains, etc., you will need plywood, building plaster, papier-mâché, fiberglass, acrylic paints and other finishing materials.
Building
Models of buildings can also be purchased at toy stores or you can make them yourself from wood, cardboard, papier-mâché, plywood, etc.
Modelers often take real train stations as a model, photograph them and turn them into miniatures on the table.
On the site, I will periodically publish my developments and those sent by you, you are probably interested in information on how to make a train model, traffic lights, trees, bridges and other elements for the railway. I will also publish electrical diagrams, photographs and drawings of old and new trains.
|
How to make a do-it-yourself railroad layout . Toy railroads are inherently associated with childhood. Many of us at a young age once had a plastic or iron prefabricated model railroad. And those who could boast of a foreign-made model were considered lucky. In modern times, the hobby of toy railroads has grown into a major modeling industry. Trees, houses, roads, cars, relief surroundings were added to the main attributes - a track and a locomotive with trailers. And a table with a full-fledged model of the railway, with many details and trifles, is already a real art. Abroad, such products cost from 2 thousand dollars, but in this article we will tell you how to make a full-fledged model of a toy railway with your own hands. |
Table
.
You will need space for the layout. Ideally, this should be a separate table, but you can get by with a small table, or just a fenced-off area on any suitable surface. It all depends on your desire and scope. I recommend starting with a small area, like part of a table, and then, if inspired, make a large layout. It is better to start small than to immediately take on a large amount of work and throw it halfway.
starter kit
.
The thing without which it will not be possible to make a model of the railway is the railway itself. Or rather -, and for him, or just ready-made models of railways.
.
sketch
.
To know what you are moving towards, you need to have a goal in front of your eyes. Make a rough sketch on paper - where everything should be, and what the general look of your layout will be. Surf the Internet, look at the numerous models of railways and take note of what you like -,. You can make a model of a station in the Wild West, or you can make a station in the center of a modern city. But be sure to decide before you get to work. And make markings on the table so as not to suddenly discover that the track goes beyond the boundaries of the table, or that it will cling to a passing train.
.
Mountains
.
Through which the train will pass, will be the decoration of the layout. To create a small mountain, you will need mounting foam, plywood, a knife, alabaster and sandpaper.
First, think over and, if possible, draw a sketch of the future mountain. Then knock down a small box of plywood or other suitable material above the rails. Make sure that the size of the box will allow your train to pass freely through the tunnel. Then start applying foam around the box, with pauses of one and a half to two hours, to allow the layers to dry and not sag under their weight. After you apply the foam of the desired volume, leave it to dry for a day, no less.

In a day, pick up a knife (more convenient - a clerical one), and start picking the mountain - cut off the extra pieces, giving it the shape you intended. Cut out hollows, crevices, try to make it as natural as possible.
Then you will need alabaster. Dilute it with water, and cover the entire mountain with a thin layer up to 3 mm. It dries quickly, so dilute it in small portions. Then again wait a few hours until everything hardens - it is better not to use a hair dryer.
Now you need to paint over the mountain in gray. To do this, buy a can of primer in any auto shop, the color of a gray stone, and you can paint your mountain. Just test the paint on something else first to make sure it's the right color for you.
Next, use sandpaper and rub the mountain in places to remove layers of primer in some places. This will give the mountain a more naturalistic look, so that it is not a uniform color, but a shade from light to dark gray. You can repeat painting and sanding several times until you get something that suits you. You can also paint individual pieces of the mountain white or black for more believability.
Finally, take green paint and tint the pieces of the mountain also in the color of greenery - this way it will be even more naturalistic. Only the paint should be a believable, "mossy" color.
Your mountain (or slide) is ready. Congratulations, you've already done a lot of work. Next in line are the rest of the relief details.
Here everything depends on your imagination, the size of the free space and the suitable details that you have. Fill in the unoccupied surface of the table - for example, with a dummy, which is sold in stores.
If you and your child are thinking of making a toy with your own hands, then try building your own railroad. Children love toys with lots of details. A railway assembled with an adult can become a favorite toy. For manufacturing, you will need very few items that can be found in any home. And in the end you will get a unique and bright thing that will delight your child and remind you of the time spent with you. If you don't know how to make a railroad yourself, but want to try, then it's time to learn.
Tools and materials
- Thick cardboard sheets
- Ruler
- simple pencil
- Paper scissors
- Stationery knife
- PVA glue
- Acrylic paints
Step-by-step instruction
There are several ways to make a toy railroad, but it's best to start with the simplest.
- Determine the approximate size of the future railway. The length of the rails will depend on it. The rails need to be cut out of thick cardboard. You can use boxes from shoes, furniture or appliances. Lay a sheet of cardboard on the floor and draw stripes of the chosen length on it. For sure, your railway will have bends, so you will need not only straight lines, but also curved strips for turns. Thus, you can make a ring road, which is much more interesting to play with.
- Paint future rails with gray paint, as it is most similar to metal. Choose acrylic paints as they won't wash off the surface of the paper.
- Prepare your sleepers. To do this, cut a sufficient number of small strips of cardboard. At both ends of the sleepers, you need to mark the points where the rails will be superimposed. Sleepers are best covered with brown or red paint, as they are made of wood.
- Lay out the painted blanks of rails in the correct order and turn them upside down. On this side, you need to glue the prepared sleepers at the same distance from each other.
- Now it's time to move on to making the train. For wagons and a locomotive, it is most convenient to use small cardboard boxes from juice or milk. If there are no such boxes, then you can glue them from pieces of cardboard yourself. For the locomotive, you will need two boxes that need to be glued together so that one box is vertical and the other horizontal.
- The locomotive and wagons are usually painted the same color, but you can use any color and pattern you like. After the paint dries, don't forget to paint the windows.
- Painted wheels must be glued to the wagons, and the wagons themselves must be interconnected with strips of cardboard. The train is now ready to be placed on the railroad.
- To make the toy even more interesting, make a station or several stations out of a cardboard box. They can be realistically painted with paints. From the remnants of cardboard, you can cut out the silhouettes of people, trees, houses, roadside poles and paint them with felt-tip pens and paints.
How to assign roles
Now you know how to make a railroad with your child. Let him actively participate in the process. The child can be entrusted with coloring the parts and gluing the parts of the railway together. And it is better to do all operations with scissors and a clerical knife yourself so that the child does not cut himself. If you want to trust your child to cut out some of the details, then give him scissors with rounded ends, designed for small children.


