Plasterboard ceiling design with backlight. How to make a two-level plasterboard ceiling with lighting? Frame assembly options
Among all plasterboard ceilings, backlit multi-level structures are the most popular. Illuminated plasterboard ceiling allows you to zone the room, perform successful lighting of individual zones and the room as a whole. The installation of the entire structure is quite painstaking and complicated, but if you follow the installation technology exactly, then you can do all the work yourself. It is important to choose suitable materials, taking into account the purpose of the room and the lighting sources for the backlight device.
Scope of two-level ceilings from plasterboard
A two-level plasterboard construction with lighting can be done in any room. It is important that the dimensions of the room allow for the installation of a multi-tiered ceiling, because the height will decrease significantly.

Typically, such ceiling systems are used in the following residential premises:
- If the dimensions of the children's room allow, the illuminated ceiling will create coziness and soft lighting of the sleeping and play area.
- Plasterboard ceilings with lighting in the living room- a frequently used design option for the ceiling surface. The classic technique is a frame ceiling with a box and lighting around the perimeter of the room.
- A bathroom with impressive dimensions is also no exception for installing such a design. The main condition is that the height of the room should be at least three meters.
- Multi-level plasterboard ceiling with lighting in the bedroom usually done with lowering and backlighting in the area of \u200b\u200bthe bed. Recessed lighting allows you to achieve soft diffused light that is appropriate in this room.
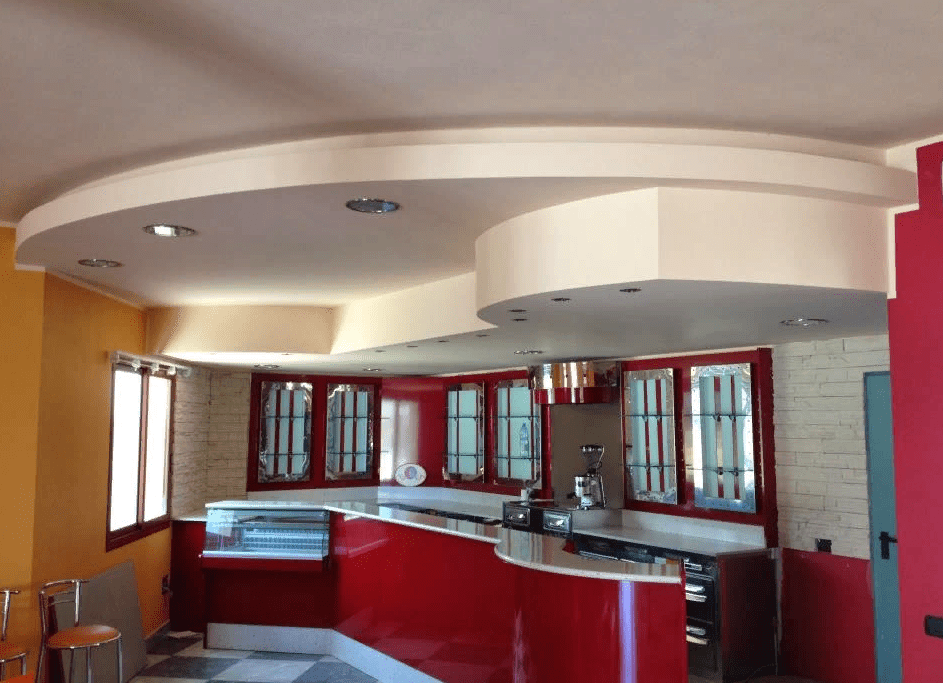
- In the kitchen-dining room a two-level ceiling allows you to perform functional zoning of the room and additionally illuminate the work area.
The price for installing a multi-level structure starts at $ 10 per square, so it is much more profitable to make a do-it-yourself plasterboard ceiling with lighting. The dimensions and configuration of the structure are selected depending on the dimensions of the room, its zoning and lighting options.
Diagram of a two-level ceiling device without lighting
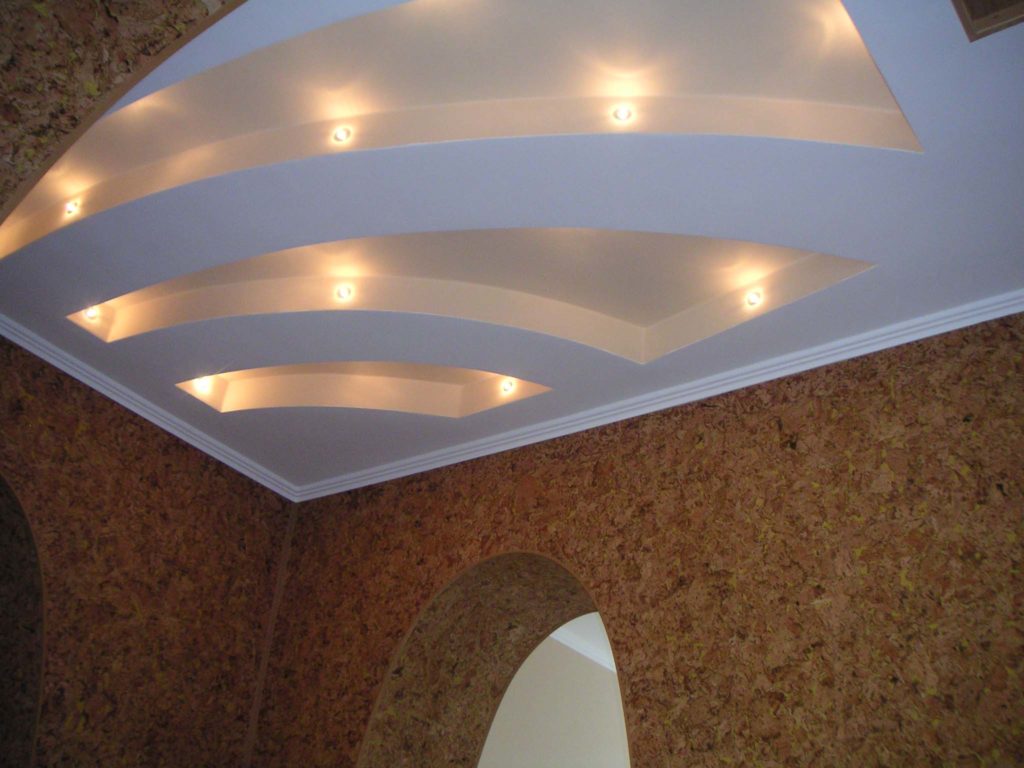
Two-level plasterboard ceilings with illumination in the photo can be immediately distinguished from ordinary multi-tiered coatings. Unlike the latest designs, backlit systems have an open shelf in the lower tier box, where an LED strip or other device for hidden lighting is placed.

Conventional two-level ceilings consist of a supporting frame sheathed with plasterboard sheets. At the same time, the first tier of the structure is an ordinary single-level ceiling made of plasterboard. A frame of the second level is constructed on its surface. After that, it is sheathed with drywall. The configuration of the lower tier is varied - rectilinear and curvilinear. The side faces of the structure are blind planes, without shelves and protrusions.
Choosing the Right Drywall
There are three main types of gypsum boards that are used when installing multi-level backlit systems:
- ceiling drywall;
- moisture resistant GKL;
- arched plasterboard sheets.
Ceiling plasterboard, unlike its wall variety, has a plate thickness of 9.5 mm, which reduces the weight of the material and does not weigh down the floor structure. It is used to create basic surfaces in rooms with normal humidity conditions - in bedrooms, nurseries, living rooms, offices and hallways.

Moisture-resistant drywall sheets are suitable for use in high humidity conditions, so they are used in the bathroom, bathroom, and kitchen. The material has a characteristic greenish color of cardboard and has a thickness of 12.5 mm.
Arched drywall is needed to form curved curved surfaces. But you can do without it. To do this, it is enough to walk on the sheet with a spiked roller and moisten the surface with water. After some time, the sheet bends in a given direction.
Advice! To bend the GKL, you need to make shallow cuts with equal pitch on the back of the sheet.
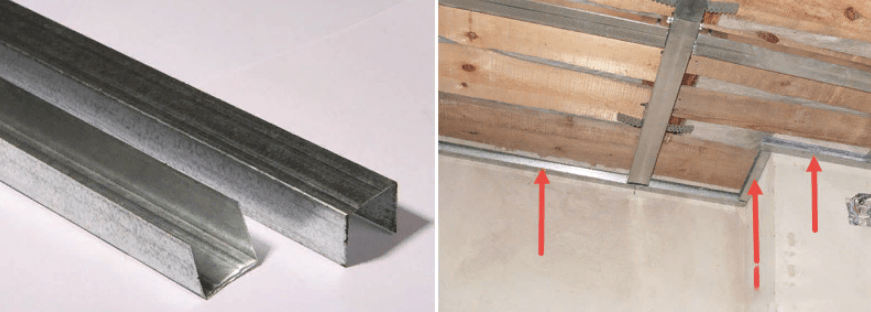
Selecting the right profiles
For the installation of the supporting frame, metal profile systems are used. There are several types of profiles. To install a two-level ceiling, you will need the following products:
- ceiling profile CD is also called rackmount, it has a cross-sectional dimensions of 27x60 mm and a length of 3-4 m, the surface of the product is profiled;
- guide rails UD have cross-sectional dimensions of 25x25 mm and a length of 3-4 m, they come with and without perforation and are mounted on the walls of the room;
- carrier rails marked UW will be needed when installing a figured two-level ceiling with built-in lighting, profile dimensions 50-100 mm x 40 mm with the same length, only the wide side of the element is profiled.
Choice of lighting fixtures

For installation in a drywall construction, the following lighting fixtures are suitable:
- Most often, an LED strip or spot LEDs are laid. These light sources are quick to install, inexpensive, give bright light, allow you to choose the color and brightness of the lighting, and save energy.
- Fiber sources also consume little electricity and allow you to create a unique design and lighting in the room. Fiber optic strands are suitable for ceilings with the effect of "starry sky". The price of such light sources is rather big.
- Another light source is glass tubes with neon inside. However, such devices make a lot of noise, they need to install a convector to adjust the light level. For the installation of neon lighting will have to pay a lot of money.
Tools and materials for work
If you decide to make a backlit plasterboard suspended ceiling, then you will need the following tools:
- square;
- building and laser level;
- pencil and tape measure;
- screwdriver and a set of screwdrivers;
- drill;
- kapron thread;
- perforator;
- stationery knife;
- chamfer planer;
- rollers;
- spatulas;
- metal scissors.

In addition, you will have to purchase the following materials:
- metal profiles for the frame;
- suspensions;
- connectors;
- self-tapping screws and dowels;
- sickle;
- ceiling drywall;
- corrugation, wires and switches;
- lighting devices;
- primer and putty;
- paint or wallpaper for finishing;
- glue for plasterboard.
Step by step installation instructions
Installation of a two-level plasterboard ceiling with lighting begins with the preparation of the base ceiling surface and its marking. After that, the first tier of the structure is mounted, engineering networks are laid and the second tier is being built.
Ceiling preparation
One of the advantages of plasterboard ceilings is that there is no need to prepare the base. If the old finish is firmly attached to the base, then it will not have to be dismantled. Peeled wallpaper, tiles or plaster are removed. If there are areas with mold, they are treated with antiseptic compounds.
Surface marking
Before marking, we find the lowest corner in the room. From it we measure a distance equal to the height of the lowering of the entire ceiling. The resulting mark is transferred to other corners in the room using a laser level. We connect all marks in the corners of the room with lines on the walls.

Then, on the base ceiling surface, we draw a line of difference between the tiers and mark the installation sites for the ceiling profiles. Usually they are mounted in increments of 40-60 cm. Be sure to mark the places where the ceiling lights are attached. Dots mark the places of fixation of the suspensions. We draw circles with a homemade compass from a cord and a pencil. To do this, find the center of the circle and draw a semicircle or circle. To get a curved line, we match several circles of different diameters.
First level installation
The assembly sequence of the first level frame is as follows:
- According to the markings on the walls, we fix the guide profile. To do this, we use a puncher, screws and dowels. Fastener installation step - 50 cm.
- Further, according to the markings on the ceiling surface, we fix the suspensions with a step of 500 mm.
- We cut the ceiling profiles to the desired length and insert their ends into the grooves of the guides on the walls. We fix the central part of the ceiling profiles on suspensions.
- We stretch the cord between the guide profiles and, by adjusting the ends of the suspensions, we align the entire structure in one plane.
Wiring
We lay cables in a protective corrugation along the base ceiling. The latter is needed to isolate the wires from contact with the metal frame in order to eliminate the risk of a short circuit and fire. At the installation site of the lighting fixture, the wiring is led out of the ceiling structure by 150 mm. The wiring is connected at one end to the switch, and at the other end to the electrical box or LED strip power supply.
Second level installation
The frame of the second level is mounted on the bearing base of the first tier. The assembly sequence is the same. Since the lower level is curly, the profiles will have to be bent. To do this, you can use special arched products or simply cut the shelves of the ceiling profile with an equal pitch and bend it. The pitch of the cuts depends on the radius of the bend, the larger it is, the thicker the cuts are made.

Between the upper and lower guides of this level we mount racks from ceiling rails. We fasten them with self-tapping screws to the UD-rails. The pitch of the posts also depends on the curvature of the surface, but cannot be less than 600 mm.
At the lower level, a box is made for laying the backlight. To do this, the horizontal ceiling elements of this tier are released beyond the edge of the lower rail by 100-150 mm. The ends of the shelves are closed with trim strips.
Fixing drywall sheets
After assembling the frame, proceed to the installation of the GKL. At the same time, the following rules are followed:
- The first product is mounted in the corner of the room in the direction perpendicular to the supporting profiles.
- The joint of all plates should fall in the middle of the frame rail.
- If we cut the sheet, then be sure to make a chamfer along the edge. For this we use a planer. The chamfer is needed for the subsequent reinforcement of the seam and its puttying.
- First, we sew the lower level and its side face. Then we carry out the installation of the GKL on the upper tier.
- All fasteners are sunk into the material by 1 mm.
After completing the sheathing, we putty the seams. To do this, we apply one layer of putty, lay and press the reinforcing tape, then apply a second layer of putty composition. After the mixture has dried, we grind the seams with sandpaper. We cover the ceiling with a primer and after it dries, we apply the selected finishing option.
Due to the comfort provided by the perimeter-illuminated plasterboard ceiling, this type of product is very popular among consumers.
Finished construction from GKLNote! Even one unusual detail changes the perception of the interior, so a two-level do-it-yourself illuminated plasterboard ceiling, made according to an individual project, transforms the room, making it comfortable, elegant and cozy.
The classic white ceiling with beautiful LED lighting in the form of built-in compact fixtures makes up 90% of all installed two-level structures.
It is worth considering that not everyone can do such experiments with a tension and suspension system. However, with due patience and effort, you will cope with the arrangement of a stretch ceiling, and learn how to do real miracles with the help of LED backlighting, which can be white or colored.
Attention! The white light of the LED backlight has a beneficial effect on human vision, because it does not tire the eyes. In addition, with the help of it they focus on certain elements of the interior in the room, creating a textured and original design.
If you want to install a two-level ceiling with LED lighting yourself, this will allow you to get three advantages at once.
Advantages of self-installation:
- If you are renovating an apartment in an old house, two-level ceilings will hide all the irregularities and imperfections of the ceiling tiles.
- Thanks to LED lighting, the room acquires an unusual appearance, and also with the help of lighting, the space of the room is divided into different zones.
- If you make a ceiling without involving builders-finishers, you can cut costs by 30%.
Conventionally, installation work is divided into three stages (frame installation, electrical wiring, plasterboard lining). But first, you should determine for yourself a list of the necessary tools and stock up on them before starting work.
 Sectional structure in the diagram
 Required tools:
- two building levels (one laser type, the other normal);
- perforator with impact action;
- measuring tape;
- pencil;
- tracer and hammer;
- scissors for metal;
- hacksaws;
- square;
- screwdriver;
- plane.
In addition, buy drywall sheets and fasteners for fixing in advance. It is recommended to buy material with a margin of 10%.
Preparation and installation of the frame base
The first layer of sheet material is fixed to the ceiling surface and the upper area of the walls. Using a level (preferably a laser one), mark the location of the future frame base.
After that, the desired ceiling height is selected - the distance between the two ceiling levels. On average, this figure is 20 cm. After all, in bunk structures you need a sufficient amount of internal space to install lighting. Otherwise, if you need to replace lamps or repair the lighting system, the lack of space will cause serious inconvenience.
 Frame formation
 Note! There is no need to remove traces of old plaster from the ceiling and walls. This procedure is done only if there are serious flaws on the surface and a thorough leveling is required.
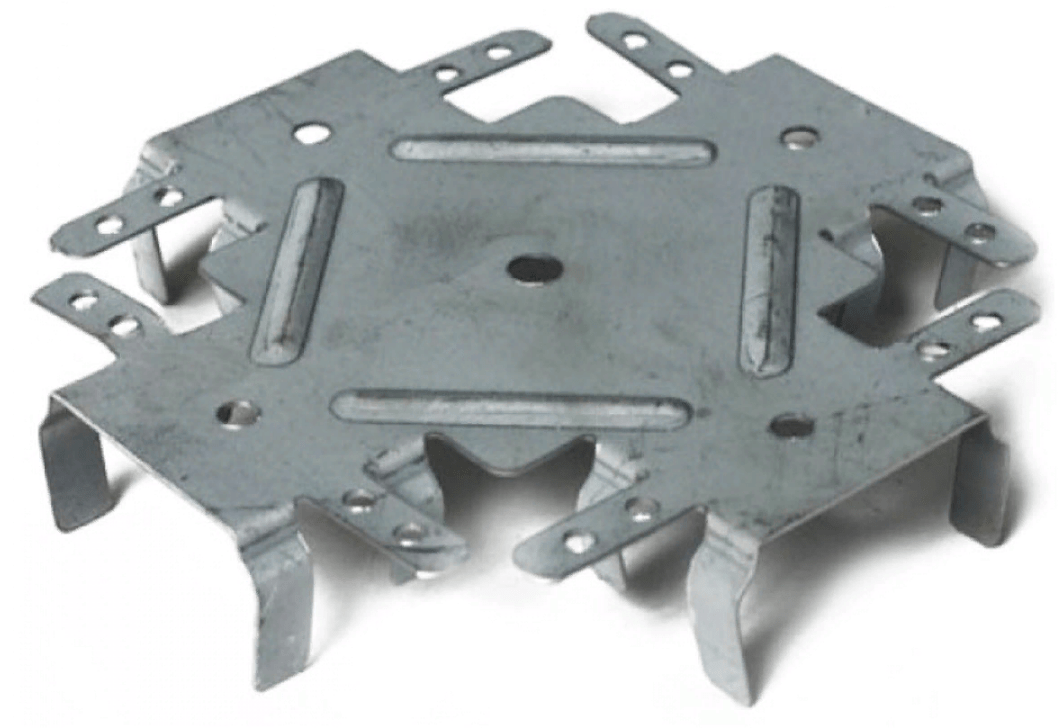
The supporting structure for the ceiling with two tiers will be a special frame base, which is made of galvanized steel.
Elements for the manufacture of the frame:
- guide type profile (27.5 or 30 cm);
- set of anchors with screws (6/50);
- ceiling profile (27.5 or 30 cm);
- direct suspensions;
- self-tapping screws (3.5x11 mm or 4.2x16 mm).
Scissors cut profiles, which are subsequently installed in the appropriate marking places. The profiles are fixed with dowels, which are driven with a hammer into holes prepared in advance by a perforator. At the end, each dowel is screwed with a screwdriver.
The ceiling profile is cut into pieces, the length of which is 5 cm shorter than the expected ceiling height. The ends are bent so that they do not interfere during the installation process. Pieces of the ceiling are attached to both ends of the guide profile.
Next, a piece of the same length as the upper element is cut off from the lower guide profile. After that, this part is unfolded with the back side, special grooves are cut on it, and the lower profile is screwed to the bottom of the ceiling at the ends.
After that, the remaining segments of the ceiling parts are installed. This sequence of actions allows you to quickly assemble the frame.
Installation of electrical components
After creating the base of the frame, mark out those places on it where the lamps will be located. Then profiles are installed that are designed to fix the drywall material. They are cut so that the length of half a centimeter does not reach the width of the frame base. The sharp ends are bent, and the profiles themselves are attached to the frame in such a way that the placement of the fixtures does not overlap. They should not be too close to these zones.
 Lead out
 Places for mounting hangers designed to hold profile segments are outlined.
Note! The suspension is able to withstand weight up to 40 kg. Based on this, the required number of suspensions in each section is calculated. Between these elements maintain a distance of up to 1 meter.
After fixing the suspensions, the installation of all profiles is completed. For this, self-tapping screws are used.
If the lighting system does not require the installation of additional equipment, all relevant wiring components can be located inside the structure. Lamps at this stage do not need to be installed.
The cable is led out to the mounting box or to sockets, where the entire system will be connected. To secure further operation, it is recommended to place the wires in cable channels. It is advisable not to place them near the metal parts of the frame base.
Also read how to make step by step instructions and choice of materials.
Sheathing of the frame base
Drywall cutting is in progress. If you wish to equip the outer sides for hidden lighting, the material is cut with allowances of 8-12 cm. Their ends are sanded and chamfered.
Note! The chamfer is removed at an angle of twenty-two degrees. It should take up 2/3 of the page.
These segments are fastened with self-tapping screws to the profiles through sheets of plasterboard material with a minimum step of 15 cm.
The video review below demonstrates the process of installing the frame base and fixing drywall material on it.
After the sheets are installed, close the seams. For this, a putty solution is prepared and the joints that have formed between the sheets are carefully filled with it.
After that, a paper tape is laid on top, which is covered with a layer of putty. After drying, grind the surface and apply a primer layer. The procedure for sealing seams is carried out at least twice. Grinding and priming, which are performed after each layer, are done only after the composition dries.
Photo gallery
Examples of two-level ceilings with lighting:
 Ceiling structure in the form of a star
  Standard design option
  Rectangular ceiling system
  Rectangle with chamfered corners
  oval fantasy
  Classic shapes and elegance
  Square in the middle of the ceiling
  Smooth lines with neon illumination
  Part of the ceiling decorated with a two-level design
  The border of levels is underlined by neon illumination
  Smooth lines in the design are difficult to implement
  Round elements
  Oval shape ceiling system
  Rectangular motifs
  Another decorating idea
  Blue backlight will emphasize the border between levels
  The border of the levels is highlighted due to the correctly selected backlight
  Simple and tasteful
  Delicate, graceful, winning
  All the same rectangle, but in a different design
 When choosing a ceiling design, everyone wants it to be beautiful, original and functional at the same time. These qualities are combined by a two-level plasterboard ceiling with lighting, which looks unusual, divides the space into zones, hides defects in the base base, wiring and communications under the draft ceiling.
Photo of a two-level ceiling from GKL
Types of ceiling
If the base ceilings are even, and you only need to zone the space in the room or hide the wiring, then a single-tier plasterboard box is mounted in the center of the ceiling surface or along the perimeter of the ceiling.
 Two-level plasterboard ceiling before finishing
 With an uneven base base, two-level plasterboard structures are used. In this case, the first tier is installed on the entire surface of the ceiling, and the second tier is attached to it. Or, a decorative box is first mounted, and guide profiles are already fixed to it for arranging the main ceiling structure.
Depending on the location of the fixtures, a two-level plasterboard ceiling with lighting can be:
- with open illumination, when devices are built into the structure in pre-made holes, attached to the ceiling base on suspensions;
- with hidden lighting, when the lamps are placed in specially equipped niches located between the tiers of the decorative structure. In this case, the light emitted by the appliances is reflected from the surface of the ceiling, creating a comfortable and cozy atmosphere in the room.
 Ceiling lighting options
 Despite the impressive effect produced by such designs, it will not be difficult to do it yourself with backlighting. Even without the necessary skills to work with power tools, you can always use the recommendations that will help you install bunk ceilings in an apartment and install lighting.
 Making a sketch (sketch)
 To successfully implement the project, you need to draw a sketch of the future ceiling on a piece of paper. Then it will be easier not only to apply markings on the base base, but also to calculate the number of consumables and components that will be needed in the work.
Prepare the following materials and tools:
- perforator;
- drill;
- tape measure and marker;
- knife for cutting plasterboard sheets;
- upholstery cord;
- profiles;
- suspensions;
- drywall;
- lamps or other devices, depending on the chosen type of lighting;
- dowels, self-tapping screws.
For finishing the structure, you will need: a sickle mesh, a wide and narrow spatula, a primer, putty (starting and finishing), paint or other finishing materials.
Marking

The marking of the ceiling is carried out as follows:
- the lower corner in the room is determined, a mark is affixed from it at the required distance, corresponding to the lower level of the future decorative ceiling. The distance depends on the size of the lighting fixtures and the height of the structure;
- using the water level, the point is projected onto the other corners in the room so that the four marks are on the same level. The points are interconnected by a flat horizontal line, which will become the base of the second level of the ceiling from the GKL;
- then it is determined in which direction the sheets of material will be attached, and the ceiling surface is drawn across the sheets every 50 cm.
Frame installation
First level installation

The algorithm of actions will be as follows:
- first, the UD guide profiles are attached to the horizontal line outlining the perimeter on dowels-dummy with a diameter of 6 mm and self-tapping screws (4-5 mm). If there are no mounting holes on the profile, they can be done independently every 40-50 cm;
- along the lines drawn on the ceiling, the attachment points of the suspensions are marked after 50-60 cm;
- suspensions are attached to the base surface on the same dowels and self-tapping screws as the guides;
- further to the suspensions and the UD-profile, the CD ceiling profiles are fixed to the self-tapping screws. For joining profiles, self-tapping screws are also used. To prevent sagging of the ceiling profile, each CD-bar is pulled up with medium suspensions, the “ears” of which are folded under the profiles;
- the evenness of the structure is checked with a stretched nylon thread. Fix the thread on self-tapping screws on UD profiles. Adjust the height of the frame of the first level with suspensions.
After the installation of the frame structure for the first tier is ready, it is sheathed with drywall. The sheets are attached to the profiles with a screwdriver on metal screws 2.5 cm long every 30-40 cm. The consumption of self-tapping screws per standard sheet will be about 60 pcs. The head of each screw is "recessed" into the sheet by 2-3 mm.
 Decorative box of irregular shape
 First, the contours of the box are drawn, to which the backlight will be attached, on the first tier. Next, cuts are made on the side walls of the guide profile every 5-10 cm for ease of bending. The profile is screwed to the first tier sheathed with GKL along the outlined line through drywall.
The UD profile, which was used to install the first level frame, is attached to the wall with self-tapping screws, and the CD profile is between the wall and the bend. If the length of the ceiling profile exceeds 50 cm, additionally reinforce the fastening with suspensions, screwing them to the frame profile of the first level with self-tapping screws.
The rack elements are cut from the CD profile to the required length, fixed to the frame with self-tapping screws.
 Installation of finished segments cut to fit patterns
 At the final stage of installing a suspended two-tier ceiling, the second level of the frame is sheathed with plasterboard sheets. It is better to fix the material in whole sheets, and do the trimming on the ceiling. Or you can make patterns according to which to cut the sheets and attach finished segments to the frame.
To close the vertical plane with drywall, cut out a strip of the required width, screw it to the structure with self-tapping screws. At the same time, the smaller the distance between adjacent fasteners, the more reliable the fixation will be.
 Lighting in the kitchen - dining room
 Decorative lighting is an additional source of illumination of the room. A chandelier or lamps with bright light bulbs are installed as the main lighting device on two-level ceilings made of plasterboard.
As for the backlight, neon tubes, LED strips and duralight are considered common sources. The last two options are LEDs installed in a certain sequence, the advantage of which lies in the low power consumption (12 or 24 W). They are monochrome or multi-colored. Colored ribbons are controlled by a controller and a remote control.
 White LED strip lighting in the hall
 LED strips are:
- ordinary. Mounted in rooms with low humidity;
- waterproof, on which a lacquer coating is applied on top during manufacture. Used for bathrooms
- moisture resistant LEDs are soldered into polymer pipes or cases. Such tapes are used to illuminate aquariums, pools, etc.
Neon tubes are filled with a mixture of gases (inert and luminous). The brightness of the devices is determined by the current strength, which is regulated by the convector. The power of the convector is more than 100 W, and they are mounted in increments of 5 meters. A large amount of energy will also be consumed by transformers that are installed for neon tubes.
 Box lighting with colored neon tubes
 Instead of neon tubes, neon cords powered by AA batteries are used to illuminate a suspended two-level plasterboard ceiling. In this case, the controller does not need to be purchased separately, since it is already included in the kit. The only negative is low power, so this lighting option is best combined with hidden LED lighting or used to highlight individual interior items.
When working with LED strip, observe the following rules:
- cut the tape only in specially marked places;
- connect individual elements of the tape to each other with LED connectors or with a soldering iron;
- fasten the tape to the metal base of the drywall box through a layer of insulating material;
- during installation of lighting, de-energize the wiring.
To fix the tape to the surface of the box, remove the protective layer from the reverse side of the tape, press the product to the base of the box with an adhesive surface. For reliable fixation, degrease the surface at the place where the LEDs are attached.

The backlight is connected as follows:
- direct one end of the wire from the power supply to the current source, the other to the tape;
- if you install a multi-colored backlight, observe the polarity (red wire - plus, black and blue - minus);
- before installing the tape, check the operation of the device.
If spotlights will be mounted, then holes are made at regular intervals in the GKL sheets until the frame is sheathed. In this case, the wires to the devices are connected at the preparation stage.
At the final stage of work, the finishing of the two-level ceiling is carried out. Joints and recesses from self-tapping screws are puttied, the surface of the structure is coated with a primer. Such a ceiling can be painted, wallpapered, finished with decorative plaster or gypsum stucco.
Video how to make a two-level plasterboard ceiling with lighting in the corridor
In all design work, lighting is of no small importance. The illuminated plasterboard ceiling makes a unique design of the room, in which it is pleasant to relax and easy to work. Do-it-yourself plasterboard ceiling with lighting can be done without any effort, you just have to set yourself some tasks and have a great desire.
 The original design of the plasterboard ceiling with lighting
 Such a ceiling plays a major role in the design of the room. Illumination can be combined with different types of light illuminations. The electric light is adjustable in brightness. With the help of light trim, the room can be divided into a recreation and games area, for example, in a children's room.
Advantages and disadvantages of this design
Such a ceiling has many advantages that even a skeptical person cannot fail to notice.
- The top of the room becomes perfectly smooth and even.
- Before starting work on the manufacture of the ceiling, it is not necessary to do complex preparation of the base coat.
- The plasterboard construction hides many different wires, hoods, ventilation ducts.
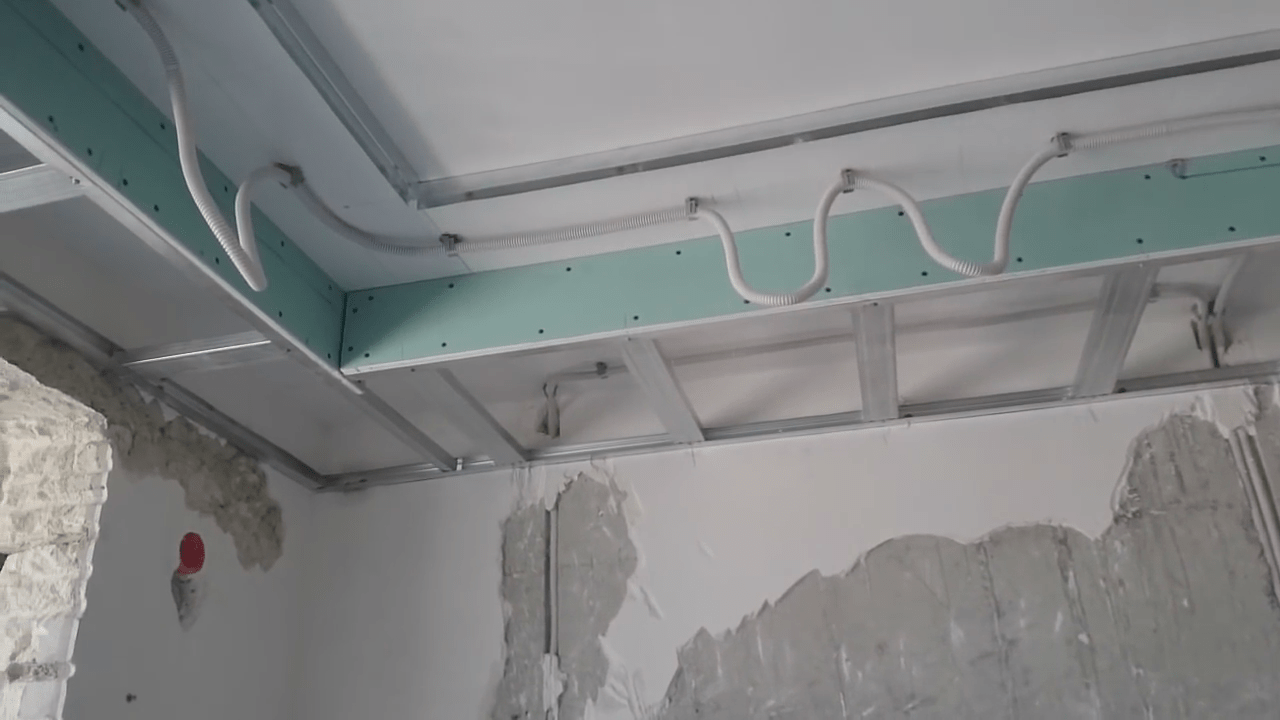
 Cable outlets in plasterboard ceilings
 - Possibility to realize your most fragile ideas with ceiling levels as well as room lighting.
- The height of the room is reduced.
- A backlit plasterboard ceiling requires a minimum knowledge of electricity, but sometimes such knowledge is not enough to make electrical wiring.
ATTENTION! In case of incorrect wiring and connection of fixtures, a short circuit may occur. This will not only ruin the wiring, but will render the fixtures unusable.
When carrying out repair work on a ceiling with lighting, the following nuances must be taken into account:

Before starting work, you should think over and write down everything to the smallest detail.
Types of lighting that can be implemented
In the assembly of a plasterboard ceiling, the following types of lighting fixtures are used:
- Spot light emitters are used for night light and area lighting in a room or kitchen. They are a budget option. They can be placed in any ceiling, assembled and sheathed. This type of lighting is used as additional light in the room. The main source of light is a chandelier or diodes. Their cost is low with a large selection of design solutions.


Watch the video: how to make a backlit drywall box.
Choosing an LED Strip
A strip of diodes for lighting looks like a strip, the width of which is 9 mm. This strip is made of flexible material. In the tape itself there are resistors, diodes and tracks - current conductors. Such a tape can be installed in the ceiling both in the hall and in the kitchen.
Main parameters:

To ensure that the current supply is uninterrupted, transformers are installed. The tubes themselves are very fragile in their structure, their installation is difficult, it requires a lot of time and patience. Flexible neon. Consumes little electricity. Also used for auxiliary illumination. 
It differs from other devices in an extensive choice in the color palette of shades. It doesn't get hot which is a big plus. The cost of such installations is quite high.
Ceiling construction
How to make a plasterboard ceiling with lighting?
not complicated. If a person adheres to the classics, and there is no way to make many levels of lighting on the ceiling, you can design a two-level plasterboard ceiling with lighting step by step. In this case, the backlight can be placed in the side, which is the second level. For it, a height of 12 cm should be allocated.
Ceilings with open lighting
Open lighting includes built-in lighting devices. With a ceiling made entirely of plasterboard, the lamp is installed directly into it.
 Example of a plasterboard ceiling with open lighting
 But, it is also possible to install the device in a box designed for installing a lamp. This option is chosen to maintain the same height of the ceiling. The box can run along the walls of the room, or it can act as a figurative image of boxes on the ceiling. An ordinary box along all walls has dimensions: width 50 cm, height up to 70 cm. To create a box for a lamp, you must have.
Ceilings with hidden lighting
Both in open lighting and hidden, you can make a box along all the walls of the room.
 Ceiling design scheme with hidden lighting
 The backlight box can be open or closed. This is done for the play of light. In a closed niche, the light is refracted and there is a clear line of light
An open box is made with a ledge of 5-10 cm. To create a closed niche, it is necessary to attach a guide profile to the edge of the protruding part. After that - drywall 5 cm high.
It affects the lighting of the ceiling. If the distance between the niche and the ceiling is small, then the strip of light will be narrow and very bright. Conversely, the greater the distance, the more the light scatters.
Combined backlight
When planning combined lighting, you need to focus on such nuances as:

To make a two-level plasterboard ceiling, you should calculate everything at once, and not after completing the work on.
Ceiling lighting installation

When buying an LED strip, you need to look at:
- Tape type by number.
- Color palette.
- Power.
- Security.
Preparation
Before you start assembling a frame for a ceiling with lighting, you need to have an idea of what it will be like and what type of lighting will be used in this design.
ATTENTION! Before assembling the ceiling, the room should be disconnected from the electricity in order to avoid electric shock, if this is not possible, then all bare wires must be insulated.
Initially, you need to prepare the old ceiling for installation. To do this, the old plaster is removed, which may soon collapse. It also removes mold and rust stains. Everything is cemented. After drying, you can pick up drawings for drawing points. This is done in stages.
When drawing control points, you should take into account the distance at which they will be.
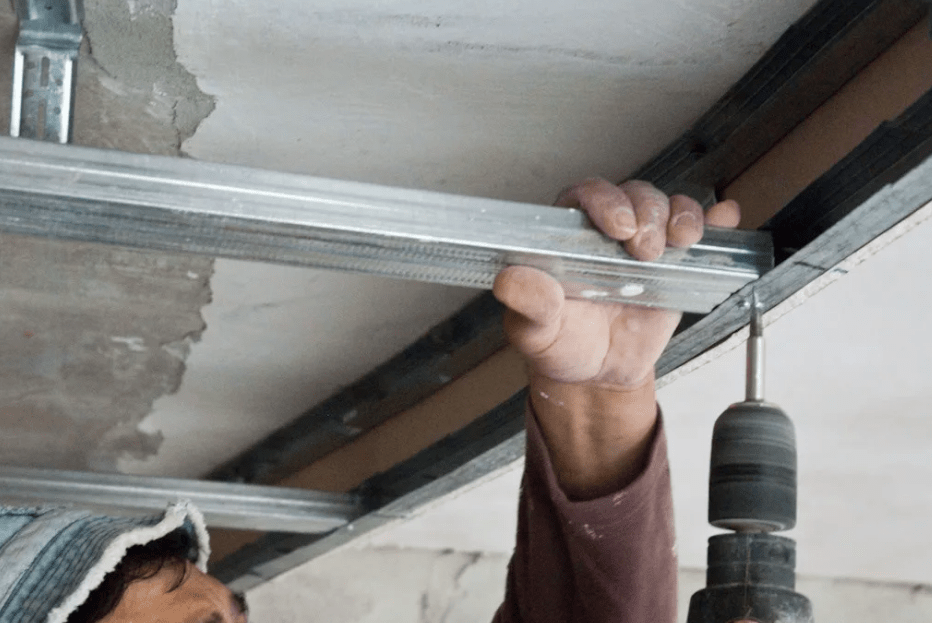
 Fixing profiles to concrete ceiling
 And also it is worth deciding on the place of passage of the wiring and other wires (cable TV, Internet). The places of external lighting fixtures did not coincide with the place where the profiles were attached.
Level 1 frame
After applying the control points on the ceiling, you should retreat 10 cm down the wall. Draw a line along all the walls of the room, a horizontal ceiling and floor. Attach along the intended line. Suspensions are attached to the NP every 40 cm. Jumpers are also attached to the ceiling base using "crabs". Now we collect the wiring. This takes into account both the main lighting and additional lighting. The best example is the kitchen ceiling. It is small in size and includes a combined backlight.
Nuances when conducting wires:

ATTENTION! When working with construction wool, you should remember about safety measures. When the frame with wiring for the 1st level is prepared, it can be sheathed with drywall. Caps from fasteners need to be “drowned” in drywall to achieve perfect evenness.
Second level
At this stage, it is done with backlight. At this level, a structure is being built for future lighting.
 Ceiling lighting fixture
 With certain intentions, you can make a frame for a structure with lighting. In this case, the second level is made in increments of 10-17 cm from the walls. The center of the ceiling seems to hang in the air and is illuminated by lighting fixtures. But, there is an option to do the opposite, when the box protrudes above the ceiling. And the ceiling itself inside remains higher than the box. With a certain illumination, the impression of a high ceiling is created.
The plasterboard ceiling with LED lighting is done in this way:

If the two-tiered ceiling is not rectangular, but curvilinear, then you need to prepare sketches of curved proportions in advance. Apply a drawing to the 1st level, and then, to a sheet of drywall.
box
If the plasterboard ceiling is single-level, then:

box plan
Near the windows there is a place for a cornice measuring 60 cm. The box is lowered from the ceiling down by 12 cm. The side in the box is 5 cm. The protruding shelf is 6 cm. Corners are rounded for decoration. This is very clearly visible in the diagram.
 Scheme of the device box for lighting
 ATTENTION! The lines on the double ceiling are drawn every 54 cm and not every 60, because there will be a step under the lighting. The extended shelf will be 6 cm. In order for the lines to be even, a special cord is used. If you make a circle on the ceiling of plasterboard or rounding, then the drawing should be made already with a step, and not where the profile will be laid.
 The scheme of the circle on the ceiling of drywall
 - 1 - a place for fastening profiles;
- 2 - the line where the step ends.
After the circles are applied to the ceiling, it follows. To do this, the profile is cut on the sides, the base remains intact. A cut-out strip of plasterboard is attached to the guide profile, the width of which is 12 cm. It will be the back wall of the box. Near the window openings, a strip covering the eaves should be attached.
Vertical segments are attached from 50 cm, the length of which is 9.8 cm (12 cm in height minus 1 cm installation of profiles minus 1.2 GKL thickness). After that, the NP is also attached to the vertical segments below. Thus, the bottom of the box coincides with the profile on the wall. 
Jumpers are horizontally installed to fasten the drywall sheet. He will make a shelf-step and close the box.
Curves and lining of the box
In order to sheathe the box around the perimeter, you just need to cut strips of drywall of the required size. In order to sheathe, a GKL strip of the desired size is taken and an incision is made every 5 cm - the gypsum breaks. These pieces need to be attached to the frame.
Each piece of gypsum is fixed with 1 self-tapping screw in the middle so that the piece does not break. If extra fragments have formed from below and along them, they are carefully removed with a construction knife.
Oval figures are made in the same way. Installation of a plasterboard ceiling with lighting is almost over. Until the box is hemmed, it needs to be puttied, then it will be extremely difficult to do this because of the protruding step.
 An example of mounting a round figure frame for a plasterboard ceiling
 After puttying, the drywall box is hemmed from below. The width of the filing is 60 cm. The sheet must be cut into strips and the box must be hemmed. When the hemming reaches the circumference, it is also required to initially cut everything out, and then hem it. After that, the guide profile is screwed to the formed step. A side will be attached to it (optional) to cover the direct rays of illumination. At the end, the assembled structure is puttied and brought to a perfectly smooth surface.
An attractive and spectacular interior of the room consists not only of beautiful things and decorative elements, but also of a properly selected lighting system. Two-level plasterboard ceilings will help not only to give design ideas a certain “zest”, but also create the right composition in combination with lighting.
Advantages and disadvantages of backlit two-level plasterboard ceilings
A two-level ceiling is made of drywall and stretch fabric. Designs of this type are very popular with consumers, as they allow you to create unusual compositions that will not only emphasize the interior of the room, but also become its main detail.
Among the advantages of a multi-tiered ceiling are:
- Curly structures are lightweight, which does not create an excessive load on wall and ceiling ceilings.
- It is characterized by simple installation, drywall is easy to cut and give it the desired shape.
- Sheets of drywall reliably mask all the flaws in the ceiling. When deciding to install a two-level structure, the consumer may not care about the careful leveling of the surface.
- Thanks to the free space between the base of the ceiling and the levels of the plasterboard structure, the user has the opportunity to install volumetric structures (ventilation cabinet) and lay utilities.
- The two-level design has many configurations, which allows you to visually divide the room into separate zones. In combination with the right lighting, this will be especially impressive.
- When finished, the two-level ceiling has a magnificent appearance, certainly attracts attention and can become a central element in the interior of the room.
- Having multiple levels allows you to play with lighting options. Many designers use this design feature of a plasterboard ceiling to create beautiful and harmonious lighting in a room.
- Due to the special technological properties of drywall, its use as a ceiling covering helps to improve the heat and sound insulation performance in the room.
Along with the advantages, experts highlight a number of negative points that need to be taken into account when deciding on the installation of a 2-level plasterboard ceiling with backlight:
- This design is quite overall, significantly reduces the height of the ceilings in the room. Due to the profile on which the base rests, the room loses about 5 cm of space. Installing the second tier will also remove about 10 cm.
- In the area of \u200b\u200bthe joints of drywall sheets, cracks and other deformations may form over time. This can be avoided by installing special protective tapes or a decorative frame at the points of contact.
- It is almost impossible to cope with the installation alone. If the user plans to do everything with his own hands, he needs to enlist the support of friends and acquaintances who will help him.
- Installation of a two-level ceiling structure is considered a rather laborious process. The consumer needs not only to have certain construction skills, but also to have a fairly large assortment of construction equipment at hand, be able to draw up drawings and design.
The device of a two-level plasterboard ceiling with lighting
One of the key reasons for the popularity of two-level drywall constructions is the wide range of design options. Design features allow you to create real masterpieces that will become the central element of any design idea. A two-level plasterboard ceiling with backlighting in the photo looks especially spectacular.
The first level has a fairly large mass, it must be firmly fixed to the base of the ceiling. The second level is lighter, it is he who forms the geometric shapes in which the design is executed.
Important! If the plasterboard is installed in a room with high humidity, it is necessary to initially choose drywall with water protection. This will prevent deformation of the structure.
Types of two-level plasterboard ceilings with lighting
Experts distinguish between two main types of ceilings - single-level and multi-tiered. The first option is suitable for almost all rooms, regardless of their size and functional purpose. As for the two-tier structures, everything is much more complicated here.
When deciding on the arrangement of a two-level ceiling, one must remember that such a design can significantly reduce the height of the room by at least 10-15 cm. The loss of free space will be catastrophic for rooms with low ceilings. That is why structures of this type are not installed in them.
Two-level ceilings can be classified in several ways:
- Depending on the type of backlight. There are ceilings with spot or contour light, with external and internal lighting, etc.
- Tier material. The two-level design allows you to combine different types of overlap. Both tiers can be made of drywall sheets. The most popular option is a combination of plasterboard and stretch fabric. This option will significantly increase the decorative functions of the installation, give the structure a more aesthetic appearance.
There are also several types of design depending on the installation:
- Framework. It goes around the room around the perimeter, leaving an uncovered ceiling base in the middle. This option is equipped with spotlights, and in the center they often have a pendant chandelier, which has a style that is as close as possible to the interior.

- Diagonal. Crosses the space of the room diagonally, can be straight and curved. The first level is as even as possible, the second - protrudes above the base for a short distance. The most successful option for zoning a room.

- Zonal. Used for arranging studios and large rooms. Allows you to visually divide the space into several autonomous zones.
Depending on the shape of the structure, three variations are distinguished:
- figured. The second level has an unusual shape in the form of a geometric figure, a plant element or an animalistic motif;

- abstract. Here there is a combination of various forms, which can be arranged both in a strictly defined sequence, and randomly. To make the overall composition stand out, the forms are given a different color;

- soaring. This option is suitable for rooms with high ceilings. Thanks to the fastening of fitting bushings and metal pins, the composition takes on a slightly fabulous look. Visually it seems that the ceiling is floating in the air. Especially this effect can be emphasized by properly selected lighting.

Dimensions of a two-level plasterboard ceiling with lighting
The dimensions of a two-level ceiling structure can be very diverse. One of the advantages of this option is a large selection of architectural forms and design solutions.
When deciding to install a two-level illuminated plasterboard ceiling, the user needs to think about the concept of the project in advance. The specific size of the structure will directly depend on the features of the interior, the chosen style and the area of the room. If the room is spacious enough, you can install a volumetric overall composition.
Types of lighting for a two-level plasterboard ceiling
For two-level ceilings, there are two lighting options:

You can use any lighting options, ranging from spot and contour lamps, ending with overall pendant chandeliers and LED strips.
The only thing you need to pay attention to when shaping the lighting is the dimensions of the suspended structure. If the ceiling is small, a massive chandelier will look ridiculous on it, besides, it will visually reduce the free space, which will negatively affect the overall exterior of the room.
Important! When installing the backlight, make sure that the electrical wiring does not come into contact with the metal elements of the frame.
Schemes of a two-level plasterboard ceiling with lighting


How to make a two-level plasterboard ceiling frame with backlight
Since the two-level illuminated ceiling has a fairly large size, for this structure it is necessary to mount two frame bases. To carry out the installation of the frame of the first level, you must perform the following steps:
- Install guide UD-profiles on the surface of the concrete (brick) base of the ceiling. They must be firmly fixed with an optimal fastening step of 60-70 cm.
- Ceiling hangers are attached to predetermined points, and fixed with the help of "fleas" to the guide elements.
Important! Ceiling hangers must be fixed with the optimal mounting pitch, which corresponds to the installation of guide profiles. According to experts, the distance between them should be within 60-70 cm.
- Insert the ceiling profile CD, after which it must be firmly fixed with a hanger.
- If the structure is large enough, it is necessary to prevent possible deformation of the base. For this, special connectors of the "crab" type are used. They will give the structure stability, prevent subsidence.
After mounting the frame, it is sheathed with drywall. This will be the first tier of the ceiling. To form the next level, you need to install a second frame:

Do-it-yourself installation of a two-level plasterboard ceiling with lighting
The process of installing a two-level ceiling structure with lighting begins with preparation. First you need to collect all the materials and tools:
- drywall sheets. In order not to buy extra material, you must first calculate the ceiling model, and find out how much drywall is required for installation;
- UD and CD profiles;
- ceiling hangers. If the design provides for sufficiently large dimensions, it is better to use spring traction, if the dimensions are small - direct suspensions;
- soundproof materials;
- extension cord (if the width of the room exceeds the length of the profile);
- fasteners (dowels, "fleas", etc.);
- self-tapping screws;
- finishing material.
After preparing the necessary equipment, you can proceed to the installation of the structure. The first stage includes the preparation of the frame parts of the future ceiling. How to mount the frame is described above.
As practice shows, it is not difficult to make a two-level plasterboard ceiling with lighting. Often problems arise in the process of sheathing the frame with plasterboard sheets. Therefore, the following points must be taken into account:
- if a drywall sheet is cut, a chamfer is made on the edge with a knife or planer;
- to ensure the most reliable fastening, it is necessary to dock the gypsum board in the middle of the profile;
- in order not to complicate the subsequent finishing, the screw heads are slightly drowned in plaster;
- when fastening, the distance between the screws should be 30-35 cm, while there should be at least 2 cm to the edge of the sheet;
- between sheets of gypsum plasterboard you need to leave a small gap (no more than 2 mm). This is necessary to prevent deformation due to sudden temperature changes and high humidity in the room.
Finishing options for a suspended two-level plasterboard ceiling with backlight
In order for the two-level ceiling structure to be as even and beautiful as possible, after installation work, the joints and seams of drywall must be primed. It is recommended to use a special putty composition for seams.
After the primer dries, the places of application are rubbed with a thin layer of plaster. A special tape is applied to the wet layer, which must be slightly drowned in the primer. Particular attention should be paid to the heads of the screws, they are also putty. After that, in places specially marked on the GKL, holes are cut out for the lamps.
The finish depends on the chosen material. Often, GKD is covered with several layers of putty, after which it is cleaned with special tools to obtain a perfectly flat surface. You can proceed to painting the ceiling with water-based compositions with the addition of colored pigments.
Also, fabrics, wallpapers, 3D paintings and other materials can be used as a finish.
Tips for caring for a two-level backlit plasterboard ceiling
Plasterboard multi-tiered structures have a long service life. In order for them to continue to please the eye with an ideal appearance, they need to be carefully looked after.
Caring for KGL is quite simple. They should be wiped regularly with a dry cloth to remove possible accumulations of dust and dirt. You can also use a vacuum cleaner. If the consumer plans to wet cleaning, you need to take non-aggressive detergents. Before cleaning, the cloth should be thoroughly wrung out, it should be barely damp.
Particular attention is paid to the location of the lamps. Often, under the influence of GKO lamps, it changes its color. This negatively affects the overall appearance. You can get rid of plaque and faded parts with the help of special felt-tip pens, which can be easily found in any hardware store.
Photo of bunk ceilings of their plasterboard with backlight


Conclusion
Two-level plasterboard ceilings have a very spectacular appearance, are characterized by simple installation and a long service life. However, when installing such overall structures, you need to remember important nuances, follow the installation technology.


