Installation of drainage systems. Fastening downpipes to the wall of the house with your own hands - instructions
Gutters remove rain and melt water from the roofs, redirecting it to specially designated places. It is better to deal with their installation before the completion of construction work, this will help to optimally select the mounting system. Gutter brackets should be given special attention, the stability of the system, which takes on the load of snow cover and strong wind, depends on their strength and reliability.
The holder is a fastener for installing a drainage system. With it, the gutter is attached to the facade of the building, cornice or any base. The shape of the bracket should repeat the design of the gutter. It has several holes, which allows the use of self-tapping screws during installation.


Choice
Gutters most often go on sale equipped with fasteners suitable for this model. If the drain is created and installed by hand, the brackets are selected independently.


When choosing holders, you can give preference to metal products with a thickness of at least 2.5 mm. It is necessary to check the integrity of the anti-corrosion coating, the quality and stability of the hooks, because they will have to withstand a certain load. You should choose monolithic products, without seams. So that the drain does not collapse from gusts of wind, it is better not to save on brackets.


These are general selection rules, but each system requires an individual approach. Holders must follow the shape of the gutter. The length of the elements is selected according to the circumstances. Long hooks are mounted before the roof is finished, while short and universal ones can be used at any stage, even after construction is completed. Fasteners must be larger than the gutter. It is also worth paying attention to the size and shape of the section. Elements are selected that match the color of the drainage system.

Giving preference to well-known brands, you can be sure of the durability of the original product. To date, the brackets of the brands Rohrfit, Rainway, Kvado have proven themselves well.
Kinds
It is impossible to say unambiguously about the types of holders for the drain. They are divided by size, shape, material, attachment point. Depending on the size of the brackets, there are three types.
- Long the bracket is produced in the size of 200-350 mm. Made in the form of a hook with an elongated bar, with its help the holder is mounted to the base. Such fasteners are used before roofing.
- Short the bracket has a small mounting base, it can be installed on the finished roof. In terms of strength, it is not inferior to long structures.
- Universal hooks are collapsible models, which include a small bracket and holder. They are adjustable in size and can be mounted anywhere, even on metal pins driven into the wall.


Brackets and shape differ. In this case, the holder must repeat the shape of the gutter, so their designs differ.
The most common fasteners are square and semicircular:
- square the brackets are easy to mount, they can be mounted on either side both to the gutter and to the base;
- semicircular fasteners encircle pipes or a semi-circular gutter and fix them to a wall or other support.


Mounting brackets can be very different.
We have already found out that long brackets are attached to the roof covering, short ones - to the finished roof. The type of holders depends on where they will be attached: to the rafters, crate or front wall of the house.
- Frontal the holders are fastened with screws to the wind board installed along the roof slope, to the rafters vertically or at an angle.
- flat curved brackets are attached to the rafters, crate or plank flooring. It is necessary to maintain the fastening step, but when working with the crate, this is not always possible. Flat holders are also lateral, they can be attached to the rafters from the side.


There are also non-standard types of fastening.
- Brackets that regulate the slope with a beveled base.
- Hooks in the form of clothespins or staples for attaching to plastic or polymer base.
- Bracket extension straight is used for short holders as an additional element. They are used for fastening to the flooring when lathing with a large step. There are side options that allow you to mount the gutter to the rafters on the side.


Differences may be in the material of manufacture. The material of the brackets affects their cost, weight and appearance. The most common products are made of metal in a polymer coating or plastic. Copper or aluminum are installed less often according to individual customer requests.
The material of the holders must match the gutter. It is impossible to install plastic fasteners on a heavy structure. It is desirable that the fasteners match the color and texture with the rest of the gutter elements.
- Plastic products attract with low cost, light weight and ease of installation. Lightweight hooks are suitable for plastic gutters. To avoid deformation under the weight of snow, the step between fasteners should be no more than 50 cm. For greater stability, plastic fasteners are thickened and high, which gives them a bulky look, so they are used infrequently, only complete with plastic and other light material.
- metal brackets are most often made of steel. They are galvanized or polymer coated. The positive aspects include their strength, a large selection of shades, factory completeness.


Installation
Drainage is an integral and important part of the house. If you do not remove rainwater from the roof and walls, they will soon become unusable and begin to collapse. High-quality fasteners and other structural elements, proper installation, will help the system to work for a long time and flawlessly.

Before you start installing the drainage system, you should calculate the number of brackets that you may need. Their number depends on the material and configuration of the roof, the more bends and turns, the more fasteners will be needed to mount the gutter. Plastic holders can be used up to three pieces per meter, metal ones do not require frequent fastening, a step of 50-90 cm is enough. You should not increase the distance between the brackets, the gutter can bend and deform under the weight of snow.

To install the drainage system, you need to prepare in advance all the necessary elements: gutter, pipes, fasteners (tongs, clamps, brackets). The reliability and service life of the entire structure depends on the correct installation of fasteners.
For mounting fasteners on the finished roof, short brackets are selected. They are also suitable for vertical fixing of pipes. Hooks have additional stiffening ribs, which allows them to withstand fairly large loads. Such holders are reliable even with strong gusts of wind.


Hooks are mounted on any board, in case of its absence, additional extensions are used, which allow fastening through the rafters. If there is no access to the rafters, metal supports are installed, fixing them to the wall of the house.
During the installation of fasteners, the slope angle is maintained towards the nearest funnel or drain pipe. It is 5 cm for every ten meters, this will be enough to form the direction and speed of the water along the gutter. With a weak slope, precipitation will not be able to have time to go into the pipes. Too much slope does not look aesthetically pleasing, and the funnel will not cope with the active flow.

Properly installed first and last fasteners will help to properly slope. Between them it is necessary to make markings along the line of descent, where each hook will be located starting from the top point. Holes are drilled in the marked places and brackets are fixed with self-tapping screws. Gutters are installed on the holders with the help of coverage.

To avoid errors when installing a drain, some nuances should be taken into account:
- the gutter mounting step is indicated in the kit from the manufacturer, you should not do it more, this will lead to the structure sagging under the weight of precipitation;
- if the slope is not ideal, it can be adjusted by bending the bracket in certain places;
- so that the movement of snow covers does not damage the drainage, during installation, the gutter laid on the holders should be blocked by the weight of the eaves (almost to half of its diameter);
- if the edge of the roof does not coincide with the center of the gutter, this can provoke an overflow of water;
- a large gap between the edge of the roof and the gutter can also lead to overflow or cause splashing of melt water.

The final stage of the roof installation is the installation of a drainage system. Among the various systems, you need to choose the one that suits your requirements - metal with galvanized coating or plastic. Gutter manufacturers offer a complete range of accessories. For information on how to make the installation itself, read the article.
Calculation of components
Based on the size and shape of the roof, you can independently calculate: how many pipes, gutters, brackets and other parts of the drainage system will be needed.
Based on the size of the roof, choose the diameter of the gutters:
- If the roof area is less than 50 m2, gutters 100 mm wide and pipes 75 mm in diameter are used.
- Up to 100 m 2, 125 mm gutters and 87 mm pipes are used.
- More than 100 m 2 - gutters 150 mm and pipes 100 mm (it is allowed to use gutters 190 mm and pipes 120 mm).
In the case of a complex roof structure, gutters and pipes are determined by the largest projection of the roof part.

The area of the roof, consisting of parts, is 160 m 2 . Considering that one drain pipe is enough to service 100 m 2 of the roof in the projection, for the roof from the example, you will need 2 drain pipes located at the corners of the house. The number of funnels corresponds to the number of pipes, i.e. - 2 pieces.
The number of vertical pipes is determined depending on the distance from the cornice to the blind area. 30 cm are subtracted from this distance - the height of the drain elbow above ground level.
For example, the height to the cornice is 7.5 m. Then 7.5 m -0.3 m = 7.2 m.
On each side we need 3 pipes of 3 m, which means that there are 6 pipes on both sides.
The number of clamps will be equal to 5 for each side (between the elbow and the pipe, between the pipe and the ebb, and between the pipes) and, accordingly, 10 pcs for the entire roof.

Calculation of the number of gutters
The most commonly used gutter size is 3 meters. The length of cornice A and cornice B is 10.3 m. So we need:
- On eaves A - 4 gutters (3m + 3m + 3m + 1.3m). In this case, we will have another 1.7 m of unused gutter.
- On cornice B - 3 gutters and the remainder (1.7 m) from cornice A.
- For cornices C and D we use 2 gutters each, that is 4 pcs on both sides.
- In total, 11 gutters of 3 m for the entire roof.
The number of gutter corners corresponds to the number of roof corners, in our example there are 4.
Calculation of the number of brackets and gutter locks
Brackets are installed at the rate of 1 piece for about 50-60 cm. We accept 50 cm and make calculations.
Summing up the numbers in the last column, we find out that in order to fix the gutters, we need 58 brackets.

The number of locks between the gutters is equal to the number of joints. In our case, this is 16 pieces.
The number of ebbs (marks) is equal to the number of funnels. In this case, knees are needed 2 times more for each funnel. Then for 2 funnels you need:
- 4 knees;
- 2 low tides.
If the facade is not even, but has protrusions, it is necessary to purchase knees to bypass it. The figure below will help determine their number.

List of required items
In total, for this drainage system you will need:
- Gutter (3 m) - 8 pcs.
- Gutter (2.5 m) - 2 pcs.
- Gutter (1.3 m) - 2 pcs.
- Gutter lock - 16 pcs.
- Gutter corner - 4 pcs.
- Bracket - 58 pcs.
- Knee - 4 pcs.
- Drain elbow (mark) - 2 pcs.
- Pipe (3m) - 6 pcs.
- Funnel - 2 pcs.
- Clamp (with pin) - 10 pcs.
Pro tip:
Installation of brackets and gutters
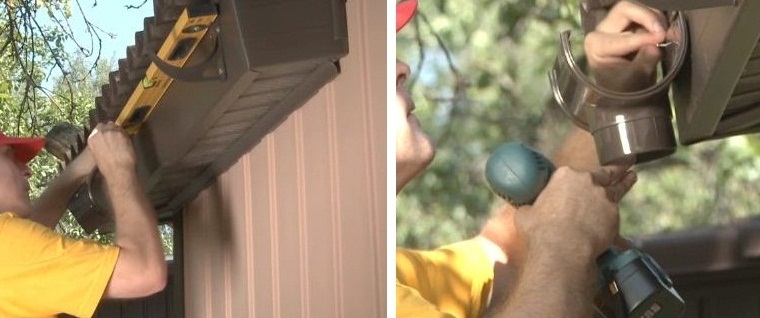
Fastening the drainage system begins with marking the installation sites of the brackets using a marking thread.
The center of the gutter should be located under the line of the lower edge of the roof. The gap between the line (shown as a dotted line in the diagram) of the continuation of the roof and the top of the gutter holder must be at least 25 mm.

The funnel is installed above the storm water inlet. The funnel must be fixed on two brackets or at two points. The location of the funnel can be in the center or on the edge (laid in the project). A hole is cut in the gutter with a hacksaw to fit the size of the funnel.

The brackets are fixed on the gutter line (the slope of the gutter line towards the funnel is from 2 to 5%). The installation step of the brackets is from 0.5 to 0.75 m (for selection, use the manufacturer's "Gutter system installation instructions"). The end bracket is mounted at a distance of 25-30 cm from the plug at the end of the gutter. The distance from the corner element to the bracket is no more than 15 cm.
The gutters are inserted into the brackets, starting from the back, plugs are installed on the ends. The joints of the gutters are fixed with special locks or connecting elements. The ends of the gutters should be located 50-100 mm behind the side cut of the roof. If the roof span is more than 8 m, an expansion element is required between the gutters.
Types of fastening and material of brackets
- Brackets are installed on the rafter leg. Use metal brackets.
- When using a frontal (front) board, plastic brackets are used.
- The brackets are attached to the deck using metal extensions. Use plastic or metal brackets.

Possible errors and consequences
- The increased spacing between the brackets leads to sagging of the gutters.
- Mismatch of the edge of the roof with the middle of the gutter leads to overflow.
- Increasing the gap between the gutter line and the edge of the roof - splashing and overflow.
Pro tip:
When cutting gutters and pipes, the use of angle grinders is not allowed, as the coating is damaged and burrs remain. Cutting is done with a hacksaw. It is recommended to clean the cut ends with a file.
Installation of the curly part and drain pipes
The laying of the drain provides for the installation of pipes from top to bottom, while the elbow, coupling and drain are installed with a socket to the top.

Installation is done like this:
- A part of a straight pipe of at least 60 mm is inserted into the knee-knee connection (depending on the distance between the frontal board and the wall).
- Next, the necessary curly part is assembled, into which the upper end of the pipe is inserted.
- The system is attached to the wall using clamps, the distance between which is up to 1.8 m. Only one clamp is fixing, the second is a guide. In some systems, the manufacturer recommends the use of clamps - expansion joints. The clamp is attached under the connector.
- The pipe is set strictly vertically using a plumb line.
- At the lower end of the pipe, fixed with clamps, a drain elbow is installed (the lower edge is at a distance of 25-30 cm from the blind area).
- If there is a drainage system or a storm water inlet, then the lower end of the pipe goes there. The pipes are connected using a coupling (connector).
- Each subsequent pipe is inserted into the connector installed on the previous one.
- A clamp is attached under each connection.

- Depending on the design features of the installation site, an elbow of the desired shape or a coupling is attached to the funnel. In the case of a roof protrusion beyond the facade, two elbows and a pipe segment are used. If the roof is without a ledge, then a coupling is used.
Installation of roof drains is carried out taking into account the compensation of thermal expansion. For this function, manufacturers use compensation gaps. So on pipe connectors in some systems there are assembly lines. The edge of the pipe is set along these lines, depending on the air temperature at the time of installation. Silicone-treated seals allow smooth sliding of the elements during expansion. When using a pipe connector, leave an air gap of at least 0.6-2 cm.
Pro tip:
It is not recommended to assemble the drainage system at t o C below -5.
This completes the installation of the drainage system. It is necessary to revise all installed elements. If the configuration of the drainage system is fully consistent with the project, calculated and installed according to the manufacturer's recommendations, then all the water that enters the roof will only leave through the pipes, without splashing or overflowing through the edges of the gutters.
At the end of each season, it is advisable to inspect and flush the system (using a hose with water). When clearing emerging congestion (leaves, debris), do not use sharp metal objects.
The presence of a drainage system is a prerequisite for all types of buildings, both residential and industrial, commercial or public. Manufacturing companies offer developers a huge selection of drainage systems that have their own design differences. But they consist mainly of minor changes in linear parameters, geometry and appearance, the functional tasks remain unchanged.
This applies to all elements of gutters, except for brackets. Their various types have cardinal differences and require completely different methods of fixation. By the way, the type of brackets also affects the technology. There are brackets that must be fixed before the installation of roofing, and there are those that can be installed at any time, both before and after the installation of the roof.

Holders simultaneously perform several tasks, each of which has a great impact on the performance, safety and durability of the spillway system. What are the functions of the brackets?

How to properly install the brackets so that the drainage system works properly for a long time, we will describe a little lower. First, you should familiarize yourself with the existing types of gutter holders.
Types of brackets
These elements must retain their original characteristics throughout the warranty period. During development, specialists pay attention to several important characteristics of brackets. They are common to all types of products.

Holders are made of structural steel or polymers. Responsible manufacturers use structural steel sheets with a thickness of at least 1.5 mm, but there are also very poor quality products on the market. In them, the thickness of the sheet does not exceed one millimeter, and the metal is low-quality low-carbon steel.
The same situation with plastic holders. They must be pressed only from virgin material with innovative additives that increase the resistance of the material to negative hard ultraviolet radiation. But not all companies act responsibly, some in order to increase profits for the manufacture of brackets use the material obtained after the processing of old products (secondary plastic). Accordingly, there is no need to talk about any high quality of such holders.

Table. Bracket types.
| holder type | Features and brief performance characteristics |
|---|---|
| They have special mounting strips that make it possible to fasten the elements to the crate or rafter legs. This fixation significantly increases the strength of the drainage system. The design feature influenced the technology of roofing - hooks must be installed before the installation of roofing. In some cases, they should be fixed even before the manufacture of the crate begins. The specific decision is made by the master roofer, depending on the type of roof and the characteristics of the coatings. | |
| They are nailed to the frontal board, can be installed both before the installation of roofing, and after the completion of these works. According to the material of manufacture, they can be plastic or metal, simple and complex. Complex brackets have several adjustments, which allows you to quickly and very accurately set the position of the gutter and ensure maximum functionality of the system. | |
| Relatively recently, engineers have developed a new design solution for short brackets. They have special grooves into which metal extension cords are inserted. The brackets, according to the installation method, resemble hooks and are fixed to the crate or rafter legs. True, not all builders understand why these extension cords are needed, in addition to increasing the cost of the system, they have no positive effect. The actual performance characteristics of brackets with extensions are in all respects lower than those of ordinary cheap hooks. The only situation that justifies the use of universal brackets with extensions is the roof is so complex that both types of elements must be used to fix the gutters. But such cases are extremely rare. |
The vast majority of drainage systems can be fixed both on long metal hooks and on short plastic brackets.

Prices for different types of gutter brackets
Bracket for gutter
General installation rules
To fix the elements, you will need a tape measure, a screwdriver or a screwdriver, twine, a bubble level, a building marker and self-tapping screws of the appropriate size. What general rules for fixing brackets should be followed, regardless of the features of the elements?

If you follow the general rules, you can be sure that the drainage system will always cope with the tasks.
Prices for popular models of screwdrivers
Screwdrivers
Step-by-step instructions for fixing plastic holders
Before starting work, you need to determine the number of elements and the distance between them. In this case, the location of the intake funnels and couplings must always be taken into account. The fact is that here you have to attach additional hooks, regardless of the distance. Work can be done after the roof is fully installed and the frontal board is fastened. If it is planned to cover it with decorative materials, then these works must be done, and only then fix the brackets.
Step 1. Drill holes in the finishing material for the rubber washers. They are needed to compensate for the thermal expansion of plastic.

Step 2 Attach the end brackets to the board with self-tapping screws. At the same time, take into account the above recommendations on the slope for water runoff and the distance from the projection of the roof to prevent mechanical damage from falling snow.

Step 3 Using a bubble level, mark the position of the funnel, do not forget to follow the slope recommended by the manufacturers. Fix the elements.
Practical advice. If the length of the slope is large, then between the extreme brackets it is necessary to pull the rope and put all the remaining elements along it.
Plastic brackets should not be tightened very tightly with self-tapping screws, control your efforts. Further installation of elements is carried out in the same way.

Step-by-step instructions for attaching long hooks
They are installed under roofing with a maximum pitch of not more than 60 cm, additional elements must be fixed near the funnels. For such fasteners, it is necessary to bend the long part of the part, due to this, the slope of the gutter is ensured. Bending is done in this sequence.
- Count the total number of brackets on one slope. Take into account drains and couplings, they increase the number of attachment points.

- Fold all the elements side by side on a flat area. Draw a diagonal line, taking into account the required slope. For example, if the slope is within 3 mm per meter, and the slope length is 9 m, then the vertical distance between the first and last bracket should be 9 × 3 = 27 mm. This value can be rounded up to three centimeters.

- Bend the brackets along the marked lines with a special bending machine. It is important to know not only the place, but also the angle of the bend. It is equal to the angle between the slope plane and the horizontal. Do not confuse with the angle of inclination of the slopes, this parameter is determined by the position of the slope to the horizontal line. For example, if the angle of inclination of the slopes is 25 °, then the brackets must be bent at 115 °. This value is determined simply by adding 90 ° to the angle of inclination of the slope.

- On the roof slope, mark the mounting points of the holders, then screw the brackets, controlling their position with a level.

Installation of gutters and funnels is carried out in the same way as on short brackets, but it is carried out only after.

Gutter prices
drains
Conclusion
Most manufacturers of drainage systems sell brackets in the kit, and you can immediately choose the best option. Fastening can be carried out with metal hooks to the boards of the crate or rafter legs. When choosing a specific option, you need to know that there is no ideal solution. Each type has its own strengths and weaknesses.
Long brackets
They have high strength values, are not afraid of UV rays, do not change their properties for a long period of time. These are virtues. Disadvantages - the complexity of installation and certain nuances during the installation of roofing. The stronger the sheet steel, the more difficult it is to bend it to the right angles.

Most often they are made of plastic. They are much easier to install, some designs have the ability to fine-tune the position of the gutter. This allows you to quickly correct mistakes made during installation, correct the position of the gutters. Disadvantages - there are no plastics in nature that are not afraid of hard ultraviolet rays. The service life of the elements does not meet the wishes of demanding developers.

Video - Installation of gutter brackets
The correct selection and installation of gutter brackets is of great importance for the entire drainage system. But the functioning of the drain is influenced by other factors that must be considered when installing it. You can read about how to properly install a roof drainage system.
For an experienced roofer, installing a modern gutter system is not difficult, but an inexperienced person may not be aware of some of the nuances that lead to serious problems in the future. Of which the most common are deformation, bending of the gutter, leakage and destruction of the facade from constant moisture.
Moreover, only one small installation error can serve as the cause of all this. And therefore, how to fix the gutter so that it has served faithfully for more than one year, we will tell you now in the most detailed details.
How to choose the right mount?
In total, to fix the drain, you will need the following fasteners:
- brackets on which you will attach the gutters. It will not be difficult for you to choose a suitable mount, based on the shape and dimensions of the purchased gutters.
- Clamps- special devices that allow you to attach drain pipes to the wall. Such fastening is also selected depending on the type and size of the drain pipes. Also decide on the material for making the clamps: if it is plastic, then it has two attachment points, while metal ones have one, long hardware.
On sale you will find hooks of two types:
- Long ones are attached to the crate, to the rafter legs.
- Short ones - to the frontal board, according to the original plan or due to the fact that the roof has already been installed.
The distance between the hooks should ideally be about 50 cm, maximum - 60 cm. If you use long hook holders, it is better to screw them through the crate directly to the rafters, then the drainage system itself will be more durable.
At the end of the installation, both long and short hooks from above must be covered with a cornice strip.

Of course, according to all instructions, long hooks must be fastened under the roofing directly to the crate. But often there are situations that it’s not easy to remove the old roofing just like that, just like lifting it up.
For example, it is old, so such hooks are often screwed even onto the cornice filing. Despite all the illogicality of this method, in practice it often turns out to be rational and sometimes the only possible one.


Basically, according to the rules, metal hooks are used for a metal drain, and plastic - for plastic. Today, copper hooks are rarely but still used:

How to properly position the brackets?
At this stage, you will have a completely expected question: how are the gutters attached to the roof itself? Hooks for them are mounted to the frontal board, windshield, to the cornice overhang or directly to the rafter legs.
The mount is installed on the rafter legs when there is no frontal board as such, in principle, or it is important to leave it untouched for the sake of a certain aesthetic effect. But, if the roof is already ready, then the only rational option is to attach the fasteners to the frontal board:

Sometimes fasteners for the drainage system have to be installed directly to the roof sheathing. For this purpose, special elongated clamps are used, which are fixed at two points. Brackets are attached to the rafters (through the crate) only pre-bent.
Often, home craftsmen try to save money and put the brackets too far apart, although the distance between the fasteners should not exceed 60 meters. If this rule is violated, over time, the gutters are deformed and gradually damaged under the pressure of the weight of water, ice and snow.
It is also important to be careful with the location of the brackets so that they are not too low or too high relative to the edge of the roof. If the hooks are located lower than necessary, rainwater from them will not get into the gutter, it will splash and drip on the facade.
Sometimes such an installation error even leads to breakage and breakage of the fastener itself. And rightly so, if the gutter protrudes slightly beyond the edge, at least half of its width. If the gutter is installed too high, then the mechanical pressure on it and its fastenings will be many times greater than the norm, and the gutter system itself will have to withstand a load of falling snow.
At the end of the installation of the fastener, it is important to correctly install and align each hook:

Also keep in mind that when installing metal tiles, an anti-condensation film with an allowance is also used:

How to fix the gutter yourself?
When installing any gutter system, it is extremely important to take into account the thermal movement of the gutter and its structural elements, which, depending on the material of manufacture, work differently in tension and contraction.
According to the rules, the only movable element of this kind should be a hinged complaint, which is mounted without additional gluing - only on a latch. Moreover, modern manufacturers take care of this by making a special, so-called expansion mark inside the gutter, which helps to assemble in accordance with the air temperature that exists at the time of installation.

Here's how to properly mount the gutter directly on the eaves:

How to fix modern plastic gutters?
In total, you will need the following tools for installing a plastic drain: a cord, a hacksaw or a grinder, a screwdriver or a screwdriver, a puncher, a pencil, a tape measure, a ladder, a hook bender or a vice.
Let's look at an example of how to properly install a plastic gutter system. In total, it will be enough for you to spend about a day for this lesson. The main thing is to correctly calculate the slope of the gutter towards the funnel, so that the water flows easily and the melted ice quickly falls down. According to building codes, it is desirable to make 1 cm of slope for each linear meter. Then follow these instructions:
- Step 1. So, we mark the hooks: lay them on a flat surface close to each other.
- Step 2. Now on the hook where the gutter will be mounted, make notches as many centimeters as necessary to create a slope, and mark this place with a pencil.
- Step 3 Attach a ruler and draw a line from the first mark to the last. The line will not turn out to be horizontal, as you understand, and it is along this line that you will mount the brackets.
- Step 4. Next, if you have metal hooks, then you will need a special hook bender, if not, then a small vise. They should be clamped along the line and bent towards you.
At this stage, we install all the hooks, while checking the bend angle. Please note that the angle of bend for all hooks should be the same, and only the place of bend along the line is different.
So, step by step:
- Step 1. Take the hook with the smallest bend and screw it to the eaves. You should get the highest side of the complaint attachment and the lowest.
- Step 2. Make sure that the edge of the roof is exactly in the middle of the hook. This is important so that the snow moving down in winter does not damage the gutter and rainwater falls exactly into the funnel.
- Step 3. Now pull the lacing or strong thread between the first and last hook, and attach all the remaining hooks clearly along this line. The distance between the hooks should be between 50 cm and 65 cm.
- Step 4. Now we take the gutters and mount them. Please note that modern gutter systems have special strips along the edges of the complaints that simply snap into place, and a well-thought-out rubber gasket protects them from leaks. It is usually black and hard to miss.
- Step 5. Now install the gutter cap. It should be placed first on the inside of the hook and pressed on its outside.
It is important that the mounted gutter is perpendicular to the ground:

We continue with the installation of the drain:
- Step 1. In the next step, measure the distance from the funnel to the gutter connector, and at the same time keep in mind that during the installation process it will go into the funnel and connector up to 7 centimeters.
- Step 2 Install the funnel so that it is 20-30 cm from the edge of the roof.
- STEP 3. Cut off another piece of complaint. It is most convenient to cut a plastic gutter with a regular hacksaw with a fine tooth, or with a grinder with a thin circle for metal.
- Step 4. Now we pick up a funnel. Please note that it has special sides - these are the limiters to which you need to insert the gutter.
- Step 5. We mount the funnel and gutters.
- Step 6. Now we move on to installing the knees. The knees must be installed on the drain hole of the funnel and turned towards the wall.
- Step 7. After that, we take the second knee, and measure the distance between them. The second knee must be secured with a clamp.
- Step 8. The next step is to measure the distance to the knee of the drain. It will be convenient to fix the clamp to the wall using self-tapping screws with press washer in 30 mm or dowels, if you have brick house.
The following step-by-step photo illustration will help you consider the process in more detail:

How to fix metal gutters?
Modern metal gutters do not always have mechanical latches, and therefore their parts must be joined by cold welding or using special glue:


Let's look at the technology of fastening a metal drain in more detail. So, all the parts necessary for assembling such a system are still manufactured at the factory with high precision, so you can assemble the elements into a single system yourself and without particularly straining:
- Step 1. First of all, you need to take the exact dimensions and make a fastening scheme for the future drain to accurately calculate the number of pipes with fasteners, gutters and brackets, gutter plugs, funnels and their connectors. And get it all from a quality manufacturer.
- Step 2. To set the correct slope of the gutter (5.0-10.0 mm is enough), fix the first and last brackets, and then stretch the cord between them.
Step 3. Now let's move on to the installation itself. First, we install gutters with the obligatory maintenance of the desired slope along the roof slope. Install the fixing brackets along the perimeter of the roof at a distance of 0.50 m. - Step 4. Several parts of a metal gutter in one length will be easier for you to connect on the ground using rivets and special sealant. Those ends of the gutters that will not drain water, close them hermetically with plugs.
- Step 5. Next, install the downspouts, which should be fixed in the required places on the walls. Connect the sections of pipes together with clamps.
- Step 6. Check the verticality of the pipes with a plumb line.
metal roof drains. - Step 7 Now connect the gutters to the pipes and funnels.
- Step 8. And finally, install the lower drain elbows in the desired direction.
Fashionable copper gutters are fixed according to the same principle as ordinary steel ones:

But the most difficult thing is the installation of a gutter of complex shape:

Be sure to check the installed drain for reliability and leaks by simply pouring water into it from a garden hose:

How to install a heating cable in the drain?
In order to protect the newly installed drain from breaking with ice with the very first cold weather, a cable heating system is being installed today. It is an electrical cable that is pulled around the entire perimeter of the roof. It works in temperature conditions from 0 to minus 15 degrees, and even in the presence of ice and water on the roof.
Such cables are equipped with a temperature main office sensor. They are installed along the edges of the roof on the south side, and such sensors regulate the switching on and off of the cable system.
So, any gutter is always subjected to constant loads during its service. Especially if it rains, snows and there are strong winds quite often in your area. In addition, ultraviolet radiation and wind-blown debris have a devastating effect on the drain. And therefore, even a well-installed gutter system always needs to be looked after!
Gutters have a non-decorative function. They work by storing water from rain and other precipitation.
Such a system protects against precipitation and on the walls of the building.
Most often, specialists are hired to install the drain, but this is not a particularly difficult matter, and anyone who has his own house is able to mount the system on his own.
We propose to consider the topic of attaching drainpipes to the wall in this article.
In recent years, galvanized steel has become less popular, and plastic structures have become popular.
If you want to save money, then you should not buy ready-made kits for the drainage system, but it is better to purchase all the elements separately and make the system yourself. When installing such a system, there will be no difficulties.
Disadvantages of using plastic elements
But it should be borne in mind that the negative quality of plastic elements is poor resistance to frost. For this reason, the design of the drain must be made so that the water in the drains does not stagnate or freeze.
In addition to plastic, gutter systems are also made from different metals. On sale there are drains made of copper, various alloys, but such drains are not cheap.
Drainage installation
To complete the installation of a plastic drainage system, you need to follow a few steps.
First of all, it must be remembered that the installation of drainage units must be carried out at a certain angle. This is done so that there is no stagnation of water.
- Bracket fasteners are mounted during the construction of the building.
- First, gutters are attached, then funnels for water are installed. Covers are attached to the ends of the gutters.
- After that, a vertical segment of the drain is attached to the catchment funnel.
- To the wall, a vertical pipe section is attached to pre-installed brackets.
The installation of the gutter starts from the edges, but it must be taken into account that the pipe segment located vertically should be no further than fifteen centimeters from the nearest bracket!
Gutter pipe fixing
Gutter installation
The bracket is installed first from above, then a vertical line is marked with a plumb line and the places for fixing the brackets are marked.
 Fastenings on a vertical section of the pipe should be with a distance of one meter.
Then you mount the vertical section of the pipe and, after fixing it, mount an elbow at the bottom of the pipe to drain water into a container or onto the ground.
It should be noted that the junction of the outlet and the drain pipe must be attached to the wall with a separate bracket.
Good luck in your endeavors!


