Do-it-yourself drywall work. Proper work with drywall. Additional accessories for work
Working with drywall will help allow you to finish the premises at the highest level. The walls, using such material, can be perfectly aligned and hide all visible and sometimes quite complex defects, and on the ceilings you can create simply excellent figures, adding to which certain lighting, you can make a decorative masterpiece from the ceiling.
With the help of drywall, you can easily and simply create your own unique and inimitable interior. You can decorate concrete walls and any others with drywall with your own hands, while maintaining the quality of such a finish at a high level. In addition, drywall sheets have excellent soundproofing performance, as well as performance for thermal insulation. Well, just an indispensable assistant for any kind of repair and finishing work, eh? To carry out drywall work was not burdensome and took place quickly, you will need to prepare a special tool.
Tools used for installing drywall
For quick and unhindered work with material such as drywall, you will need a different type of tool, and its number will depend on the method of installing drywall (on a crate, or using adhesive mixtures). To save space and time, we will describe a full range of tools that are equally will be good both for working with the crate and with adhesive compositions.

So, drywall work will be required in stock:
- A screwdriver that is useful for installing the frame of the crate and directly attaching the sheets to this frame.
- A couple of small to medium sized spatulas to easily apply putty and glue.
- A notched trowel that will be useful for applying adhesive to the drywall surface.
- Building level, which will help to markup, if required.
- A cutting tool (a clerical knife or a light hacksaw is suitable) for cutting material.
- A drill with various nozzles, which may be required both for making holes in the wall, and for mixing adhesive and putty compositions.

Now that you have collected the entire set of tools that may be required when working with drywall sheets and finishing them, it is worth considering the varieties of drywall and getting to know its characteristics better.
Variety of drywall
It is worth noting that before you purchase the required number of sheets, you will need to carefully measure the premises and calculate it (quantity). We add 10% of the calculated amount to the obtained value for every “fire” case (damage to the sheet, poor-quality sheet in the package, etc.).

Now directly to the question. The production of drywall is now represented mainly by 4 types, each of which is intended for use in specific premises with their special characteristics. The marking of drywall sheets for their intended purpose is unified, and when choosing, you will not need to puzzle over why this sheet is green and that one is red, and what these colors mean in general.
- The gray color tells us that this is the most common, even classic version of the sheet, which is suitable for use in rooms with moderate ambient humidity.
- The pink color of the sheet (sometimes faded red or purple) means that this type of sheet is heat-resistant and fire-resistant, making it ideal for cladding areas around a fireplace or stove.

Certain markings (or designations) have been adopted for each of the considered species. So, a simple drywall is designated as GKL, resistant to fire - GKLO, water - GKLV, and the combined type, respectively, - GKLVO.
Additional Consumables
To work with drywall and finish, whether it be a wall or a ceiling, you will also need to purchase consumables in addition to the tools and the sheets themselves. So, among them will be:

In order to carry out finishing or repair work using drywall, a number of preparatory measures will be required. Let's figure out which ones.
Preparation for work
Whatever work is carried out with drywall sheets: whether you decide to finish the walls, the ceiling or sheathe the balcony, it doesn’t matter, because the required surfaces will need to be put in order. Conventionally, such measures for preparing surfaces for work are as follows: cleaning the walls, sealing cracks and holes and treatment with antiseptics and soil compositions. To begin with, the work surface will need to be cleaned of the old coating as best as possible. The putty layer, no matter how reliable it may seem, is recommended to be removed to zero. Old wallpaper, even old drywall - everything will need to be removed. It is more convenient to carry out such work using a hard spatula and a roller moistened with water. If cracks are found in the surfaces of walls or ceilings, holes will need to be deliberately cleaned to the very foundation. All detected protrusions are also better to chip off, knock down and process with a primer or putty. After the surfaces have been treated, it is recommended to apply a thin layer of plaster, which is designed to smooth out other minor surface defects. At the end of the surface preparation, it is recommended to carry out additional treatment with antiseptic compounds and a primer.

And it’s better with an antiseptic primer. Now, when the walls or ceiling are completely ready for further work, you need to wait for the surface to dry completely and only then continue facing or finishing work. formulations.
Methods for attaching drywall to surfaces
It is much easier to carry out installation work with drywall using adhesives than when installing a frame from a profile, however, it should be understood that in this state of affairs, additional installation of heaters and sound insulators is simply impossible. The process of gluing panels is as follows: the surface that we already pre-prepared, we measure using a plumb line or level. If there are irregularities, it will be necessary to bring them to the same level relative to the common plane. Such procedures can be carried out as follows: slaps of solid adhesive are applied to the walls in certain places and in the required quantities so that when attached to them, the drywall sheet is in a strictly horizontal or vertical position. Later, after complete drying, the sheet is fixed on these slaps with the help of self-tapping screws. Such a measure will help to achieve a relatively high-quality finish and give the walls an even and smooth appearance (after attaching the sheets, of course). A primer layer is applied over the slaps and in general on the entire surface, which must dry thoroughly before drywall is attached to it. 
After the primer has dried, proceed to gluing the sheets. You should start from the far corner. The adhesive solution is applied to the reverse side of the sheet and applied to the surface, while it is pressed tightly, but without much concentrated effort, because with such an impact, the drywall sheet is easy to deform. After the sheet is applied, we wait for some time until the surface and the adhesive composition seize, and proceed to gluing the next sheet. After the work is completed, it is necessary to leave the room alone for about a day (or better, if there is nowhere to rush, two ). After that, you can safely start grouting. When the seams are sealed, additional priming work is carried out, and after them - finishing with putty solutions.
The process of mounting on a frame is inherently similar to the process of mounting on glue. However, here the profile acts as glue slaps, which is fixed to the surfaces in such a way that one even and regular plane is created. The advantage of this method of fixing drywall is that the frame allows you to place various types of insulation between the profiles if necessary. The only difficulty lies in the fact that the profile is set in one plane, which will greatly help the level, plumb line and rule. When the profile is installed and the insulation is laid, you can begin to fasten the sheets. They are fixed with a screwdriver and self-tapping screws directly on the butt profile. All subsequent work: grouting, priming and puttying are similar in principle to those described earlier for the case of mounting on glue.

Conclusion
The methods and methods of installing drywall sheets on the surface discussed in the article: walls, ceiling - will be especially useful for novice repairmen or those who started finishing work for the first time. Knowledge of the classification of sheets will also be useful, and a list of the necessary tools and requirements for the surface to be tiled will help to approach the matter as responsibly as possible and be "in full swing." I would also like to note, and it is important to understand that, despite all its positive characteristics, drywall It also has a long service life, and with proper operation and installation, it will become an indispensable assistant in creating a pleasant and cozy atmosphere in your home. All the best!
Work with drywall can be done without the intervention of professional builders. More often, the owners of a private house resort to an independent solution of construction problems. After all, repairs in such a house are impressive and cost a pretty penny. And not hiring workers will save money.
The technology for handling drywall sheets (GKL) is different. It depends on the conditions of the room and the features of the object being built. Repair with wall alignment has two options for the development of events. In the first case, the sheet sits on the adhesive, which fixes the drywall against the wall. In the second case, the manipulations look more complicated, you will need the construction of a special frame.
Frame base
More often, the frame method is resorted to if it is not necessary to level the walls, but to form a decorative partition, since the construction of the frame steals useful centimeters in the house.
The ceiling is also sheathed with plasterboard. With the help of the material complex structures are made. The result is a renovation with a unique design execution.
Home renovation starts with planning. If the alignment of the wall is supposed, here you can do without drawings and complex calculations. Only the calculation of materials is required. A multi-level ceiling will require considerable effort, so it is recommended to carefully consider each design element, mounting methods, structure structure and processing materials.
When choosing materials, you should immediately consider the characteristics of drywall and make a choice.
On the market there are sheets of the following types:
- Standard - an option for simple types of work (GKL);
- Moisture resistant - for rooms with a high humidity index (bathroom, kitchen), marked as GKLV;
- Refractory - for premises requiring a special approach to fire protection (GKLO);
- Universal - the material combines the properties of a refractory and moisture resistant sheet (GKLVO).
 Drywall range
 What is useful in work
Working with drywall includes the need to build a frame. The metal profile forms a “skeleton”, which is subsequently sheathed with sheets. To start the repair, you need to stock up on guides / racks in the required quantity.
The list should include:
- CD - main element (60x30 mm);
- UD - auxiliary product (30x30 mm);
- UW and CW are additional rack and rail elements that are necessary if the repair includes the construction of a partition.
In addition, you should get:
- Self-tapping screws for drywall;
- reinforcing tape;
- Dowels to fasten to walls and ceilings;
- thermal insulating material;
- Gypsum putty;
- Primer;
- Dry adhesive composition (if the repair assumes that the walls and ceiling in the house are aligned with the adhesive method of fixing the GKL);
- Sealing tape;
- Direct hangers.
Read also: - stages of work with photos and videos, the choice of material and its properties
Features of wall alignment
The walls in the house are the main objects that affect any repair. They need preparation before proceeding to the direct construction of the frame.
The preparatory technology step by step looks like this:
- The walls are cleaned of pieces of plaster that has peeled off.
- The surface is covered with a primer.
- An antiseptic composition is applied.
- Vertical markings are being applied for the installation of racks.
 Mounting racks
 Racks in the frame are best placed in increments of 60 cm or 40 cm. These indicators are considered optimal when working with 120 cm drywall sheets.
Frame erection
- Sticking tape to the guide profiles to reduce noise (the side with which the element is attached to the floor, ceiling or walls is pasted over).
- Installation of guide profiles on the ceiling and floor for further installation of racks (it is better to use dowels).
- Checking installed components for accuracy of location in one vertical plane (a plumb bob is used).
- Installation of racks inside the guides and fixation with a cutter or self-tapping screws.
- Fixing racks with straight hangers and dowels.
- Fastening the racks to the hangers with self-tapping screws (for additional rigidity).
- Bending of protrusions on suspensions.
 Finished crate against the wall
 - Laying wiring for organizing a communication system.
- Warming the wall of the house with mineral wool.
The insulation material must be insulated with a vapor barrier membrane. You will need double-sided tape to attach to the frame.
After that, the frame is sheathed with drywall. Installation is made from below. Depending on the height of the ceiling, finishing the frame requires manipulation of the material. This is where drywall technology comes in handy.
Work with drywall sheets
Regardless of what will be sheathed with drywall - walls or ceilings, repairs in the house are done according to the rules. Even if it concerns seemingly insignificant nuances at first glance.
The first thing the builder faces is cutting the material. Sheets are unpretentious in this regard, but a trick is applied here. After marking on the surface of the material, a sharp clerical knife is carried out along the notch line. By fixing one half of the GKL and pressing on the other, you can easily break the material along the incision made.
 Material cutting instructions
 A ceiling with a complex structure / decorative partition sometimes requires the implementation of curly elements. For these purposes, it is better to use an electric jigsaw. This tool cuts precise and controlled details by the master.
The electric jigsaw is set to the operating mode with the maximum number of revolutions. Appropriate markings are preliminarily applied to the sheet. The material is laid on a surface convenient for work. The sheet is fixed with one hand, and the second is cut with a jigsaw. The tool is pressed tightly against the GKL.
If figured decor is required
A figured ceiling or a plasterboard niche will be an excellent interior decoration. Such objects cannot do without the use of special technologies for working with the material. In some cases, to achieve the desired shape, the GKL will need to be bent. Sheet capabilities allow you to perform such procedures. Moreover, there are several ways to bend the product at once.
The dry processing method involves cutting the sheet with a clerical knife. All lines must be parallel to each other. The cutting depth is no more than 0.6 cm. This will allow you to bend the sheet, but not cut it completely.
The more notches are made, the larger the radius of curvature will eventually be. In other words, frequent lines will allow you to strongly bend the sheet. More rare incisions will limit the fold line somewhat.
 Material bend pattern
 Working with drywall in a wet way is carried out by soaking the material. Water is applied to the sheet, it should be cold. After that, using a spiked roller, the entire surface is treated. If there is no such tool at hand, use a fork moistened with water. The result will be small holes that will allow you to bend the product. This must be done carefully.
There is a more gentle way. It lies in the fact that the sheet is wetted and laid on the surface so that its edges hang down. In a few days, the material itself will bend under its own weight.
The review below discusses the specifics of working with drywall when building a partition:
GKL as a skin can be attached to a metal or wooden frame. The latter is rarely used, so it is not taken into account. Hardened screws are used for fastening. The recommended size of the fasteners is 3-3.5 cm. The sheet is applied to the frame base and tacked with self-tapping screws, the fasteners fall exactly in the middle of the profile. So that further surface treatment does not cause problems, the head of the screws is recessed to a depth of 0.1-0.2 cm.
Fixation step - 100-150 mm. Sheets are placed end-to-end with a minimum allowable gap of 2-3 millimeters. After that, the seams are filled with putty. The primer is pre-applied. When it dries, grooves are cut out at the joints of the sheets, a sickle tape is applied and a layer of putty is applied.
It remains to wait until it dries, primed and apply putty again. This time the layer will be the final one. The result is rubbed with sandpaper to eliminate irregularities.
In contact with
Tsugunov Anton Valerievich
Reading time: 6 minutes
Despite the fact that drywall has been used since Soviet times, it has become widespread only in the last two decades. Working with drywall with your own hands is quite within the power of a simple layman with a minimum of building skills, and the scope of this material is extremely wide. It is ideal for leveling walls and ceilings in apartments, erecting all kinds of arches, interior partitions and creating other interior details that give the apartment its individuality.
Drywall is valued by finishers for its undeniable advantages.
- The material is excellent value for money.
- In addition to solving aesthetic problems, it can be used for warming apartments, increasing their sound insulation.
- Under its surface, it is easy to hide not only the unevenness of the wall, but also protruding pipes and communications.
- Working with drywall is not accompanied by as much dust and dirt as, for example, plastering walls or whitewashing the ceiling.
- This finishing material is environmentally friendly, does not conduct electricity and is easy to use.
All these factors determined the widespread use of drywall in repair work.
What is drywall
Before you figure out how to work with drywall, you need to decide on its types. Building material must be selected taking into account the specifics of the room and its microclimate. For convenience, the sheets of material are painted in different colors depending on the type.
- In ordinary rooms with normal humidity, gray drywall is used.
- Fire-resistant sheets marked with the abbreviation GKLO are painted in pink or light purple. They are used when finishing surfaces near stoves and fireplaces.
- The letters GKLV and green color indicate moisture-resistant drywall for bathrooms and kitchens.
- For finishing walls and ceilings in the kitchen, you can also use sheets of dark gray or blue color, which have the designation GKLVO. They combine good moisture resistance with high fire resistance.
- GKLA arched drywall is often used to create curved structures. It has a smaller thickness - 6-7 mm and is very plastic.
The most detailed information about the types of this material and its parameters, as well as its classification according to the new GOST can be found in the article "".
Profiles for drywall installation
Installation of drywall can be carried out in two ways: on glue or on a frame. More often, a frame structure is used, which has only one drawback: a more significant reduction in the internal space of the room. But with its help it is easier to level the walls or ceiling, provide heat and sound insulation of the room, hide communications.
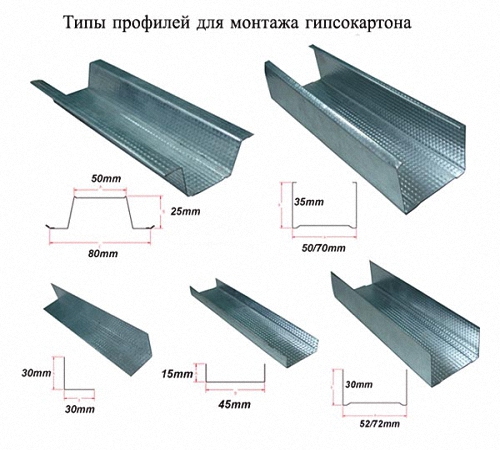
Fastening drywall to a frame made of wooden bars is currently rare, it is much more convenient to use special metal profiles. Their length is standard and is 3 m, and the remaining parameters are indicated in the profile marking. The first number is the width of the profile, and the second is its height.
- The basis of the drywall frame is made up of guide profiles, designated PN or UW. Ceiling or rack profiles are attached to them.
- For fixing suspended ceilings and for wall cladding, guides are used that are marked PNP or UD.
- PP or CD ceiling profiles are inserted into the guides, which are also used when leveling walls, which are subsequently fixed with crabs or anchors. With their help, a frame and jumpers are formed.
- To create walls and partitions, rack profiles are inserted into the rails, denoted by the abbreviation PS or CW.
For curved structures and arches, a special arched profile is used. There is also a corner profile designed to strengthen the outer and inner corners.
In addition, a wide variety of fasteners are produced, thanks to which do-it-yourself drywall work on walls and ceilings turns into an assembly of an exciting designer.
The profiles are attached to the wall and ceiling with the help of U-shaped brackets, self-tapping screws and “quick installation” dowel-nails. To fasten the profiles together, you can use rivets or a cutter (special mounting pliers). There are many parts for fasteners, but with a single do-it-yourself job, most of them will not be required.
Required Tools
The tool that will be needed when installing a drywall structure is best prepared in advance.
- When attaching the profiles to the wall, you will have to drill a lot of holes for the dowels. With a conventional impact drill, this process can turn into a real torment. Therefore, it is better to stock up on a good puncher.
- A screwdriver with a set of interchangeable bits is useful when mounting the frame on a wall or ceiling and fixing drywall sheets.
- You will also need a hammer, metal shears, a screwdriver, a level, a plumb line, a clerical knife and a spatula.
This is a necessary minimum, you can expand the list of tools based on your needs and capabilities.
Sheet cutting
In order to cut a sheet of drywall, you can use a regular clerical knife. With its help, an incision is made along the ruler on one side of the sheet, after which the sheet is easily broken into two parts.
If you want to cut a curved hole, such as an arch, it is better to use a jigsaw. It is necessary to insert a metal file into it and cut at maximum speed.
What brand of drywall do you use?
Poll Options are limited because JavaScript is disabled in your browser.
The one in the store 12%, 24 vote
15.03.2018
To obtain a smooth bend, you can do without incisions. The GKL sheet is attached with one side to the prepared curved frame, the free side is slowly and carefully bent, rounded in the shape of the frame. This job is best done by two people.
Check out the video tutorial that will show you how the pros do it:
With the wet method, the side of the GKL sheet, which will be concave, must be moistened. For a better effect, you can walk on the surface with a spiked roller, and in its absence, with an ordinary fork. Once wet, the sheet can be gently folded into the desired shape. It is best to carefully lay it on the template, wrap it with tape and leave it to dry completely.
Surface preparation
Regardless of the purpose and method of fixing drywall, the surface of the wall or ceiling needs preliminary preparation.
- . It can be paint, wallpaper or fragile plaster.
- Large cracks are primed and sealed with cement mortar.
- The surface is treated with an antiseptic, otherwise mold or fungus may develop under the drywall.
In most cases, this method is used to level the walls. The order of installation work in this case will be as follows:
- On the ceiling, a line is drawn on the inner edge of the drywall sheet. In this case, the distance from the wall cannot be less than the thickness of the profile, that is, 30 mm.
- A UD guide profile is screwed along this line. Its outer border should coincide with our line, and it will be between the wall and the mark.
- Using a plumb line, the same line is drawn on the floor and another UD profile is screwed. If everything is done carefully, then the profiles will be in a single vertical plane.
- Installation of vertical racks. Each sheet of drywall must be screwed to three such racks from the CD profile: one is located in the center of the sheet, and two along the edges. With a standard drywall width of 120 mm, vertical posts must be installed every 60 mm. Adjacent sheets will also be attached to the profiles located at the edges. The verticality of the profiles is checked using a level.
- Racks are fixed with a cutter or self-tapping screws. In order for the frame to become rigid, each rack must be connected to the wall using brackets. They are attached to the wall with dowels in increments of 500–600 mm. In the future, their edges are bent and attached to the profiles with self-tapping screws. In this case, it is necessary to avoid the curvature of the racks, controlling the level of their verticality.
If the ceiling is leveled with drywall, then anchors are used instead of dowels when fastening. Rough plastic dowels and self-tapping screws can only be used in case of a slight load. Also, when installing the ceiling, wire strands and "butterflies" are used, which are necessary if the distance between the ceiling and the GKL sheet is significant.
- Sheets of drywall are attached to the frame with self-tapping screws 30–35 mm long. The distance between the attachment points should not exceed 20 cm, most often a step of 10–15 cm is chosen.
The caps of the screws must be deepened into the sheet by a few millimeters.
Sealing joints between sheets
When fixing drywall, a gap of 1–2 mm is allowed between adjacent sheets. At the final stage, it is necessary to process these joints so that the drywall surface is ready for fine finishing.
- If there is no factory chamfer on the sheets, then it is necessary to make it with a sharp knife at an angle of 45 degrees.
- This triangular seam is filled with putty, and a sickle mesh is glued on top. It is pressed with a spatula and recessed in putty. The corners are puttied with special perforated corners. You should also not forget to fill with putty all the recesses formed at the screwing points of the self-tapping screws, otherwise the rust from them will eventually come through the finish.
Before installing drywall, you should prepare the frame on which it will be attached. For these purposes, a special profile is used, which differs in size, cross section and configuration. We will talk about the features of installing a profile for drywall and its purpose further.
Profile for drywall: characteristics and general information
Drywall is a material that is quite simple to use. However, in order to fix it on the surface, it is necessary to build a special structure from the profile. In the process of performing these works, difficulties often arise.

The construction of a structure from a metal profile for fixing drywall allows this material to fully perform its functions. Since the frameless fastening of drywall is gypsum sheets that decorate the room. At a time when frame structures differ in shape, size, have arched openings, etc.
The absence of a crate will not allow you to level the walls, finish the ceiling or install partitions.
There are two options for profiles used in the installation of drywall structures:
- wooden;
- metal.
The first option is distinguished by a lot of disadvantages, among which, first of all, the low duration of operation, compared with metal. In addition, a wooden profile is more susceptible to moisture than a metal one.
Steel profiles are several times more expensive than wooden ones, this is their main drawback. Despite this, they have a lot of advantages, among which we highlight:
- high resistance to all external influences;
- availability of acquisition;
- simplicity and reliability in use;
- duration of operation, galvanized steel, 6 mm thick, is used for their manufacture;
- this profile is easy to restore;
- a variety of profile options that are suitable for use in certain situations.
The main types of metal profile for drywall
In accordance with the purpose, all profiles for the installation of drywall are divided into:
- basic;
- guides.
The dimensions of the profile for drywall vary in relation to the features of the design that is being built from it.
The first option is marked PS and PP. It is designed for high traffic areas. It is on this type of profile that drywall sheets are attached. The two versions of the guide profile differ on the edges in the form of the letter P or S.
For the guide profile, there is a PN marking. It is a horizontal bar, which is the basis for attaching vertical racks. It is this profile that forms the basis of the steel frame.
We suggest that you familiarize yourself with the main profile options for drywall made of metal:
- PN - are guide profiles for ceiling purposes, since it is on them that the drywall used in the process of finishing ceilings is attached;
- PP - a kind of ceiling main profile, used in the process of fixing drywall on the ceiling, it is fixed around the perimeter of the room when installing suspended ceilings;
- PN - profiles for wall purposes, perform the function of a vertical rack in wall structures.
Tip: Ps profiles are used partially, that is, they are installed in segments, in order to save material. This does not affect the final quality of the design.

There are two more profile options that are used infrequently:
- corner - help to form the corners of the drywall partition, they are installed directly on the already installed drywall and protect it from the effects of various kinds of mechanical irritants, when arranging the ceiling, the corner profiles are fixed around the perimeter, when arranging the walls, they are mounted on the floor and ceiling;
- arched - are used in the process of constructing arches, in addition, with its help they form radius and various asymmetric shapes of walls or partitions, simple self-tapping screws are enough to fix such a profile.
Please note that the maximum bending radius of the arched profile is 50 cm, with a greater load, there is a risk of structural failure.
Features of fastening a metal profile
To fix the material, special suspensions are used, with the help of which the interval between the wall and the profile is adjusted. Thus, before the construction of the structure, it is not necessary to pre-align the walls.
If the ceiling height is more than two meters, then 5 hangers attached to the ceiling or wall are required to install the profiles. With their help, the evenness of the entire structure is adjusted.
Please note that the basis of the metal frame structure is a guide type profile. It is fixed with dowels and screws. The average distance between holes is 200 mm. Thus, the structure will be securely attached to the wall.
Some types of profiles already have pre-drilled holes, for beginners it is better to choose just such materials.
In order to facilitate the installation of a profile for drywall, we suggest that you familiarize yourself with useful tips for this process:
1. Two drywall sheets can easily fit on the wide wall of the profile, but keep in mind that each of them should be evenly spaced on it.

Tip: Calculate the installation of vertical racks so that the interval between them is six centimeters less than half the width of the drywall.
2. Screws are installed in close proximity to the wall to ensure a more secure fastening.
3. Drive the self-tapping screws only at a right angle, otherwise, unscrew the self-tapping screw and install it again.
4. All self-tapping screw heads are recessed by 0.5 mm in the profile.
5. Vertical racks have a special place for installing engineering communications. Although in most cases, wires and pipes run directly under the drywall.
6. When finishing a private house, you should take care of the presence of additional heat and sound insulation.
7. When buying profiles and guides for drywall, you should increase the required amount of materials by 10% to compensate for various cuts and technical issues.

Features of installing profiles for drywall around the perimeter of the room
First you need to mark the plane along which the frame will be installed. Next, prepare the tools in the form:
- two plumb lines;
- fishing line;
- rulers;
- hammer with nails;
- chalk.
To fix the plumb line on the wall, nails are used, it must be fixed to the ceiling, but hang down to the floor. The second plumb line is attached in the same way. Please note that the plumb lines should not touch anything, as the evenness of the vertical will be disturbed.
A fishing line is stretched along the wall in three places: top, bottom and center. The highest point on the wall will serve as the installation site for the metal frame. Retreating from her place, check the accuracy of the breakdown. Parallel to the previously stretched fishing line, pull another part of it against the side wall. Connect the sections of the woods located on the two walls with a ruler, thus making marks according to the location of the plane.
Repeat this procedure for all other walls and ceiling. Using the rule and chalk, draw the perimeter of the structure.

Mounting profile for drywall guide type
In order for the further construction of the profiles to be even and correct, it is first necessary to correctly fix the guide profile, which is the basis of the frame, which takes on most of the entire load.
To fix the guide profile you will need:
- perforator;
- electric drill;
- hammer;
- fasteners;
- scissors for metal;
- pliers.
Install the guide profile on the wall, according to the markings made in advance. To make it more convenient to work, it is better to start the whole process from the bottom. Step back from the top of the profile 0.3 m, and drill a hole, which should be a few millimeters longer than the length of the dowel-nails. Make two more holes in the center and bottom and install the dowel-nails.
Check the evenness of the entire structure according to the given markup, if necessary, correct the profile and hammer in nails. Next, measure the distance that remains to the end of the wall and add twenty millimeters to it, since the guides are installed with an overlap.
Using scissors for cutting metal products, cut off the side sections of the profile and bend it outward, cut off the central part and align with pliers. Install the next part of the profile, while at the butt section, hammer in an additional dowel-nail.
Align the profile according to the marking and fix it with dowel-nails. In the same way, all subsequent guide profiles are installed along the perimeter of the walls and ceiling. For additional strengthening of the entire structure, dowels are used, installed in increments of thirty centimeters. Before this, it is recommended to once again check the design for evenness and compliance with the markup.
Do-it-yourself installation of a drywall profile: vertical sections
Vertical purpose profiles must be fastened in accordance with the size and type of installation of drywall sheets. From the beginning of the wall, a distance equal to the width of the drywall sheet is measured, a mark is made. It is here that the vertical profile will be located, which will become the junction of two sheets. The mark indicates the transverse middle of the metal profile.
In the same way, mark all vertical sections of the profile mounting. The drywall sheet is divided into two parts according to its width, each of them should not be more than fifty centimeters. Make marks on the floor surface, they will indicate the middle part of the vertical profiles.
Throw a plumb line from the ceiling to the floor, and mark the places where the vertical profile is attached to the ceiling. Using the first mark, transfer the dimensions to the ceiling surface. To check the correctness of the work, throw a plumb line from the ceiling to the floor, if the marks match, then the markup does not require adjustment.

To fix vertical profiles on the ceiling, you will need:
- electric screwdriver;
- self-tapping screws for metal;
- fishing line;
- pliers;
- rules;
- pencil
- suspension in the amount of three pieces;
- hammer;
- fasteners;
- electric drill.
On the central part of the wall, measure the gap between the ceiling and the floor. Transfer all measurements to the profile surface, while subtracting one centimeter. To avoid errors, use a pencil to mark the size of the entire workpiece. Cut off the side sections of the profile, bend its edges outward, cut through the central part. Use pliers to straighten the cut. Thus, the guide will connect to the vertical profile.
After installing the workpiece on the wall, you should mark it around the perimeter. Further, the wall is divided into three sections, on which marks are made and the workpiece is removed.
Install the suspension according to the marks made, drill holes in the suspension with a perforated drill and fix it on the marks with dowel-nails. With the help of plumb lines, drywall is very conveniently attached, in addition, with their help it is set in the required direction.
Mount the second hanger and return the workpiece. Attach the vertical profile to the surface of the guide using metal screws. First fix its upper part, and then the lower one. Please note that the height of the profile is less than the total height by one centimeter, so care should be taken to have an allowance of 0.5 cm at the top and bottom.

On the surface of the vertical guides, screw the screws on which the fishing line is fixed. The side sections of the suspensions need to be bent, and a vertical profile is set along the fishing line. This process will require more than one person.
Please note that the profile, in no case, should not push the line or move away from it. It is possible to check the evenness of the structure using the rule.
Tip: If even minor errors are found, they should be corrected at this stage of the work. After installing vertical profiles, errors cannot be corrected.
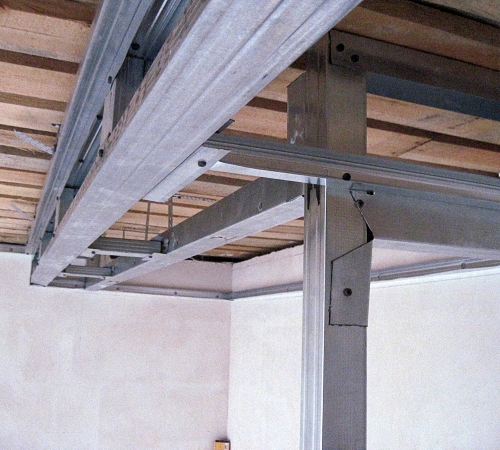
Installation of horizontal fragments from a metal profile
The horizontal parts are jumpers that increase the strength characteristics of the structure. These components are fixed directly to the structure, not to the wall. In order to save material, in the process of fixing the horizontal parts of the profile, the principle of fixing drywall should be applied, that is, install jumpers in areas under the drywall.
Please note that during the installation of drywall, you should use the principle of a checkerboard pattern, that is, first a whole sheet is laid, and then half of it. This will help prevent the appearance of long seams and strengthen the strength of the structure.
To complete this process, you will need:
- screwdriver;
- self-tapping screws with scissors for metal;
- pliers;
- crabs;
- marker.

In the place where the transverse profile intersects with the vertical structure, a special part is installed, which is called a crab. If an even cross does not form, follow these steps:
- measure the distance between the middle sections of the two verticals;
- cut the workpiece and install in place;
- using a marker, mark the sections of the profile installation;
- using scissors for metal, cut off the desired section of the profile;
- pliers will help align the cuts and bend the side sections at a right angle;
- install the profile and attach it with self-tapping screws;
- check the evenness of the resulting structure.
Video installation profile od drywall:
Often, gross mistakes are made in working with GKL, certain knowledge will help to avoid them. Drywall installation technology must be observed, no matter what type of work you choose. Naturally, some nuances, changes and additional requirements are possible, but the basis is the same for all do-it-yourself work with this material.

Where to begin
Starting drywall work in any room, you must understand the qualities and properties of the material, this is the only way you will determine how GKL is suitable or not suitable for such work. You must choose the type of material, its dimensional parameters, determine the type of drywall installation, frame rigidity, tools and materials, and only after that, having additionally drawn up a work plan, proceed to install a wall, partition, communications lining box, ceiling, arch or other structure .
Drywall and its types
This material has many varieties and types, distinguished by composition, thickness and application.
There are three main varieties:
- GKL - standard;
- GKLV - moisture resistant;
- GKLVO - moisture-fire resistant.
The standard sheet of drywall is the most common in use, in terms of thickness and application, it is arched, ceiling and wall. Moisture-resistant material designed for the repair and decoration of premises with a high level of humidity. Sheets of this material are able to absorb excess moisture in the air and allocate it back when there is a shortage.
You should not feed yourself with the illusion that the GKLV is completely waterproof. Moisture-resistant drywall is based on gypsum, in which there is only a certain percentage of special additives that make the material moisture resistant. When rough finishing a box or other structures made of GKLV with your own hands, the surfaces must be primed.
Moisture-fire-resistant drywall has enhanced performance in two of these directions. It is used for fire protection of rooms with high, low and normal levels of humidity.

Tools for the job
The tool kit of a home master, of course, can differ significantly from the "equipment" of a professional. However, there is a certain minimum, without which the installation of drywall is simply not possible.
Read also:
Rational putty consumption per 1 m² of wall: correct calculation
The necessary set of tools for working with GCR with your own hands:
- Screwdriver;
- Building level, plumb line, hydraulic level;
- Chopping thread;
- Metal scissors or grinder;
- Mounting or clerical knife;
- Construction or simple pencil;
- Drill or perforator;
- Yardstick.
For a rough finish of any GKL construction with your own hands, you will need a container for diluting putty mixtures, a wide and narrow spatula, as well as a mesh or sandpaper.
In order to greatly simplify your work when mixing the mixture, you can purchase a mixer - a special nozzle for a drill for stirring construction and finishing mixtures.
However, professionals have their own secrets for installing drywall with their own hands. Some of them are in the toolkit. An air or gas gun, for example, greatly simplifies the installation of the GKL, and the Prosekatel simplifies the assembly of the frame. A lift helps to lift a massive sheet of material under the ceiling, and a needle roller helps to bend the material in an arc.

Assembly order
The main plasterboard structures include ceiling structures, as well as walls, boxes and partitions. The main mistakes home craftsmen make in assembling these particular segments with their own hands. Knowledge of the technology and sequence of work during the installation of a ceiling, wall, box or partition and drywall guarantees a successful result in the end, as well as the durability and safety of the structure.
Knowing the technology of installing drywall on the simplest elements of the interior, you can learn how to mount complex geometric shapes with your own hands.

Mounting technology
It is important to work correctly with the marking and installation of the frame, followed by the usual sheathing of the frame with plasterboard, which will create a uniform, integral surface, or make an original multi-level ceiling.
When creating a frame for a box, you should remember what you plan to hide in it.
It is also important to remember that in addition to the standard profile for creating a ceiling box, certain accessories can be used to help in the work. In addition, sometimes you have to strengthen the structure, for example, if you want to install some communications, lighting, ventilation, and so on in the thickness of the ceiling.
Read also:
Do-it-yourself drawings on the walls will create a mood and make the interior unique

Assembly rules
Here, as in any other work with drywall sheets, several types of installation can be used, and each type has its own technology. It is necessary to remember about the frame and frameless method, to understand that the frame can be wooden or metal, and the frameless method involves the installation of drywall on the adhesive composition.
It is possible to install drywall using the Knauf technology, which involves a clear sequence consisting of preparation, installation of the frame, cladding of the GKL walls and puttying of the surfaces.
We consider the drafting of a project to be the most important stage in such work, because it can include not only a drawing, but also all the costs of work, which is very convenient.
Do not forget to immediately determine the type of work, because it will depend on it whether it is worth leaving a place in the wall for insulation, whether it is necessary to soundproof the room, make a separate box for communications, niches in the wall, and so on.

Box device: installation nuances
The main objective of this design is the decorative "framing" of some communications, unaesthetic elements or any fasteners. The process of mounting the box on the ceiling is not much different from assembling the box on the wall or in the partition. At the heart of the box, like any other drywall construction, is a frame made of a metal profile, which is sewn up with material. After a rough finish, the box can be decorated with any materials: be it sea pebbles with glass mosaic or ordinary paper wallpaper.

Partition wall mounting technology
We believe that the main thing in the construction of such structures should be considered the project and its observance, as well as clear marking, correct installation of the frame and its strengthening, if necessary.
In a similar way, we can talk about so many elements and stages, because drywall work includes the technology of mounting a drywall frame, and decorative elements installed in the premises, and even the most elementary things, such as shelves and small boxes. But it is worth paying attention to more complex structures, for example, plasterboard fireplaces, cabinets, walls with niches and more.


