Do-it-yourself kitchen renovation: where to start renovation?
A comfortable, beautiful and functional kitchen is important for everyone. But what to do when your kitchen has been in use for 10 years or more? Are the surfaces of all the kitchen cabinets worn out or peeling in places, the tiles are perhaps cracked or look like a legacy of the distant pre-revolutionary past, is the paint on the walls faded?
Having carefully looked at the picture that you observe every day, a completely logical decision comes to you: The kitchen needs urgent renovation! At the same time, you decide to do DIY kitchen renovation. Well, it’s a completely sensible idea to do this. Read this material and you will understand that making repairs without involving builders is a difficult task, but doable...
Think about it and you will agree. Not only is a kitchen renovation an ideal opportunity to change its appearance and aesthetics, it is also the right time to improve the ergonomics and functionality of the kitchen. This is the time when we can change the system of functioning of the premises. To change what for a long time did not allow us to feel absolutely comfortable in the existing space. This is the time to add individual elements that are still missing or to abandon something that is not functional. Basically, it's just time for a revolution!
The word repair even evokes a feeling of fear in some people and creates a great reluctance to do anything. This attitude is understandable. It's no secret that renovation, as a rule, guarantees many more problems than building from scratch. Even for designers and architects and planners. When renovating, it is not always possible to fully realize your desires. Sometimes even the biggest revolution is not able to satisfy all the intended plans, mainly due to the existing installations and room parameters.
The main reason for dissatisfaction with the results of a kitchen renovation is the lack of a clear, well-thought-out plan of action, a clear plan. In any case, if you decide to do DIY kitchen renovation, be prepared for unforeseen difficulties. But don’t be scared, move step by step, step by step and deliberately and everything will work out as you planned.
2. Where to start renovating the kitchen?
The answer to this question depends on your plans. How big will your kitchen revolution be, and what do you want to get as a result?
- Will it only be replacing or updating furniture and perhaps equipment?
- Perhaps this is a partial change in the functional system or a small redecorating?
- Maybe you are planning a large-scale major renovation with replacement of floor coverings, wall finishing, ceiling finishing, or replacement of furniture and equipment?
A clear answer to these questions is the beginning of the whole process. So, where to start renovating a kitchen step by step? Have you decided on the answer? Then you can start.
3. Repair and renovation of kitchen furniture
If you do not want to replace the kitchen unit, but want update your old furniture, you have several known and available options to solve the problem:
- The first option is the simplest, most reliable and the most effective in terms of quality. This contacting a kitchen furniture sales specialist. That is, you need a manager for a company that sells furniture and components. He will select and order new furniture facades for you. And your update will take place quickly, without headaches and unnecessary stress, but with significant costs.
- The second option is search through advertisements of a private owner specialist, which specializes in furniture repair. He will inspect your headset and suggest the most convenient solution for updating it. The option does not guarantee an excellent result 100%, but has an optimal balance between quality and price.
- The third option is Carrying out repair work yourself furniture. This can be an order of ready-made facade panels in an online store or from a manufacturer or dealer of a furniture production company. Or maybe it’s a DIY façade repair. This is the most difficult, but cheapest option to solve the problem.
The method of restoring kitchen items largely depends on the material from which it is made.
When you decide to do your own repairs, you need to clearly know what material the furniture is made of. If this material is wood, then simply remove the old varnish or paint with sandpaper, clean the surface and cover it with a new coating. If it is made of veneer or laminate, you can use durable decorative film or special paint. Such facades are not sanded with sandpaper; the surface is degreased and painted a new color. Depending on the extent of the transformation, you can also replace individual furniture components, such as handles.
If repairing a kitchen set is not an option for you and purchasing new kitchen furniture is inevitable, read the information: how choose a kitchen set, about what color will suit you and why chipboard for furniture is worse than MDF in the article.
The issue of updating furniture facades is a separate big topic. You can see examples of updating facades using paint in the kitchen renovation photo at the end of this article. If this is not your case, we move on to major or cosmetic repairs.
4. Major or cosmetic renovation of the kitchen
If you are planning a cosmetic or major renovation, in combination with a change in the functional layout and arrangement of elements in space, it is worth remembering a few very important principles and rules. These include:
- The principle of unity of design and style in the kitchen;
- The principle of kitchen zoning;
- Forms of kitchen organization;
- Kitchen design rules
Kitchen design, its style in a house or apartment
The ideal room is what you want to see as a result. These are functionality, convenience, design and style. You need to think about what the available space allows and what you want from it. What will this place serve you for? Will it just be a place to prepare food, or will it be a place for small snacks or regular meals?
It should be remembered that the kitchen should not be stylistically and aesthetically separated from the rest of the house or apartment. Especially it should be combined with a cozy living room. The next step after determining its nature is to determine the maximum repair budget. This greatly facilitates the planning stage, and partly determines the appearance of what you want to achieve and achieve.
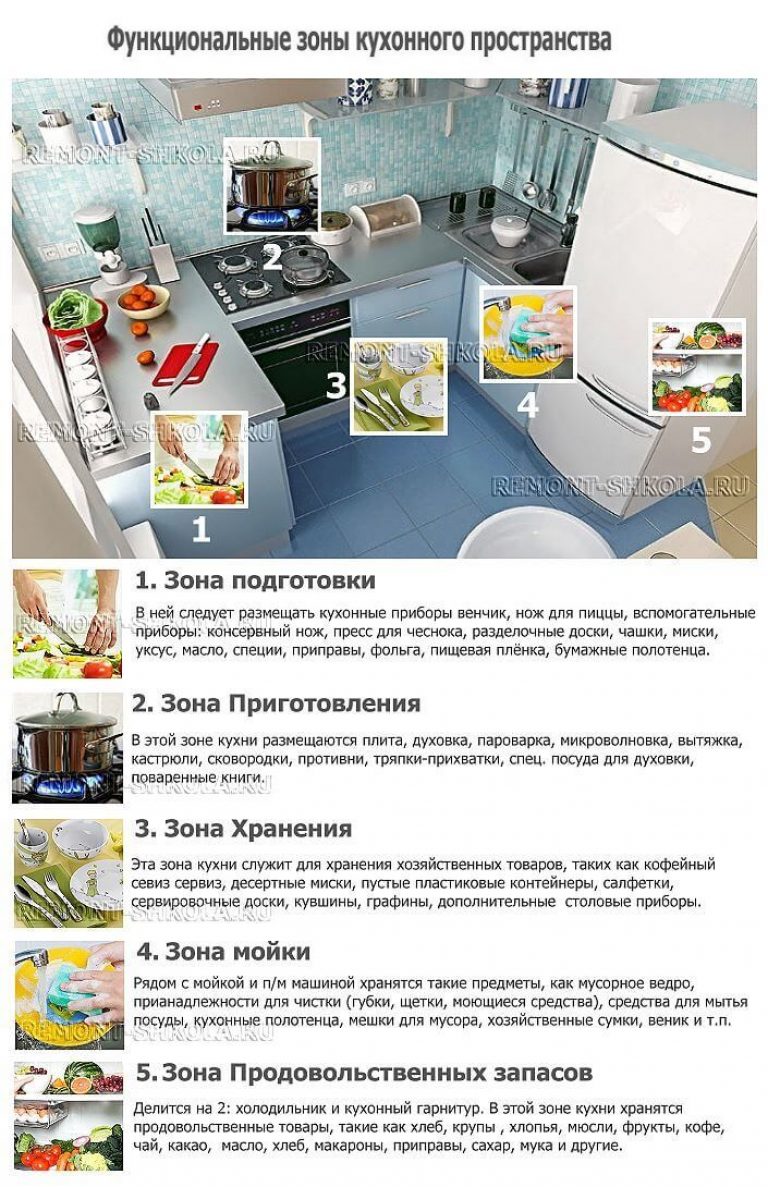
Compliance with the principle of zoning the kitchen space
You know that the principles of ergonomics oblige us to ensure that the kitchen has 5 functional zones. As a rule, it is recommended to follow a certain sequence in the location of these zones. However, the real, not picture, layout and dimensions, especially of small rooms, make their own adjustments. That is why the sequence is conditional, desirable but not required. So, 5 functional zones in the kitchen:
- Preparation area
- Cooking area
- Storage area
- Washing area
- Food supply area
Each zone in the kitchen has its own purpose and ensures that certain work is carried out and certain items or food are stored. You can see the detailed list of storage items in each zone in the figure.
It is optimal, if possible, taking into account the functional layout of the room and specific installation points for furniture and equipment, to create a working triangle between the refrigerator, stove and sink.
Of course this is ideal, but unfortunately a rare option. Therefore, you have the opportunity to organize your life, taking into account the shape of the room and your own preferences.
Organization of the kitchen space
Depending on the size, shape and functionality, you choose one of forms of organization. It could be:
- Single row configuration (linear);
- Double row configuration (two-line);
- L-shaped configuration;
- U-shaped configuration;
- Island configuration
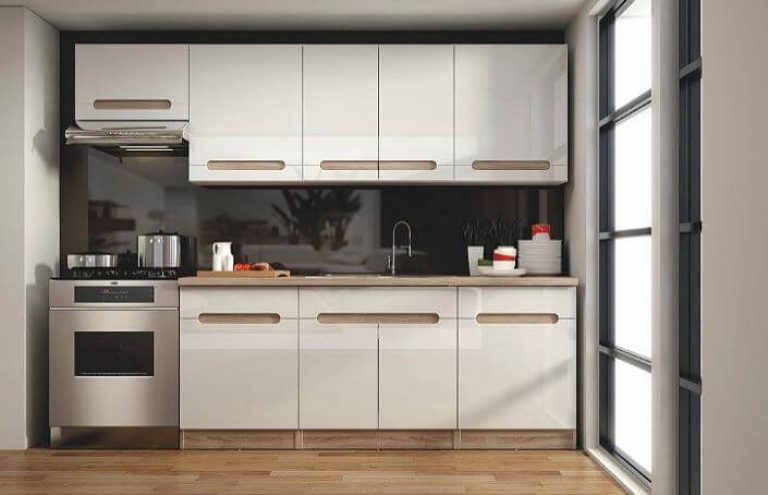
Single row kitchen configuration
The name itself suggests that all the furniture, as well as the stove, refrigerator and sink are located in one line. This means arranging furniture and equipment along one wall. This is the ideal configuration for a long, narrow room.
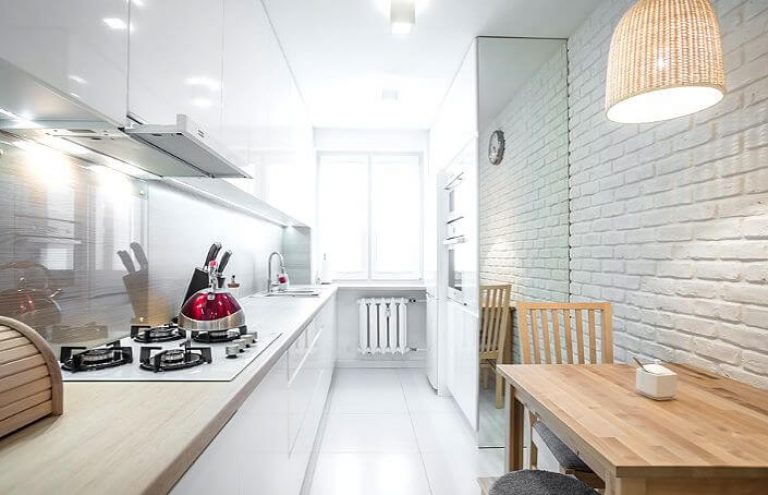
Single-row kitchen space configuration is ideal for narrow kitchens
With this shape of the room, it is not possible to create a working triangle, so you should pay attention to maintaining the recommended order of zones: storage, washing, cooking. In this case, it is desirable that the stove is not located next to the refrigerators, but is separated by a sink.
Small single-row kitchens with the right configuration are fully functional
In addition to using this option in narrow rooms, it is also used in studio apartments, where permanent zoning is very conditional and easily changeable.
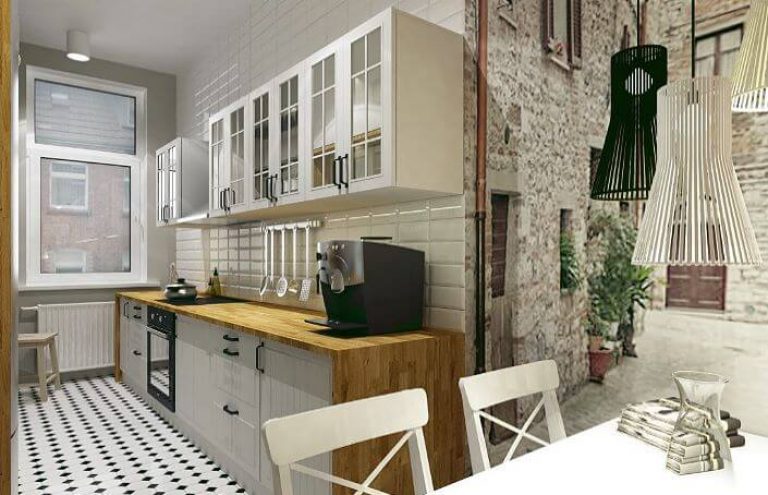
Table placement when choosing a single-row configuration is often associated with certain problems
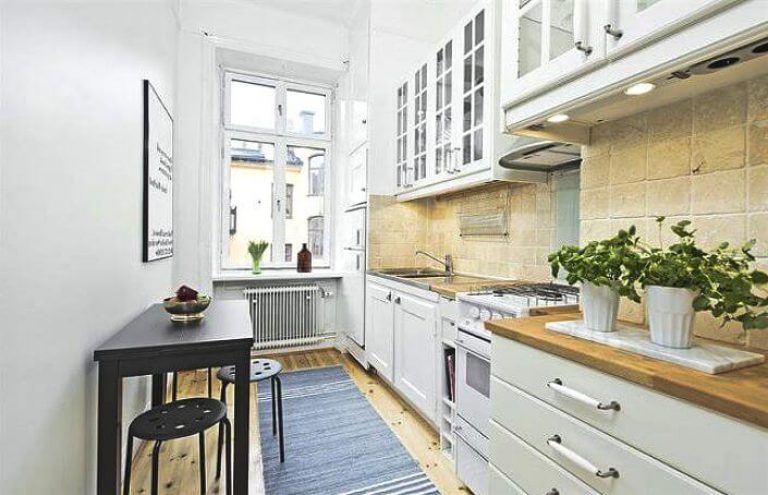
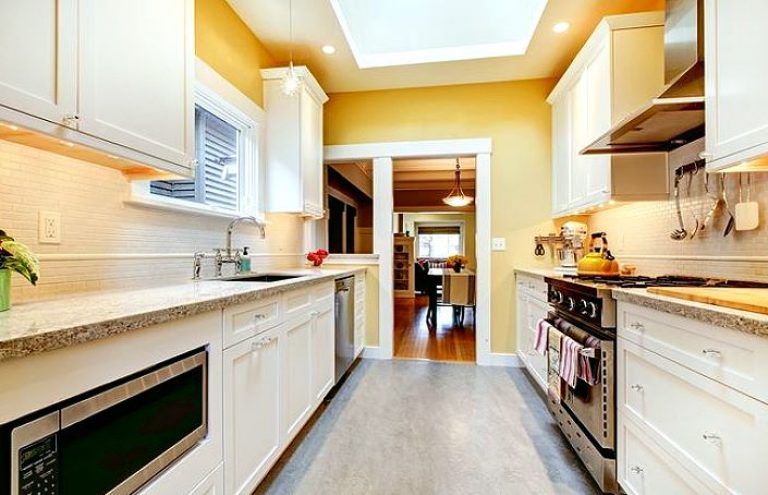
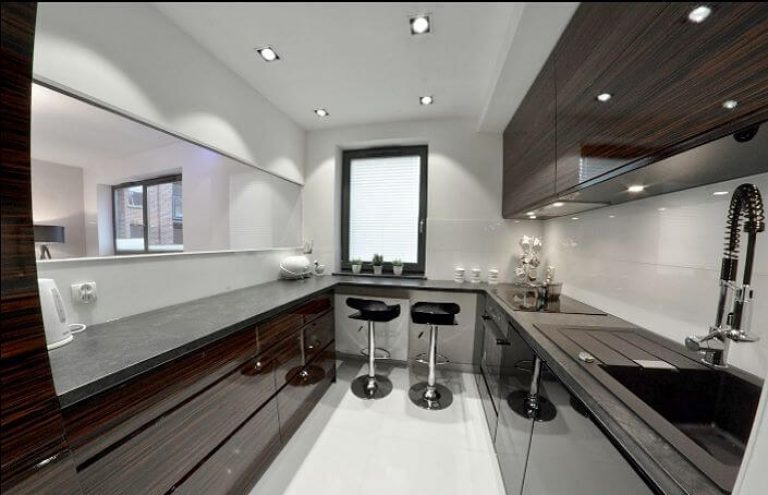
Double row kitchen configuration
This configuration of the kitchen space is recommended for relatively narrow spaces, which, however, allow for a two-row arrangement. The window, as a rule, with this option is located opposite the door to the room. This allows you to organize a work triangle, which is a big plus when working constantly.
Proper organization of the workspace using a two-line arrangement of elements makes the kitchen comfortable and cozy
The optimal distance between cabinets is 120-130 cm. As a proven option, you can consider the following arrangement: side A - sink, separated by the work surface from the stove; side B is the food products area, including a refrigerator and cabinets and an additional work surface.
If it is impossible to locate the dining table in the kitchen area, you can consider installing it in the living room at the entrance
With this choice, the question often arises of determining the optimal place to install the dining table. But the issue of placing additional kitchen equipment is being resolved: mixer, coffee machine, multicooker, juicer, kettle, etc. So when making a decision, think it over a hundred times and determine your priorities.
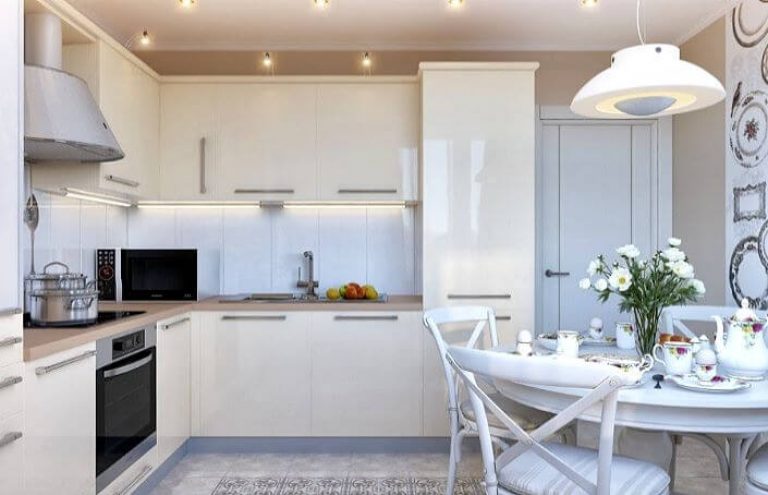
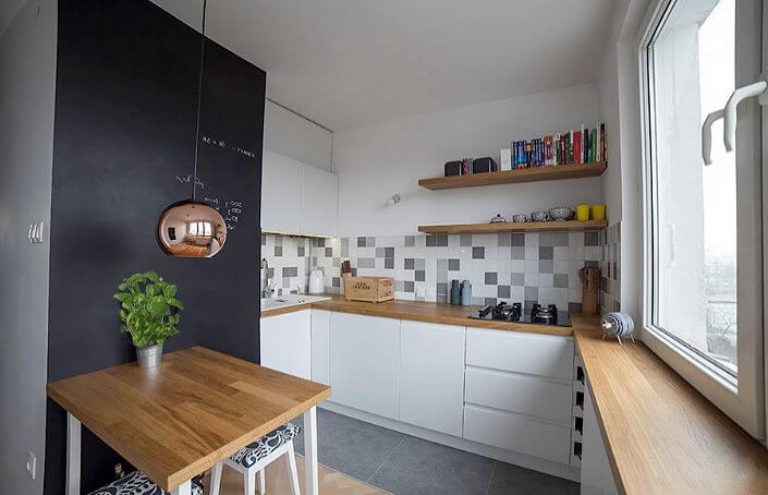
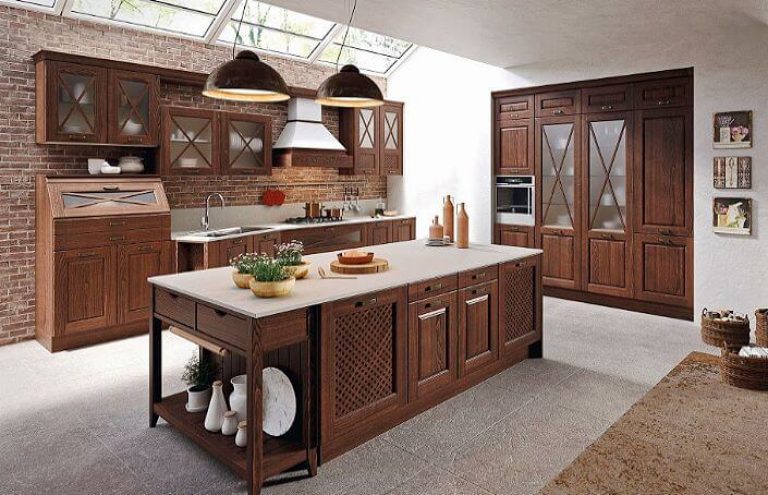
L-shaped kitchen configuration
Like any other L-shaped configuration, it has its own advantages. Its choice makes it possible to clearly separate the dining area from the working area, as well as install an additional countertop and storage cabinet. The L-shaped design is used in rectangular and square rooms and is not suitable for narrow ones.
An L-shaped kitchen can be conveniently placed in any room, but is most often used in small kitchenettes
A well-planned L-shaped design allows you to make even a small kitchen functional and comfortable. In addition, this system allows you to install a table on a free wall for sharing meals. Thus, it is a good choice for a large family, or in a situation where your home often receives guests.
L-shaped kitchens are the ideal solution for both open and closed spaces.
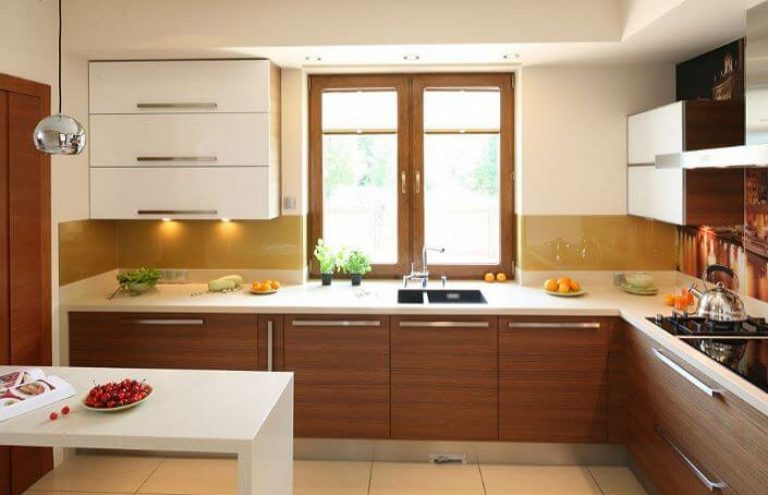
U-shaped kitchen configuration
The U-shaped design is relatively simple, but the most desirable. It, like the two-row configuration, provides a complete functional working triangle. But at the same time, due to the use of the third wall, it reduces unnecessary movements and makes working in the kitchen more comfortable. This is ensured by the proximity of all work areas. Therefore, if the room allows you to use this choice, then go for it.
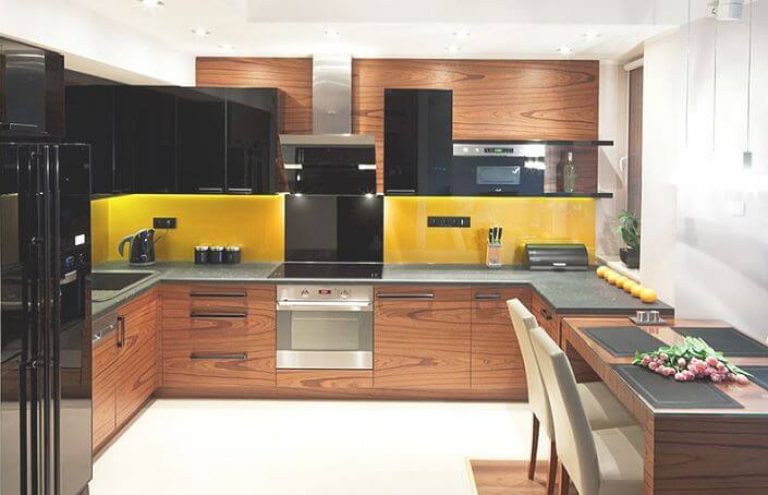
A kitchen with a “U” shaped space organization is ideal for both rectangular and square spaces.
The U-shape fits especially into rectangular and square spaces. Keep in mind that the distance between rows cannot be less than 110 cm. The optimal minimum distance is 120-130 cm.
“U” shape is also suitable for small spaces
An extremely popular option is to install a U sink under the window in kitchens. This is not surprising; washing dishes comes much easier. Oddly enough, this is facilitated by natural light and the view from the window.
A narrow and long kitchen is not an obstacle to choosing a U-shaped layout
Island kitchen configuration
The island configuration is today a fashionable and at the same time practical solution for organizing the kitchen. It is becoming increasingly popular. It is only suitable for large, spacious interiors and open spaces, but each of us would like to have just such an option.
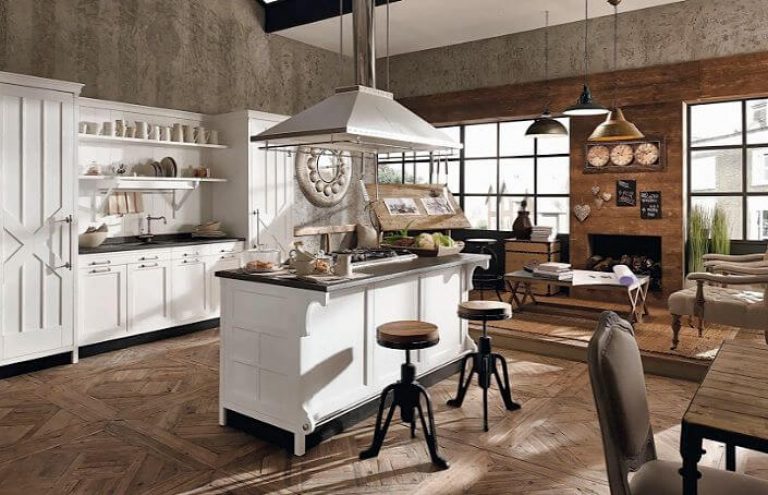
Kitchen island in a spacious room combined with the living room
This arrangement has many features. It provides an interesting look to the kitchen and provides additional storage space for kitchen utensils and food items. It is a real bar, a mini dining room, a spacious washing area, in general it is an integrated food preparation center. As a result, everyone will find enough space to work and cooking together doesn't turn into a constant clash.
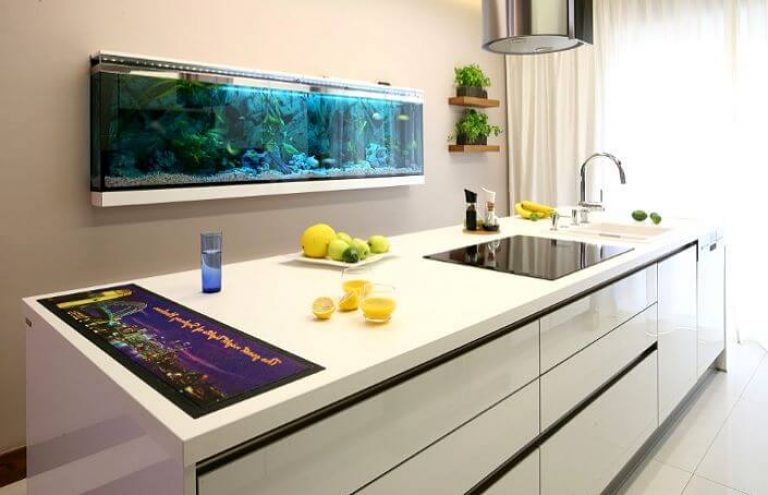
The photo shows a modern island kitchen with an aquarium
With this choice, the classic triangle should not intersect with the island part, otherwise cooking will be absolutely uncomfortable. The area of the room should not be less than 17-19 meters, and the width of the passages should be at least 1.1 - 1.3 meters.
Choosing this form for organizing space in the kitchen initially requires the maximum area for the room
Kitchen design rules
Kitchen design rules are a rather difficult stage when carrying out a major renovation. To be honest, all the small but important nuances can only be taken into account by professionals who have practical experience in design and data on actual operation based on customer reviews. However, knowing the main points will not only be educational, but also useful. Therefore, familiarize yourself with the basic functional distances that must be maintained when designing a kitchen.There are justified recommended distances and locations.
- The distance from the refrigerator to the sink should be from 120 to 210 cm.
- The distance from the stove to the refrigerator is from 120 to 270 cm.
- The minimum distance for wall cabinets from the working surface is 50-70 cm, the recommended distance is 55-60 cm.
- The distance from the stove to the sink should be 50 cm.
- The recommended distance on both sides of the stove should be a minimum of 40 cm.
- Do not place the stove directly next to a window or immediately in front of a natural gas supply pipe.
- The standard height of a kitchen mirror is on average 855 cm.
Built-in kitchen appliances, such as a hob or stove, dishwasher or oven, are selected at the kitchen design stage. Of course, when designing a kitchen, you need to know and take into account the dimensions of the specific appliances you have chosen.
5. Do-it-yourself budget kitchen renovation: example with photo
In the kitchen, as you can see, amber brown reigned, fashionable 15 years ago. The set was already in poor condition, but its complete replacement was not included in the renovation plans. And the repair itself was not planned to be expensive. That's why it was chosen option using special paint. In a word, replacing the floor covering, walls, and even the kitchen unit itself was not included in the kitchen renovation plans. Just painting! Although this option is not yet very popular and many people treat it with caution, see for yourself what the result is.
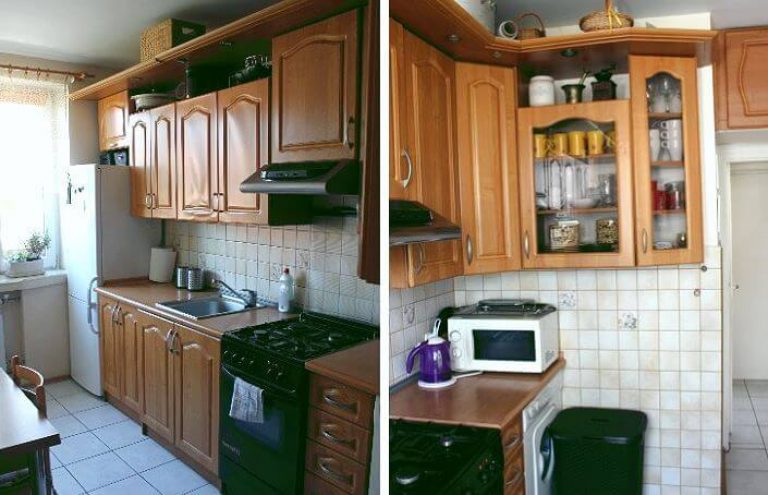
Photo of the old kitchen before renovation - general view
Before painting the kitchen set, the old coating was removed from it. But it was not just the furniture that needed repairs, but also the tiles on the floor and wall, and even the scratched washing machine.
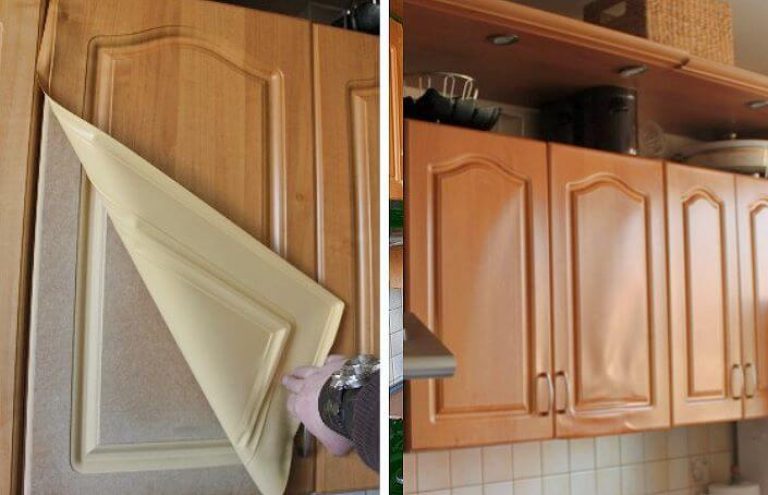
Photo of an old kitchen set
The design of the new kitchen was developed in cool gray tones with the addition of white and black. The renovation began with wall tiles. The entire area to be painted was thoroughly cleaned and degreased. After the tiles had dried, special paint was applied to the wall. Painting was done using a brush and a fine-pile roller.
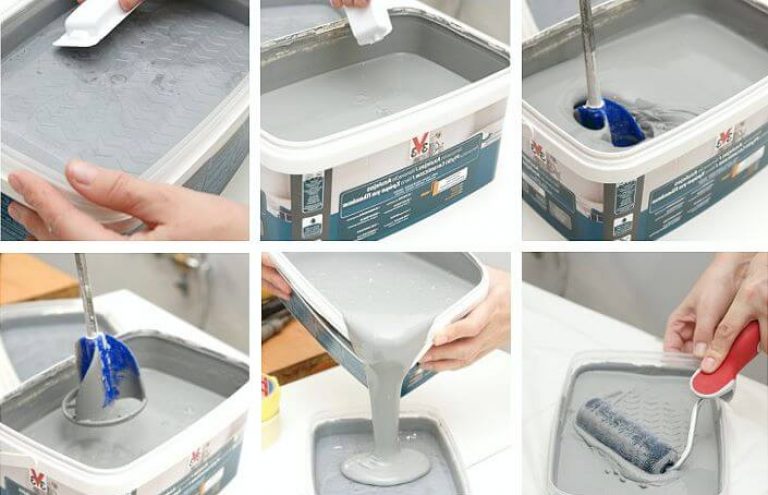
Special paint for DIY kitchen renovation using a roller and brush
To paint the tiles on the walls, we used a special Polish-made CERAMIC paint V33, color GRAY MARENGO. The paint container consists of 2 parts. The bottom part contains the paint itself, and the top cover is used as a tray, which is quite convenient. Before use, an additional component is added to the paint and everything is thoroughly mixed. You must remember that after mixing the two components, the paint should be used within 10 days.
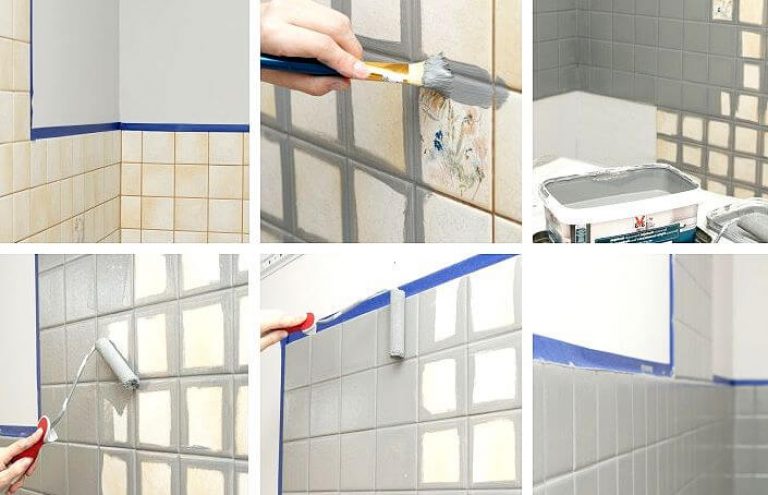
Step-by-step photo of painting walls in a small kitchen
To repaint tiles you need: sticky mounting tape, a brush and a good roller. First, the surface around each tile is painted with a brush, and then the main area with a roller. Depending on the color of the paint and the surface to be painted, at least two layers of paint are required.
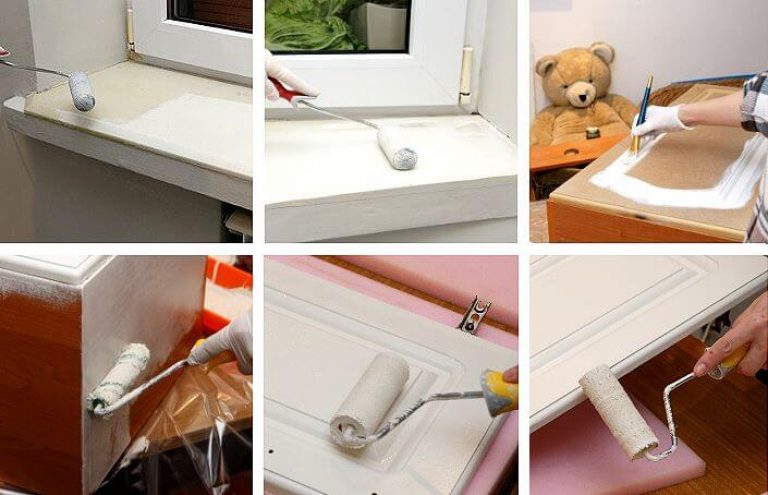
Stages of updating a window sill and kitchen unit using paint
The window sill was also repainted so that it fits into the new interior. Next came the turn kitchen set. To paint the cabinets, we used special paint for kitchen furniture from the same Polish brand V33. In addition, it produces other targeted coatings: for heating radiators, for household appliances. For example, you can paint a refrigerator or the facade of a washing machine. However, you can from any manufacturer. But at the same time, read reviews from real users of the product.
Before painting the kitchen set, it must be thoroughly cleaned and washed with clean water. After drying, you can begin painting. Since the doors had embossing, for high-quality painting it was necessary to use a brush, and then a roller. The method of applying the coating to a flat surface is the same as for conventional painting work. Drying time after applying the first layer is 20-30 minutes. The second coat is applied after approximately 6 hours.
After painting the furniture, it's time to transform the floor tiles, also by painting. The clear, contrasting checkerboard color looks very elegant. Painting tiles on the floor is done in the same way as on the walls.
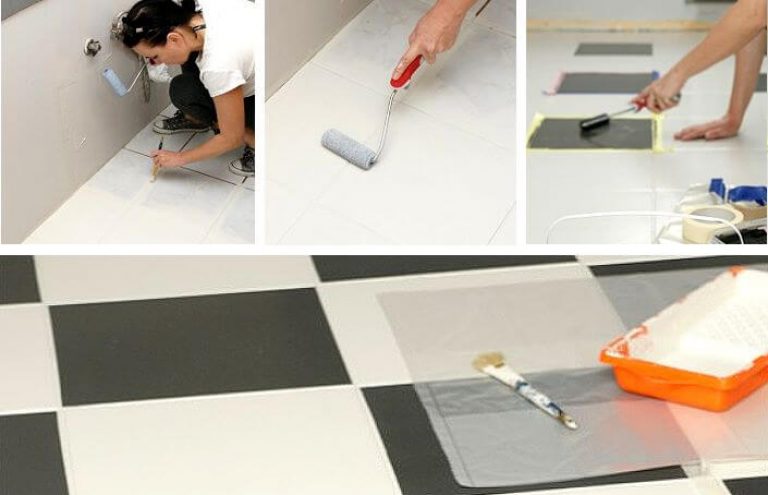
Painting floor tiles when renovating a small kitchen with your own hands: a budget option
At this point the work can be considered completed in full. Although, in addition to painting, the countertops, sink and faucet were replaced. And additionally, several small decorative elements were purchased to completely update the appearance.
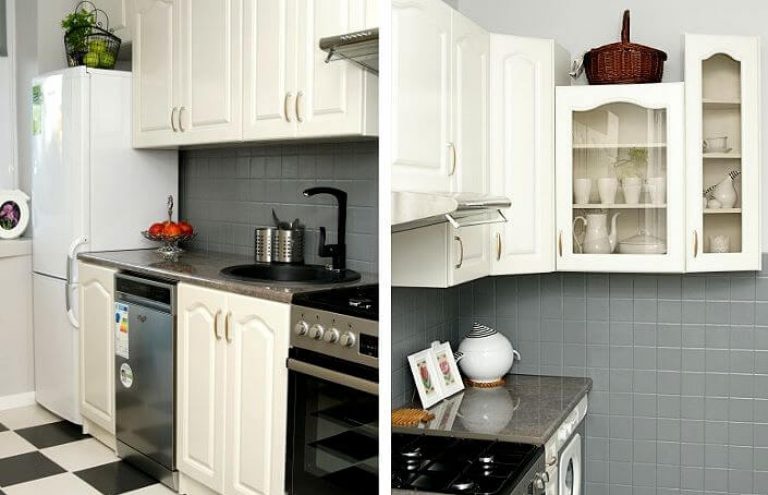
Modern kitchen renovation does not mean expensive and time-consuming
After painting, the kitchen looks fresh, light and spacious
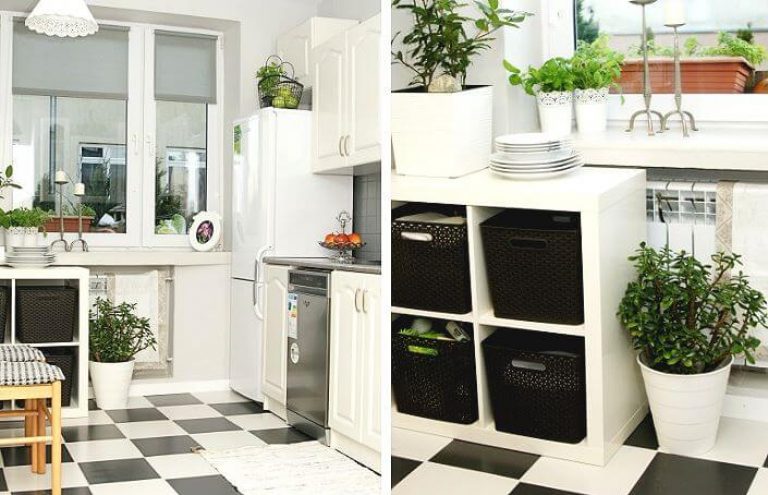
The kitchen looks fresh and modern after repainting. After painting the furniture white in combination with a contrasting black and white floor, the kitchen seems more spacious and brighter. Decorative elements from Ikea: a wardrobe, flowers and herbs in white pots and metal candlesticks now fit harmoniously into the interior.
We can safely say that the radical transformation with minimal costs, both labor and financial, was fully successful.
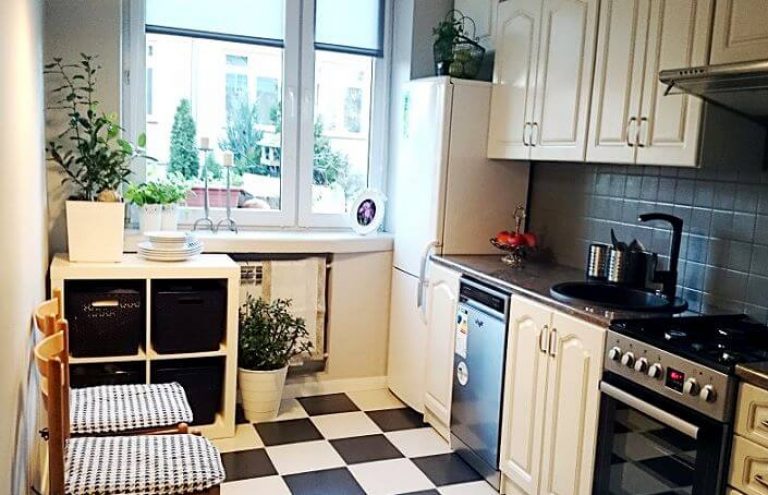
General view after renovation
Once again about the paint that can be used for this solution. When choosing paint, first consider the individual properties of these products. The manufacturer must ensure that these paints have the following practical characteristics:
- They can be applied directly to the surface without a primer.
- After drying, the coating becomes stain resistant.
- In addition, they are heat resistant, which is very important in the kitchen.

General view after renovation. The washing machine was also painted, as were the walls in the room.
6. In conclusion
Always remember that the kitchen should be a reflection of culinary tastes, lifestyle and household habits. If cooking is not your passion or lack of time forces us to choose simple dishes, let's consider whether you need a large set with a huge number of cabinets that reach to the ceiling? Likewise, if you love culinary experimentation and often cook with children or friends, you should not opt for a minimalist design that reduces the number of countertops and cabinets to a minimum.
If you dream of a place where it will be convenient and comfortable for you not only to cook, but also to have breakfast and dinner, pay special attention to the quality of the set. Visit a professional furniture showroom, get acquainted with the materials, colors, styles of furniture fronts and countertops in person. When in doubt, consult a professional who can help you make your choice and create the perfect space for you.