Faucet in the kitchen possible malfunctions and their. Do-it-yourself faucet repair - examples of some common breakdowns and their repair. Causes of water tap malfunctions
Even the best quality plumbing fixtures break down after a while. However, not everyone is able to solve the problem on their own and fix a leaking faucet. Don't put off repairs for too long. After all, a leak increases water consumption and spoils the appearance of plumbing fixtures with unsightly stains and traces of rust. You can fix the faucet yourself. What is required for this and how to carry out repairs?
Preparing plumbing
If the faucet is leaking, you can fix it yourself. First you need to prepare everything. If you still have the packaging from the mixer, it’s worth finding it. As a rule, it will contain detailed instructions describing the structure of the accessory and some recommendations for its repair. In addition, the package may contain the tools necessary to repair the faucet.
Before starting repairs, turn off the water. To do this, close the valve. In this case, you need to turn off the supply of not only cold, but also hot water. To collect the liquid you will need a deep container, such as a basin. During repairs, you should have dry cloths or sponges on hand to wipe away splashes.
What is needed for repairs
After the preparatory work, you can begin troubleshooting the mixer. If a closed faucet is leaking, you will need special tools to fix it. They need to be prepared in advance. To troubleshoot you will need:
- Flathead screwdriver.
- Crosshead screwdriver.
- Replacement part.
- or linen.
- Soft material.
- Dry cloths.
- Deep capacity.
This simple set of tools is usually enough to fix a leak. If you don’t have time to run out for new gaskets, they can be made from leather or rubber. Usually the faucet leaks due to wear of this part. Soft material is required to protect the sink from damage. After all, the tool can slip out of your hands. As a result, ceramic products may break, and the enamel of metal ones may crack.

Two-valve tap: replacing the gasket
Why is the faucet leaking? Most often, such accessories wear out the liner or gasket. To replace it you need:
- Unscrew the valve body. To do this, the part must be turned counterclockwise.
- Now you can remove the damaged gasket.
- A new part should be made from a piece of thick leather or rubber. It is worth taking a worn gasket as a sample.
- The new part must be carefully installed in place of the old one.
- It is worth wrapping a little sealing tape around the stop edge. You can use linen.
- Finally, it is worth installing the valve body in its original place. To do this, the part should be rotated clockwise.
- The installed valve must be tightened well. You can use a wrench for this.
If the faucet has been leaking for a long time and a quick replacement is required, then a new gasket can be purchased at a specialized store. This will save time. As for the homemade part, it is more suitable for short-term repair of a breakdown.

How to replace the oil seal bushing
A two-valve faucet leaks for several reasons: a gasket that has become unusable or wear on the sealing insert of the stuffing box. If necessary, both parts can be replaced independently. You can recognize the wear of the oil seal insert by the flow of water between the valve stem and the oil seal nut. To fix the problem you need to:
- Unscrew the nut of the oil seal itself. This can be done using a screwdriver with an appropriate tip.
- It is worth making a new liner from fluoroplastic sealing tape, similar to the old one.
- The worn part must be carefully removed.
- The new liner should be wound around the valve stem.
- Finally, tighten the nut.
If everything is done correctly, the leak will stop. In this case, the valve will turn more smoothly.

How to replace a shower hose gasket
Often a leak appears in the place where the shower hose and faucet connect. The main reason for such a breakdown is wear of the ring gasket. This part can be easily replaced. For this you should:
- Disconnect the shower hose from the mixer using an adjustable wrench. Everything must be done very carefully so as not to damage the thread. Otherwise, the hose itself will need to be replaced.
- Now you can remove the worn part.
- A new one should be installed in place of the old O-ring.
- Finally, all that remains is to screw the shower hose into place, acting carefully and without squeezing it.
To eliminate such a leak, experts recommend using a silicone ring gasket. Parts made of rubber are short-lived and wear out quickly.
If, when switching the water flow to the shower hose, the tap still flows smoothly, then the shut-off element needs to be replaced. This part is called a “crane axle box”. The locking element is located in the mixer handle. You can purchase a crane axle box in a specialized store.
The main causes of failure of a single lever ball valve
If a faucet is leaking, the problem must be fixed quickly and efficiently. Otherwise, the water can cause more damage and ultimately ruin your plumbing. Single-lever ball-type products may become unusable:
- Due to wear of the sealing gasket.
- Chips and cracks on the body that occurred as a result of mechanical damage.
- Rusted aerator.
- Accumulations of large amounts of dirt.
- Blockage between the ball and the seats.
A defect on the body can be eliminated by using cold welding or sealant. However, this is only a temporary measure. After some time, a complete replacement of the structure will be required.
If the reason lies in a rusty aerator, then it should be removed and then cleaned. This can be done using an old toothbrush. It is worth noting that after cleaning, the water pressure will become stronger.
If the ball valve is broken
A ball valve has a more complex structure and differs from a two-valve valve. Most often, such products break due to dirt accumulated inside the case. It is this that disrupts the operation of the mixer. If water flows from the tap, it must be disassembled, cleaned well and reassembled. This requires:

Problems with the new faucet
What to do if the faucet is leaking? How to fix a new faucet? As a rule, such products cannot be repaired. The main reason for their occurrence is a manufacturing defect. To troubleshoot problems, you should dismantle the new faucet and take it back to the store. You must replace the damaged product. The main thing is not to throw away the receipt and documents before the first test of the mixer. Only a professional plumber can repair a faucet that has a manufacturing defect at home.
Is it possible to avoid damage?
If desired, you can repair the faucet in the bathtub or kitchen yourself. This will save you a decent amount. However, repairs do not always allow you to fully restore the functions of the crane. In most cases, a complete one is required. To avoid frequent breakdowns in the future, you should carefully consider the choice of accessory. Please note:

In conclusion
A running tap in the bathroom or kitchen is unpleasant. Constantly dripping water irritates and spoils the appearance of plumbing fixtures. You can fix the problem yourself. The main thing is to clearly understand the structure of the structure and have the necessary tools at hand. Repair of a product also depends on its type. Most often, ball and two-valve mixers fail.
A faucet is a necessary attribute of any kitchen or bathroom. Cooking, cleaning and water procedures, of course, cannot do without his participation. Due to the fact that the mixer is subject to such frequent use, breakdowns associated with operation will not bypass any owner of a house or apartment. Since there are three types of faucets (single-lever, double-valve and touchless), the faults of each of them should be considered separately.
Reducing the flow volume from a faucet
Most likely, the cause of the malfunction was a clogged aerator - a special nozzle that is attached to the end of the gander designed for water outlet. The aerator saturates the stream with oxygen, and also helps to ensure that it is smooth and splashes water around as little as possible. The aerator can be made of either plastic or metal. To fix this problem, you need to remove the aerator from the spout and wash it. Often water has increased hardness, which contributes to clogging. After cleaning the aerator, you need to screw it into place.
Faucet leaking
This problem may be caused by a foreign body stuck in the valve discs or ball sleeve area. Since the valve plays the role of a regulator for opening and stopping the supply of drinking water, the foreign body located between its disks contributes to the fact that water continues to flow into the gander, despite the fact that the valve is closed. To fix the problem, you will need to disassemble parts of the mixer body. If the shutter is a ceramic cartridge, then it is impossible to disassemble and repair it. In this case, it is advisable to replace this part with a new one. A mixer with a ball cartridge can be easily repaired with your own hands. During disassembly, it is necessary to carefully inspect the seal, springs and other parts of the internal structure of the ball cartridge, remove blockages, and replace worn parts with new ones.
Breakdowns of two-valve mixers and their elimination
Leaks in double-valve faucets that have a ceramic cartridge inside can be eliminated in the same way as in the case of single-lever faucets - by replacing the cartridge. Since in this case the mixer has not one lever, but two, breakdowns are often associated with the valve system.
Water leaking from valve
Most often, the cause of this malfunction is a pin flying out of the rod. This situation can occur if the pin was initially inserted loosely into the rod, or if the hemp wound around it has worn out over time. To eliminate the leak, you need to turn off the water, then remove the flywheel from the valve head and remove the fallen pin. In order for it to fit tightly into the rod again, it is necessary to remove the old hemp and replace it with a new one. If hemp is not required, the pin just needs to be reinserted into the rod.
Leakage from under the spout union nut
The cause of such a breakdown is the wear of the rubber gasket. The union nut must be removed from the spout and the old rubber ring removed. The only correct solution to the breakdown is to replace the rubber ring with a new one. Most often, it becomes unusable due to the hardness of the water and due to the fact that a two-valve mixer often has a movable spout, the use of which contributes to abrasion of the rubber gasket located under the union nut. By the way, you can make a rubber ring yourself if you have rubber 2 mm thick.
Since the cause of faucet leakage is often precisely problems with the faucet axle, the simplest solution in some cases will be the whole thing - you will save a lot of time, which will be spent on finding the necessary parts and repairing the faucet by replacing individual worn out parts with new ones.
Breakdowns of touchless faucets
As a rule, touch faucets are the most durable, in contrast to single-lever and double-valve faucets. This is not surprising: they do not have parts that are subject to mechanical impact from humans. For touchless faucets, even the warranty period is set at 5 years and above. Of course, if it breaks, it will be difficult to find a repairman, because not every plumber will be able to understand how it works and what caused the problem.
Over a long period of operation, the sensors (infrared or with a photocell) that are responsible for supplying water when your hands approach the tap may fail. In this case, it is better for you to contact a specialist, because repairing such parts requires special knowledge. If the aerator breaks down, you can fix the problem by following the instructions, which are suitable for all other types of faucets.
Regardless of what type of faucet is in your kitchen or bathroom, from time to time it will require care and repair, because not a single thing can last forever, especially one that has to be used so often in everyday life.
And in conclusion, I advise you to watch a detailed video about the repair of mixers, which clearly demonstrates all the stages of troubleshooting their faults.
How to repair a faucet with your own hands
Single-lever faucets attract with their laconic design and ease of control of water flow. Turning on the water, changing its temperature and pressure - all this with one turn of the handle. These devices are reliable and have a long service life—some branded ones come with a 5-year warranty. However, repair of a single-lever faucet is periodically necessary.
Types of single-lever mixers and their design
Despite the external similarity, there are two types of rotary or single-lever faucets - with a cartridge (cartridge) and ball - with a ball inside. You can repair any of them, but to do this you must first disassemble them. And so that you can not only disassemble, but also assemble, it is advisable to become familiar with the internal structure of each.
The design may be different, the structure remains the same
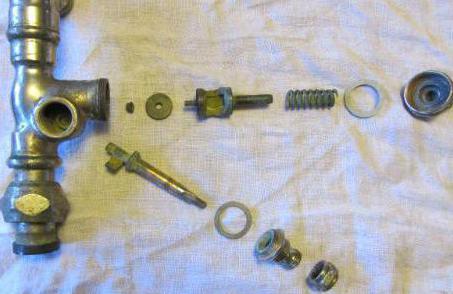
Cartridge mixer: structure
Cartridge mixers are so named because their shut-off and control mechanism is hidden in a special cartridge flask. In more expensive faucet models, the cartridge body is made of ceramic, in cheaper ones - from plastic. The good thing about these models is that they are easy to repair, but it is not always easy to achieve the required pressure with them - you need tighter control of the handle. But changing the water temperature is very easy - with a slight movement of the hand.
The structure of a single-lever faucet with a cartridge is simple. If you go from top to bottom:
- Switch with fixing screw.
- Locking (clamping) nut.
- Cartridge. The water flows are mixed in it, and the same device shuts off the water.
- The mixer body, which has a “seat” for the cartridge.
- Fasteners, studs and gaskets to ensure tightness.
- Spout (gander). It can be a separate part - in rotary models for the kitchen or part of the body - for sinks in the bathroom.
- If the spout is separate, gaskets are also installed below and there is also part of the body.

The cartridge itself contains several (usually 4) ceramic or metal disks of a special shape. A rod is welded to the upper disk. By changing the position of the rod, we change the position of the plates relative to each other, changing the amount of water passing through the holes in the plates.
In order for the faucet/mixer to work normally, the plates are ground very tightly. For this reason, cartridge single-lever faucets are very demanding on water quality. Foreign fragments getting between the plates causes the faucet to leak or stop working altogether. To avoid this, some manufacturers install filters on the incoming pipes. But, it’s better to supply and get clean water, which can be safely supplied to household appliances.
Single lever ball mixer
It got its name from the element in which the water is mixed - a ball with cavities. The ball is usually metal, hollow inside. Its outer part is polished to a shine. The ball has three holes - two for the entry of cold and hot water, one for the exit of already mixed water. A rod is attached to the ball, which fits into a cavity in the handle. This rod with a rigidly attached ball changes the temperature of the water and its pressure.

It is easier to adjust the parameters with such a device - the parts are well lapped, the handle moves easily. Mixers with a ball mechanism are less critical to the presence of mechanical impurities, but do not respond very well to the presence of hardness salts and excess iron. So for normal operation, pre-filtration is required here too.
How to disassemble and repair a faucet with a cartridge
Repairing a single-lever cartridge faucet often involves reassembling and cleaning the O-rings. Salts are deposited on them, debris and dirt accumulate, which is why the faucet begins to leak. To eliminate this nuisance, the mixer is disassembled, all parts are wiped of dirt (with soapy warm water), rinsed, dried, and put back in place.

Let's figure out how to disassemble a faucet with a cartridge. First, turn off the water, and then the procedure is as follows:

That's all. The single lever mixer with cartridge was disassembled. As you can see, there are not many details. The main working part is the cartridge. It is in it, inside, that mixing occurs.
Replacing the cartridge
The cartridge itself has a sealing gasket - a rubber seat at the bottom, which ensures a tight fit to the body. Over time, the rubber loses its elasticity and water begins to leak out. If this is the problem, you can first try to clean this ring from the salts and deposits that have formed on it. Place the cleaned part in place and check the work. If the leak does not stop, you will have to replace the cartridge.

Cartridges for “one-arm” faucets
Cartridges for mixers have different diameters, and the inlets and outlets in the lower part are located differently. Therefore, if you need to replace it, first you disassemble the mixer, get the treasured part and go to the store or market with it. You must choose exactly the same model without any deviations. At home, install the cartridge into the housing, turn it slightly until you feel that it “sits” in place. Next is assembly, it goes in reverse order.
First install the clamp nut. Actually, at this stage you can check how the new cartridge works. Turn on the water, adjust the temperature and pressure with the rod. To make it more convenient, you can put a handle on the rod. If everything is fine, continue assembly.
We disassemble and repair a single-lever ball mixer
The single-lever ball mixer was invented a little over 40 years ago. Its design is simple and reliable - there is nothing to break. If problems arise, it is only due to poor quality water - dirt particles settle on the rubber saddles on which the ball rests. The contact deteriorates, water leaks out and the faucet begins to leak.

Some ball valves are also available with a cartridge. Only inside the cartridge there are not plates, but a ball. Disassembly of this type is no different from that described above. All the difference is hidden inside the flask. There are also other types of taps. In them, the locking ball is installed directly into the rubber seat. There are some minor differences here.
The faucet lever is removed in the same way - first remove the plug, then unscrew the screw with a hexagon. Pull the lever up and remove it. Afterwards the steps are very simple and similar to those described above:
- We unscrew the cap, preferably by hand, since it is usually made of thin metal and is easy to bend.
- We unscrew the clamping nut, there is a washer under it, remove it too.
- Access to the ball has opened. Pull the rod and take out the ball.
- Under the ball there are two saddles, with springs so that the elastic bands are pressed more tightly to the ball.
That's it, sorted it out. Next comes the repair of the single-lever mixer. In theory, the problem is that deposits have accumulated at the contact point between the ball and the seat. They need to be removed - carefully clean and wipe. There may be problems with the springs. Dirt sometimes accumulates on them too, but more often they simply lose their elasticity.
The third source of problems is the ball itself. In general, it should be made of stainless steel; accordingly, it only needs to be cleaned of deposits. In reality, this is not always the case - cheap faucets have appeared even with plastic balls or made of cheap metal. In this case, peeling of the surface or other similar troubles may occur. Such a locking element will no longer work normally. It needs to be replaced. You also go to the store with the ball and select a replacement of the appropriate size. Assembling the mixer in the reverse order: springs from the seat, the seat is out of place, there is a ball on it, etc. When assembling the entire structure, carefully center everything - misalignment will lead to rapid wear and the tap will leak again.
Repair of a single lever faucet with swivel spout
Faucets with a swivel spout are installed on sinks in the kitchen or bathroom. Periodically it starts leaking from under it. In this case, the locking mechanism is not to blame; it’s just that the gaskets have lost their elasticity or the lubricant has dried out.

In this case, disassemble the mixer as described above, then remove it by pulling the spout up. Remove all old gaskets. If they are stuck, you can use a flathead screwdriver or even a knife blade. You have to remove them, but they are still replaceable. Use the removed gaskets to select new ones. It is advisable that they be made of silicone, not rubber. Silicone is more elastic, retains its properties longer, and tolerates contact with water better.
Lubricate the new gaskets with plumbing silicone grease and install them in place. Reinstall the spout. It must be pressed down well so that it rests against the union nut on the mixer body. Next is the assembly of the rest of the mechanism.
Probably every person has encountered a situation where they discovered a puddle of unknown origin on the bathroom floor. An attentive person would immediately find a small stream of water flowing from the faucet.
That's it, you need to call a plumber...
Or try to repair the faucet yourself.
Kitchen faucet
With the mixer that is in the kitchen, everything is more or less clear. This is the simplest type of mixer.
If the stream continues to flow when the “faucet” is closed, it means that the rubber gasket in the mixer has worn out. For a simple faucet repair, all you need is a suitable open-end wrench, a screwdriver and a suitable gasket.
You can replace it in the following way.
- We turn off the water using ball valves.
- Using a screwdriver, remove the wings from the mixer taps.
- Using an open-end wrench, unscrew the taps from the mixer.
- We replace the gasket with a new one.
- We screw the faucet into place, having previously wound the sealing tape around the thread.
The last step will help avoid leaks in the kitchen faucet threads.
Bathroom faucet

It is more difficult to troubleshoot a bathroom faucet.
Let's try to understand this issue.
First of all, there are two types of bathroom faucets:
- Single lever mixers
- Mixers with two valve heads.
Each type of mixer has its own advantages, disadvantages, and, therefore, its own special defects.
Breakdowns of single-lever mixers

Let's start with breakdowns of single-lever faucets.
These include:
- Faucet leaking.
- Weak stream of water.
- Simultaneous flow of water into the drain and into the shower net.
- Failure to operate the pushbutton switch.
- Leaking near the push button switch.
Faucet leaking

Most often, the cause of this malfunction is a small speck that ends up in the mixer mechanism. The speck may end up between the ball and the ball sleeve or between the shutter discs.
In this case, you need to replace the cartridge.
How to do it:
- It is necessary to remove the decorative plug of the water switch lever.
- Unscrew the fixing screw under the plug.
- Remove the switch lever from the mixer body.
- Replace the cartridge.
- Assemble the mixer.
Weak stream of water

The cause of this malfunction may be a clogged aerator.
- The aerator needs to be unscrewed.
- The aerator mesh must be blown out and washed on both sides.
- Restore original position.
Simultaneous flow of water into the drain and into the shower net

There may be several reasons for this malfunction, but the main one is most often wear of the gaskets in the spool switch.
This malfunction can only be eliminated by replacing the gaskets and rings.
The only problem with such repairs is that rubber rings for the spool are rarely found on the open market. A spare set is usually sold with the mixer. But, if it has not been preserved, then as a temporary measure you can cut out such rings yourself. Any thick rubber will be suitable for this purpose. But such rings will not last long.
Pushbutton switch failure

The cause of this malfunction is a broken spring. This means that in order to eliminate this malfunction, it is enough to replace the spring. The diameter of the new spring must be selected slightly smaller.
Leak in the area of the push button switch
The cause of the malfunction is a damaged oil seal. It just needs to be replaced. You can buy oil seals at any hardware store. The faucet operating instructions usually describe the standard procedure for such replacement.
As you can see, repairing a bathroom faucet is not such a difficult operation. Even if the mixer is a single lever.
Breakdowns of mixers with valve heads


Many people still use faucets with two valve heads out of habit. Its device is much more primitive. There are much fewer defects. Eliminating them is much easier. But we still list the defects:
- Leakage under the clamping nut.
- Damage to the shower-spout switch
- Water leaking from the tap.
Leak
This defect can be eliminated by replacing the sealing gasket.
Damage to the shower-spout switch The switching mechanism is simple. If such a breakdown occurs, then when disassembling the mixer, you can immediately identify the broken element and replace it.
Water leaking from the tap
There may be two reasons for this:
- Gasket wear
- Defect in processing of conical plug.
Both causes can be eliminated by disassembling the mixer and replacing the damaged elements.
Repairing a faucet will not take a thinking person much time. You just need to turn on the logic, open the instructions and work a little with your hands. It's not as difficult as it seems.
Video
How to fix water leaking from a faucet, see the following video:
Photo


The faucet is an integral element of every bathroom that has a hot and cold water supply. Thanks to it, the temperature of the water coming out of the tap and its pressure are regulated. In addition, the faucet has a switch that allows you to redirect water from the tap to the shower. Like any mechanical device, the mixer is not immune to all kinds of breakdowns. Fortunately, its design is not too complicated, allowing you to fix problems yourself in most cases. In this article we will look at the design of a bathroom faucet with a shower, repair the faucet if any breakdowns occur, and list the causes of malfunctions.
Let's look at how the shower works. This will help you understand the principle of its operation depending on the design. All faucets that can be used in the bathroom are divided into 3 categories:
1. Sensory. The control element of such a device is a photocell, which gives a command to turn the device on and off. Self-repair of such devices is very difficult, so it would be most rational to refer it to specialists.
2. Valve. The design of a bathroom faucet with a valve-type shower is quite simple:
- frame;
- spout;
- valves. Designed for manual control of the mixer;
- crane axle boxes. They regulate the water supply. Older models are equipped with rubber gaskets, while newer ones have ceramic plates.
Tip: Ceramic valve axle boxes are much more durable than older models, and they are much easier to operate, since the valve rotates a maximum of 180 degrees.
3. Lever. Recently, this type of mixer has been gaining popularity. A typical lever model consists of the following elements:
- frame;
- spout (gander);
- a ceramic or ball cartridge in which water is mixed. Ceramic cartridges cannot be disassembled. If such a cartridge has become unusable, repairing a bathroom faucet with a shower will consist of replacing such a cartridge;
- control handle that regulates water pressure and temperature. Attached to the cartridge lever;
- nut fixing the cartridge in the housing;
- a housing cover that covers the cartridge and is designed to give the mixer a more aesthetic appearance.

The main causes of faucet breakdowns
If you carefully study the design of a bathroom faucet with a shower, its repair will not be difficult. It is only important to know the causes of breakdowns:
- Unsatisfactory product quality. This is typical for products from little-known manufacturers who use low-quality components and consumables in their work;
- Use of old-style consumables. For example, paronite or silicone gaskets last much longer than rubber products. In addition, they are less deformed and do not collapse from drying out;
- Dirty water in pipes;
- Increased water hardness affects the internal parts of the device, causing the formation of deposits and cracking of seals.
Major breakdowns and their elimination
Let's look in more detail at what kind of breakdowns can occur during the operation of a faucet with a shower, as well as how to fix the faucet in the bathroom yourself. Malfunctions may be of the following nature:
Leak at the junction of the gib with the mixer body
This is the most common breakdown, since the gander constantly rotates in different directions, which leads to wear of the round rubber gasket. This gasket is located in the groove of the gooseneck, so to replace it, the gooseneck must be disconnected.
Actions are performed in the following sequence:
- the fastening nut is unscrewed;
- the gander is removed;
- the remains of the old gasket are removed from the groove of the gander;
- a new gasket is installed;
- the gander is installed in place;
- the thread onto which the fixing nut will be screwed is wrapped with 2-3 layers of FUM tape;
- The gander fastening nut is tightened.
Leaking from under the control lever
This failure is typical for single-lever faucets and is caused by a broken cartridge. It is necessary to disassemble the mixer and replace the cartridge. In addition to this failure, there are several other signs of cartridge failure:
- the lever became difficult to operate;
- the temperature of the supplied water changes spontaneously;
- no supply of either hot or cold water;
- the tap does not close completely or does not open completely.
In this case, the cartridge needs to be replaced. Repairing a bathroom faucet with your own hands is done in the following order:

Important: There are protrusions on the cartridge body that must align with the recesses inside the body. Combine them carefully. If they don't match, the faucet will leak.
Two-valve mixer valve leaking
The cause of leakage in a two-valve mixer is wear or destruction of the sealing washer located on the faucet box. The crane box itself may also be destroyed. If your bathroom faucet is leaking, how can you fix it quickly and inexpensively? Only on your own replacing the faucet axle or the washer on it. There is nothing complicated about this.
All work is carried out with the water supply shut off:
- remove the plug from the leaking valve;
- unscrew the screw that secures the valve to the mixer body;
- using an open-end or adjustable wrench, unscrew the axle box;
- the valve axle itself or the sealing ring on it is replaced;
- a new or repaired crane axlebox is installed in the old place.
Faucet-shower switch leaking
There is another gasket between the faucet-shower switch and the housing that can be damaged. How to fix a bathroom faucet with a leaking switch? Just disassembling the switch itself:
- the button (switch) is removed, for which the rod is held in a stationary position with pliers;
- the valve with the stem is removed;
- the damaged oil seal is removed;
- in his place a new oil seal is installed;
- the switch is assembled together.
Repair of a mixer with a flag switch is shown in the video.
Malfunction of the button or valve “faucet-shower”
If the button does not return back after turning off, then its spring is faulty. It is necessary to disassemble the switch as described above, and then remove the broken spring. In her place new spring installed.

If the switch does not work and water flows from the shower and tap at the same time, then the cause is cracked seal located on the switch rod. Necessary:
- remove the button (switch);
- remove the rod;
- replace the oil seal;
- assemble the switch.
Leak at the shower hose connection
This problem occurs due to damage to the hose gasket. If your bathtub faucet is leaking, do-it-yourself repair will involve replacing this gasket. To do this, simply unscrew the hose nut by hand and then remove the worn washer. In her place a new paronite washer is installed. Before tightening the nut, it is advisable to wrap a couple of layers of FUM tape around the thread. here.
Leak where the watering can connects to the hose
How to fix a bathroom faucet if there is a water leak at the junction of the hose and the shower head? Very simple. There is a round insulating gasket under the nut located on the hose. It is easy to replace even without the use of tools.
Weak water pressure
If the water pressure through the mixer has noticeably weakened, but the neighbors have remained the same, you should suspect, first of all, clogged filter aerator located at the tip of the gander. You should unscrew it by hand or with pliers, and then check the pressure. If the pressure increased without an aerator, then the reason lay in its contamination. You need to carefully rinse it under running water, and then screw it back into place.
Tip: Often it is not the aerator itself that gets dirty, but the cleaning filter located at the entrance to the room. Therefore, if cleaning the aerator did not give anything, then unscrew the filter and check the cleanliness of its mesh.
We found out how to repair a bathroom faucet with a shower with your own hands. When using higher quality consumables, such problems will occur much less frequently.
Do-it-yourself bathroom faucet repair video


