How to make plastic cups for seedlings. Do-it-yourself seedling cups: the most economical options. Plastic film cups
For growing seedlings at home, containers are first of all needed. Seedlings feel best in cups, in which the roots of plants are not intertwined as in plants planted together in one box. When planting seedlings from cups in the ground, the roots of the plants are not damaged, since the plant extracted from a separate container with a clod of earth is transferred to the hole without damage, so seedlings from cups take root faster. Crops such as peppers, eggplants do not like transplants and get sick for a long time if the root system is damaged, it is recommended to grow their seedlings only in cups.
There are many varieties of cups on the market in different sizes and from different materials. The most popular cassettes or cups are made of dark plastic. However, many do not have the opportunity to spend additional funds on the purchase of containers for seedlings. Therefore, they collect tetra packs from juice, plastic bottles, then cut them at the right height for planting.
The easiest and cheapest way to make do-it-yourself paper cups . It is best to use glossy magazines. You can use newspapers, but they need to be folded in several layers, because after heavy watering, newspaper cups get soaked and may tear. Glossy magazines have thick glossy paper, besides, the size of the pages of magazines printed in A4 format is perfect for twisting cups - this is an ordinary landscape sheet.

How to make seedling cups:
To work, you will need a couple of magazines, wide tape and a glass or tin can of the desired diameter. According to the size of the glass, you will twist the cups, for example, for tomato seedlings we use containers up to 400 ml, for this we take a glass with a diameter of 8-10 cm, for seedlings of pepper and eggplant, the diameter of the cups should be about 6 cm. the process of twisting them.
From the center of the magazine, tear out the sheets in pairs, so you get paper in two additions.
Put the glass to the bottom edge and wrap it in paper.

Seal the edge with tape, in several pieces, starting from the top.
Move the cup in the paper to the desired height of the seedling cup. Crumple the remaining free edges of the paper tube along the bottom of the glass inward and seal with a piece of adhesive tape.

Place a paper cup and use the glass inside to press down on the bottom to make it stable.

The seedling cup is ready, place it in a box or box. It is better to place paper cups tightly together in a box or box with high sides so that they do not lose balance.

Do-it-yourself cups are covered with earth, then you can proceed to transplanting or sowing seedlings.
Seedling cups from magazines are well preserved until disembarkation, do not soak, do not tear even when moved. There are holes in the bottom between the leaves through which excess water flows after watering to prevent waterlogging of the seedlings and rotting of the roots.

All gardeners know that the summer season requires financial investments. Here you need to buy seeds and seedlings. Let's say you can grow seedlings yourself. But, again, the question arises - in what to grow? Buying special cups for seedlings is also expensive, especially when it is planned to grow on a large scale. So, at this stage, you can save a lot - with your own hands. And you don’t need to buy material - there will always be old newspapers, cans, bottles, packaging, film at home. Yes, and in the winter there will be something to do with yourself.
Material for cups for seedlings
As a feedstock, there can be both ready-made containers and improvised means, namely:
- Cardboard boxes for juices or milk, both small (for one seedling) and large (cut lengthwise and planted seedlings in groups).
- Large plastic cups from dairy products (in small cups from yogurt there will not be enough space for a seedling).
- Disposable tableware (glasses).
- Used water bottles or bottles (they are treated in the same way as with cardboard boxes).
- Tin cans that contained canned food or beer.
- Cardboard boxes (for example, shoe boxes) serve both for cultivation and as a pallet.
- A cylinder from a toilet paper roll (you can leave it round or make it square for convenience).
- Paper cups (newsprint or toilet paper).
- Film cups.

Since the finished container can already be used, let's dwell on the last two points that require human participation.
Paper cups for seedlings
In order to make paper cups, you will need paper (newspapers, magazines) and a blank (base) of a glass. As a blank use:
- a cut plastic bottle with a loop on the bottom (in order to make it more convenient to pull the blank out of the made glass);
- tin can cut off at the top.

Cut paper into strips up to 40 cm long and 20 cm wide. Wrap them around the base for the glass so that the paper protrudes 5 centimeters beyond the edge. Then tuck this protruding edge and make the bottom of the glass. Now the base can be carefully pulled out, and the cup itself can be fastened with paper clips or glued with glue for strength. Ready! It remains only to pour the prepared soil and you can plant seedlings. If you use toilet paper, then it is pre-moistened abundantly, and then dried well.

The advantage of paper cups is that they can be planted in the ground along with the seedling, during the growth process the paper will decompose and will not interfere with the growth of the root system.
Cellophane cups

Such cups are made using the same technology as paper cups, but with careful use they will serve more than once. To do this, twist the strips of film into a cylinder and secure the bottom and walls with a stapler.
You can do it even easier and buy wholesale plastic bags for packaging. Immediately fill them with earth and put them in a box for stability. Such packages are pre-pierced from the bottom so that moisture does not stagnate.
For more information on how to make cups for seedlings with your own hands, watch the video:
Spring is a troublesome time for gardening enthusiasts, because it means for them, first of all, working with seeds. The modern assortment of various seedling containers and pots is really huge, but still, most gardeners prefer to use improvised means in order to save money. Do-it-yourself cups for seedlings are made in a variety of ways, and you will learn about the simplest and most affordable ones from this article.
Jars of canned food, coffee or tea are, so to speak, classics. In the bottom of each container, you need to drill a couple of drainage holes (preferably from the inside), and for easier extraction of young plants, additional incisions can be made on the walls. If the cups will be used for several seasons, instead of cuts on the bottom, it is better to lay a strip of polyethylene or thick paper - so you can remove the earthen ball without damaging the root system (you just need to pull this strip). Cut beer cans, toilet paper, PET bottles, and more can be used in the same way, but more on that later.


An excellent seedling container can be cups of baby food and yogurt. But the bottom of such jars needs to be cut off, and instead of it, lay a cardboard or tin circle of the appropriate size.

When transplanting seedlings is required, it will only be necessary to press on such a bottom with a stick.
Note! Disposable plastic cups are not the best option for seedlings, due to the risk of slowing down plant growth.

Prices for plastic glasses wholesale
plastic glasses wholesale
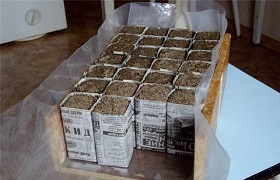
Cups from old newspapers
A small stack of newspapers is quite useful for making disposable cups. Tellingly, such containers are more convenient than the options described above, because when transplanting plants, you do not need to shake them out - instead, you need to break the glass. As a result, the root system will not be damaged.

For the manufacture of such cups, we need a form. A small bottle or tin will do. The algorithm of actions should be as follows.
First, take a sheet of newspaper and fold it in half.


We fold the edges of the resulting container and its bottom.

Fill the glass with soil mixture.

Note! If you are not sure that the cup is strong enough, you can tie it with a thread or an elastic band.
Seedling cups from toilet paper
The next manufacturing option is based on the principle of papier-mâché. Here we need a spray bottle, glass cups and toilet paper itself. The technology is extremely simple: we wrap the glasses with toilet paper, moisten them abundantly with a spray bottle, and then carefully press the paper against the walls. We dry the workpiece for a day, and then remove it with careful circular movements.


Note! Such cups are good because they can be simply broken to transplant seedlings into the soil, as mentioned above. Or, alternatively, plants can be planted together with containers (which will subsequently collapse naturally).
The original version of the manufacture of newspaper cups
It will require all the same newspapers, as well as a piece of construction profile. The latter, if necessary, can be easily found among construction debris, so you don’t have to buy anything. In our example, two sections of profiles are used, each approximately 20 cm long. The width can be different, depending on the specific culture (for example, wider cups are needed).
First, take a newspaper, cut it lengthwise and across.

In one hand we take a cut of the profile, in the second - a newspaper folded in half (i.e., two layers). We wrap the form with newspaper as shown in the image below.

Where the bottom of the cup will be, bend the corners one by one.

We do not extract the profile yet - it is much more convenient to fill the cup with soil mixture with it.

When the cup is full, carefully pull out a piece of the profile.


Filled cups are placed in a box, previously covered with polyethylene.

As a result, you should get something like the following.

Paper cups - an improved version
Another option for making containers from old newspapers is to use the original fixture. For the convenience of visitors, the step-by-step guide is given in the form of a table.
Table. Master class on creating paper cups.
| Steps, photo | Description of actions |
|---|---|
| For work, we need such a rectangular fixture - a kind of tin sleeve, put on a small wooden block. |
| We will use such a device when making seedling cups from newspapers. The sleeve can be made from a tin can. Such containers are tinned with food tin, and therefore it will be enough to overlap the tin and heat the joint with a soldering iron. We will use the tape on the sleeve to navigate when winding the newspaper so that the finished cups have the same height. |
| We can paste over one end of the bar with a piece of leather soaked in oil. Due to this, the soil will not stick. |
| First, fill the sleeve with soil mixture as shown in the picture. |
| We wrap the sleeve with a strip of newspaper, focusing on electrical tape. |
| To form the bottom of the container, we bend the edges of one side. |
| Gently pull the sleeve onto the bar, holding the soil with the butt end with a leather blotch. |
| We put the filled cups in a wooden box, previously covered with polyethylene. |


Note! As for the dimensions of the container, they will largely depend on the dimensions of the box itself. Although on average it is from 2x2 to 4x4 cm.
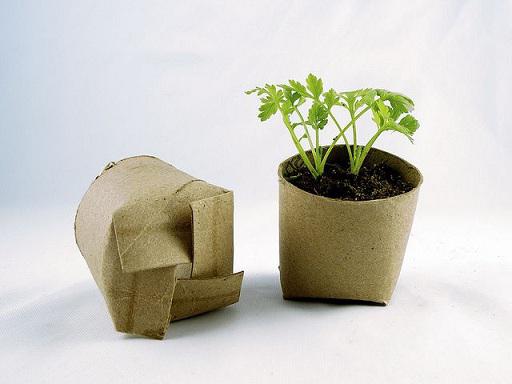
Using toilet paper rolls
The advantages of this method are the same as those described above - the bushings are an environmentally friendly material, they do not contain third-party impurities, therefore seedlings can be planted in the ground without removing them from the cups (the latter will rot in the ground without a trace). If the cups will be used for large plants, we can use the sleeves as a whole, in other cases they (the sleeves) can be cut in half. The manufacturing process itself is not complicated.
Table. Workshop on making cups from toilet paper rolls.
| Steps, photo | Description of actions |
|---|---|
| So, first we prepare everything you need - these are the bushings and scissors themselves. |
| We take the first sleeve, crush it and cut it into two halves. |
| On one half we make four cuts (about 1/3 of the height). |
| We bend the "blades", which were formed as a result of this, and form the bottom of the future cup. Simply put, we make the same bottom as in ordinary cardboard boxes. |
| The bottom is almost ready. |
| The result should be something like the following. |
| Everything, seedling cups are ready for further use. It remains only to fill them with soil mixture and sow something you need! |


Video - Making cups for seedlings
Film cups
To create such cups, it is recommended to use PET film for greenhouses. We also need a simple stapler and a base that has the desired shape. First, we cut the film in strips, wind it on the base, and then fix it with staples. The result is a nice square cup. Although there is a simpler option - to make small tubes from the film with curved upper edges (required for rigidity). These tubes are placed on a pallet or in a box and filled with soil mixture.

Note! The film must be dense, otherwise it will easily lose its shape!
You can also use bags of fermented milk products. To begin with, we tuck these bags, fill them with soil, sow the seeds and turn the edges back. In the future, as the seedlings grow, the earth will have to be gradually poured. The disadvantage of this method is the instability of packages. To achieve greater rigidity, it is desirable to strengthen the edges with cardboard strips.

We make cups from a plastic bottle
Any plastic bottle will do here (in our example, a 1.5-liter bottle). The algorithm of actions is given below.
Table. Master class on making seedling cups from plastic bottles.
| Steps, photo | Description of actions |
|---|---|
| First, cut off the neck and bottom of the bottle as shown in the image. |
| The cut may be uneven - this does not play a special role. |
| We flatten the cropped bottle (you can use a glass jar, as in the photo), forming a couple of the first edges of the cup. Due to the characteristics and properties of plastic, the ribs will necessarily turn out to be straight and parallel. |
| It should be about this. |
| Next, we press the resulting workpiece with our hand (the hand does not have to be six-fingered, as in the picture) and cut along the lines of transition of the container into the neck and bottom to get smooth edges. |
| The edges are really smooth. |
| We bend the workpiece as shown in the photo, and make a couple more ribs. |
| We still use a glass jar for this. |
| As a result, we got a square container without a bottom. We measure the side of one square and divide the resulting figure by 2. Example: 7: 2 \u003d 3.5 cm. |
| We cut each of the faces by 3.5 cm. |
| The result should be the following. |
| We bend the cuts and form the bottom, as, again, with a cardboard box. |
| We align the edges so that the finished cup is more stable. |
| The glass is ready. We do not make drainage holes. |
| At the end, we wrap the container with “foil” - a label from the same bottle. If you are concerned about the water seeping through after watering, you can seal the bottom with tape, although this is not necessary. |


How to sow seeds in such cups? There is nothing easier! As an example, consider the cups described above, made from plastic bottles.

So, we take a ready-made glass and fill it with soil mixture - store-bought or prepared with our own hands.

We fill the container completely or only 2/3. We place a couple of seeds, peppers or any other crop on the soil.

Then lightly sprinkle the seeds with soil mixture and water well.

We cover the cups and place them in a warm place, waiting for the emergence of seedlings. As you can see, even from such a seemingly useless thing - a plastic bottle - you can make excellent seedlings.
Alternative option - make nutrient cubes
For the manufacture of such cubes, we prepare:
- 1 soddy soil;
- 5 - humus.
There is another option:
- 1 part of humus;
- 3 - peat.

We mix the prepared ingredients, and add ammonium nitrate (15 g per 1 kg), potassium sulfate, superphosphate (50 g per 1 kg) to the resulting mixture. In addition, add water - such an amount that the finished mixture has a creamy consistency. All this is placed in a pallet with a layer 80-100 mm thick, and then cut into cubes of the required sizes. You can move the cubes a little apart to make it more convenient to work. At the end, we sow the seeds.
Manure prices
humus
Video - How to make seedling cubes yourself
As a result, we note that no matter what kind of cups you use, they must necessarily be rigid, roomy enough, with low thermal conductivity and opaque walls. In addition, you should take care of drainage - it will protect the plants from an excess of moisture. If all these requirements are taken into account, then the seedlings will grow healthy and strong, and adult plants will surely please you with a rich harvest or abundant flowering!
Video - Making cups for seedlings
With the advent of the new calendar year, every lover of growing vegetables in his own garden is again preoccupied with finding containers for sowing. Almost all gardeners have abandoned the habit of growing seedlings on the windowsill in bulky wooden boxes - they are too inconvenient when transporting to the country. In addition, the tender young seedlings have time to grow into the roots of neighboring plants. The best solution in choosing containers for sowing is a seedling cup.
Buy from a store or make your own?
Of course, production technologies do not stand still, and every hypermarket that respects its customers keeps in its assortment a convenient container for peat seedlings, which not only does not damage the root system of a young plant, but simply dissolves in the soil. Why build your own cups when you can buy ready-made ones? The answer to this question is extremely simple. Experienced gardeners are accustomed to planting more than a dozen or even more than one hundred seeds of various vegetable and flower crops. Can you imagine how much it will take to invest in order to stock up on containers for all the seeds? Therefore, we will save and make peat cups for seedlings on our own. In the meantime, let's determine if there are any improvised materials that could become a container for seedlings.
Simple solutions from improvised materials

Even during the winter, gardeners collect plastic bottles, juice boxes, milk bags, and sour cream containers. Literally everything is used: from paper to a dense greenhouse film. And the fantasy of gardeners knows no bounds. The film is sewn together with threads, chopped off with a stapler, wound in several layers. There is another simplest way to design containers. Two-liter bottles of drinks are cut at the right height and turned into a container for planting. Plastic cups for seedlings, made in such a simple way, have one small minus. Nevertheless, when transplanting, the root system will have to be disturbed a little. Painlessly, only the excavation of those plants that, during the time spent on the windowsill, did not have time to acquire long and strong roots, occurs.
Making paper cups for seedlings

Some plants are so capricious that they do not withstand transplantation, they get sick for a long time and do not take root well. As a result, while the seedling is acclimatizing in a new place, the precious time allotted for growth will be lost. Therefore, we will make cups for seedlings from paper. During the winter, you can collect unnecessary newspapers. Pressed pulp obtained from recycled materials is used for printing publications. It will easily rot in the garden, serving as food for omnivores.
We cut the newspapers into pieces of 10x30 cm. Newspaper sheets are quite thin, and in order for the process to go faster, you can fold them in half or three times. We take an ordinary glass and wrap it with the resulting blanks in several layers. We leave a small protrusion, which will later be needed to form the bottom. Now we dip the bottom edge of the paper in a small amount of glue and wrinkle it well, forming the bottom and fixing it tightly at the bottom of the glass. We press down the newspaper blank with a glass and let the glue dry. We repeat this simple manipulation as many times as we plan to receive blanks. Paper cups for seedlings are ready! Now they can be put away in the pantry until the sowing time.
Peat container for planting

If we are not sure about the density of newspaper sheets, then we can use a more sophisticated technology for manufacturing a landing container. A peat cup will bring even more benefits to a painlessly transplanted plant. After all, it, dissolving in the soil, actually becomes a good fertilizer. You can make peat containers under your own order. We ourselves will determine the required dimensions of the cups and adjust the conical steel billet to fit them. We take into account the fact that in order to obtain an earlier harvest, it is necessary to sow the seeds in a spacious spacious container. The root system will develop well in it, the transplant will be painless, and the plant will immediately be able to proceed to fruiting.
To make a peat cup for seedlings, we need:
- steel conical shape of the required size;
- blank for forming cups;
- circle with rod.
The composition of the nutrient mixture
Having found all the components of the form for the design of future cups, we proceed to the manufacture of a peat base. We will need the following proportions: 50% peat, 40% cow manure and 10% black soil. Instead of black soil, you can use any other fatty soil. Mix well and add azotobacterin, phosphorobacterin and water to the composition. The mixture should be quite thick in consistency.
Responsible stage of production
To begin with, we lower a circle with a pin to the bottom of the steel glass and fill it with the prepared peat mixture to a thickness of 2 cm. We thoroughly tamp the future bottom with a blank. Now, without removing it, we will fill the solution along the edges, filling the entire gap between the steel glass and the blank. A glass for seedlings will not dry out if the mixture is immediately carefully tamped when pouring. The blank can be immediately removed as soon as the peat composition fills the voids up to the very top. It is not scary if the liner is difficult to remove, it can be slightly rocked from side to side. Now it remains to carefully pull the rod and remove the finished glass.
Time for experiments
Not all peat cups for seedlings are of perfect quality the first time. Sometimes home-made containers are able to disintegrate and dry out - perhaps the point is the insufficient density of the mixture. Sometimes too dense and hard products are obtained, which are difficult to dissolve in the ground during planting. The necessary skill and flair will definitely come, even if it requires multiple repetitions.
Seedling pot made of polyethylene

To make a container with a height of 10 cm and a diameter of 7 cm, you will need a piece of dense film measuring 33x15 cm. We find or cut out a rectangular bar to fit the size of the future cup. In two faces of the bar responsible for the bottom, we make grooves in such a way that a stapler is placed in them. We cut polyethylene blanks and proceed to the design of the landing container. Then we wrap the blank from the film around and fix it with a stapler and 5 staples. With two of them from above and below we fix the side face, and with the rest we form the bottom, folding the ends of the film with an envelope. It's okay if more staples go to the bottom. In this way, cups of various sizes can be modeled.
Conclusion

We learned a lot about how to make seedling cups. Of course, peat or paper containers seem to be the best solution compared to homemade polyethylene glasses. The idea of planting plants in the ground along with a natural glass that dissolves with water in the soil was revolutionary at one time. But it is up to gardeners to decide which of the presented methods for making containers for seedlings is the most acceptable for them. After all, not everyone will be able to find steel blanks for peat cups, and not everyone will have enough time and patience for painstaking work with glue and paper. Therefore, the manufacture of cups for seedlings is a purely individual matter.
Perhaps you will use the proven method and sow the seeds in disposable plastic containers, besides, they perfectly show the condition of the root system and the degree of soil shedding. Also, this container can be used multiple times. Whatever container you choose for sowing seeds, we wish you a rich harvest!


