Cardboard key holder. Wall key holder - stylish highlights and beautiful do-it-yourself models (102 photos). A simpler option, more suitable for eco-style, is to find a thin stick and hang corks on bright threads. Drive a hook into each cork and
Key holders are wall and pocket. Pocket cases are sewn from leather, fabric. There are hooks for keys inside the case. This type of key holder contributes more to the convenience of carrying keys in a bag, accustoms to neatness and organization (keys in a case are inconvenient to carry in pockets).
Key holders that are hung on the walls come in open and closed designs. Closed key holders are not very convenient if you have to use them often (the doors of the structure will have to be constantly opened and closed).

Open key holder design
The shape of the key holder largely depends on the place where the key holder will be nailed. Perhaps it will be long and narrow, or in the form of a square or a circle. For the first time, you can come up with a sketch of a simple model and feel free to get to work.

Planks of wood - a favorite material in the work
Wooden planks are the most favorite material for crafts. First, they are easy to find. Secondly, planks of any length and thickness are suitable. Thirdly, the boards can be folded into any figure, connected in any sequence with each other. Another important argument is the fact that the tree is easily processed. For example, using sandpaper, you can sand the surface to a smooth state. You can cover the surface of the tree with paint, varnish, stain. Each time it will be a completely different appearance of the wooden surface. But still, the basis of the key holder will be in a strict classical style.

If you want to enhance the pattern of the tree, then with a metal brush you need to break the flat surface of the planks. After that, varnish, paint, stain is applied. Again, the pattern will be different each time, but the soft spots become darker after coating and this is how the pattern of the tree appears on the surface.

Hooks are nailed to the treated wooden surface after it has completely dried. You can use the same hooks, but hooks different in color, or shape, or material of manufacture will give your housekeeper a certain uniqueness.

Plywood is easier to work with
Using plywood will shorten the work time. The main task is to come up with an interesting figure for the housekeeper. You can cut a large key, a dachshund, a mouse, a sleeping cat. The surface of plywood, unlike wood, does not require processing. All you need to do is sand the cutouts (edges of the plywood). To make them smooth, they are covered with paint. The last step is to attach the hooks in a strict order or randomly.

An original way to use picture frames
An unusual key holder can be made using a picture frame. Hooks can be attached to the frame itself to the top bar from the back. It is also recommended to attach the base with chipboard from the back with brackets. It can be decorated with wallpaper or small multi-colored mosaics, painted with paint or simply glued on a picture. Hooks can then be attached to this base.

Key holder made of wood and without hooks
It will be unusual to see a key holder without hooks. Wood is used to make it. The trick is that the keys are not hung, but inserted into the slot. It is not difficult to make such a gap in a wooden base. You can cut the gap exactly along a horizontal line, or you can make it with a slope of an acute angle to the wall. To do this, you need a milling machine or a circular saw. You can accurately achieve a good result with a regular saw. The gaps made must be carefully processed.

Key holder in youth design
If you have non-working panels of any devices, then they can be used to design an unusual avant-garde housekeeper. It is important that the panel has sockets for plugs. A neatly cut panel from the appliance is screwed to the wall. The key is connected to the ring, a plug is attached to the ring, which can be inserted into the socket of the new key holder. So the key, using its unusual keychain plug, will be attached to its new place.

An interesting key holder will be in the form of a neck from any stringed instrument, for example, a guitar. If it is inconvenient to hang the keys on the neck pegs, additional hooks can be attached.

Unusual options for models of key holders
No one says that the creation of housekeepers is necessarily a long and painful process. You can take a non-standard approach to this issue. Then the key holder will be ready in 5 minutes.

- The connectors will play the role of a key holder, and the plugs will play the role of key fobs. The new key holder-connector is screwed to the wall at the selected place. By inserting the plugs into the sockets, the keys are hung in their places. The job will take 20 minutes.
- Hooks are hung on a flat stick from aluminum wire. The stick can be dyed or wrapped with multi-colored woolen thread. A rope is tied at both ends of the stick. The original key holder is hung on it by nailing a nail or hook into the wall.
- A key holder is made quickly and in an original way from wine bottle corks. Wine corks are connected to each other with glue. It is necessary to wait for complete drying. On sale you need to purchase hooks-screws. Such a screw is screwed into the cork surface already together with the hook. Minimum costs and original design of the key holder.

The required number of hooks, the size of the structure depends on your wishes and, to a greater extent, on the number of households. If the family is large, care must be taken that the model is durable. It is recommended to hang the housekeeper at the eye level of the youngest family member (not counting, of course, a tiny baby). You need to design the key holder so that it harmoniously fits into the interior of the corridor. Invite the children to develop a model of a housekeeper, let them show their creativity.
The key holder is a convenient and original way to keep your keys in order. There are two types of key holders - wall and pocket. We offer you to get acquainted with the original ideas for making wall key holders with your own hands.
Do-it-yourself wall key holder - varieties and characteristics
The design features of key holders changed in relation to the type of keys used. With the great popularity of spring and lever type locks, the size of the key holder was large and very original. Key holders had various forms; forging, woodcarving, painting, etc. were used to decorate them. Home key holders were made in the form of overlays on the walls, in order to avoid damage to the finish with a metal key.

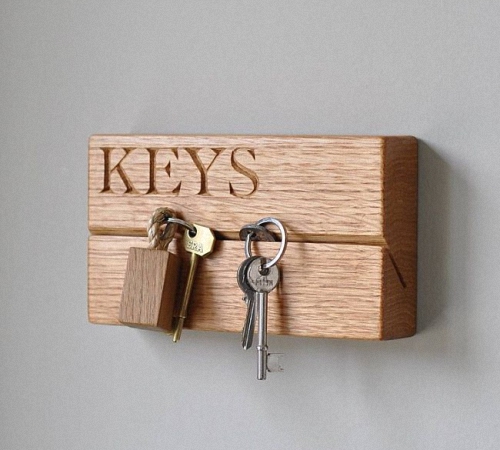
One of the most popular options is the manufacture of a plank key holder, which easily fits into any type of interior, takes up little space and has a simple design.
Key holders in the form of small shelves are also distinguished by their compact size and ease of use. To make the simplest key holder, it is enough to use wood or plywood. You can also store other small items, such as glasses, on such a key holder.
If the house has a large number of lockable rooms, sheds, outbuildings, etc., then it will be relevant to install a large key holder. Most often, it has the form of a board, each of the fragments of which has a certain type of key. The location of such a housekeeper is usually near the kitchen or in the utility room. For the standard set of keys used to lock the front door, a small key holder is installed, usually located in the entrance room.
When restricting access to the key holder, it is necessary to install the option of a lockable cabinet. Such key holders are located in secluded places, some of their options are additionally locked with a key or a special code, which is even more convenient.

The most popular version of the key holder is the key holder-board. Their widespread use is due to their simple design, ease of operation, and ease of self-manufacturing. It is quite possible to make such a housekeeper from ordinary cutting boards. However, it is recommended to choose for the manufacture of key holders such boards that have oblique grooves. Next, install the fasteners for the keys. Most often, these are nails or screws. If necessary, the key holder is painted in relation to the individual characteristics of the room and installed on the wall.
The key holder in the form of a wooden bar is distinguished by high reliability. All fasteners for keys are located on it firmly, without the possibility of deformation.
Another option for making a key holder is a frame. It goes well with the wall, makes the interior unusual and original. It is enough to build a frame from wood or other materials, attach key hooks to it and hang it on the wall. In the presence of a durable finish, it acts as a highlighted image on the wall. To fix the frame on the wall, use glue or additional fasteners. The installation method is determined individually depending on the material from which the walls are made.
In order to combine several useful properties of the key holder, we recommend that you take a closer look at the organizer key holder. On such a capacious shelf there is a place not only for keys, but also for various papers, notes, reminders.

If there is a need to install secret locks or store not only keys, but also additional documentation, we recommend stopping at a cabinet key holder. Sometimes the front door of such a key holder additionally performs the function of a clock.
Another subspecies of a key holder in the form of a cabinet is a house key holder. For its manufacture, wood is most often used. The front door of the housekeeper is decorated with carvings, original drawings or even decoupage. The size of the key holder of the house is smaller than that of the closet, it is more compact and roomy.
Do-it-yourself wall key holder - master class
If there is an unusual, original box in the house, you can also build a key holder from it. In this case, fittings are attached to the back wall of the box to hold the keys, and it is fixed on the wall with self-tapping screws. Please note that the box in this case must be made of wood.
The same key holder can be made from an old wooden box, additionally completing its decoration. For additional strength, the wood is covered with moisture-resistant compounds.
Quite often, key holders are made from the remnants of plywood. With the help of a special tool, it is possible to create incredible works of art in the form of small key holders. For additional protection of plywood, it is varnished after polishing. Artistic sawing on plywood allows you to make key holders in the shape of a horse, heart, star, animals and plants.

In production, this process is carried out using laser machines. However, it is quite possible to make such a version of the key holder at home. For these purposes, follow the instructions below:
- draw or print on the printer the picture you want to receive;
- prepare a manual jigsaw;
- if you have a vibrating jigsaw, use it for cutting especially thin elements;
- using a manual cut, the workpiece is made, in order to hide small irregularities, the surface is additionally processed using an electric wood burner;
- to make such a device, you will need an old soldering mechanism and a power supply unit.
We offer a variant of making a key holder in the form of a plywood key. To make it, prepare a sketch of the shape you like. Such a key holder for children is especially interesting, as it has an extraordinary shape and resembles the “Golden Key”.
Do-it-yourself wall key holders photo:

To make original wall key holders with your own hands, it is enough to use simple tools at hand. The first option - fixing branches from knots on a wooden plank allows you to get a completely original key holder. Do not choose too small branches that can break under the weight of the key. Do not forget to additionally treat the wood with antiseptic compounds.
The second way is to use a previously dried boletus mushroom. These elements are characterized by high strength and long service life. From old tableware in the form of forks and spoons, you can also build original key holders. By bending the plug in a certain position, you get the original key hanger.
If you have experience with various techniques for decorating key holders, you can create whole masterpieces in the form of wall key holders. From polymer clay, you can make a key holder of various shapes and colors. Most importantly, this element should be in harmony with the overall style of interior design. After drying, polymer clay acquires special strength and has a long service life. Additionally, fittings of a suitable size are fixed on the key holder.
An oven is used to bake the finished part. Only after complete cooling, the part is ready for operation and further opening with varnish.
The prepared surface of the housekeeper is also decorated using decoupage technique. To fix this removal, a varnish on a matte or glossy base is used. There are two ways of decoupage - direct and reverse action. The first involves pre-coating the surface with a primer, applying glue and gluing the picture.
In the second method, transfer-type pictures are used that are installed on the surface. Do-it-yourself decoupage wall key holder - it has an original and unusual appearance. Particular attention should be paid to the absence of wrinkles on the decoupageable surface. It is possible to decorate the housekeeper with 3D decoupage. However, for this you need to have experience in carrying out this kind of work.
How to arrange and make a wall key holder with your own hands
The process of designing a wall key holder should be given special attention. After all, it is on the quality of this process that both the aesthetic appeal of the resulting product and the duration of its operation will depend.
Most often, wooden key holders can be stained, varnished or artificially aged. For painting wooden products, we recommend using acrylic-based paints. The duration of their drying reaches five hours. They are distinguished by a wide range of colors, the presence of simple and glossy brilliant shades. With their help, you can imitate wooden, metal, nickel, chrome surfaces.
After applying paint to a wooden wall key holder with your own hands, you can get a thin, durable and elastic coating. Thus, it is possible to achieve the effect of an aged surface. For these purposes, an abrasive sponge is used, which is used to treat the surface after painting.

As additional elements for decorating the surface of the key holder, we single out the following means:
- varnishes - these compositions allow you to get a glossy, matte, textured or smooth surface;
- varnishes with 3D effect - allow you to create a rather thick protective coating that has individual optical components and makes the image convex;
- textured pastes - after drying, they allow you to create an image in the form of an aging, cracking texture.
The technique of decorating the crackle housekeeper is to obtain a cracked surface. At the same time, there are many varieties of this technique and various types of compositions for the formation of cracks.

How to make a wall key holder with your own hands photo
Particular attention should be paid to the key holder, with a secret mechanism. This version of the housekeeper has the shape of a regular picture, which opens with a special lock. By clicking on the secret bar, it is possible to open the key holder. The secret bar, in this case, is equipped with special bevels that allow it to open and close with one touch.
To make such a key holder, you need to have special experience and knowledge. First of all, you should draw up drawings and determine the mechanism for opening the picture. Next, you should build its frame part.
Inside the picture there should be hooks for the location of the keys. Additionally, the mechanism is equipped with spring mechanisms and clamps. We recommend that you purchase such a key holder in a specialized store, since it will take a lot of time and effort to make it.
Another option for a hidden key holder is a key holder in the form of a shelf with a hidden lock. To open it, a special magnetic locking mechanism is used. Therefore, to open such a key holder, you will need a special key.

Do-it-yourself wall key holder made of wood
In the process of working on the key holder, you will need to have:
- scraps of plywood or fiberboard sheet;
- acrylic paints;
- varnish for processing wooden surfaces;
- napkins;
- brushes;
- glue;
- fittings and fasteners.
To make such a key holder from wood or plywood, make a rectangle or square. In order to give the surface maximum smoothness, sand it additionally. After stripping, the workpiece should be coated with spray paint. Next, the workpiece is varnished in several layers with complete drying of each. Further steps for surface decoration are determined individually and are described above.

To fix any decor, a moisture-resistant varnish is used, which will protect the key holder from destruction. Additionally fix fittings for keys on it. Hang the finished product on the wall using self-tapping screws.
Making a wall key holder with your own hands is a completely individual process, the procedure for which is described in the drawings and depends on the preferences of the master doing the work.
How to ruin your mood without leaving home? Very easy, just forget where you put the keys! It is especially insulting to be late because of such a trifle for an important meeting.
Keep the keys in one place, so as not to waste time and nerves looking for them at the right time.
If you are tired of wasting time looking for the keys to your apartment, car, office, garage, basement, there is a simple solution that will allow you to forget about this problem once and for all.When a housekeeper hangs in your hallway, there is more order at home.

Checked: the sight of empty hooks is the best reminder that you need to look for right now, and not just before the exit.
A wall-mounted key holder will not only become a permanent meeting place for all your keys, but also decorate the hallway: there are many design options for this essential item in every home.You don't have to go to the store to find your dream housekeeper, you can make your own! In this article there are several workshops available in which you will find ideas for making it.

You will have to try a little, but the result will meet your expectations.
- A key holder of a style, size and color suitable for your interior is a rarity. It is enough to go in search of her once to be convinced of this. You will save time if you do it yourself.
- Only a housekeeper created for the house with your own hands can become the embodiment of your individuality and love for loved ones.
- You will be sure that your wall key holder is made of durable and high-quality materials, because you chose them yourself.
- You will not only enjoy creativity, but also surprise your guests with a beautiful and unusual thing in the hallway.
- Finally, a housekeeper made with your own hands from improvised materials will cost less!

"Keepers of the keys" are very diverse. You can choose them for a variety of interior and style of the hallway.
Deciding on design and construction
How to make a house key holder? Very simple! We have selected design solutions, thanks to which you do not have to spend money on expensive materials: almost every apartment has everything you need for work.
Materials and tools:
- Plywood, piece of chipboard, leather, frame;
- Acrylic paints, stain;
- Hooks and hangers;
- Drill, jigsaw and pressure roller;
- Screwdriver, spatula, awl and needle;
- Sandpaper;

To realize the most daring ideas, you need only a few materials and tools.
Master class number 1: a key holder from a saw cut of a tree
Do you want your key holder in the hallway to look stylish? This master class simply and clearly describes everything that is required for this.

A few simple steps - and it can be hung on the wall.
What you need:
- Spil,
- Alcohol or water stain,
- Abrasive sponges or sandpaper of medium or fine grit,
- Acrylic lacquer,
- Printout of the mirrored image,
- Wide synthetic brush
- pressure roller,
- hooks,
- Hangers - 2 pieces,
- Drill,
- Crosshead screwdriver.
A saw cut key holder is a suitable option for those who like working with wood. You can use a saw cut of any tree species, but it is better if it is pine.

Its wood is easy to process and has a beautiful pattern.

Master class number 2: a key holder from a branch
This master class is for those who often visit nature and simply love eco-style in the interior! A lot of materials are not needed, the main thing is to find a suitable branch.

This housekeeper is sure to impress your guests!
What you need:
- dry tree branch,
- wood stain,
- Acrylic paints (optional)
- jigsaw,
- Drill,
- Hangers.
There are no two identical branches, which means that your housekeeper will certainly be special!

This key hanger is easy to make.
- We take the branch of the tree we like, wash it, dry it, saw off all that is superfluous. Now we need to decide whether we will save the bark. Option A: remove the bark, using sandpaper if necessary. Option B: the bark remains, we remove only its damaged areas.
- With the help of a jigsaw, we will make a saw cut from the side where the suspensions will be and with a drill we will drill recesses for self-tapping screws.
- With a wide brush we apply a stain on the housekeeper: it will not only shade the tree, but also serve as an antiseptic. After that, leave the branch to dry for about an hour.
- If we have an option without bark, we simply cover the branch with acrylic varnish. If you chose the option with bark, first we will impregnate the branch with varnish, diluted with water in a ratio of 1: 1, and after drying - undiluted.
- If desired, you can walk on the surface with a dry brush with acrylic paint of a suitable shade. The result must be fixed with a finishing layer of varnish.
- Knots will serve as hooks for keys. It remains to screw the hangers.

You can be proud of the results of your work: the housekeeper is ready.
Master class number 3: a housekeeper from a picture frame
Do you have an old picture or photograph frame at home? Don't rush to throw it away: a framed key holder is a great way to decorate your wall and define a permanent place for your keys!

This master class describes not only how to make a key holder, but also how to decorate it.
What you need:
- Frame,
- Suitable piece of plywood
- acrylic primer,
- Acrylic paints,
- Wide synthetic brush
- Sandpaper of medium and fine grit or abrasive sponges,
- decoupage card,
- transparent file,
- Decoupage glue (or stationery pva),
- Acrylic lacquer.
- Key hooks and hangers,
- Drill,
- Crosshead screwdriver,
- Jigsaw.

Necessary materials for work.
To get started, we need to know the internal dimensions of the frame. Using a jigsaw, cut a rectangle of the desired size from a piece of plywood.We take a thin drill (with a diameter of 1-2 mm less than the screws on which we will fasten the fittings) and drill all the necessary holes.We cover the plywood with acrylic primer or white paint. When the primer is dry, sand it with medium grit sandpaper (No. 600-800) and wipe it with a damp cloth.

For the frame, use paint that matches the color.
Now we will decorate our product using the decoupage technique. Place the image on a stationery file face down and moisten well with water, smoothing the bubbles formed on the surface from the center to the edges.Apply glue to the primed plywood base and immediately attach a file with a decoupage card. Again, smooth the card from the center to the edges (it is convenient to use a pressure roller). Now the file can be removed.

If small folds remain somewhere, the pattern can be smoothed out with wet (!) Fingers. Let dry for 2 hours.
Now you can tint the frame with diluted acrylic paint. Apply acrylic varnish with a synthetic brush.We insert plywood into the frame, fasten the hangers and hooks.

If you have a lot of keys, this key holder will keep them in order.
Additionally, you can hang tags with numbers. And to make it easier to navigate, it’s enough to stick signs under each of the keys with the inscriptions “From the basement”, “From the dacha”, etc.
Master class number 4: key holder made of plywood or chipboard
Do you have plywood 6-10 mm thick or a piece of chipboard? Are there any shelves left from the old nightstand? It is worth arming yourself with a jigsaw, and you will have an exclusive wall key holder made of materials that you did not even hope to use!

It is much more aesthetic when there is an original little thing in the hallway.
What you need:
- Pattern,
- jigsaw,
- Drill,
- wood putty,
- Putty knife,
- Key hooks and pendants.
We find a suitable picture on the Internet, set the desired dimensions and print it. Simple generalized forms look spectacular: a fish, a key, a leaf, the contour of a flying bird, cats ...

For novice designers, it's great to try your hand at creating public key holders.
The pentagon easily turns into a house for keys. Even an ordinary circle can be beaten if, by adding a few details, to build from it, for example, a semblance of a balloon. We cut out the figure along the contour and circle the resulting pattern with chalk or a simple pencil.Now you need a jigsaw.

Carefully, slowly cut out the selected figure along the contour.
It happens that chips form on plywood when working in this technique, especially if the plywood is not of its first youth. It is in our power to make the surface and even the ends of the key holder smooth. We arm ourselves with a spatula or palette knife and apply wood putty to problem areas. We are waiting for complete drying.

We sand with sandpaper, first medium, and then fine grain, paying special attention to the ends.
With a drill we make recesses for suspensions and drill holes for self-tapping screws, on which hooks will be held.

Turn on your imagination at full power and create!
A do-it-yourself key holder can be decorated using the decoupage technique, as described in the previous master class (in this case, we will additionally need glue and a suitable pattern).

It remains to screw the fittings and hang it on the wall.
Master class number 5: leather key holder
How else can you make a key holder? If you think that the best place for keys is in a pocket, our master class is for you.

The key holder, made in the described technique, will not require much effort.
What you need:
- Pattern,
- Thick leather (an old bag will come in handy),
- Lining,
- Lightning,
- strong threads,
- thick needle,
- Awl,
- buttons,
- Key carabiner,
- Scissors.

What materials to use and how to decorate the key holder you decide for yourself.
The more keys you have, the larger the pattern should be. Exactly according to the pattern, we cut out all the details from leather and suede. Connectingdetails of the outer part and lining.

To make the product look neat, trim the edges with scissors.
It remains to unscrew our key holder and admire the result. We attachcarabiner - and a leather key holder in your pocket!

Now, no matter how many keys you have, they are all in one bunch.
Decorating the housekeeper: ideas and solutions
Your housekeeper is almost ready. It's time to add some more charm to her! Shabby chic or Provence, cyberpunk or country, ethnic style or retro, painting or embossing... It's up to you to decide in what technique and in what style the key holder will be decorated.

This can be done with the help of improvised materials, so we are collecting ideas.
If an old clock is broken, you can use a few gears, 5-6 unnecessary keys and a little glue - and your steampunk key holder is already decorating the hallway! If you are into decoupage, you may have craquelure polish and wax patina.

This is enough to give the product the look of an antique: you get a retro-style key holder.
Stencil and putty - and the key holder is covered with a three-dimensional pattern. Got small nails and thread? Take a hammer, draw a few lines on the board, drive in nails and wrap them with thread - your panel key holder will be super stylish! If old forks or spoons are preserved, bend them and nail them to a wooden base - the key holder is ready to take its place on the wall.

Ideas are everywhere, you just have to look around!
Twine scraps, buttons, chains, beads, castings from gypsum or self-hardening plastic, cardboard cuttings, ice cream sticks, pieces of ceramic tiles - any little thing that lies idle at home can be the final touch to something that you will be proud of.

The time you could spend looking for keys is now put to better use!
Regularly lost keys are a reason to look for a key keeper, with the help of which these important pieces of iron in life will always be in one place and in plain sight. The easiest way is to buy a miniature "hanger" in the store, but in this case you can forget about the originality and originality of the accessory. The option with a homemade key holder is devoid of standardity and allows you to make any model quickly and cheaply.
If there are no plans to buy a new piece of furniture, then independent creativity will be the ideal solution, which will help detailed instructions on how to make a beautiful housekeeper.

Why is it better to
Just look at the photo of the original key holders to understand all the advantages of making them yourself:
- originality. No standard forms and drawings-stamps.
- Harmony. You don’t have to choose among the available options when you can make a key holder that is perfect for your home interior.
- Cheapness. For small hooks, shops ask three times more than the real price, and it is easy to make “your own” from improvised materials.
- Quality. You use quality materials, and in stores - fragile plastic and wood.

The variety of options is also attractive: you can make a “keeper of keys” from any material at hand. Below - everything is in order.


From a saw cut tree
The most popular material for making a housekeeper is wood. The easiest way to use a saw cut:
- Saw off a saw cut of suitable thickness (it is better to use a pine trunk).
- Sand the surface on both sides, moving along the grain.
- Sequentially cover the workpiece with stain in three layers, waiting for the complete drying of each of them.
- If desired, apply a drawing, pattern or ornament to the surface.
- Varnish.
- Drill holes for fasteners with a drill from the back side.
- Screw the hooks on the front side.

from the whole thread
Among the ideas on how to make a key holder, there is another part of the tree - a branch that perfectly complements the ecological style in the interior.

The main thing is to find a beautiful branch, clean, dry, file and perform several actions:
- Cover the workpiece with stain and leave to dry for an hour.
- Screw fasteners.
- Supplement hook-knots with several metal hooks.

From the frame from under the photo
A stylized “screen” with keys will look no less impressive and original, for which you need:
- Prepare a piece of plywood that is the right size for the existing frame.
- Apply a suitable pattern to the board or simply cover it with plain paint.
- Color the frame.
- Connect details.
- Screw hooks and fasteners.

From a piece of chipboard
Any piece of wood, chipboard or plywood is a great base for an original key holder. The main thing is to follow the following steps:
- Find the right stencil.
- Cut out the shape.
- Sand the contours.
- Drill holes for hooks and hangers.
- Supplement the product with a drawing or drawing of details.
- Apply a final coat of varnish.

From the constructor "LEGO"
An interesting solution would be to decorate the hallway with a children's designer. Step-by-step production of such key holders with your own hands looks like this:
- Find the base: take a single plank or assemble an interesting composition from Lego.
- Make an inscription on the base with the constructor "keys", "home".
- On separate "bricks" burn holes with a hot nail.
- Insert individual keys into the burnt hole.
- Attach the keys in any convenient place.


Leather
If a square piece of leather is lying around at home, then making a desktop key holder from it would be a good option. This is done simply:
- Treat the skin.
- Fasten each corner of the square with a metal rivet.
- Add fittings that match the style (chain, braid, riveting).

There are other ideas for desktop key holders: a varnished seashell, an old jewelry box or a gift box.

Any given do-it-yourself master class on key holders is your chance to make your “place” for constantly lost keys, perfectly in harmony with the existing interior. To do this, just find a knotty branch in the yard or slightly update the photo frame. The main thing is to turn on your imagination, find a suitable basis and be inspired by the ideas above.

DIY housekeeper photo


Note! 


Note! 


Note! 


The key holder is a convenient device for storing keys.
wall model. Wall key holders are hung in the hallway on the wall. The design feature of this item is its fixation on the wall surface and the presence of hooks or other fasteners for keys.

pocket model. This model is a wallet and is convenient because it allows you to store all the keys in one place.

desktop design. This model looks like a box in which the keys are stored. The design, shape and design of this model may be different.

cabinet design. Outwardly, this model resembles a small cabinet with doors.

How to make a housekeeper with your own hands
The key holder is a versatile item, because it can store not only keys, but also other small things, such as glasses, or mobile phones. In the event that you plan to place not only keys in the key holder, you will need to install additional fasteners in it.

Wooden key holder
Many are interested in how to make a key holder out of wood? It’s not at all difficult to make a wooden model of a key holder; this will require plywood scraps, acrylic-based paints, varnish and a few napkins, as well as a few brushes, glue and fasteners.

First, you need to cut out a rectangular or square part from plywood and sand it. Then the blank is painted and varnished several times. After that, hooks for keys are attached to it.

Key holder with lock
A more complex option is a cabinet key holder with a lock. To make such an item on your own you need to have certain skills. You can also see how to make a housekeeper with your own hands master class.

Pocket key holder
A fairly simple way to make a key holder is to sew it. To do this, you will need pieces of leather, threads and a do-it-yourself key holder pattern.

First, with the help of a pattern, details are cut out of the leather, which are then sewn together. If desired, such a product can be decorated with beads or ribbons.

Key holder from the frame
If you have unnecessary photo frames or picture frames at home, then you can make an unusual housekeeper out of them. For this you will need: plywood, glue and fasteners. Such a key holder can be decorated in different styles using a variety of materials.

Decor
When making a key holder, it is important not to forget about the decor, because it is a full-fledged element of the interior of the hallway. Wooden products are usually painted with acrylic paints or varnished. An extensive range of acrylic-based paints with a matte or glossy surface will allow you to create an interesting design.

Varnishes of different textures look no less impressive on wooden surfaces, creating a matte or glossy surface. The varnish with a 3D effect looks especially beautiful on wood, making the product voluminous with a convex pattern.

If desired, you can create an aging effect on a wooden surface using a textured paste.

Some use the crackle technique as a key holder decoration, which creates the illusion of cracking. Moreover, the varieties of this technique depend on the composition that will be used in the process.

Keys are a very important item with which we get into the house and open all doors, drawers and cabinets. But often people forget them at home and lose them, for this you need to adapt a storage place for them that will always be in sight, convenient, reliable and outwardly attractive.

Of course, you will have to tinker with the key holder, but it will save you time looking for the keys, save your nerves, and become a bright, spectacular element of the hallway interior.

Of course, in our time you can buy a ready-made version, however, a thing made by yourself will be original, stylish and suitable for you.


