Bathhouse made from Soviet tents. Camping sauna from a tent and polyethylene: do it yourself. Camping sauna: video
28.08.2016
If you intend to go out into nature on the weekend, or another day, and at the same time you are thinking about a bathhouse and wondering whether you should cancel your trip to the bathhouse, then the answer is obvious. Take the bathhouse with you or build a new one there. After all, a trip to nature and a trip to the bathhouse can be combined and made into one whole. We are talking about a bathhouse in hiking conditions, which you can build with your own hands.
Is it possible to buy a camp sauna?
For beginners in this business, it is necessary to know in detail what needs to be available when constructing this structure, so that, in the end, the intended event with washing and the steam room occurs. If you are planning a trip to nature using personal transport, then it is better if the racks for the frame of the camp sauna are already available. Also, if you want to avoid unnecessary work, but, nevertheless, if you need a camp bathhouse, buying such a structure today is not difficult. Can buy camp sauna entirely, you can buy - by component elements: only the stove, only the frame, only the awning. In short, it’s more economical to buy something that you most of all don’t want to invent and do yourself. The purchased bathhouse looks, of course, more aesthetically pleasing, so it is best to purchase it for country house or a dacha, if there is no permanent bathhouse there yet, but you really want to wash yourself, and even more so, take a steam bath. The principle of such baths, no matter what their design, is the same - hot stones are watered with water or herbal decoctions.
What do you need to make a sauna on a camping trip?
For those who are planning a hike, of course, it makes more sense to build a bathhouse right at the resting place. However, you will have to take some things with you. But in order to fulfill your plans, you need to know whether everything you need will be in this place. After all, in order for a camp bathhouse to turn from an imaginary object into something real, certain conditions are necessary. At the resting place it is obligatory and necessary:
- Availability of water. Without water, it will actually be very difficult to wash yourself. This could be the bank of a river, the coast of the sea or a lake.
- Presence of stones. Steam when splashed on - without it, a bathhouse in camp conditions will turn into a simple dousing with water. Well, if this is the coast, there will probably be stones. It is worth choosing them carefully. It is better to take uniform round ones large boulders, the fact is that different components of the stone can react differently to temperature changes and, as a result, when heated, the stones will crack and scatter into small components. If there are no boulders, you can get by with pebbles. You need a lot of stones, approximately 1 bucket for 1 wash. In short, each participant in the bathing procedure must collect a bucket of stones for himself.
- Availability of young thin trees for frame construction. You can also stock up on racks in advance. These can be simple aluminum stands from sales tents. They are quickly and easily assembled and disassembled, and easy to transport. Some hikers use carbon fiber stands, which are also safe. If there are none available, you will have to cut down young trees. The diameter of the finished poles should be about 3-4 cm. But here we must take into account that the wooden poles will be a safety concern, and you will always have to think about this. You also need to think about the way to fasten them together. Moreover, each trip will need to invent new poles. Therefore, regular fans of camping baths take collapsible racks on camping trips. This allows you not to think about fire safety, and also saves time in constructing the structure.
- Availability of firewood. You will also need a lot, assuming that it will burn for at least 2-3 hours. No need to choose too thick logs. They burn poorly and this does not save any time. The size of the firewood should be a maximum of 10-15 cm, then they will have time to burn out and give off all their heat.
But you need to think about how to cover the constructed frame in advance. You need to take covering material with you, since, unfortunately, you won’t be able to find anything suitable in nature. There are also many options here, you can buy something, maybe you can find something on the farm. The simplest option is a square piece of polyethylene measuring 6 by 6 meters. You can also use an awning from an old tent, the bottom of which, naturally, needs to be removed, or a piece of tarpaulin of a similar size.
Construction of the stove: first option
When all of the above is already available, all that remains is main question, how to put all this together so that it works, in other words, how to make a camp sauna? First things first, you need to work on the fire, since it will burn for at least three hours, so you can work on the frame later. Well, if there are a lot of people on a hike, and everyone wants to wash, let them participate in the work. Then all the work can be done in parallel: some collect stones, others build a frame, others work on the awning, others chop wood, and the most responsible one, of course, manages the whole process. The stove in our case will be like a layer cake. A layer of stones is piled onto the layer of firewood, which are also covered with a layer of firewood. Now you need to make a fire and when it flares up, add another layer of stones. This procedure with layers must be repeated until the stones run out. For 2-3 hours it is necessary to maintain a good heat, the stones should become red hot, in dark time days it is more noticeable.
Frame construction
The frame must be made strong and close to the fire (about two meters) and water. The proximity to water ensures fast and uninterrupted water supply, and, if desired, can replace the presence of a swimming pool. The fire must be at a safe distance, and at the same time we must remember that stones will have to be transported there. It may happen that they have time to cool down before they get to the steam room. For stones, by the way, you need to dig a pit on the territory of the frame, and the stones will be collected in it when they heat up to the desired condition. If the frame is made of poles, they can be connected using the example of a hut or cube. The joints can be tied with rope, wrapped with tape or tape (all this should be taken with you as a precaution). After assembly, the ends of the poles must be “packed” into soft material so that they do not pierce the film. If there are racks for the frame, its construction will not take much time. We insert the racks into each other, according to the design technology, and the frame is ready for use.

Installation of covering material
If the stones have already heated up to the required temperature, it is time to move them into the frame, into a hole specially dug for them. The stones are moved as best they can, some roll them, some drag them with a shovel, the main thing is to do it quickly. You shouldn’t take heavily crumbled ones. When all the stones are already in place, it is necessary, in order fire safety, place the fire (or stones) in contact with the ground, pour water. Now you need to install the awning on the frame. This must be done carefully, without touching the hot stones. You need to leave a “skirt” outside, laying out on it everything heavy that is at hand: stones (cold), logs, etc., so that as little heat as possible comes out. It is better to make the entrance in the opposite direction from the stones, but directly - to the water, there, after the park, you can dive and rinse off. To check whether everything is ready for the parka, you can splash water on the stones; if the steam rises upward in a hot wave, it means that the bathhouse is ready for the steam room; if the steam has filled the structure with a thick fog, it means that the stones have cooled down, and you won’t be able to steam anymore.

Construction of the stove: second option
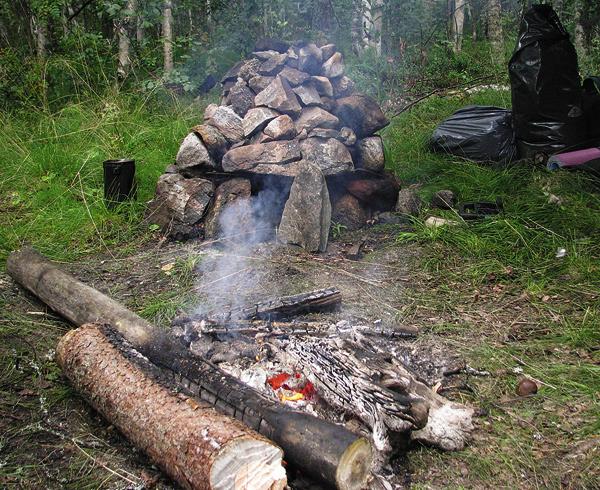
There is another version of the stove design. The camp bathhouse, in this case, will resemble a Russian “black” bathhouse. Such a bath is, of course, smokier, but also hotter. The stove for such a camp bath needs to be built somewhat differently, and the essence will be the same, but the shapes will be different. The first attempt is to place a huge stone - a boulder - in the middle of the proposed stove, and all the other stones are poured around it and placed on top. All the firewood is piled on this pyramid at once, so that no more firewood can be added. When the entire fire has burned down, the bathhouse is ready. The second attempt is to make a U-shaped structure out of stones, and put firewood in the middle. It will take 5-6 hours, the bathhouse is ready. The third attempt is to make (in advance) a non-flammable box for stones and place it over the fire. And this bathhouse is ready.

Installation of awning
The option is convenient for those who do not like playing golf, with rolling stones into one hole. Here, on the contrary, a frame with an awning is installed above the place where the stones are heated. But first you need to remove all unburnt logs and cracked stone fragments from the fire, and pour water around the fire. It is necessary to equip places for the steam room, placing, for example, a layer of pine needles around the stones. The entrance to the bathhouse can be done in the same way as the previous option - opposite the stones, next to the water. Well, the issue of safety in this version of a camp bath needs to be approached most carefully. If everything is ready, you can steam.

So, the options have been exhausted. Of course, they all have a chance to exist. Practice will help which one is better to choose. One thing is certain - after a day spent in nature, a steam room in a bathhouse is the best way to end it. You can feel this only when you experience all the splendor of this procedure for yourself. It’s better to try and not regret than not to try and regret the missed chance for the rest of the time until the next trip!
Camping sauna - video
Camping sauna (video instructions):
How to simply make a sauna in nature:
Camping Bath
A camp sauna is a simple tent equipped with a stove. Both structures are assembled at the resting place from those available at hand natural materials or they carry factory-made dismountable structures with them in their car.
DIY camp sauna
A mobile bathhouse tent is constructed from a frame covered with film, awning or tarpaulin. A stove is installed inside. There are 2 options for organizing a bathhouse: assemble a structure from available materials or install a factory-made tent.
In the first case, the frame of the camping bathhouse is optimally folded from thin metal tubes, but it will have to be transported to the resting place. In nature, a similar skeleton of a structure is assembled from long, strong poles. Cobblestones are used to lay the stove.
The second option for a camping sauna is a ready-made, factory-made tent. She will have to be transported to her vacation spot by car. Plus for the tent they take metal stove. It is small, but it has weight, and it is difficult to carry such a load manually.
Advice! When using a tent, it is optimal to give preference to a Soviet-style product.
The choice is explained by the fact that in such models a tarpaulin serves as cover for the frame. The material retains heat and moisture and does not emit harmful fumes when heated.
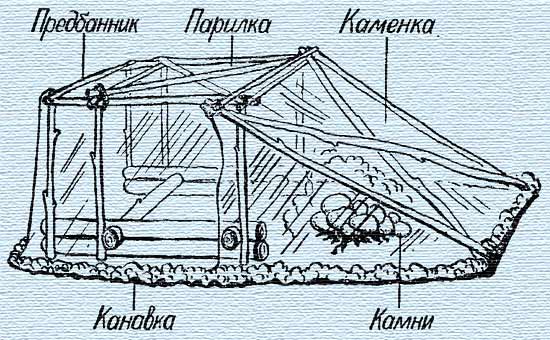
Features of the design of a camp bath
The main requirement for such structures is that the camp sauna tent must be light, safe, and quickly disassembled and assembled.
The best frame for a bathhouse is made of aluminum tubes. When disassembled, it is easy to carry even by hand. Assembled frame durable, fireproof. If the skeleton of the tent is made from wooden racks, That the best material are considered to be long thin trunks of young trees. The poles should not be taken dry, as they are fragile and more susceptible to ignition from the stove.

The best covering material for a bathhouse is Soviet-style tarpaulin, but it is heavy, expensive and cannot be purchased everywhere. An ordinary film will serve as a primitive shelter. For a tent designed for 5 people, you will need a piece measuring 6x6 m. The disadvantage of the film is that it quickly burns out when hit by a spark from the stove, but it is easy to carry with you on a hike.


Any sauna tent must be equipped with a stove. There are 2 options to choose from:
- The stove-heater is built on a resting place from large cobblestones. The design resembles a well with a closed top. A window is left on the side for placing firewood in the firebox.
- The portable sauna stove is welded from metal. The design resembles a potbelly stove. There is a platform on top of the stove where you can heat water and heat stones to create a steam room.
The camping stove can be folded inside or outside the tent. The first option is called “black”, since there is smoke inside the bath along with the steam. The second option is called “in white”. Smoke from the stove does not penetrate into the tent. The stones are heated outside the bathhouse and brought inside while hot.
Important Terms

A portable sauna tent cannot be installed anywhere. It is optimal to choose a site with suitable conditions:
- Availability of water. In field conditions suitable option
- for a bathhouse is the bank of any reservoir or river.
- Stones. If there is no metal portable stove, it will have to be stacked from the cobblestones. There should be stones nearby, but not layered, but solid. Otherwise, the cobblestones will crack due to heating. Flying fragments can injure a person. The optimal dimensions of a cobblestone are from 10 to 12 cm. Small stones cool quickly, while large stones take a long time to warm up over a fire. The optimal shape of the cobblestones is slightly flattened and elongated. It is difficult to build a stove out of round stones, as they will roll off.
- Young trees.
If you don’t have the frame with you, it is collected from long poles 3-4 cm thick. The material is looked for in the nearest forest or planting.
Firewood. The stove in the camp sauna is heated for about 3 hours. Firewood requires dead wood. Trees are selected with a trunk thickness of 10-15 cm.
On a hike, it’s not always possible to find a place for a bathhouse with all the conditions, but you need to try to find something in between. First of all, a body of water is in demand. Stones, firewood, and poles can be searched for and brought by hand.
DIY manufacturing steps

“The white way” is to set up a sauna in a tent with your own hands without a stove. It is built outside the steam room. Only hot stones are brought inside the tent. The advantage of this method is the absence of smoke. The downside is that the camp bath takes a long time to warm up and cools down quickly. It is optimal to build a small tent so that there is only enough space for necessary procedures. Volumetric camping steam room It will take a long time to warm up, you will need a lot of stones, and in cold weather this is almost impossible to achieve.

Due to the absence of a stove inside the tent, film can be used as a covering material. The frame in the traveling version is most often made of poles. You will need 8 poles more than 1 m long. The poles are tied together with wire or tape. You should get a cube or parallelepiped.
Advice! For a group holiday, it is better to build a bathhouse for 4 people and take turns to steam.
For 1-2 people, you can get by with a wigwam-shaped frame. 3 poles are placed at an angle, forming a cone. Before stretching the film, tape all sharp knots on the sticks. The polyethylene sleeve is opened with a knife. The resulting single-layer fabric covers the frame. The film is taped to the poles and secured with clothespins.

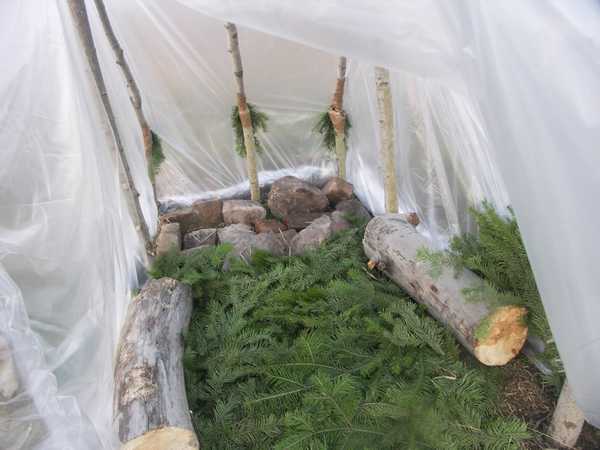
2 large sheets of film are left on the entrance side. The doors should overlap so that steam does not escape from the camp bath. Inside they set up a place for hot stones. It is fenced off with sticks 30-50 cm long driven into the ground. The floor of the camp bathhouse is covered with spruce branches. For sitting, you can lay a rug or find a stump.
The stove is installed at a safe distance from the tent. The spark should not reach the film cover. You also can’t move the stove too far away, because you’ll still have to carry hot stones into the tent. After the construction of the stove, the remaining stones are not thrown away. They press the bottom of the tent's film cover to the ground. It is important to place the stones tightly together, otherwise steam will escape from under the unpressed areas.
Making a sauna tent “the black way”
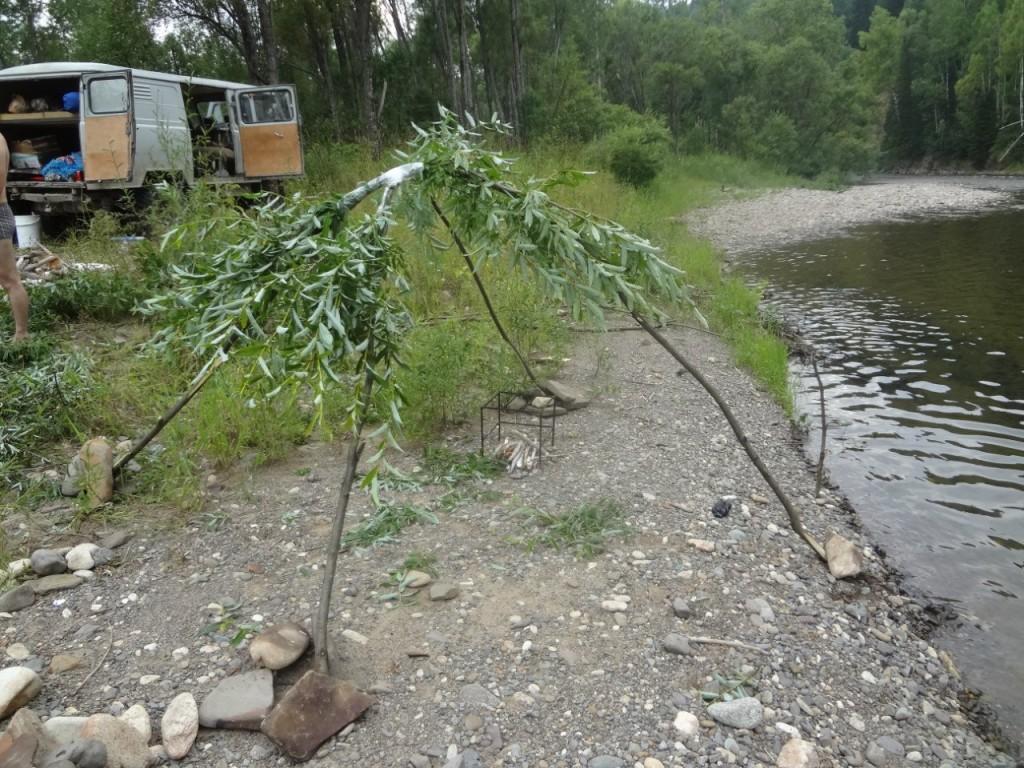
Using the “black” method, a do-it-yourself sauna on a camping trip is installed in the same way. The difference in the design is the location of the stove inside the tent. The frame of a camp bath is tied with willow twigs or vines. The easiest option is to fasten 4 poles about 1.5 m long with tape. If you can find long poles about 3 m, then 2 of them will be enough. The poles are simply bent, tying them with a cross in the center to form a hut shape.
Film can serve as a shelter for a camp bath, but polyethylene is afraid of fire. The stove will have to be folded efficiently in order to protect the film tent as much as possible from sparks.

For a “black-style” camping sauna, it is better to install a collapsible frame made of thin aluminum tubes. It is guaranteed not to ignite in the oven. Instead of film, the tent is covered with a tarpaulin. Durable racks will withstand the shelter even if it is covered with snow or rain accompanied by strong winds.

A quick camp sauna with a stove is organized in a factory-made tent, only with a tarpaulin cover. The frame is assembled from folding arches in a few minutes. For convenience, first a stone stove is laid out in the tent, and then a tarpaulin cover is pulled up.
Do-it-yourself camping sauna stove

The stove-stove for a camp bath is built with your own hands on the spot from large cobblestones. In fact, the design resembles a potbelly stove. First, lay out the firebox in the shape of an unfinished ring, leaving a window for loading firewood. The vault is made as shown in the figure: solid, vaulted or with a lintel. The first scheme is worse due to poor heating of the upper cobblestones, since there is not enough flame to reach them.
The main stages of constructing a bath using improvised means
Experienced travelers quickly erect a sauna tent with a stove. A beginner should follow the steps step by step, following the recommendations. After several training sessions, installing a camp sauna will take no more than an hour.
Selection of location
A suitable site for a camp bath is selected taking into account important conditions. Any source of water, firewood and stones is required. Carrying cobblestones from afar is difficult. The same goes for water. You can bring a couple of buckets, but the pleasure from bathing will be limited. It’s good to stop on the shore of a pond, where you can take a dip after the steam room.
When choosing a site, it is worth examining the soil. The ground must be solid. In soft and loose soil it is impossible to reliably strengthen the tent poles.
Construction of the stove

The most important step is to install a stove for a camp bath using cobblestones found in the vicinity. The simplest heater is built according to the following rules even before covering the tent with a tarpaulin:
- Under the stove, cut off the upper part of the soil with a sharp spatula. The base is laid out in the recess with cobblestones. If there is dry grass nearby, remove it with a spatula to prevent fire.
- Using flattened cobblestones with a size of 200 mm or more, lay out the fireplace. Its height and diameter are approximately 700 mm. A small opening is left for storing firewood in the fireplace. The hearth is covered from above with a large flat stone. You'll be lucky to find a slab-shaped savage. It is convenient to place a bucket of water on a flat stone.
- A fire is lit in the stove of the camp sauna tent 4 hours before swimming. The readiness of the stones will be indicated by their red or White color, which depends on their breed.
The first watering on the stove is done with caution. If the stones do not crack and no fragments fly off from them, the cobblestones are selected correctly.
Frame structure
A collapsible tent has a frame made of tubes. Using homemade design, the felled poles are cleared of knots. The most convenient and safest is a two-compartment camping sauna. The frame of the tent is made in such a way that the steam room is slightly removed from the stove.
First, 4 racks are dug in the corners. From above they are connected along the perimeter and crosswise by crossbars. The poles form a strong outline of the tent and prevent the tarpaulin from sagging on the ceiling. Two long poles are placed at an angle to one side of any wall. They are attached to the tent frame from above, and pressed into the ground from below. This creates a second compartment for the stove.
Canopy for camping steam room
For a tent, it is advisable to use a single piece of film or tarpaulin. It should be larger in size than the frame so that the bottom edges can be strengthened well. The canopy is pressed to the ground with cobblestones or earth. Most good option- This means digging a trench around the frame, laying a canopy, and covering it with soil.
The warm floor inside the tent is made of spruce branches. Lay a rug on top or lay out thin branches with foliage. Birch is ideal.

Using a sauna tent is easy. A few tips will not hurt novice travelers:
- when burning wood in the tent, leave a small open window to ventilate the smoke;
- a bucket of water is placed on the stove to water the heater;
- after heating the stones, the burnt-out heat is removed from the heater, and the tent is tightly closed to avoid heat loss;
- The stones are watered as needed to create a comfortable amount of steam.
Cooling of the stove stones takes about 2 hours. During this time you can comfortably steam. To protect the walls of the tent from fire and people from accidental burns, the stove is fenced with shields made of branches.
Conclusion
A camp bathhouse is not built to be too spacious. A large tent leaves heat faster. It’s better to install a small structure and take turns steaming.
A tent on the bank of a leisurely beautiful river in the shade of centuries-old trees, a starry sky and tea drinking by the fire, a fragrant fish soup made from freshly caught fish - that’s all large quantity people are once again giving preference to active recreation in nature. Tourism is coming back into fashion, because it is this kind of weekend or vacation activity that allows you to return to your workplace in stuffy offices, rested and relieved of the burden of everyday worries. One of the problems that vacationers face is the lack of opportunity to wash in normal conditions, and if the vacation is also in the Altai mountains, then washing in seething icy rivers can be compared to an extreme sport. There is a way out - this is a camp bathhouse. We will talk about them and their construction in this article.
Exact time It is impossible to indicate the appearance of the first camp baths, but it is known for certain that already during military campaigns the ancient Romans erected structures reminiscent of Roman baths. In descriptions of Russian military transitions of the 18th century, and more early periods, there are also references to camp baths, in which the role of a stone stove was played by cannonballs and firewood, and the walls of the room were constructed of dense fabric impregnated with a special solution.
Great option for summer residents
The baths are camp, despite their name, a good option not only for people who prefer outdoor activities. This structure is ideal for country dachas and houses. Especially in the case when building materials are currently beyond your means, but you really want to take a steam bath.
Also this perfect option for construction crews abandoned at remote sites by the will of the employer. In general, such baths will help those who like to give in to the park in a variety of situations.
Choosing a place for a bathhouse
What can compare with the pleasure that lovers of light steam receive when pouring refreshing ice water over their steamed body! To get this pleasure, a place for a bathhouse should be selected next to a pond. Ideally, it would be nice to build a structure over a small stream, then you will always have cold water at hand.
It is better to build a camp bathhouse near water on stable, fairly soft, but not viscous soil.
When choosing a location, you should also take into account the soil structure. You cannot build a bathhouse on wet ground, in which case the stakes may become loose and the entire structure will collapse. If the ground is too hard, it will cause some inconvenience when driving stakes.
What does the industry offer?
On modern market There is a huge range of ready-made mobile baths. You can purchase a structure with a stove-heater or just an awning for covering. Some models are immediately equipped with a frame, while others imply self-assembly bath basics.

Ready-made camp bath structures can be purchased in specialized stores
Of course, if you purchase a completely ready-made kit that includes a stove, the problem of washing it while traveling will be completely solved, but it will be difficult to transport this rather massive structure. If you are traveling in a group in several cars, then this option is for you. Other travelers can be advised to purchase only an awning. Most likely, in the place where you will be resting, there will definitely be some poles that can be used for the frame, and stones for the stove will not be big problem, but these awnings hold steam much more better than polyethylene.
Camping sauna made from a tarpaulin tent
A do-it-yourself camp sauna is easily assembled from an ordinary classic canvas tent from Soviet times. As a rule, they are highly waterproof, making them ideal for this purpose. In addition, in this case you will not need to take an additional awning with you. It is enough, after steaming to your heart's content, to move the structure to the place where you spend the night and it will again turn into sleeping area.
Advice: do not use modern tents as an awning for a bathhouse. As a rule, the material from which they are made does not withstand very high temperatures.
Instructions: construction of a camp bath
So where to start?
First you need to prepare everything you need. We will need:
- Frame. It is best to use aluminum or carbon fiber racks. In order not to strain too much, you can take ready-made elements four-person tent. Subject to all fire safety standards, they can withstand fairly high temperatures. If you have nothing suitable for creating a frame with you, ordinary wooden stakes will do.
Tip: when using wooden materials it is necessary to either treat them with special fire-fighting agents (which are unlikely to be found in your hiking backpack, but when building a temporary bathhouse on your site, this advice may come in handy), or carefully monitor their heating during operation in order to avoid the entire structure catching fire.
- Covering material. If it is not possible to purchase a special awning or use tent covering material, regular polyethylene will do. big size. Optimal size canvas - 6x6 m. In a bathhouse built from a piece of polyethylene of this size, up to 6 people can steam at the same time.
Interesting: quite often lately there have been camping bathhouses built from old banners, which hold heat and steam well and are highly resistant to high temperatures.
- Water. Without water, a bathhouse loses all its meaning, so it needs to be arranged on the shore of at least a small body of water.
- Stones. It is necessary to prepare a number of large round boulders in advance. Please note that for one pass you will need at least a bucket of stones. Chipped and heterogeneous stones, as well as layered and flat stones, are not suitable. They can split when heated, and flying fragments can cause serious injuries to vacationers. You should not use granite, which, when heated to a certain temperature, simply crumbles into sand.
- It is better to have an abundance of firewood than to experience a shortage during the soaring process. You should take dry trees with a diameter of no more than 15 cm.
We will describe step by step how to make a camp sauna.
Stove for a camp sauna
First you need to make a stove in which the stones will be heated. If you already have a ready-made oven frame, it should be done in two opposite sides cover with large stones, if possible without gaps. Two sides are left open to maintain draft while the fire is burning. Next, we line the oven on both sides and on top with smaller stones. This will be the basis of our steam room.

This is what the oven should look like if you already have a ready-made frame
After this, you can light a fire. First, we place small chips inside the resulting structure and achieve even, constant burning. Now the cavity is completely filled with firewood. Combustion is maintained for at least 2-2.5 hours, ideally from morning to evening. The flame should be strong and not fade for a minute.

But this is the kind of oven you should get, if not metal frame
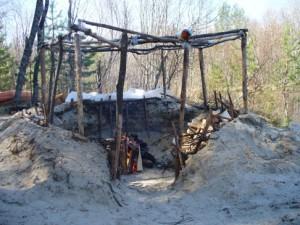
If there is no ready-made frame, then instead of it a base of large firewood is laid, and stones are laid out evenly on top with small gaps. The fire is set on fire and during the burning process the procedure for laying firewood and stones is repeated many times until all the boulders are engulfed in dense fire. Such a fire can burn for up to 4 hours.
We build a frame for an awning
Pre-prepared racks are connected to each other in such a way as to create a structure that resembles a cube without a bottom. For the link you can use any suitable material:
- insulating tape;
- scotch;
- rope.
The ends of the wooden stakes must be carefully wrapped with fabric so that they do not tear the awning material.

Frame made of wooden stakes for a camp sauna
Tip: For greater stability of the structure, the diagonals of the roof can be connected to each other using poles.
Our camp sauna with stove is almost ready, all that remains is to cover the frame and you can take a steam bath. There are two options for further construction: black and white.
Black camp sauna
In this case, all coals and ash are removed from the stove, and the entire space around it is carefully filled with water. The finished frame, together with an awning or polyethylene put on it, is installed over hot stones. Reservoirs with cold and hot water(water can be heated in a pot over the same fire).
Advice: it is better not to enter such a bathhouse without shoes, since when sweeping out the firebox, small hot stones may remain on the ground and lead to burns.
Detailed video process will help you better understand how to make such a bathhouse yourself.
For those who want to steam in white
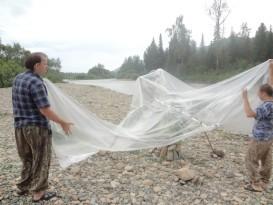
This bathhouse is different in that the fire pit remains in the same place, but the hot boulders are quickly rolled with a shovel along a specially prepared path under the frame. The path must also be thoroughly watered cold water. Now we very carefully put the awning over the frame, and it is important that there is a person inside to ensure that the canvas does not fall on the hot boulders.

The main difference between black and white camp baths is the location of the frame. In black baths it is located above the fireplace, and in white baths it is located separately, and hot stones are rolled into it
To make the bathhouse hotter and for a long time remained functioning, in both cases the ends of the shelter should be pressed to the ground with stones, pebbles or simply sprinkled with sand.
What else might you need for a camp sauna?
First of all, what is a bathhouse without brooms? Therefore, you should take a couple of these attributes with you from home. In camping conditions, such a broom is simply steamed cold water.
Secondly, when heating water to pour over stones, it is worth adding some aromatic herb, for example, lingonberry leaves, pine needles or juniper. In addition to inhalation healing effect You will also get great pleasure from inhaling the invigorating aroma.
Have fun!
A camping sauna is a mobile analogue of stationary structures. The structure is assembled on site from scrap materials or a specialized tent and stove, which can be purchased in stores selling goods for outdoor activities. If you are going to make a camp sauna with your own hands, you will need to prepare before the event. To do this, you need to familiarize yourself with the installation process and the selection of materials needed for its implementation.
What types of camping baths are there?
There are several options for making a tourist camp bath:
- based on the purchased stove and tent;
- made entirely from improvised means;
- combined from specialized and improvised materials.
The first method of building a camp bathhouse is the simplest, however, it has several significant disadvantages:
- acquisition costs;
- transportation of a large stove and frame;
This option is suitable for tourists who often travel outdoors. own car. If you plan to install a camping sauna tent very rarely, then there is no particular point in purchasing specialized products.

Attention! It is not recommended to use synthetic tents to build a sauna. They are not intended for high temperatures (even if they are fireproof) and can quickly deteriorate and release toxic substances during heating. Performance tourist bath perhaps from canvas tents.
Choosing a place to install a camp sauna
To install a camp sauna, you need to choose a place where there will be enough stones to build a stove. The most suitable option would be a forest river, since in such an area you can find stones, materials for kindling and building a structure. The presence of water nearby also plays an important role, thanks to which you can get steam without extra effort.

Before you make a camp bathhouse with your own hands, you need to arm yourself with a tarpaulin or plastic film, as well as a frame or make it on site from sticks. To build the frame on site you need to take duct tape or twine. An indispensable attribute on every hike is a camping knife, which does not take up much space, but has a wide range of applications in nature.

How to install a camp sauna
To install a camp sauna you will need:
- dig a small hole in the sand or earth (it is recommended to lay the bottom with stones);
- install the frame of the future stove and place stones on it;
- light a fire inside the stove (the fire should be high, since the stones heat up very slowly);
- when the stones heat up and the fire burns out, you need to install a bathhouse frame (purchased or homemade) and stretch a tarpaulin (film) over it.
Instead of the first two points, you can use a purchased stove for a camp sauna.
The frame can be assembled in advance so as not to waste the heat of the stove, and only after that you can secure the tarpaulin and start using the sauna. It is advisable to pour hot water onto the stones, which can be boiled during construction.

Attention! Try not to install a camp sauna stove directly on the ground. Heated rocks can begin to burn the ground beneath them, causing carbon monoxide. If you cannot find a sandy base, it is recommended to make a thick cushion of stones under the stove.
In order to make a small bathhouse frame with your own hands, you need to pick up several elastic branches, secure the bases in the ground or sand and connect them with tape or rope in the middle. It is very convenient to use adhesive tape, since it can be used to fasten small sticks into the desired structure.
Wet and especially damp stones, as well as fresh sticks and logs, can tear under the influence of heat, so it is recommended to choose dry ones Construction Materials for the stove. If this is not possible, you need to be as careful and attentive as possible until the stones warm up completely. Under influence high temperature The water contained in the stones turns into steam and tries to escape. If the moisture in the gaseous state does not have enough room to escape, the stone will explode due to the high pressure inside. Compliance with this simple rule safety will allow you to enjoy your outdoor recreation without any problems.
If you have the opportunity to take additional cargo with you on a hike, a sauna in the field will be quite comfortable. People have realized the need to keep their bodies clean since time immemorial in all corners of the earth. The peoples in those distant times were divided into nomads and sedentary ones. Accordingly, the baths were either used in the field or were stationary.
A little history
The baths were discovered during archaeological excavations of ancient structures of the Aztecs and Incas.
IN Ancient Greece Baths are complex engineering structures with aqueducts and centralized heating. Arabic and Turkish baths have been famous throughout the world since ancient times.
During excavations in Ancient Egypt the remains of structures identified as baths were discovered. These were two-story buildings. On the ground floor there were devices for heating water, on the second there were washing rooms and swimming pools.
IN ancient China the use of the bathhouse was elevated to a cult. In the legends and myths of China hot water and steam, in addition to its direct purpose, helped in the fight against evil spirits.
The use of the bathhouse is mentioned in deciphered sources from the ancient lost civilization of the island of Crete.
In general, no specific nation or even continent can claim copyright for the use of the bathhouse.
Mobile baths are also an ancient invention. Even the Greek historian Herodotus in his works mentioned such a bathhouse in which the Scythians steamed. In those days, nomads covered the frame of poles with felt.
The field bath can be divided into the following three groups:
- marching;
- trekking-luxury;
- mobile

Camping bathhouse-Lux
Hiking option
This is a do-it-yourself bathhouse using improvised means extreme conditions, which is very easy to build. The expedition of Dmitry Shparo moved toward the North Pole for more than seventy days in the harshest conditions of the polar winter. Having reached their goal, they set up a bathhouse in a tent. According to the testimony of the expedition participants, this was one of the most vivid impressions.
Our climbers Balyberdin and Myslovsky also used the experience of polar explorers. Several days of stress at the limit of human capabilities in thin mountain air while climbing Everest. And the invigorating steam of the camp bath. They knew exactly how to make a sauna in nature.
The design of a camp bath is very simple. Set up a tent, or if you don’t have one, make a hut made of branches. Stones are heated in the fire. The heated stones are dragged into the prepared room, “just add water” and the steam room is ready.
The choice of stones must be approached with all seriousness. They must be free of cracks and not emit harmful substances when heated, otherwise the sauna with your own hands will not be complete.
How to make a luxury camp sauna
You need an awning or polypropylene film. The rest is done by hand. The poles for the canopy are cut down on site. A small hole is dug, the size of the hearth and the depth of a shovel bayonet. A hearth is built from large stones.
The requirements for stones are the same. Hot stones with cracks, if water gets on them, can fly into fragments and damage the awning. Harmful substances, released when heating some stones, will spoil the smell and pleasure of the bath.
Such a bathhouse differs from a simple camp one in that the hearth is heated to the desired state, and then a frame of freshly cut poles is built around it. Then the frame is covered with a pre-supplied awning. That's it, the bathhouse is ready.
Mobile option
A camp sauna and a mobile sauna are two very different things. If a camp sauna is made from improvised means, then a mobile sauna is a high-tech product. In its production the most modern materials and innovative design solutions. But the principle itself is the same. This is a tent. It consists of a frame and an awning.
In the 21st century, special fabric is used for the awning. This is polyester or its analogues. The tent design includes a door ventilation holes, sometimes windows, a hole for a chimney in a fire-safe version. The door can usually be closed from the inside and outside.
The frame is assembled from light and durable duralumin, sometimes titanium, tubes. The assembly, as they say, is intuitive. In some models, there is a cable running inside the frame tubes and there is no other way to insert them. In others, the tubes are connected by hinges and it is enough to secure the clamps.
The stove is designed specifically for a field bath. Constructions different manufacturers have several general characteristics. It is light weight and spark resistant. Often the stove has a built-in water tank and a heater, into which you just need to add stones.
The tent flap unfolds on the ground. The frame arcs are inserted into the grooves for the zipper. All zippers are fastened, the stove is installed and the sauna is ready.
Mobile baths are available in configurations ranging from 2-3 people, to military versions for dozens of people. Russia is the undisputed leader in the production of such products. Other countries only produce mobile toilets and showers.
A field bathhouse, made in nature with your own hands, will bring maximum satisfaction to the body and soul.


