How to make a hammock with your own hands - video
Today it is quite difficult to imagine a full-fledged comfortable summer vacation on a country site without a hammock. Hammocks in the country are very comfortable and practical, you can sunbathe on them, read a book or just take a nap on a fresh vacation. In addition, the original hammock can be made with your own hands, you just need to make a little effort.
Varieties of hammocks
Among modern hammocks, there are several varieties of products that differ in their qualities and technical characteristics.
Hammocks with a frame. Such designs are very popular, so you can see them in many areas. The main advantage of hammocks with a frame is the ability to place them almost anywhere: near the house, in the garden, on the river bank, etc.
Frame hammocks can be prefabricated and stationary. The latter option is more reliable and stable, but the transportation of this product can cause problems. Prefabricated hammocks do not have a high level of reliability, since they are made from more fragile materials, however, such hammocks can be easily disassembled and transported from place to place. Hammocks with a frame can have a variety of shapes and colors.
Hanging hammocks. These models can be considered classical, since for the first time a person began to use them. The positive characteristics include versatility, the presence of a synthetic base that does not allow moisture to pass through. The use of a mosquito net will be especially relevant in the warm evening hours when mosquitoes fly out to hunt.
You can build a hanging hammock for a summer residence with your own hands. To do this, it is enough to find two trees standing next to each other and fix the base on their trunks. Tension elements or a carabiner are used as fasteners. If there are no suitable trees nearby, then poles are used to create a hammock.
Hammock chair. Such a product is in high demand because it has practicality and versatility. The presence of a hammock chair brings additional convenience to a simple stay in the fresh air.
This hammock model can be large, which will especially appeal to people who relax with a group of friends. On a comfortable basis, several people can be accommodated at the same time. Here you can chat, swaying slightly or drink a glass of lemonade. The cost of chair hammocks will be slightly higher than other varieties, especially if such a hammock is equipped with additional fixtures and accessories. It is possible to make a hammock chair with your own hands.
Hammock swings. Such hammocks have a rather unusual design, which makes them an original decoration of any suburban area. The fulcrum for hammocks-chairs can be the same trees, and the seat, the main condition is the possibility of free swaying. Modern models of such hammocks can take the most bizarre forms and have a variety of design designs.
Rules for operating a hammock
As you can see, there are a great many modifications and varieties of hammocks. However, they all require compliance with certain operating rules that can protect you from various negative situations and make your vacation really enjoyable.
Consider these rules:
- First of all, after installing any hammock, it is necessary to check its stability and reliability of fasteners. The trees or poles on which the entire structure rests should have a diameter of 20 cm or more. The poles are dug into the ground by about 1 m. Do not use a product that sags a lot, as this will only damage the base of the hammock;
- As for the distances, between the hammock supports it is from 3 m, and the mount from the ground is 1 - 1.5 m;
- The reliability of the fasteners must be checked in advance. The cables carrying the entire load must have a diameter of at least 8 mm.
Advice! To achieve an even greater level of security, experts recommend using eyelets. There are cases when their use is impossible - it all depends on the specific model of the hammock.
- The base of the hammock should consist of durable dense fabrics - tarpaulin or camouflage. Don't skimp on fabric as it can protect you from injury if you fall. Matter needs to be replaced every 2 to 3 years;
- In order to make a do-it-yourself hammock from a mesh, it is best to use cotton threads that do not fray, do not slip and tighten quite tightly.
Hammock decoration
After the hammock has been purchased and installed or built independently, you can take care of decorating it. The design itself is considered a good decoration of a suburban area, but there is no limit to perfection. Often, hammocks are decorated with canopies made of transparent or dense fabrics, which perform not only an aesthetic, but also a practical function - they protect from bright sunlight and wind.
To achieve comfortable conditions, the hammock is equipped with additional soft cushions painted in bright colors. Ribbons will also be an excellent decoration that will make the design of the hammock elegant, light and airy.
How to make a hammock with your own hands?
Method number 1
In order to make a hanging hammock with your own hands, it is enough to get strong ropes, reliable fabric of a suitable color and a sewing machine. No special skills are required for this job.
- Foundation preparation
The dimensions of the base for a hammock are calculated in accordance with the height of a person, and for an allowance on both sides, another 60 cm should be added to these indicators.
The uneven edges of the fabric are cut off, and places for mounting the drawstring are marked on both narrow sides. To do this, cuts are made 30 cm at a distance of 18 cm from each other.
- Making a drawstring
The drawstrings are located along the edges of the matter on its narrower sides. This is where the ropes are pulled. Incisions in 2 layers are folded over and stitched with double seams. The ends of the seams are securely fastened.
- Creation of eyelets and installation of the rope
Consider how you can weave a hammock with your own hands. The rope must be threaded into ready-made drawstrings, leaving a margin of about 180 cm, it is pulled through the cuts by 1 m. To make a hammock, about 40 m of rope will be required.
The ends of the rope are tied in two on one side, and four loops are pulled out in the middle, which must be wrapped with a rope and brought together. It will take about 10 m of rope to carry out a good winding. Before connecting, the loops are straightened and tied at the top of the bend. As for the transverse winding, it should be carried out only after all the longitudinal loops have been laid, and the rope has been fixed. Longitudinal loops are made from a thinner rope, the length of which will be slightly less than half a meter.
A longitudinal loop is necessary to securely fix the ends of the winding. The winding threads remaining at the end of the work are crossed among themselves and pressed tightly. Further, a rope is pulled through the fixing loop, and then the longitudinal part is wound. When the work with the carrier loop is completed, you should connect the two remaining ends of the rope and wrap them together. After creating two turns, tightly tie the remaining ends of the rope.
- Installation
As mentioned earlier, the easiest way to install a hanging hammock is to attach it to two adjacent trees. The main condition is that the fastening must be strong and reliable. In addition, poles dug into the ground, as well as a stand for a do-it-yourself hammock, are an excellent support.
- Decor
For a comfortable stay in a hammock, you must use soft, comfortable pillows that you can sew yourself using holofiber, fluff or synthetic winterizer as a filler. It is better if the pillows are painted in a color that contrasts with the color of the hammock itself.
Method number 2
If you are still tormented by the question of how to make a hammock with your own hands, then you can use the second no less accessible way. This will require the following materials:
- Approximately 2.5 m of durable tarpaulin or other material;
- 20 eyelets, as well as tools for their installation;
- 35 m of rope with a diameter of 6 mm;
- A pair of large metal rings;
- Drill and drill bit 12 mm;
- A pair of hardwood beams with a size of 30x50. The length of these products should correspond to the width of the future hammock;
- Sewing machine.
- Foundation preparation
After choosing a suitable fabric, it is necessary to measure and cut off a piece 2.7 m long. In the event that the structure will be located under a canopy, you can not take into account the resistance of the material to getting wet. If the hammock will stand without a roof, then this factor should be taken into account without fail.
The edges of the fabric must be folded and stitched using a sewing machine. The fabric is tucked up by about 6 cm. For more convenient stitching, the wrapped tip is ironed, then it is re-tucked and ironed again.
In the process of work, you will need to make sure that the stitched bend is on the underside of the hammock, where it will be completely invisible. Hemming of the side edges is sometimes not required at all for dense fabrics and is used, as a rule, to reduce the width of the future product.
Installation of eyelets
Places for installing eyelets are pre-marked with a marker or chalk on the surface of the fabric. On each narrow side, 11 elements must be mounted. Eyelets should be located at an equal distance from each other.
Creating a spacer from wood
As struts for a hammock, bars with holes made through which it is necessary to stretch the ropes are used. The struts will keep the hammock from collapsing under the weight of the human body.
We fix the spacer on the frame
The length of the bars is measured depending on the width of the hammock. Through holes in the bars must exactly match the location of the eyelets. The thickness of the products must be at least 25 mm, any width can be selected (from 50 to 120 mm). Finished spacers are sanded and varnished.
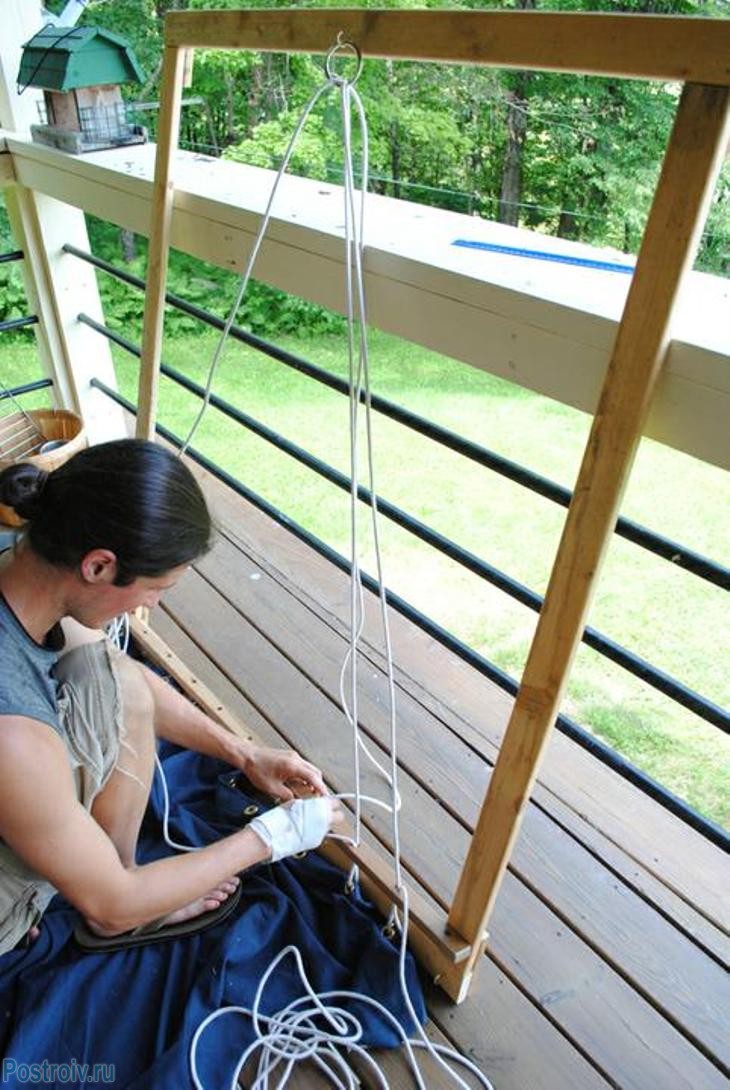
Installing a hammock
Initially, hammock slings are mounted, to simplify the process, a special frame is often made, but you can also do without it. To do this, a metal ring is fixed on the hook, and the canvas is laid out on the floor and fixed in place with something heavy.
A spacer is mounted on the frame. Each sling must go through a certain eyelet, then through a hole made in the spacer and a ring, and then the rope is returned back. After the tying is completed, the ends of the rope are tied. If desired, you can braid the metal ring with stroma ends to give the finished product a more attractive look.
Exactly the same manipulations must be carried out with the other end of the hammock. A hammock is hung on any supports suitable for these purposes.
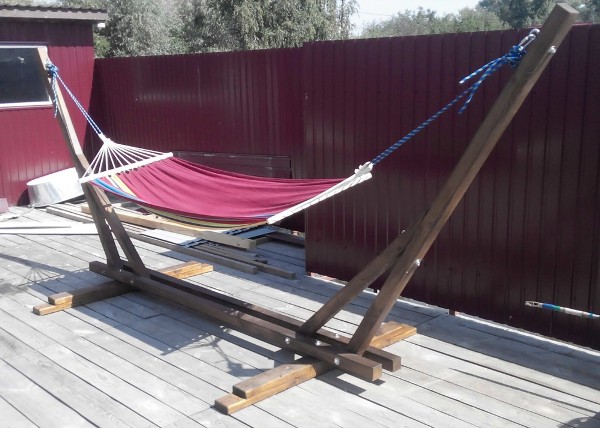
DIY hammock stand
Unfortunately, not in every yard you can find a couple of trees located in a cozy corner, and even at the right distance from each other. The best solution to this problem is to create a hammock stand with your own hands.
This design has many advantages:
- it is light, mobile and compact, it is easy to carry it to any place in the suburban area;
- quickly made with your own hands from available materials, the cost of which is much lower than the price of a finished frame for a hammock;
- it is durable and attractive to look at.
Required materials and tools:
- wooden bars with a section of 80x80;
- board with a section of 100x30;
- studs, nuts, washers for fastening;
- grinder, circular saw, drill;
- stain or varnish on wood;
- hooks for fastening the canvas.
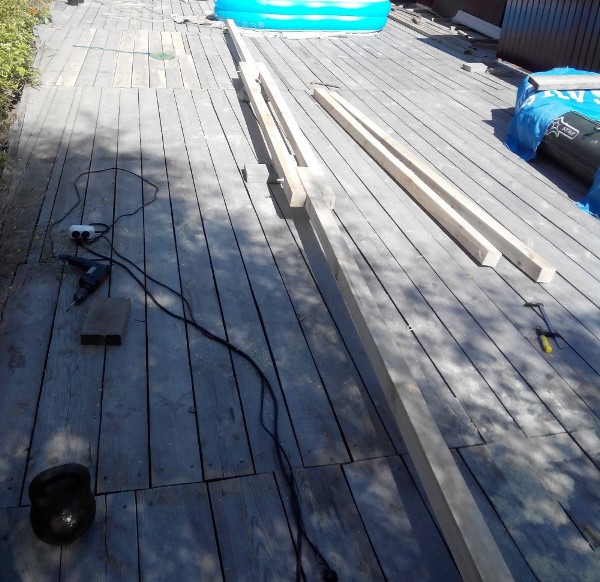
do-it-yourself frame for a hammock in stages. photo
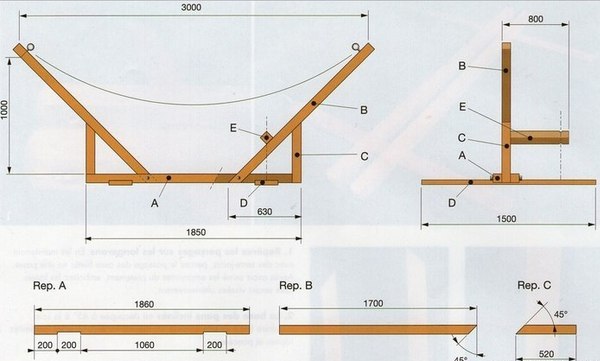
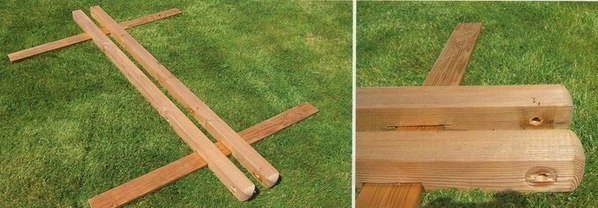
The lower, supporting part of the rack will consist of two longitudinal bars of 3 m each and two crossbars of 1.5 m each. The side part - 2 fastening beams (beam 2 m long) and 2 stops (beam 1.45 m).
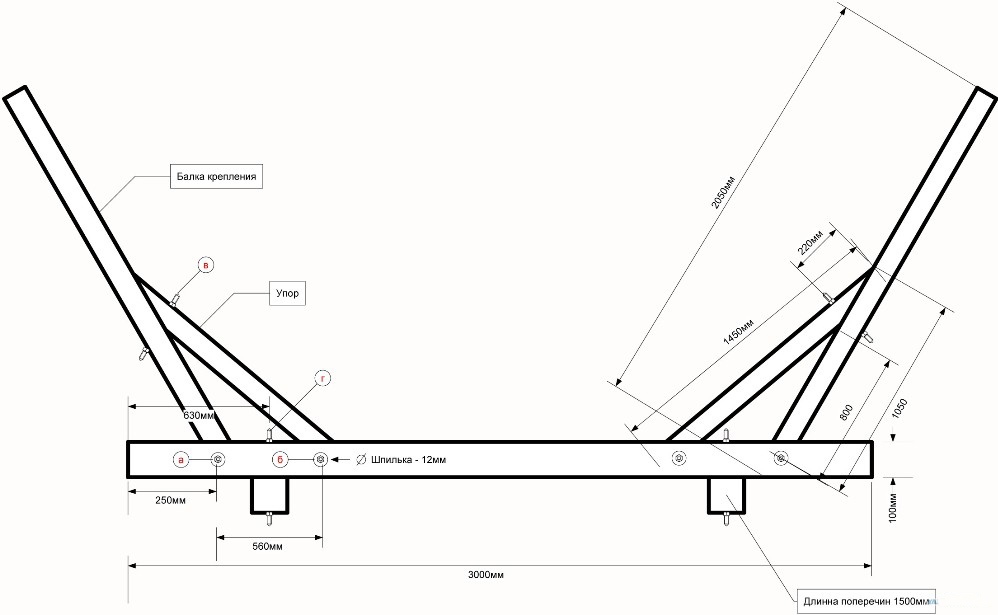
hammock frame drawing. Photo
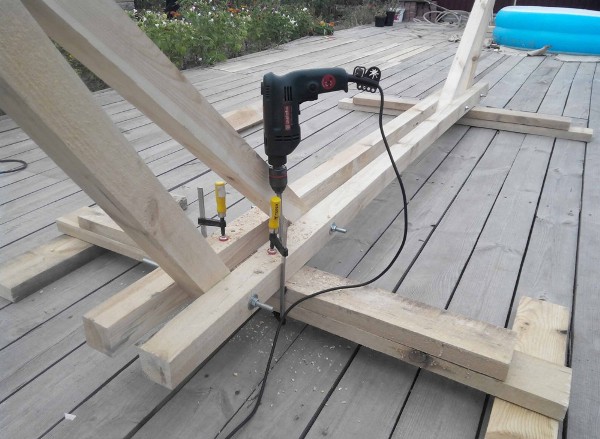
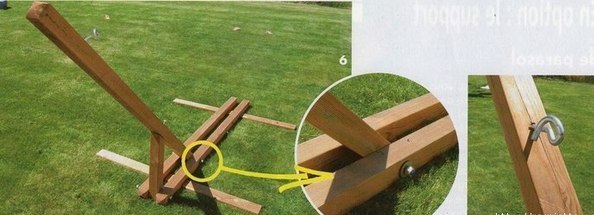
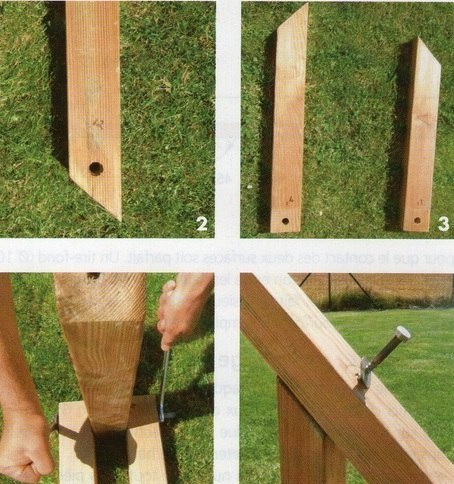
The first step is to make a jib - the side part of the rack, on which the hammock canvas will be attached with hooks. To do this, the beam and the stop are rigidly fastened together and cut off at the bottom so that a sheer, but at the same time stable structure is obtained with a collapse at the upper points of at least 4 m.
The resulting side parts are installed and fixed vertically between two longitudinal bars. Their location should be mirrored relative to each other.
The crossbar consists of 2 pieces of board (1.3 and 1.5 m), which are located one on top of the other to ensure better stability.
At the final stage, the longitudinal bars are fastened to the crossbars at a distance of 60 cm from each edge.
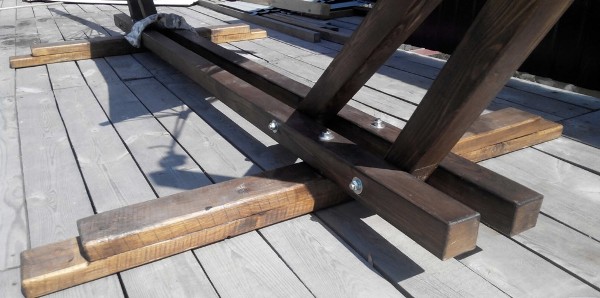
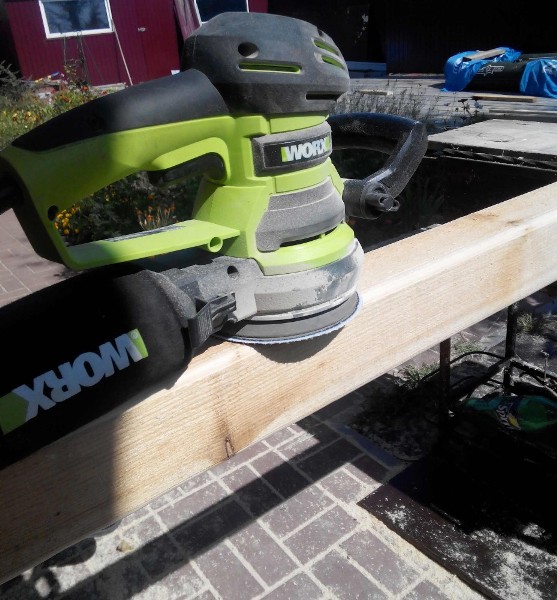
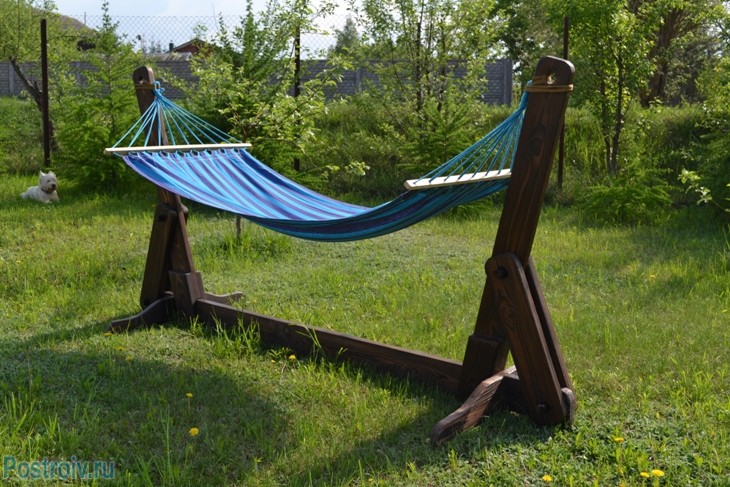
We grind, cover with stain or varnish - and the frame for the hammock with our own hands is ready. It remains only to fix the canvas.
DIY hammock frame
hammock frame drawing 2
You can also make a slightly different design, which someone seems more comfortable. The materials and tools are the same as in the first case.
do-it-yourself frame for a hammock in stages. Photo
The difference between this frame is the way the jib is made and the presence of a small handle for comfortable lifting from a lying position.
Thus, making a hammock stand with your own hands is not difficult at all. And it will be doubly pleasant to enjoy the result of the work.
Photo of hammocks
On the presented photos you can see what hammocks are, belonging to different types. You can notice significant differences in the design of products, as well as in their design and decoration methods. All these photos can be used to build a hammock with your own hands.
How to make a hammock with your own hands - video
In order to make a hammock with your own hands, it is not necessary to be a specialist in the construction industry, since the video shows the work process and describes it in great detail. Now, in order to enjoy a good rest in the country, you should make only a little effort. Follow the recommendations and instructions - and everything will definitely work out!