How to make a hammock with your own hands. Master Class
I want to touch on a topic that is quite relevant today. The holidays are approaching and the summer season has almost begun. Well, as in the country without a hammock? What’s more, it’s easy to make it yourself. And how pleasant it is to relax in the evening on a hammock after work in the garden and in the garden ... You can sunbathe on it and in general ... not a single child will refuse a hammock. Maybe you think about making a hammock with your own hands? It can be woven, knitted, sewn from old jeans and many more ideas. Are we watching? The hammock has its own history and certain rules must be followed when creating it.
What will you answer the question of what item is the most necessary and necessary in the summer in the country? Of course, a hammock! Anyone who has ever rested in a hammock knows that this is the best way to rest your tired body. Only in a hammock can you completely relax. And a couple of hours of sleep in such limbo replaces a good night's rest. This has already been recognized by scientists and psychologists.
History of the hammock
The way to relax in the air was invented by the American Indians. I really want to make a small digression in order to expand knowledge about the indigenous people of America. Strikingly creative children of nature, they brought to the world many inventions, without which humanity cannot imagine itself. Basketball and rubber ball. The Mayan Indians called this game "pok-ta-pok", and it symbolized the movement of the planets in space. And the ball was made from latex and the juice of rubber plants. It took half an hour to make it! The juice was mixed, in fifteen minutes it thickened, and a ball was molded from it!
Canoes and scuba gear, snowshoes and moccasins, thermos, ponchos, chewing gum, popcorn and chocolate, syringes and camouflage clothing... The Indians taught the whole world to drink cocoa and coffee, grow potatoes, tomatoes, eggplants, peppers, tobacco (by the way, they were not poisoned they, but were treated!, peanuts, corn, sunflower, vanilla... Their ethnic ceramics, weaving, jewelry are still highly valued in the world today. This is only what I know personally. And how big a contribution is really, no one knows, probably.
So what about the hammock? It was invented by the Mayan Indians a thousand years ago. Hanging beds were woven from the bark of the hamak tree, hence the name. Gradually, the idea spread to Central and South America. And it has taken root in all tribes so much that the hammock has become an obligatory household item. The ancient Indians literally lived in hammocks. Over time, the patterns have varied. Hammocks appeared from thick, durable cotton ropes, then from solid linen. Columbus, returning to Europe from the "New World", brought several copies of such hanging beds. The idea immediately took root among sailors and travelers.
Today, hammocks can be found in many gardens and even homes. No other bed design can so relax the muscles of the back, shoulder girdle and neck. Country workers know how important it is to recover after a hard day's work. Especially in spring, when every fine day is valuable, and in autumn during the harvest. Is there not enough work in the garden and garden in the summer?
You can buy a hammock in many building supermarkets. But the article is devoted to how to make a hammock with your own hands. This can be done fairly quickly and easily. A few hours of work, low-cost materials and an evening in the garden can already be spent sitting with your favorite book in a hammock.
General rules
Hammock models are different. But the requirements for all of them are common.
1. The most important thing is the reliability of fastening and supports. A hammock can be hung between two garden trees, poles or supports for a children's swing. If these are trees, then with a trunk no thinner than twenty centimeters in diameter. If the supports are poles, then they are deepened into the ground no less than a meter. Exactly the same as for installing a swing. It is important to know that the more the hammock sags, the less the load on the supports.
2. A hammock is hung at a standard height of 1-1.5 m above the ground. The distance between the supports is up to 3 m. If we dig them in, then we calculate the distance between the supports of the hammock as follows: the length of the hammock + 30 cm. more deflection.
3. Hammock mounts. Ropes should be thick and strong. Not less than eight millimeters in diameter. And do not be too lazy to strengthen the fabric with eyelets, if necessary according to the model.
4. Hammock fabric is good to use tarpaulin, mattress teak, camouflage and the like. Synthetic fabrics are lighter, stronger and cheaper, but after spending the night in such a hammock, you will realize that you made a mistake. The body must breathe. Moreover, a hammock made of natural fabrics takes the shape of the body much faster. A quality hammock is not designed to live for decades. You have to change every two years.
5. If the hammock is made of cords, then cotton threads. The knots on them are tightened tighter, and it is more pleasant to touch them than slippery nylon ones. In places where the rope can fray and where it comes into contact with a tree, we put on it a collar from a nylon tube.
Let's look at a few popular models and how to make them right.
DIY Mexican hammock

It is made without crossbars, just from a piece of durable fabric. Like a cocoon, a Mexican hammock envelops a person completely, relaxes every centimeter of the body.
It is impossible to fall out of it. It is also difficult to get into it :) Therefore, it is not recommended to use such a hammock for elderly or sick people. For everyone else, this is the most beautiful model. I folded it into a case, threw it into a backpack. The weight of a Mexican hammock is not more than a kilogram. And a house is ready for you under every tree, like a real Indian hunter.
In order to make such a miracle, you will need 2 pieces of fabric 1.5 m wide and 3-3.2 m long. Tuck each piece and stitch around the perimeter. Then follow the instructions, focusing on the diagram, which is shown in the photo.
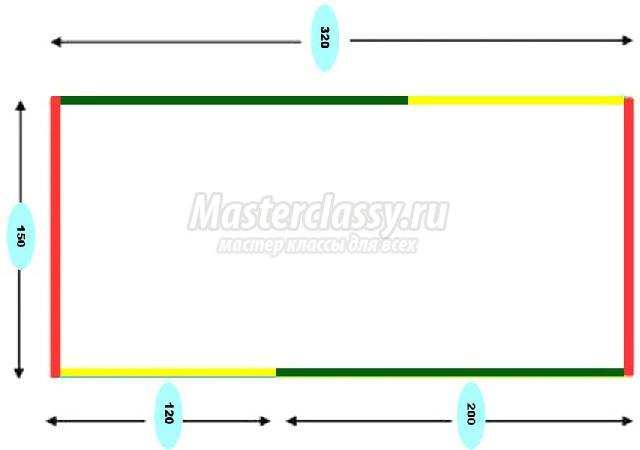
1. We sew 2 m along the long sides (green line in the figure).
2. What is marked with a yellow line in the figure, do not sew. So it will be very convenient to put a rug or “foam” inside the hammock, which will increase comfort.
3. Tighten the narrow side (red line in the figure) by 2-3 cm and sew.
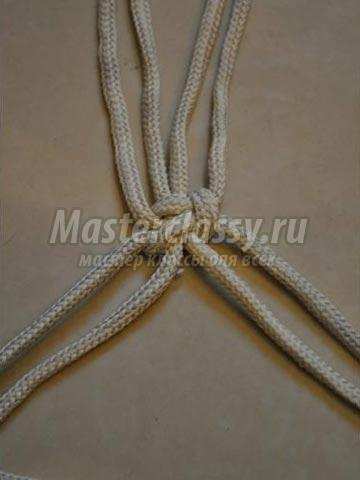
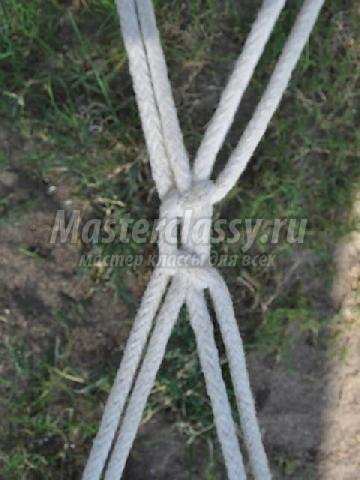
4. We pass the cord into the formed "tunnel".
5. We cross the cord and tighten its ends. The fabric will gather into a knot.
6. With the ends of the cord, we wrap the place of contraction 2 times and tie it in a knot.


7. Wrap the tree with a rope for hanging several times, placing a cloth or putting a tube on the rope. This will protect both the tree and the rope. Next, the suspension rope is attached to the knot, which fixes the fabric of the hammock with a knot.
It remains only to check the strength, adjust the tension and have fun!
If you leave the hammock as it is, it will wrap you in a cocoon. And you will feel like a baby in a sling. If you put a rug inside, the design will be more rigid and spacious. Both options are good!
Brazilian hammock on wooden sticks

If you hang it low enough, you can safely use it for children and the elderly.
You can make a Brazilian hammock with your own hands in this order:
1. We take two pieces of fabric 90x200 cm. Two wooden sticks (many recommend handles for shovels) 90 cm long, a drill, two packs of 10 m linen cord. So it will not come into contact with the body, you can take nylon.
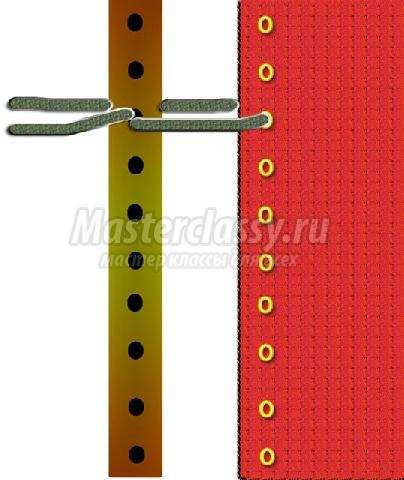
2. We sew two panels of fabric together. We bend short sections by two centimeters and sew. We make markings for eyelets every 8.5 cm.
3. We install eyelets on the marked places. We do 10 on each side. If you do not have access to such benefits of civilization, make loops from the same fabric by cutting 20 squares of 20x20 cm, folding in half, stitching and sewing securely to the edges. The rope will pass through them in the same way as through the eyelets. But metal mounts are still much more reliable. Insert them if possible.
4. We also make markings on sticks: we retreat 2.5 cm from the edges and further 8.5 cm.
5. We drill holes with a diameter of 20 mm so that a 8 mm cord can freely enter in two additions.
6. We cut the cord into meter-long pieces and pass each one through a hole in the stick, then through the grommet, again through the stick. Align the ends.
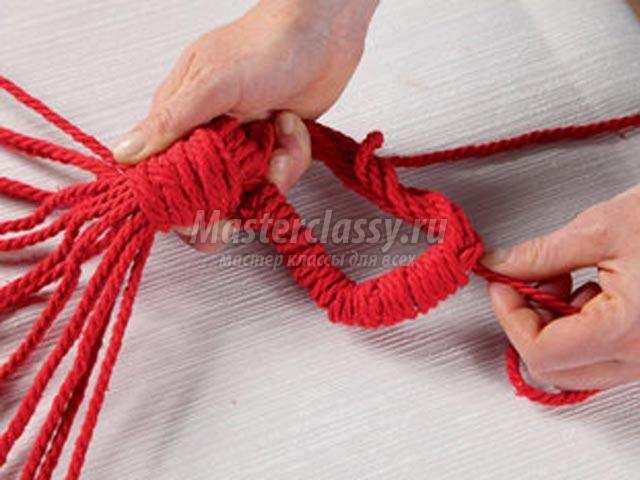
7. At a distance of 0.5 m from the stick, we collect all the cords in a bundle, tie it into a knot and tighten it securely.
8. We braid the knot. The hammock is ready.
DIY wicker hammock
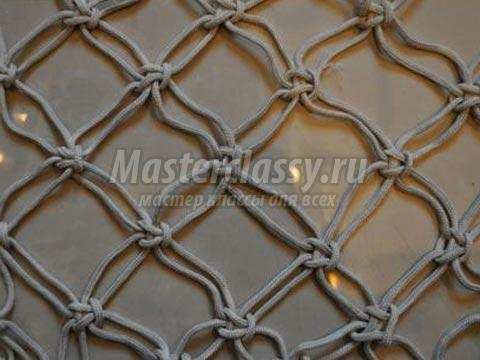
You can easily create it if you are familiar with macrame skills. In this case, you will need strong wooden slats without a single flaw (cracks or knots). We make holes in them every four to five centimeters. The diameter of the holes is equal to three diameters of the cord.
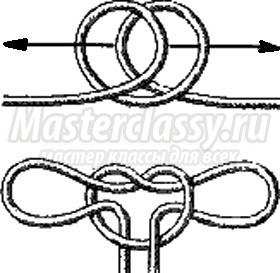
A cotton cord with a diameter of 8 mm is required. The length is calculated as follows: the distance from the rail to the rail multiplied by 3, multiplied by the number of holes. For example, if we choose a hammock length of 2.5 m with a standard width of 90 cm, then the body of the hammock will take about 150 m of the cord and 20 m for the mount. We fix each cord in a stick with a loop and weave the fabric. Each knot is woven from four cords. We try to make cells no more than 7 cm. The simplest weaving for a hammock is shown in the figure.
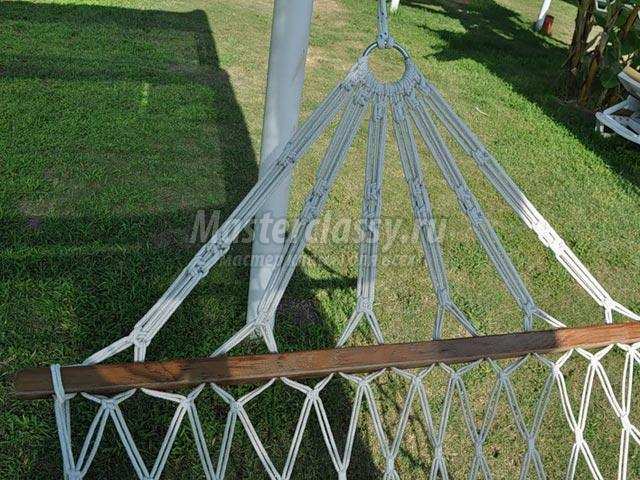
We draw the finished mesh through the holes in the bar, and connect four into knots. For strength, metal rings can be used.

Making a hammock

The round cradle hammock belongs to the design delights of our time. In order to make it, you will have to sacrifice a metal hoop. In addition, we will need:
3 m of fabric with a width of 1.5 m;
The same amount of synthetic winterizer;
8 m of reliable belt tape;
A little patience and a free evening.
We cut the fabric according to the pattern, as in the photo. Between the two layers of the main fabric we lay several layers of sentipon. We sew a "cover" for a hoop from circle segments sewn together. We sew both parts of the cover, already putting a hoop between them. The cradle is fastened with rep ribbons, which are simply tightened with tight knots on the hoop.

As you can see, it is not the gods who burn the pots! And not only Indians can sew a hammock! Finally, an interesting fact about the decor. The authors of this wonderful invention had a rule: the richer a person, the larger, thicker and longer the fringe on his hammock! A hammock without a fringe was called a "poor man's bed." So decorate what you get with a generous fringe!
If you are the author of the photo used in the article, write to us, we will definitely indicate the authorship!