The main types of connections of wooden parts. Dovetail, thorn groove and other do-it-yourself milling machine accessories Dovetail joinery dimensions and proportions
If you want to make furniture from solid wood, you will have to take certain measures against the deformation of the wood. The list of such measures includes the selection of the appropriate compound.
There are many known ways to connect wood parts so that they do not deform in the future. One of the most effective is the dovetail. The parts are connected to each other in such a way that it is almost impossible to separate them even without glue. Each thorn is clamped as if by pincers. The strength of the connection is also enhanced by the fact that the area of the docking areas covered with glue is much larger here than with simple connection without spikes.
In addition, the dovetail connection can rightly be called decorative, since it can decorate any piece of furniture, of course, provided that all the teeth are made carefully and accurately. And this will require painstaking work with a saw and a chisel. All grooves and tenons must fit exactly together, and all fugues must be equally narrow. From the first time, such accuracy is hardly achievable: first try to gain experience by processing simple boards.
Many interesting and beautiful examples dovetail joints can be seen when looking at old furniture.
The dovetail joint is considered the most beautiful, reliable and durable corner joint. It is not so easy to execute it.
It's done like this
- Cut out pieces of the desired length from the boards.
- On one of the boards, mark the spikes and grooves.
- Transfer the markings from the front face of the board to the end and then to the back face.
- Saw grooves and cut them out with a chisel.
- Using the processed board, mark the location of the spikes and grooves on the other board.
- After processing the second board, try to connect both parts without glue and make corrections if necessary.
- Apply glue to the joints, carefully connect the parts and hold under pressure until the glue seizes.
WHAT YOU NEED
materials:
Wood blanks Clay.
Tools:
- Ruler.
- Pencil.
- Awl or knife.
- Square.
- Tenon saw.
- Chisels of suitable width.
- Crafting table.
- Clamps.
- Hammer.
- Mallet.

The shape of the grooves and spikes in the dovetail connection

The beauty of this box is in the harmony of the material and the corresponding design using the dovetail connection.

Homemade stud bevel marking tool: Cut out a template from a thin metal sheet and shape it accordingly.
Carry out marking on the part having the required length
Before marking the spikes and grooves, measure the part again, it must have the required width. If the width of the part is larger than it should be, then the markup will be inaccurate and, therefore, unusable.
Choose the right chisel
Before you start grooving, check if the chisel you have is the right size for them. Take care of the right tool in advance if you plan to make very thin spikes. Chisels come in various widths - from 4 to 40 mm.
Bar protects against damage


When connecting parts, never hit the mallet directly on the wood. Use a small piece of wood to protect parts from damage.
Learn more about the dovetail connection
When making a dovetail connection, both parts are interlocked by means of a special form of teeth. The upright board shown in the figure has spikes that fit into the grooves of the horizontal board. Connecting and disconnecting boards is possible only when vertical position spikes. Otherwise, this cannot be done.
The boards connected in this way react differently to the load. And therefore, it does not matter in which part to make grooves, and in which - spikes.
In drawers, spikes are made on the front board, grooves - in the side walls. Since the greatest load on the box occurs when it is pulled out, the connection will be most durable precisely with this arrangement of the spikes.
IN hinged shelf the maximum load falls on parts located horizontally.
They should be with spikes that will hold curly grooves in vertically arranged parts.
The spikes should always be narrower than the grooves, especially when using dense and durable wood. The peculiarity of the dovetail connection is also that the spikes and grooves in finished product look different than when unfolded - as shown in the figure below.
Uniform distribution
Products with dovetail corner joints are not covered with colored varnish. Therefore, the location of the spikes and grooves must be uniform across the entire width of the parts. Extreme spikes may be slightly wider or narrower. All other spikes and grooves should be the same.
Drawing dovetail spikes
Experienced carpenters can distribute the teeth almost by hand. For those who are just starting to master this method of connecting parts, we recommend using a ruler.
For boards up to 15 cm wide, mark out, for example, four spikes and three grooves or five spikes and four grooves. For boards up to 20 cm wide - five spikes and four grooves or six spikes and five grooves. Approximate scheme distribution is as follows: the ratio of the average thickness of the tenon to the average width of the groove is 1:2.
You can very accurately draw the spikes and their bevels according to the scheme shown in the figures on the right.
Other ways of division are also possible. You can choose, for example, a smaller width of the spikes. In the so-called English connection, the spikes are very narrow, and the grooves are wide. However, in any case, the studs should not be beveled too large to damage the narrow parts of the grooves.

Mark the thickness of the board on the part parallel to the end edge, then half the thickness and then draw a line, the distance to which from the end is equal to the thickness of the board multiplied by three. To now accurately distribute the four spikes and three grooves, put marks on the oblique auxiliary line, the distance between which is a multiple of 10. Then transfer this division to the marking lines.

Here, dashed lines show the middle lines of the grooves: the points of their intersection with the auxiliary line at a distance of “triple thickness” of the board are very important for the final marking.

From the points of intersection of the middle lines of the grooves with the auxiliary line, draw lines through the points on the marking line "half the thickness of the board". Thus, the spikes and grooves will be marked very accurately.
markup
So, you have outlined the spikes and grooves on the front face of the board. Now you need to transfer the markup to the end side.
To do this, you need a square and a well-sharpened pencil, awl or knife. Depending on the type of wood, it may be useful or even necessary to cover the front side of the board with chalk: the markings will be more visible on a white background. From the end side, the markings are transferred to the back of the board.
The marking will be more accurate if the part is fixed on the workbench.
Marking from symmetrical elements on one part should be applied at the same time so that, for example, the contours of the spikes at the corners of the drawer coincide.

With the help of a sharpened pencil (or awl) and a square, the marking lines are transferred from the front face to the end side of the board.
Grooving
After transferring the marking lines, before starting to cut, shade the drop-out areas on the details - the gaps between the spikes. So you will not confuse anything with further sawing and working with a chisel.
The part should be fixed on the workbench in such a way that the marking lines of the bevels parallel to each other take a strictly vertical position. This is easy to do if you use a square. Saw first the grooves on one side, then turn the part over, fasten and saw through the remaining bevels of the grooves.
Install the saw not on the marking line, but close to it on a drop-down section of wood. From time to time check on both sides of the board if the saw is pointing correctly or if the cut needs to be corrected.
The grooves are cut with a chisel, which should be held strictly vertically. In this case, the position of the part itself must be horizontal. It is possible to more accurately guide the chisel when another board is fixed on top of the part, the edge of which runs along the line marking the depth of the grooves.
First, the grooves are processed with a chisel on one side of the part. After a recess is made about half the thickness of the board, it is turned over and the grooves are completed. This method avoids cracking of the board, as well as inaccuracies in the processing of grooves.

Fasten the part so that the marking lines take a strictly vertical position. Check with a square.

To cut grooves with a chisel, fix the parts on the workbench in horizontal position. The part must not slide.

Saw only the sides with the same slope. Turn over and fasten the part, saw through the other sides.
spikes
Experienced carpenters prefer to first make the spikes and then cut the grooves on another board. But you can do it differently: use the ready-made grooves in order to mark spikes on another board.
At the same time, it is also recommended to cover the end side with chalk so that marking lines are not lost on a dark tree with catchy growth rings. The latter must be carried out very accurately. To do this, you can use an awl or a well-honed pencil.
Transferring layout lines
Marking lines from the end side of the board to the front and back plates are transferred strictly at right angles to the end. The length of the spikes depends on the thickness of the grooved board. These marking lines must also be perfectly accurate. It is better to mark the depth of the spikes not with the help of a board with grooves, but by measuring the length of the spikes from the end edge, transfer these dimensions to the corresponding part. Otherwise, the spikes may turn out to be longer than necessary.
When marking, keep in mind that the front should be the most better side boards, and the marking lines at the same time - as accurate as possible.

It is advisable to cover the dark wood details with chalk so that the marking lines are better visible and the cuts are more accurate.
Compound
To cut spikes on the part, it is again firmly clamped, but this time the position of the board should be strictly vertical, as well as the cuts, which are only slightly beveled in a different plane, either to the left or to the right.
Fixing the part
To make cuts, the saw is also installed close to the marking line on the drop-down area of wood. After completing the work with a saw, the part is fixed on a workbench in a horizontal position and proceed to the processing of intermediate sections between the spikes with a chisel. As with grooving, the notch is made only half the thickness of the board, after which the part is turned over and the “excess” wood is removed from opposite side. At the same time, you can slightly correct the cuts if there is more than necessary between the marking lines of the wood.

First, make cuts only on the left or right side spikes, then parallel cuts on the other side.

After removing the intermediate sections between the spikes, carefully trim the saw cuts with a chisel.
Gluing
Before applying glue evenly and in a thin layer to all the spikes and grooves, lightly treat the surfaces to be glued sandpaper without rounding the edges. Then try to connect the parts without glue. You will immediately see if they fit together and what else can be corrected.
Carefully connect the boards so that the spikes and grooves do not split. Keep in mind that the grooves are especially often cracked.

Glue is applied evenly in a thin layer over the entire surface of the spike. To do this, use the spout of a bottle of glue or a thin brush.
Joiner's putty will help correct mistakes
With an ideal connection of spikes and grooves, all butt joints are very tight, without the slightest gaps, which not only reduce the strength of the connection, but also spoil appearance products. However, even experienced carpenters do not always achieve a perfect result, so you should not be upset if the connection needs to be corrected in some places.
Proceed as follows. Spread a plastic sheet under the workbench and shake off the sawdust on it. From sawdust and glue, make carpentry putty, which will help you make small adjustments.
Although ready-made carpentry putties and mastics of various colors are available for sale, home-made putty has advantages: it contains sawdust of the wood with which you are currently working, that is, this putty will fully match the tone of your product.
Putty should be applied carefully, in small portions, filling only the cracks. It is better to compact and level the puttied areas with a chisel blade, and not with a spatula.

Homemade putty will help you correct errors such as chipped chips or inaccuracies in work.
Sample
Wedge-shaped spikes can be quickly and accurately cut with a cutter using a special drill bit and template. In this case, during one working operation, two parts are processed at once, installed with a slight offset to each other. True, their connection differs markedly from the dovetail connection made traditional way, since when machining parts, all the spikes and grooves are the same. For this reason, the connection cannot be considered decorative, but it is also beautiful in its own way, and most importantly, very reliable. The distribution of tenons and grooves in such a connection depends on the size of the cutter used.

You can quickly cut the spikes with a cutter if you use a special nozzle for a drill.

This is how a template is used for cutting spikes with a cutter fixed in a drill.
Tell your friends about it:
STUD JOINTS "DOVEL TAIL"
The dovetail stud joints are not only visually attractive, but also very durable. The ability to properly cut such spikes is a sign of skill that comes with experience.


When assembling furniture, fasteners are now widely used - screws, dowels, various ties. However, spike connections, including those on dovetail spikes, do not finally give up their positions. They are quite reliable and at the same time beautiful. On such connections it is possible to fasten, for example, side walls cabinet furniture with covers. Breaking a dovetail joint by stretching is not easy. Therefore, it is often used in the manufacture of drawers. But we should not forget that the dovetail connection is resistant to such a load in only one direction.
Chipboard parts are not suitable for dovetail joints: this material is too loose. In one way or another, plywood, boards or furniture panels are suitable here.
Dovetail spike shape
If you look at the connection from above, you can clearly see that the "dovetails" are fan-shaped spikes at the end of one of the parts. The sides of the spikes are bevelled inward with a slope ranging from 1:5 - for "rough", but strong connections used when rallying softwood parts and furniture panels, up to 1:8 - for hardwood parts. The connection on the latter looks more attractive. And you need to know that with a smaller slope, the connection under load can disperse, and with a larger one, the spikes can collapse.
In the finished connection, the “teeth” that engage with the spikes are clearly visible. The slope of the spikes must exactly match the slope of the "teeth".
There should always be "teeth" (and not halves of spikes) in the connection along the edges -
this prevents buckling of the connected parts.
Another factor that affects the appearance of joints is the distance between the dovetails. In principle, the following rule applies: the wider the dovetails (thorns) or the greater the distance between them, the better. However, there is a limit to everything, besides, products come in different sizes (for example, a chest and a box), and one should not forget about the strength of the connection.
Marking spikes
The preparation of parts begins with trimming (their thickness does not have to match), and then mark
the position of the spikes and "teeth". It is better for a novice master to give a small (1-2 mm) allowance in length.
Malka is used for marking. To adjust it to the angle of the slope of the spikes, for example 1:6, two mutually perpendicular lines are drawn on paper and from the intersection point they are divided into six equal parts. Connect the sixth mark on one line with the first mark on the other. The slope of the resulting diagonal will be 1:6. According to this sketch, Malka is exposed.
At both edges, parts with spikes outline the width of the extreme "teeth" and draw lines through these points parallel to the edges. Next to the detail diagonally
impose a tape measure or ruler and turn it until the size between the lines is divided without a trace by the desired number of spikes. These points are marked on the diagonal, and then, using a thickness gauge, they are transferred to the end of the part. As a result of these simple constructions, the positions of the centers of the gaps between the spikes are determined.
On both sides of the centers found, lay off the same segment (in our example, 3 mm). The distance between the ends of the segments will be equal to the minimum gap between the spikes. From these points, with the help of a bevel, finally, the spikes themselves are marked. The height of the spikes is marked with a thickness gauge placed on a thick
the tire of the part with “teeth”. Marking is done on both sides of the part.
If the part has a length allowance, it should be taken into account when marking. In this case, the length of the spikes will be slightly longer than required. Later, when the parts are connected, the excess is removed with an end planer.
When marking up, all parts with spikes are marked with some conventional signs to avoid confusion.
thorn cutting
For cutting spikes and “teeth”, special tenon saws are used. When using a conventional fine-toothed rip saw, it will require additional preparation, in particular, to reduce the set of teeth (especially if the saw is new). To do this, the saw blade is placed with its entire surface on the touchstone and one or two times it is easily passed over it. The same is repeated, turning the canvas over to the other side.
When cutting dovetail spikes, the part is clamped in a vise. If there are two such parts (for example, the side walls of a drawer), the spikes can be cut into both at once.
Start cutting along the marking lines by tilting the saw back and at the same time guiding it with your fingernail thumb. When the cutting line is "caught", the saw is leveled and work continues until the part is sawn to the full height of the tenon (to the horizontal mark). Under no circumstances should this label be crossed.
Now you can remove the material between the notches that form the tenons. This operation is performed with a chisel. Having selected wood on one side up to half the thickness of the part, it is turned over and processed in the same way on the other side.
Next, proceed to cutting the "teeth". The part with “teeth” is clamped in a vise, the part with sawn spikes is placed on the end and fixed. Then the saw is inserted into the cuts and the end part of the part with “teeth” is cut. Finally, the “teeth” are cut in the same way as the “dovetails”. And in this case, sawing should not be done along the marked line, but in such a way that the teeth of the saw lightly touch it from the outside. In conclusion, the material between the "teeth" is removed with a chisel.
Before connecting the parts, it is necessary to eliminate possible irregularities and carefully bevel the inner edge on both sides of each tenon (especially on the outer ones). This will facilitate the operation of connecting parts, and in the finished product such a bevel will not be noticeable.
No related posts.
STUD CONNECTIONSPost navigation
Tell your friends about it:
Dovetail, detachable spike connection (trapezoidal grooves), used in mechanical engineering and carpentry for reliable fastening of parts to each other. In this material, we will consider the manufacture of devices that facilitate the production of grooves in a tree using manual router.
Do-it-yourself wood router accessories
The machine itself is a very ancient invention of mankind, descriptions of the principles of milling appeared in the 16th century, and the prototype of the machine was the invention of Leonardo da Vinci, who proposed rotating a round file to increase the processing of the product, which can be considered the first analogue of a cutter.
And already the American inventor Eli Whitney over the years of his life from 1765 to 1825 brought to mind all the scattered attempts to create a full-fledged machine, for which he is rightfully considered the creator of the first milling machine although not all scientists agree with this statement.
And since the machine has such ancient roots, there are a great many devices for the manufacture of various parts, to describe them all in the light this material is not possible, and therefore we will consider only some of them, in my opinion, the most important and useful.
Universal device for tongue and groove connection
factory plate for making tongue and groove joints
It is used with a router for cutting the corresponding grooves and spikes, it is installed in a vise, and the part is pressed against the device with a clamp. Usually sold in stores.

appearance of the connection
Consider slot milling fixtures
Cut out the top piece, a 18mm plywood tabletop 40cm long and wide enough to handle the thickest piece you plan to cleat.
Cut two 5x10 cm bars, sawing them the same length as the top. In the future, the bars will play the role of clamping the workpiece and centering it relative to the groove in the tabletop. To prepare the top, draw a line through the center of the top, then cut a groove along the line from one end.

schematic representation of the tooling
note
The notch should be the same width as the copy ring you will be using with your cutter. The notch should be long enough to match the length of the longest slot you are going to cut.
Then mill two adjustment slots perpendicular to the center line. Finally, drill a viewing hole between these two slots. To assemble the entire structure, screw the bolts into the jaws and secure the top to the bars with wing nuts and washers.
To use our equipment, draw a groove on the workpiece and mark the center line on it. Loosen the lambs and place the workpieces between the bars so that central line connected to the top line of the fixture, check that the edge of the workpiece is against the edge of the top.
Hold the lambs. Align the router bit with one end of the slot drawing, then mark guide lines on the top surface of the table along the edge of the router base.

How to work with snap-in tongue and groove
Repeat this one more time to mark the lines of the other end. Mill the slot at the bottom, starting the cut by aligning the base of the router with the first auxiliary line, and stop milling when the insert reaches the second auxiliary line.
Let's make a device for making spikes with our own hands

Spike making product
Made of wood and plywood, the jig shown above allows cutting rectangular spikes with two shoulders. The object to be machined is located with the front surface below the jig, while the router moves along the stop from above, removing the excess in two passes.
The product consists of two parallel base bars, a stopper and a stop - all made of wood of the same thickness as the part, in this case from 25x75mm bars, as well as the top surface and support, made from 18mm plywood.
Base bars should be approximately 400 mm long; cut the top surface of the plywood approximately 200mm x 250mm and screw it to the joists as shown in the picture. Screw the stopper on the ends of the base bars along with the support. Set the stop approximately 25mm from the end of the top surface.

cutting out a thorn with a device
Countersink holes for all screw heads and make sure to make all corners square. Drill an inspection hole in the top surface to accurately place the workpiece exactly on the marking.
"Dovetail" is one of the types spike connection wood used in carpentry and construction. The alternating protrusions and recesses of each of the connected parts have a trapezoidal shape, reminiscent of a swallow's tail.
Fastening in this way is considered the most reliable, which explains its prevalence and popularity for many centuries. We have prepared for you a selection of images with examples of the use of the dovetail connection in various designs.
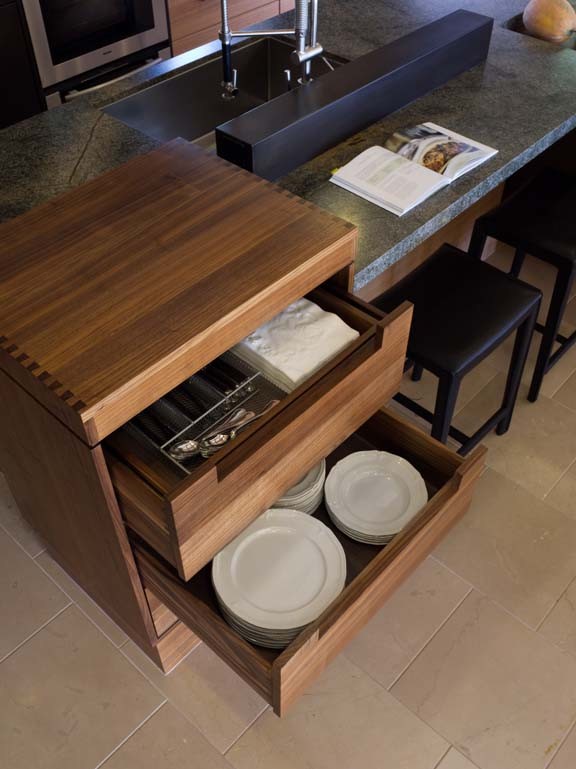
With the help of a dovetail, parts of drawers from solid wood. Thus, it can be safely considered as a sign High Quality specific piece of furniture.

On the surface of this table, you can see an expressive dovetail pattern. Furniture designers prefer not to hide this feature, as it gives an unambiguous idea of the material and build quality of the product.
The box connection is very reminiscent of a dovetail, with the only difference being that its elements are rectangular rather than trapezoidal.

The structural elements of this modern home have huge grooves and spikes along the edges, an example of the use of the "dovetail" in construction.

The beams of this house are also connected to each other with a dovetail.

The spikes and dovetails create counter-resistance, making this connection extremely strong whether glue is used or not. Drawers assembled in this way can be used intensively for many years.

Detachable fastening of parts using the “dovetail” method is carried out by installing a trapezoidal spike, cut at the edges of another element, arranged on one side of the workpiece, into the groove. The type of connection of parts is used in many designs that require the creation of a rigid one-piece frame: small arms, furniture production, mechanical engineering, wooden capital construction.
After the drawing is drawn up, the dimensions of the dovetail are selected individually. The master proceeds to perform preparatory operations, during which the frame and sled take part. The material used in the process of solving the problem with loaded nodes can be steel, cast iron, bronze. In other cases, connection types can be made from light non-ferrous metals and plastics. The surface of the product is processed with a profile cutter with finishing with a scraper or a polishing disc.
Before you make a dovetail with your own hands, you should create a drawing, the dimensions of which must withstand the allowable operational loads. When making a cut, it is necessary to correctly select the angle of inclination of the sides of the trapezoid, the standard value of which is 45 0, 55 0 and 60 0. The connection by the selected method is applied in the system:
- canopy of small arms;
- metalworking machine;
- optical device;
- "In the paw" and "frying pan" in wooden housing construction.
The positive properties of the technology include high structural strength. The application of the method allows you to fasten elements without nails, screws, self-tapping screws and chops.
Application of the method with wood
The wooden spike and the mounting groove must have an identical shape and be connected into a tight tight knot. The dovetail connection, the drawing of which is designed for different products, helps to form a T-shaped and angular fastening of boards, beams or logs without overlaps at installation sites internal partitions. The technology of assembling wooden structures makes it possible to use for interior partitions construction material smaller diameter. If necessary, protection from wind and drafts, the corner joints of the structure of the capital structure are sealed with jute fibers.
A classic example of using a join of elements is drawer furniture set. The electric carpentry equipment used in the construction of the tenon and groove system for a hand router allows the interlacing of tenon elements using the natural resistance of the articulation to the force applied to the front of the product during extension.
The connection, the drawing of which is drawn up for each item individually, can be performed in different ways.
Most craftsmen working in furniture production and housing construction prefer the method end-to-end connection joints due to the decorativeness of the repeating pattern. Preparation of elements is carried out on a milling machine with a special device.
Marking the connecting spikes
The preparation of the material for connecting the tongue and groove with your own hands according to the template is carried out after marking the “tails” with a thickness gauge, pencil or marker on the sides and edges of the part with sockets or partitions. The dimensions and number of elements depend on the type of material, the width of the board and the way the spikes are arranged. To give decorative look connection lines, the spikes must be of the same size, located on the same distance from each other.
Before starting work on the machine, the material is equipped with markings across the workpiece with a deviation of 6 mm from the edges. The rest of the board must be divided into an even number of spikes, measure 3 mm from each side of the marks, draw a marking line perpendicular to the end. Using a stencil or bevel, apply the contours of the slope of the spikes for the dovetail joints.
Cutting trapezoidal spikes
 For the formation connecting elements the box blank is placed in a vise so that one side of the spikes is vertical. On the side face of each spike, cuts are made that do not reach the shoulder line, the workpiece is reinstalled, and other side faces are processed in a similar way. After that, the part is fixed horizontally, the lateral waste is cut off at the level of the shoulders. Excess wood between the spikes must be removed with an openwork saw.
Marking and sawing out the landing nest
For accurate marking of the seat, the workpiece is placed on carpenter's table in a vice in a vertical position, the end of the board is rubbed with chalk to obtain an imprint on the part with the spikes already cut. With the help of a special device, the edges, the line of the side shoulder shoulders are aligned in the form of spikes and the end of the workpieces with nests.
After finishing preparatory work you can begin to form a groove at the corners of the workpiece next to the shoulder line in accordance with the spike markings. The cut, for which the thorn groove cutter for a hand router is used, should be made in the waste part of the board so that the groove is placed parallel to the marking line. Excess wood between the partitions of the nest is removed with an openwork saw, cleaned with a chisel or chisel with a beveled edge. The movement of the tool should be directed from the edges to the center.
Assembly of connecting joints
For the production of products, the connection of parts of which is carried out by the dovetail method, almost all types of wood, plywood, and plastic are used. A feature of the method is non-separable technology with the use of fasteners (carpenter's glue). Checking the accuracy and fitting parts is carried out after:
- preliminary "dry" assembly of the final product;
- removal of excess material;
- cleaning or sanding tight spots.
The adhesive is applied to the adjoining sides of two pieces of wood. For a tight connection of the parts of the structure, a hammer and a wooden gasket are used to protect the product from accidental damage.
After tapping the joint along the entire line, it is necessary to remove excess glue, the product is sent to dry, followed by cleaning with a jointer in the direction from the edge to the middle.
The shape and solution of the angle of cut
Standard bonding angles should not be sharp or obtuse. The large slope of the milling cut promotes the formation of short fibers in the corner. Insufficient slope of the groove reduces the strength of the connection of the elements. To solve the problem, experts recommend using bevel markings, templates or stencils. For hardwood, it is necessary to choose the optimal cut slope, which should be 1/8, for soft wood, the slope is milled by 1/6.
Decorative connection of elements
A neatly made grooved dovetail can serve as an additional decoration for household and office furniture. Design options for furniture design allow you to emphasize the beauty of wood and appreciate the skill of a specialist. The selected type of assembly of the product corresponds to the indicators of the standard proportions of the structure.
A feature of the "dovetail" is the possibility of cutting a log or beam into a half-tree in the shape of a trapezoid with corner fastening of parts. IN wooden construction often used is the method of joining beams using the “radical tenon” method, when two elements are spliced with a rectangular tenon and a groove of a similar shape. Sawing parts for connection is carried out with a cutter according to drawings, diagrams and dimensions.


