What can be made from a canister. Crafts from plastic bottles (115 photos): we make original decorations with our own hands. Crafts for the garden from plastic bottle caps
If until now you looked at an empty canister as an empty space, today very skillful hands offer to look at it as a unique opportunity to acquire many priceless household items absolutely free of charge.
The first thing is a suitcase for tools and parts.
A cleanly washed canister is cut “along the seam” so that only the bottom remains intact, which, thanks to its flexibility, will play the role of “door” hinges in our suitcase. The screw plug will serve as a lock holding both halves together. WITH inside top cover of the suitcase, we recommend pulling strings or making pockets that will hold individual parts and tools.
From the younger brothers of canisters - bottles, you can use the same principle to make small cases for small tools.
In such cases, depending on their shape and size, you can store anything, even an electric drill.
The shelf life is unlimited.
The second thing is garbage scoops.
We offer you three models of scoops varying degrees difficulties.
You will get the first and second models by cutting the canister diagonally into two parts. One of which will be a scoop with a stopper, a neck and a handle, and the second will be just a scoop without a handle. Insert a long, slightly curved handle into the mouth, and you will no longer have to bow when sweeping debris into the dustpan.
To upgrade the first model, make a threaded ring from a screw cap and secure it with it plastic bag, put on the neck. With such a scoop you can easily collect spilled liquid (paint, oil), without staining yourself and others in this “dirty business”.
In the third scoop model, intended for professionals, the canister is cut at an angle of approximately 45° so that one of the wide sides remains “undercut.” Playing the role of a loop, it inextricably connects both halves. During non-working hours, such a scoop stands modestly in the corner, pretending to be a simple trash can with a lid. But in right moment they take it by the handle and force it to open. To make cleaning work in the darkest corners easier, install a battery in the top of the scoop, and install a light bulb and switch in the plug.
Now, when sweeping away litter and even taking it out of the hut, you can do it quickly and without loss.
The third thing is the gardener's armor.
A reliable support for every gardener will be the top part of the canister, which will always provide a helping hand and help you get to your feet without getting your hands dirty. The lower part of the canister,
matched to the profile of the place where they are sitting and fastened to it with an elastic band, it will become a chair that is always in its place. It will be very useful during sedentary gardening work with frequent movements. If necessary, the chair can be unfastened and turned into a bucket.
Convenient all-terrain knee pads for crawling between beds are made from the narrow sides of another canister and attached to the legs with elastic bands or ropes. For softness and thermal insulation, you can lay foam rubber or something similar inside the knee pads.
Remember that the gardener's armor means victory in the battle for the harvest!
P.S. For those who like to rollerblade or skateboard, you can make special knee pads and elbow pads from the canister.
Thing four: pens are a thing.
Unlike those who to everything that is bad
lies there, attaches the legs, very skillful hands, placing the head, attaches the hands there too.
One of the uses of canister handles was described on p. 3, the second is on the previous page, but here’s where else you can apply them and their talents:
Use as stainless steel handles for doors, gates and cellar lids;
By passing several turns of strong rope through the hollow handle of the canister, you get a device that makes it much easier to carry heavy and awkward loads;
Having attached a handle to thick plywood, make a tool for leveling the surface when plastering;
By inserting a wooden block into the top of the canister and pressing it between it and the canister sandpaper(“skin”), build a device for sanding large and smooth surfaces.
Having made from an empty canister not everything that can be made from it, very skillful hands instruct you to continue this glorious work.
Crazy hands
Andrey Bakhmetyev, Timur Kizyakov
IN in capable hands old kitchen utensils will turn into panels or clocks. They can also be made from a bicycle or even a canister.
What to make from kitchen utensils?
Not everyone knows that excess kitchen utensils can easily be transformed into new interior items. If you have accumulated a lot of such utensils, and you bought new plates, cups, saucers, do not throw away the old ones. They will make wonderful designer items.
How to decorate a window, door?
See how you can decorate a door with old salad bowls, crystal or glassware.

To implement this idea you will need:
- transparent adhesive with strong hold;
- old glass, transparent plastic, crystal salad bowls and plates;
- degreasing solution;
- dishwashing liquid;
- soft cloths;
- water;
- door with glass.
- First, wash the base well with special means for dishes. Wipe this glass part of the door with a soft cloth.
- Wipe the dry surface to be decorated with a degreasing agent. If you don't have one, then use regular alcohol.
- See how to place transparent objects on the base. Glue the largest ones first, then the medium ones. After that, fill the space between the salad bowls and plates with smaller kitchen utensils. Wipe off excess glue with a soft cloth.
If you are replacing a window in your country house, do not throw away the old one, but you must not remove it from the frame. Glue transparent objects to one side of the glass kitchen utensils. Place the window against a wall or other support. This method will help decorate a dacha, decorate an unsightly building, or cover a tree trunk.
Picture or photo frame for wall clock
To relieve even more Kitchen Cabinet for dishes, make decorative panel. You can be sure that no one else has exactly the same.

To do designer item to decorate your home, take:
- cups, saucers, teapots;
- transparent super glue;
- large rectangular or round dish;
- soft cloth.
- Place a large dish in front of you. It can be made of plastic, porcelain, earthenware. If you then want to put a photo, painting or watch inside such a frame, then the dish should have a hole in the center.
- If it is not like that, you can make this “embrasure” using a drill and a special drill for working with such fragile materials.
- On this base, lay out the remains of a tea set or several. If there are many items, nest one inside the other. If everything suits you, attach them to the dish with glue.
- You can saw one item in half, use both halves and even glue broken dishes, but the visible part must be solid.
Shelf of dishes
The next idea is no less interesting. Cups and saucers from the service will allow you to make a kitchen shelf for the kitchen.

To create this piece of furniture, you need to take:
- 3 tea cups and 3 saucers;
- 3 metal hooks;
- Super glue;
- wooden or glass strip;
- white acrylic paint;
- brush.
- If the plank is not colored, paint it. Acrylic dries very quickly and after 20-30 minutes you can proceed to the next stage.
- Cover the bottom of the saucers with glue and attach them to the bar. Glue the cups to the saucers.
- Now you need to fix the plank to the wall. This can be done by first making 2 holes in its upper part and attaching it with screws with large heads.
- You can fix special loops on the back of the plank, hang your creation on nails driven into the wall or on self-tapping screws that are secured in dowels.
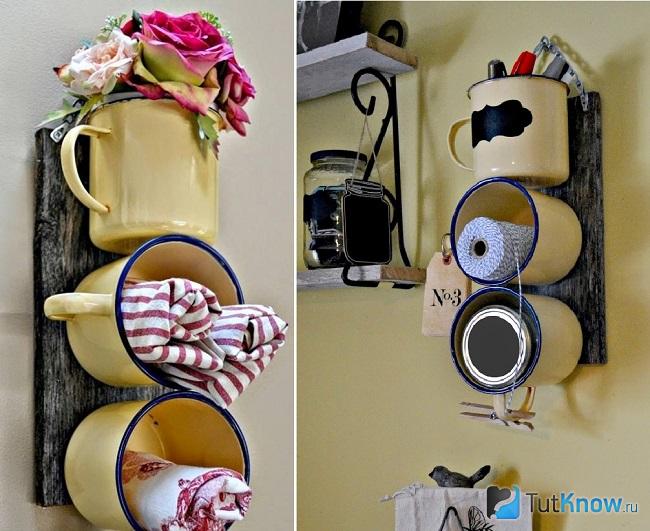
To make this organizer, take:
- wooden plank;
- wood antiseptic;
- brush;
- self-tapping screws;
- drill;
- sandpaper.
- Paint the board. If you want it to have a touch of antiquity, rub it in some places with sandpaper.
- Place the top mug on this base and secure it in this position with a self-tapping screw. Attach the next two mugs sideways to this bar.
- Now you need to hang the finished shelf on the wall, securing it here with self-tapping screws. You can put it in the top mug artificial flowers, thus decorate your creation.
The twine will not unwind in the spool if you fix it in one of the mugs. And you can attach clothespins to the handles of the mugs so that they don’t get lost at the most necessary moment.
Here's how to easily turn unnecessary kitchenware into essential items. You can even make custom cups from old cups Wall Clock. You will see the manufacturing process below.
How to make a watch with your own hands?

To make them, take:
- items from a tea set;
- clockwork;
- treated MDF panel or other base;
- reliable glue;
- self-tapping screws
You will need 12 cups and the same number of saucers. First, mark their location using a marker. Each cup will be responsible for a certain hour. Glue these items in place.
Pay attention to the length of the arrows; when passing around the circle, they should not touch the cups and saucers.
Not only a set of kitchen utensils will allow you to make such a wonderful watch. They can be made from waste material.

To make a watch yourself or yourself, you will need:
- CD disk;
- Super glue;
- clockwork;
- keys from a computer keyboard.
- Place the clock mechanism on the back side of the disk, and attach the hands to it on the front side. Take the keys from the computer where the numbers are written. Each will correspond to a specific hour.
- Place them in their places in order, with the number 12 button at the top and the 6 button at the bottom.
- If you did everything correctly, glue the buttons in place, after which you can wind the watch and admire how it moves.

See how to make your own watch using the following tutorial.
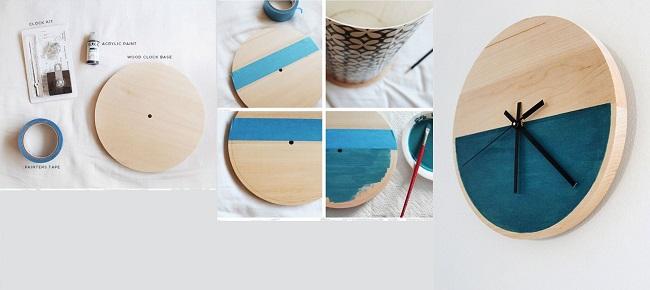
You will need:
- round plywood blank;
- drill;
- insulating tape;
- dye;
- brush;
- clockwork.
Paint one half the color of your choice. When the paint is dry, remove the tape. Attach the clock mechanism to the back and the hands to the front. In such a product the dial is not drawn, but if you wish, you can depict it.
You can depict various geometric shapes on blanks.

Here's how to make this type of clock. To create them you will need:
- cork backing;
- awl;
- clockwork;
- insulating tape;
- acrylic paint of different colors;
- tassels;
- clockwork.
- Draw even circles on the backing using a template or compass. Make holes in the middle using an awl.
- Apply the electrical tape as shown in the photo or as you wish. Paint the resulting shapes with different colors.
- After the paint has dried, all that remains is to remove the electrical tape, secure the clock mechanism and hang the clock on the wall.

But these are not all ideas. See how to make a clock on the wall with your own hands, and at the same time get rid of empty containers. These can be made for a summer cottage.

Here's what's useful for this:
- empty bottles;
- wooden planks;
- wood stain;
- small nails with large heads;
- glue;
- self-tapping screws;
- tassels;
- clockwork.
- Saw off the boards to the required length, cover them with paint or stain. Place the planks next to each other.
- To connect them all, attach two boards at the back, perpendicular to the data. Attach the clock mechanism to the back side, and the hands to the front side.
- Take reliable glue and secure clean, dry bottles with their necks facing out. Their bottom should form a circle.
- Attach the clock to the wall using hinges and screws.
From a bicycle
You can even make a clock from an old bicycle; all you need is its wheel.

To make this piece of furniture you will need:
- metal axle from a bicycle wheel;
- clock mechanism with hands;
- numbers;
- clothespins;
- black paint with a brush;
- family photos.
Numbers can be made from different materials. Cardboard, metal or plastic is used for this.
You can buy the numbers that are sold to indicate the door number and paint them, and if the metal rim is in good condition, you don’t have to cover it with paint, but leave it the same silver.

A clock on the wall is even made from a mechanism that turns a chain. It's called a carriage. If you have a few of these parts left from old bicycles, then make the following watches.

You can make them using a large and small gear from a bicycle. Then you will also need a chain of the required length. It's easy to shorten it. Remove one of the fragments, remove the excess length. Match the ends of the chain and put the removed element on them.

You can shorten the chain in the same way, put it on the gear and fix it. All you have to do is screw on the clock mechanism and then check the craft in action.

Now you know how to make a watch with your own hands, what to turn it into kitchen utensils, if it is old or unpaired. All that remains is to see what to do for the house. From them you can make wonderful interior items, without which no apartment or country house would be complete.
What to make from a canister?
If you buy drinking water in such a container, then these plastic containers periodically accumulate on you. See how many useful things you can make from them.

The result will be such a wonderful lighting system. But before you do it, take:
- 5-liter plastic canisters;
- paint;
- tassels;
- light bulbs and sockets for them;
- electrical tape;
- stationery knife;
- decorative panel;
- drill;
- fasteners.
- Wash the canisters and remove their labels and plastic handles, covers. Acute stationery knife cut off the bottom of the container. Paint the workpieces in desired color. Do the same with the rest of the container.
- While the paint is drying, prepare the decorative panel. Make three holes in it for three lamps. Pass the cords through these holes, attach them to the top unified system lighting. It should end with a plug, which you will subsequently insert into the outlet.
- But for now this is categorically impossible to do, but this is what needs to be done. Cover the sharp edges of the dried lampshades with electrical tape.
- Use a drill to make a hole in each plug and insert the lower ends of the electrical cords here. Tighten the plug, and attach the socket and the light bulb screwed into it to the wires that are under the cover.
- Check that everything is well insulated, only after that you can plug the plug into the socket and watch how beautifully the lamp burns.

Here's what you'll need for this job:
- water cans of the same size and shape;
- stationery knife;
- light bulbs with cords and sockets;
- awl;
- wire.
- Cut off the top of the bottles, only these blanks will be needed. Make two holes on their edges on each side with an awl.
- Pass the wire here diagonally so that you can use it to secure the cartridge in the center, which is what you will do.
- Screw a light bulb onto it. Secure the wires to a single panel and connect it to the lighting system.

To make this newspaper organizer you will need:
- canister;
- sharp knife;
- insulating tape;
- marker.
Not only canisters, but also other empty containers will be used. See how to make one from a plastic bottle beautiful lamp. For this you will also need:
- artificial stones;
- transparent glue;
- lamp with socket and cord.

So that you can conveniently close the bags and not get nervous every time you try to untie a knot, make the following device.

Suitable for him:
- plastic bags;
- plastic bottles;
- bottle caps.
That's how many original and useful things can be made from recycled materials.
See how you can make a shelf from plastic canister.
The next video shows what other homemade products can be made from a canister.
If you want to see how to make a clock from a vinyl disc, then check out another master class.
Many home garden owners create all kinds of products from plastic bottles to decorate your place of stay. You can create real works of art by spending a minimum of money.
Not only decorative items are made from plastic, but even furniture. All you need is a knife, an awl and a little imagination.

In this article we will look in detail at how to make crafts from plastic bottles with your own hands.

Decorating the site
Which ones homemade products you won't see on personal plots. There are flowers, animals, and trees. You can create beautiful sculptural compositions that will not only decorate the garden, but will also give you a great mood.
Let's look at a couple of instructions for beginners that will help you easily create crafts from plastic bottles. It will be a palm tree and a pig.

Bottle Palm
To make a palm tree you need to create a frame. Its length should be equal to the height of the tree.

Take bottles of the same size, cut off their bottoms and place them on top of each other. Then the leaves are cut out. They are attached to the top of the created structure. When everything is ready, the palm tree is painted green.

Funny pig made from bottles
The pig will look great anywhere in the garden. To make it you will need:
- 5 liter bottle;
- four bottle necks for making legs;
- one top part from a bottle, which is cut into two parts to make ears;
- wire for tail;
- two beads for eyes;
- glue;
- pink paint.
The parts are connected and secured with glue. Ready product needs to be painted. You can use oil or spray paint. To prevent the piglet from being blown away by the wind, you need to pour sand into it.

Besides decorative function the structure can serve as a flower bed. To do this, the top is cut off, filled with soil and flowers are planted.

Crafts made from plastic bottles for the garden can serve as flower beds, borders or paths. To make a path, bottles are inserted into the ground with their necks.

Both whole and cut plastic are used. It is important to fill the bottles with soil so that they do not become deformed when they are walked on.

Use of bottles on the farm
Bottles are used not only for decoration. These can be used to make a dustpan, washbasin, or pest trap.
Undoubtedly, everyone needs a container for storing some items. To make it, just cut off the neck.

The washbasin is also very easy to make with your own hands. The bottom of the bottle is cut off and holes are made through which the rope is threaded. The structure is suspended in Right place and pour water. To wash your face, just unscrew the cap a little.

To make a trap, you need to cut the container in half. To catch insects, some kind of bait is placed at the bottom. For example, sugar syrup with yeast is suitable for this.

Will need hot water, in which sugar and yeast will dissolve. The cooled liquid must be poured into the trap. Not only flies and wasps, but also mosquitoes will flock to this delicacy.
Note!

Even a child can make a scoop. First you need to outline its shape and then cut it out.

Can be made from plastic flower pots, greenhouses or containers for seedlings. Descriptions of such crafts made from plastic bottles can be found in large quantities on the Internet, but to create something unique, you need to show your imagination.

It is fashionable to build a self-watering device from plastic containers. To do this, cut the bottle, make holes on the sides and insert the hose into the neck. With the help of such a device, the plants will be perfectly hydrated.
For plants that do not like surface watering, make the following device. The bottom of plastic containers is not completely cut off. A trench is opened on the side of the plant where stones are placed. The bottle is buried upside down.

Then pour required quantity water for irrigation. You can place the bottles upside down, but in this case you will need to make holes in the container.

Use plastic container and for heating plants. To do this, bottles are filled warm water and place them around the plant.
Note!


For inspiration you can look various photos crafts from plastic bottles. You don’t need to put in a lot of effort to make an original decoration or useful item for your garden that will last for many years.

Photos of crafts made from plastic bottles


Note!


Useful things from an ordinary plastic canister.
A canister can make an excellent watering can. Just make holes in the lid of the canister and voila!

If you like to feed birds, then you can make a good feeder from a canister. We cut windows in the walls of the canister. We also make holes for the perches, pour in food and wait for guests.

Canisters are useful for growing seedlings.

This kind of plate for a ceramic flower pot can be cut from a canister. Cheap and cheerful.

If suddenly your brush container breaks, then by cutting off the top of the canister, you can make a new one.

Piggy bank from a canister. Large and comfortable. Cut out ears, a tail, four legs from cardboard and paint everything in pink color. Don't forget to draw eyes, a snout and make a slot for money and coins.

From the rectangles cut from the canister you will get good curtain For summer veranda. Lets light through, but unobtrusively.

How to make a scoop from a canister

Plastic corners for all kinds of stationery little things.

Cut off the top of the canister so that it is convenient for your child to place his Lego constructor there.