Drawing of a wooden hanger. Do-it-yourself floor clothes hanger, photo. To create an unusual hanger, we need
A floor hanger is a mandatory attribute of any hallway room, whether it is an apartment or Vacation home. Its price depends on the originality of the execution and the quality of the materials. The easiest option is to purchase such a design at the nearest furniture store. But there is another way out of this situation, in order not to overpay - to make floor hanger for clothes with their own hands.
A little theory from the course of physics
To achieve this goal, you will need a little knowledge of physics, as well as improvised materials and tools. Let's start with the first one. The main requirements for a floor hanger are stability and the absence of sharp elements so as not to damage the floor, wall or clothes.
Sustainability is achieved in several ways. If the floor hanger rests on one base, usually in the form of a cross or a circle, then it is necessary to make sure that the center of gravity is as low as possible. This can be done using heavier materials - massive wooden blocks or metal.
If the space of the hallway of the room allows, then it is advisable to install the hanger on two, and even better - on three points of support. In the first case, wide bases will be required so that your attribute does not fall on its side, since it is problematic to evenly place clothes. Therefore, if possible, you need to choose a support on three points.
To prevent the base of the floor hanger from scratching the floor, you will need to use materials as a "sole" that will be softer than the floor covering.
Tools and materials
Required Tools
So, here is a list of tools that you will need to make a floor hanger:
- cross (curly) screwdriver;
- self-tapping screws of different lengths and thicknesses;
- sandpaper;
- drill;
- drills (set);
- hacksaw;
- axe.
Set of self-tapping screws
You will also need to stock up on the following materials:
- dried tree (cherry, sea buckthorn, etc.) or several of these, if the hanger is planned with several support points. You can buy ready-made processed blanks;
- bars (more massive, at least 60 cm long, the optimal cut is 7x7 cm);
- metal wire (for hooks) or ready-made decorative hooks;
- wood glue;
- a piece of rubber (or silicone) no more than 3 mm thick.

Wooden blocks for work
Instructions for making a floor hanger with a cross and hooks
First you need to free the trunk of the tree from the bark, as well as coarse knots. Of course, it may seem that with the bark the hanger will look much more natural, but over time it will crumble, and the garbage will spread throughout the living quarters. In addition, the cortex may contain small insects. Yes, and clothes will cling to bumps.
You can get rid of the bark with an ax or a massive knife. Once this task is completed, you will need to go through the rest of the sandpaper several times - first coarse, then fine. After sanding, the surface will become smooth, and the likelihood of catching clothing will be minimized.
The next task is to make the base. As in construction, only that structure will be stable and durable, which is given integrity. Therefore, the base and tripod of the hanger must be one.
The base and tripod of the hanger must be one piece
You should not first make a cross, and then attach the body of the hanger to it from above - such a design will loosen very quickly and may fall out of the base under the weight of the clothes.
Here's a rule to follow - the bottom edge of the tripod should be flush (that is, on the same plane) with the sole of the base.
We proceed to measure the diameter of the barrel. We need it in order to select a bar of the appropriate width. If the bars are wider, then you need to saw off with a hacksaw along to the desired size.
The standard height of the hanger is in the range of 180-200 cm. For them, you need to make a cross with overhangs from 25 to 35 cm. Therefore, we need 2 bars 60 cm long, which we will cut exactly in the middle to get 4 blanks of 30 cm each.
Now the difficulties begin. Even if you contrive and attach these 4 bars to a round trunk, the structure will be unstable, and after the first fall, due to unevenly hung clothes, it will simply fall apart.
Therefore, we will proceed as follows: put the barrel on the floor and attach it to it with four sides received blanks. It will not work to connect them in this form, so we will make inserts in the form of triangular wooden elements on the bars exactly in the part where the body of the hanger is located. Such "triangles" are attached to the bars with self-tapping screws, and also to the tree trunk - in exactly the same way.
In order to strengthen the structure, in those places where the “triangles” will be attached to the bars and to the trunk, you must first drill holes with a drill with a diameter of 2-3 mm. less than the diameter of the fastener.
If you just screw the screws into the tree, then there is a possibility of cracks that weaken the structure.
After this procedure is completed, it is required to fill the resulting drilled spaces with glue, and only after that start screwing in the screws.
The resulting design of the floor hanger cannot be ideal in terms of stability - it often rolls over from one cross bar to another. To correct this shortcoming, you need to use pieces of rubber that should be glued to the bottom.
In order for the rubber to adhere perfectly to the surface of the wood, it is necessary to go over the surface of the wood with sandpaper and make several scratches in different directions.
The frame is ready, now you need to give the hanger functionality - add hooks for outerwear, which can be remote, that is, located at some distance from the trunk. There is one rule here: the center of gravity of the hanging clothes should not go beyond the cross, otherwise the structure will be unstable and fall.
It does not matter which hooks are used - homemade or decorative, you cannot attach them directly to the trunk, since the floor hanger will quickly become unusable. You can proceed as follows: cut out a square from the existing bars, the length of the sides of which will be slightly larger than the diameter of the trunk used as the body of the hanger. Before attaching the "square" to the top, you must first attach the hooks to it.
Decorative ones are more suitable, because they are made of wire beautiful shape very difficult to achieve. Such hooks are attached to the tree, usually with one or two self-tapping screws.
If you have time and some skills in working with wood, then with the help of a chisel you can cut recesses in the squares attached to the top of the floor hanger in order to subsequently “drown” the base of the hook in them. This is a more aesthetic solution than just mounting on self-tapping screws.
After all the hooks are attached, you need a square wooden element connect to the top of the stem. This can be done with one or two screws using the technology described above.
The final stage of work is to give aesthetics to the resulting floor hanger. First of all, you need to close the lower part - the cross with all the fasteners. For this, it is allowed to use fabric, rattan, wooden or plastic slats. The hanger itself can be painted with a protective layer of paint or varnish - both natural color and any other, depending on colors room finishing. The layer must be applied at least 2 times.

Making a suit hanger
The scheme of the floor hanger for a suit
Floor hanger for men's suits has a slightly different design and is made of wooden bars.
You can do it according to the following algorithm:
- measure and cut blanks according to a pre-made project;
- carefully process and polish them;
- make mounting holes in the right places;
- assemble the hanger according to the diagram below;
- perform finishing;
- screw roller wheels to the base or glue rubber gaskets.
There is no way in the hallway without a hanger - you can’t throw your removed raincoats, coats and hats on the floor. You can, of course, drive several large nails into the wall, but this is not at all aesthetically pleasing. Yes, and the wallpaper will be greasy, getting dirty from outerwear. Much more pleasing to the eye and more practical will be the real one - or, as you like. And you can build it yourself, and for this you do not need to be a furniture ace at all.
Tools
We will need skillful hands, a simple home tool and a minimum of materials. You can even use waste, by the way. Or beautiful branches with knots found in the forest.
So, the arsenal of the tool will be as follows:
- Screwdriver and self-tapping screws with a diameter of 4 mm with a cap of the appropriate shape. The length of the screws is 3-5 centimeters (depending on the material).
- Saw grinder for cutting boards or chipboard.
- Dowels (in case of wall construction).
- Drill or screwdriver (preferably electric).
- Roulette, level, pencil for marking.
- Sandpaper for finishing.
To create some variants of hangers, metal corners, a jigsaw (if you need to cut curly surfaces) can also come in handy. If you want to create, then there will be a need for welding machine. However, for simple products it won't be needed.
A simple hanger in the corridor with your own hands
materials
Now about the materials. Most popular - wooden planks, plywood and bars, as well as their trimmings. Hangers are often made from wood boards - it is better to take laminated ones, which look prettier. However, it is possible to paint ordinary chipboards, having previously primed them. It will be effective too.
And if you have old floor lamp with a stable base, which all hands do not reach to throw away, then you can give it a second life in the form of a hanger floor type. To do this, just remove the lampshade along with the lamp mount and disconnect the power cord. It remains to paint the product in the chosen color, not forgetting first to attach hooks to the upper metal circle - woven wire ones are well suited here.
By the way, hooks for hangers in the hallway - important detail. They should be large and comfortable. You can buy them in a furniture fittings store, or you can show your imagination. Natural materials are a good help in work. Moreover, the products from them are exclusive - no one will definitely have such products. For example, knots and branches, sanded and varnished, can be used as hooks. Beautiful and functional.
Another interesting and original version- hooks from teaspoons bent in half. Or aluminum forks. In both cases, the handle is the lower (main) part of the product. You can also bend thick wire hooks by shaping them decorative elements- beads, for example.
Wall photo in do-it-yourself hanger in the hallway
From forks From keys From clothespins Old doorknobs
From sticks From spoons From bicycle handlebars From knots
How to make a hanger in the hallway with your own hands
But before you start creating a masterpiece, please look at the drawings that we have selected for you.
Drawings of hangers in the hallway
 wall
wall 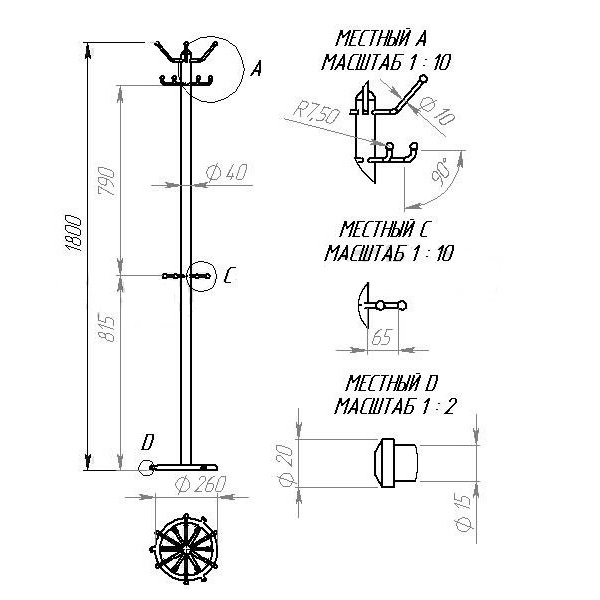 floor
floor
wall models
The base of the hanger is a shield on which the hooks will be placed. It can be made solid (from a wood board or a centimeter sheet of plywood) or trellised. The latter option is preferable - it is lighter, and less material is used.
- To assemble such a shield, two parallel horizontal boards (bars) are attached to the wall with dowels.
- Then vertical boards about 7 centimeters wide are nailed to them, and hooks are attached to those.
- The size of the product depends on the dimensions of the wall and the entire room. Decoration - optional. It can be varnish, paint, self-adhesive. The main thing is not to forget to carefully process all the edges and ends so that there are no rough edges.
- If desired, a shelf for hats can be attached to the top of the hanger with metal corners - a board about 20 centimeters wide.
- And if the hanger is made to the entire height of the wall, then it’s a good idea to provide for the bottom. It will have to be supported at the bottom with bars 5 by 5 centimeters.
The following video promises to teach you DIY wall art wooden hangers in the hallway from one board:
floor products
Here it is important to take care of a heavy base that should not turn over.
- As already mentioned, you can take improvised materials such as the bottom of a floor lamp.
- The skeleton of a floor fan that has stopped working is also suitable.
- Another tip is to use a Christmas tree stand - there are a lot of them now.
- And the easiest and cheapest way is to put together a wooden cross from thick bars, then decorating it.
Now - a hanger post.
- It can also be made from a bar with a length of one and a half meters, and in the upper part with metal corners, attach several short bars for expansion (our hooks will be located on them).
- Much more creative, however, another option will look - if you use a suitable dry tree without bark, sanding it and varnishing it. Here, hooks are not needed - twigs will play this role.
For those who have a welding machine and like to work with metal, you can make a heavy and durable metal hanger. To do this, you need a pipe with a diameter of about 3 centimeters, as well as steel rods for legs and hooks with a diameter of 1.6 and 1 centimeter (respectively). There will be three legs - they are smoothly bent and welded to the pipe. Several hooks are made at the top, as in similar finished products. And then the design is painted.
Floor hanger, which is easy to create with your own hands

From wood and chipboard
Natural wood is easy to process and finish, and it is also environmentally friendly. In addition, almost every masterful owner will have trimmings of slats, bars, boards or pieces of plywood. A little imagination, a couple of free evenings - and here is an original hanger in front of the admiring household. All you need is two longitudinal strips, several transverse ones (by the way, it’s good to use ready-made platbands for this purpose) and hooks at your discretion. For example, wooden knots, furniture handles or bright plastic cups.
Very grateful material are wood boards. From them, you can use a jigsaw to cut out all kinds of figured products. For example, a hanger, the contours of which are made in the form of a stylized tree, is now fashionable. Having cut it out, we paint it in a cheerful color (not forgetting to smooth out the irregularities with emery beforehand) and fasten it with dowels to the wall. Then we attach hooks for clothes at the ends of the branches. By the way, for such a tree, you can take thick plywood.
Before moving on to the actual manufacture of the hanger, we advise you to pay attention to the master class in the video below, which will tell you how to create a creative tree-shaped hanger for your corridor:
It is possible to build a simpler version from chipboard hangers in the hallway with their own hands, for example, a solid or lattice shield ( the simplest design wall hanger). And by taking laminated boards, we will get rid of the need to finish them. But the ends must be processed - for this, a special edge is sold, which is welded with an iron. And one more thing: you need to cut laminated sheets only from the inside, otherwise they will crack.
Do you want to create a wooden hanger in the hallway with your own hands? And, preferably, with a shelf for hats? Easy! Watch the following video carefully:
The hallway in a sense is the face of the whole apartment. I would like to feel coziness and comfort from the very entrance, so sometimes it makes no sense to clutter it up with massive cabinets. In this article, we'll show you how to do it right. wall hanger with our own hands from wood and other materials, we will show drawings, photos and videos on creating clothes hangers in the hallway.
Some Features
The wall hanger can be placed not only in the hallway, but also in the bathroom and in the kitchen, so you can make it design solution, which will add zest to the interior of the room. The main requirements that can be presented to this element are:
- simplicity;
- ease;
- simplicity;
- strength;
- availability of materials;
- compactness.
According to the method of installation, it can be:
- wall;
- ceiling;
- mobile.

In the first option, it makes sense to manufacture an angular structure. If you install the hanger on the floor, you can place more weight on it. The options can be combined, creating, for example, a wall-mounted hanger resting on the floor.
Floor construction is not commonly used in bathrooms and kitchens. This is impractical: such a hanger takes up a lot of usable space.
According to the method of hanging clothes, hangers are distinguished:
- with hooks;
- with a bar under the shoulders.

In the first case, the entire product will take up significantly less space, but you can hang any clothes on hangers without fear that they will wrinkle, stretch and lose their presentable appearance.
materials

For the manufacture of hangers, wood and metal are most often used. Someone may decide to order a finished forged structure if it fits into the overall picture. Hooks can be attached to:
- glue;
- self-tapping screws;
- magnets;
- suckers.
If you plan to hang outerwear, which in winter time is especially difficult, then the most the best option will use self-tapping screws. The rest are perfect for the bathroom or kitchen, where towels, bathrobes or potholders are usually placed.
The simplest

This option is used most often and it has a lot of variations that can be combined and combined. In order to make such a design, we need:
- the material from which the hanger will be made;
- hacksaw or jigsaw;
- fixing material;
- roulette;
- corner;
- level;
- pencil or marker.

by the most simple solution there will be a bar with hooks. To make it, we need a wooden plank (it should be free of cracks and chips, as well as well dried), instead of it, you can use part of a chipboard or MDF sheet. Its length is chosen according to your needs, and the width should be sufficient to place hooks on it. wooden base can be varnished or stained, the plates do not need this, because. They are already laminated. After that, several holes are drilled in the wall (their number will depend on the total length).
The distance between them should be such that an indent of 5 cm is obtained from the edges of the board. In order for the holes to be in the same plane, a building level is used. Dowels are inserted into the holes, and the base is screwed to them using self-tapping screws. Hooks are already attached to the bar itself. If you choose a good fastening material, then this design is able to withstand heavy outerwear.

With regard to hooks, you can dream up. Instead of buying them, you can use, for example, old spanners. First, they are cleaned and polished. After that, they bend. Two holes are drilled in them, and the keys are screwed to the bar. Forks can also be used for this purpose. You just need to take steel, because. aluminum is very brittle. The teeth themselves can be given an interesting shape.
Knots from trees are also suitable: you need such a knot to be located on a small branch. To fix it to the base, you can grind off the plane of the branch a little with grinder, after that, the hook is simply screwed with self-tapping screws. It is not necessary to place them in the same row. You can make them at different levels. If you draw a stave, then the hooks will serve as notes. A rectangular plank is not a requirement. On a round one, hooks can be hung like numbers on a clock, and arrows can be drawn in the middle. In addition, the base can be made in the shape of a heart, a cloud, a sun, etc.

It is important that the wall under such a hanger be finished, but not whitewashed. This is necessary so that things do not get dirty.
We complicate

So that things do not get dirty against the wall, you can slightly improve the whole structure. It is necessary to take two strips of the same size. Their length should correspond to the width of the planned structure. They are fixed in horizontal position parallel to one another (one above, the other below). Next, we fix a few more vertical slats between them (we do this with the help of self-tapping screws, the length of the fastening material should be twice the thickness of the slats in order to pull them together well.).
In width, they can be like the previous two or a little thinner, in length - 1‒1.3 m. If this is a hanger in the hallway, then it’s good to attach a shelf for hats and caps on top. To do this, you need a board 25 cm wide (you can take several elements of smaller width and fasten them together with two jumpers). It can be fixed to general design with help metal corners or wooden braces.
There is one more interesting option. For its manufacture, you will need a bar with dimensions of 5 × 5 cm. You need 7 of them. 30 cm each. To begin with, the boards are cleaned with a grinder. Sharp corners can be smoothed out. After that, cover them with several layers of varnish. Then they will need to be fixed to the wall with a puncher and self-tapping screws. You need to arrange them in the form of two letters P, which are connected at the bottom by a jumper.
We make two holes in each plank using a feather drill 15 – 20 mm. Next, we cut out cylindrical dowels with a diameter for our hole. We clean and paint the color of the hanger. We coat them with PVA glue and drown them, let them dry well.

Most likely, you will like a hanger in the form of a tree. To make it, we need a sheet of MDF, chipboard or plywood. Using a marker, draw the outlines of the plant. Next, we cut out the resulting figure with a jigsaw. The ends are processed and painted over or covered with an edge (in the case of chipboard). With the help of self-tapping screws, the product is attached to the wall, and hooks are already hung on the branches. Here you can apply real knots, as in one of the previous options.
Ceiling and trempels

Hooks are not always the way out. Often you need to make things fun on trempels. In order to ensure this, it is necessary to provide a horizontal bar. In this role, you can use, for example, a wooden plank 50 × 50 mm. Sharp sides are best rounded with grinder, then the hangers will be able to move freely and it will be easy to remove them. If the bar is long, then it is necessary to provide a horizontal jumper. Such a bar can be attached to the hangers with a shelf, which was mentioned above. Instead of a wooden holder, you can use a special furniture chrome tube. It is fixed with flanges.
You can not use the wall for fastening at all. To do this, we need a chrome tube. We cut off two pipes 90 cm long. We fix two flanges to the ceiling (we choose the distance between them as needed). We insert and fix these pipe sections in them. Next, we take another tube, its size will be such that it fits between two hanging pipes. We mount the horizontal tube to the vertical ones using the corners. It turned out a minimalist hanger for trempels.
This article is designed to give direction to your imagination, not to provide everything. possible options. We are sure that everyone has things at home that can be used in an interesting way.
Video
See what hanger can be made from just a few boards:
Photo


Clothes hangers are a mandatory attribute in every home, since otherwise it is rather problematic to arrange outerwear. In addition, floor hangers are also useful in the bedroom, so as not to put clothes in the closet every evening and not to use chairs or armchairs. But in the store beautiful furniture is quite expensive, so The best decision This is a DIY outdoor clothes rack. After all, from inexpensive materials, you can make original and beautiful hangers that will greatly decorate and make your interior comfortable.
You can make a clothes hanger from almost any material. But if you are going to do it yourself, the choice of material should be approached carefully.
Wood and plywood are best suited for work, these are the most practical and plastic materials that are easy to work with. If products from them are used in the house, then they are guaranteed not to be exposed to moisture and their service life will increase significantly.
Working with metal or plastic at home is quite difficult, so you should not choose these materials. It is worth considering the fact that sometimes there is a significant load on the hanger, so you need to use materials of appropriate strength so that the furniture does not break.

Examples of floor hangers using metal water pipes
When you buy wood or plywood, pay attention to their quality, because this is a guarantee that the hanger will look beautiful. In most cases, wooden products are only stained or varnished, so the texture remains visible on the surface.
Floor hanger in the form of a tree
Making a floor hanger is easy, and it does not require a lot of tools and materials. This hanger is made from two sheets of plywood, approximately 70x170 cm in size and 18 mm thick. For manufacturing, you only need glue, a jigsaw and sandpaper. The work itself will also not take much time and you will not find such hangers in any furniture store.

First you need to draw on one of the sheets of plywood the outline of the future product. This can be done simply by transferring the drawing to scale on plywood. The most important thing is that the legs are of sufficient width - about 60 centimeters. This is necessary for stability, since if you make them narrow, then the hanger will fall if you hang heavy winter clothes on it.

In order not to draw a picture on the second sheet of plywood, you need to simply fasten two sheets of plywood with self-tapping screws or clamps before you start cutting. It is best to use the clips, rearranging them as you cut the plywood. Make sure that the sheets do not move and that both workpieces are the same.

To connect the blanks and turn them into a hanger, you need to make two slots. On one blank, you need to make a slot to the middle from the top, and on the second from the bottom. The width of the slot should match the thickness of the plywood.

Both slots with inside you need to process it well with glue, and then put the blanks one on top of the other. As a result, you will get an original and beautiful floor clothes hanger, which will only have to be sanded and painted.

As you can see, making a floor hanger with your own hands is a simple task even for a beginner. And you can decorate it in any way. You can simply stain, varnish or paint the plywood. If you reduce the size, you get a children's clothes hanger that will decorate any room, especially if it is painted.
Wooden hangers made from natural elements
A good design solution are racks made of natural natural materials. More specifically, from a tree trunk. Such a clothes hanger is very easy to manufacture and does not require special tools and materials.
First you need to find good workpiece from dry wood, it must be completely dry, and there must be no rot on it. The type of wood practically does not matter, but it is worth remembering that conifers with a high resin content is better not to use. Glue can be released from the barrel even after complete drying. It is best to use hardwoods with a well-branched trunk so that there is more space for clothes.

First you need to completely clear the trunk of the bark, cut the lower branches to a height of one meter, and shorten the upper ones so that there are knots on which you can hang clothes. Then you need to completely sand the rack and clean it of dirt, bumps. If the wood is damaged by a bark beetle, then this does not interfere, as it creates a rather beautiful pattern that will fit perfectly into the design of the hanger.
The second stage of work is the stand, since the tree trunk cannot stand on its own. The most important thing to remember here is that the more massive the stand, the more stable the hanger will be. You can make a stand from a thick board, it will the best option for work. The stand itself can be given any shape, it can be a circle, square, triangle and any other geometric or abstract figure.

You can attach the stand to the stand different ways. For example, if the lower part of the tree is quite thick, then you can simply screw the board to it with self-tapping screws. The heads of the screws will be at the bottom, so they will not be visible. If the bottom of the tree is relatively thin, then you can fix it in a stand by making a hole in it, it should be no larger than the diameter of the trunk itself. Then just the rack is fixed with glue on the stand - this method is the most reliable.

It is worth remembering one feature of the tree trunk - it has a cone shape. Therefore, it is better to make a hole in the stand smaller than its diameter, and carefully trim the bottom of the tree. Thus, the stand will hold well and there will be no gaps at the junction.
When the wooden hanger is ready, you just need to varnish it, as it is better to preserve the natural color of the tree. But if a light hanger doesn’t suit your design, then you can use stain or dark paint.
original and very practical option floor hanger, which is easy to make, make it in the form of a ladder. Such an accessory is perfect for the bedroom if you do not like to use an armchair or chair back to store clothes in the evening.

For manufacturing, you will need only two bars with a thickness of about 5x5, and a length of 170-180 cm. Also, for the crossbars, you will need three smaller bars, the length of which will be equal to the width of the hanger. All bars are ground or processed by a planer. To make the hanger look beautiful and neat, it is best to connect the parts together with spikes.
Then you just need to cover the hanger with stain and varnish. A convenient and comfortable clothes rack is ready. As you can see, this DIY clothes rack is very simple and it is suitable for a bedroom or a summer house.
Like any wooden piece of furniture, such a clothes stand will look great in almost any interior and you can arrange things on it so that they do not wrinkle. If desired, you can use several clothes hangers that can be hung on the top bar. If during the day the hanger interferes, then you can simply take it and put it upright, as it is light and does not attach to anything.
Other types of floor hangers
Despite the fact that the floor rack for clothes is a fairly simple element of the interior, there are so many ways to make it. It is enough just to show a little imagination and remember that the design must be stable. Otherwise, you can make clothes racks from any available material at hand.
You don't need any special tools to work either. Of course, there are hangers made on lathe made of wood, but they are made by professional carpenters.

Remember that any piece of interior made by you personally will not only be the next step in your skill. If you make something with your own hands, then this thing will be unique and unique.

In addition, by making the elements of the decor yourself, you not only show your individuality, but also save a lot. Since even the simplest clothes racks in the store will cost an order of magnitude more expensive than craft material. And this is another incentive to start making your own, since the products self made are even more expensive.
Floor hanger, one of the most simple tasks. Therefore, you should not buy it in the store, but rather make it yourself.
Click Class
Tell VK
Wall hanger in the hallway - important element storage of things. The layouts of many apartments have narrow corridors, in which it is not always possible to place a full-fledged closet, so the owners are looking for alternatives. I want to keep the design of the apartment, comfort and ease of use.
There can be a lot of variations of hangers from the most standard and simple miniature shelves to futuristic and most unthinkable ideas.
The most popular materials for making hangers are wood and metal.
forged metal hangers amaze with the beauty and smoothness of forms. They are used in Provence and Art Deco interiors. This version of the hangers is mounted on self-tapping screws, and more often hung on them. 
This option of hangers can be attributed to horizontal. Their function is only to store outerwear. Metal hangers often have an aged look, which gives them a picturesque look.

A very interesting option is the combination of forged elements and leatherette or fabric. Looks unusual and luxurious. Such a hanger will decorate any corridor and become its highlight.

The photo shows combinations of materials: wood with fabric and metal with fabric. The functionality and originality of products is preserved. In the first version, the wood gives an array and solidity to the furniture, and in the second, metal facilitates the composition and gives grace.

Hangers made of wood can be combined with a mirror, a shelf for shoes or for head appliances. The photo shows a very compact version hallway.

The hanger can have sections: for short and long top things, which helps prevent dirt on the wall.

Hanger made of wood is understaffed with a shelf and a mirror, also great option for small hallways.

When choosing a material, it is necessary to focus on its strength, whether it will withstand ready product heavy winter things.
For this function, you can strengthen the mount: use not only self-tapping screws, but also furniture corners.
Materials can complement each other, carrying their functions. Metal, as more durable, goes to the basis of the structure, and wood as decorative elements.

Ideas for hangers in the hallway from improvised materials
I picked up a lot of ideas when the hanger was made with soul from improvised materials. This can serve as inspiration for many families. I think that in the interior it is necessary to move away from stereotypes, because any design is unique with its non-standard solutions.
In the photo, a completely ordinary hanger from a piece of board is made in nautical style. The matching backdrop and anchor hooks add color to the entire hallway.

An interesting forged lightweight option, perhaps not entirely from improvised materials, but it has a place to be. A very functional and elegant option, it contains a stand for shoes and hats.

Connected in the form of rhombuses, slats with wooden hooks, it looks very eco-friendly and stylish. Placing the hooks at different heights allows you to hang a lot of things without creating an untidy pile.

Curved leaves made of thin aluminum decorate the walls in a peculiar way. And it will be very easy to make such a hanger at home. To do this, you can buy a sheet of thin aluminum in hardware stores. This material is easy to cut and quite malleable.

Pallet hanger - the most affordable and modern version hallway decor. Creates a loft atmosphere and is suitable for non-standard young people.

And, most importantly, it is completely environmentally friendly and strong material. With the help of corners and self-tapping screws, you can build both a shoe rack and a shelf. You can simply coat the pallets with varnish or stain, then a beautiful wood pattern will remain, or you can paint over with thick colored paint to match the overall tone of the interior.

For minimalistic designs, the hanger in the photo is just a godsend. Comfortable, without unnecessary details and looks very stylish. A rod is inserted inside, which allows you to make hangers out of the hanger.

I will give a small master class on making hangers from wooden coat hangers. It turns out two rows of hooks. The option is unusual, but very functional.

Having slats of different widths, you can create the simplest option furniture by simply drilling hooks and adding crossbars for fastening.

For nature lovers, you can use images of animals and birds, and artificially aged wooden product will give the corridor history.

An interesting combination of two materials: wood and metal. Modern compact hanger with built-in hooks.

Many times I have come across the ideas of cutlery hooks: forks and spoons, as in the bottom photo.

An interesting option for a plastic hanger for a small family. IN summer period can only serve as decoration.

DIY wooden wall hanger
To make a hanger, you need to take a few boards, either ready-made or bought in a store. You can use any wood: pine, oak, birch.
We will analyze two options for hangers.
We cut out the same sidewalls, the top and the middle crossbar, to which you then need to attach the hooks.

We cut out beautiful bends on the sides and skin all the details.

We connect into a finished structure with self-tapping screws, furniture corners.

We mark places for hooks and drill them.

We check the finished product for strength and varnish it.

You can make an even simpler version of the clothes hanger.
The photo shows the diagram and dimensions of the future product.

We take purchased boards or lamellas, in this case pine wood was used.
We measure the same distance between the vertical parts and fasten the frame from the wrong side. We drill any fasteners. The shelf will be hung on self-tapping screws.

On the front side the same distance we fasten the hooks from each other. And we admire the result.

This hanger model can be supplemented with a shelf, to give contrasting colors. The photo shows an option when the crossbars do not go from the wrong side, but from the front.

Tell VK


