How to make a hanger for clothes with your own hands. How to make an elegant floor hanger for everyday clothes with your own hands. Original homemade hanger in the form of a tree
The first piece of furniture that a visitor or guest sees when entering an apartment or office is a hanger standing in the hallway. Depending on this, an impression or opinion is formed about the whole room and the owner of the house. The range of equipment designed for storing clothes is very wide, so there are ample opportunities for decorating the interior of the room (, corridor, hall and others).
Floor hangers on wheels are very convenient and practical in the interior of the apartment. They can be used for the hallway, in or rooms, on the veranda. Modern designers come up with and give such a piece of furniture various forms and interesting figures.
Advantages of floor clothes hangers on wheels:
What is the name of the clothes hanger on wheels (types and photos)
Usually it is called that: a hanger on wheels. A little less often you can find another name: wardrobe rack on wheels.
Floor rack on wheels has become a permanent fixture various stores clothes. Such racks are often used in locker rooms, wardrobes and at sales exhibitions. Clothes are hung on hooks or hangers. The wheels, which are located at the bottom of the base, create additional convenience for easy and quick movement even of the hanger already loaded with things.
Depending on what material they are made of, hangers are:
- metal- have big weight, sustainability. For the manufacture of chrome-plated aluminum is used, which, if desired, can be painted to any color;

Metal hanger on wheels
- forged structures- unique in appearance, serve as an additional decoration for the room. Very practical and comfortable;

Forged hanger on wheels
- wooden hangers - have an attractive appearance, durability. For the manufacture of various types of wood are used. Suitable for various styles interior: from classic to trendy loft and country;

Wooden hanger on wheels
- plastic models- too light in weight, so they can only be used with a small number of things.
Floor hangers on wheels are the most convenient and common type of equipment for locker rooms in schools, offices or apartments.
Clothes hangers on wheels - wood or metal?
Metal hangers on wheels
Due to the simplicity of the design metal hangers on wheels, it can be mobile around the house. The hanger can be decorated with various decorative elements that will decorate the home interior. If the room is cluttered with other things or details, then you can simply move the hanger to another room.
The designs of metal hangers can consist not only of a hanger rack, but also be supplemented with drawers and shelves for various accessories. Shelves can be made of metal, wood or other material.
Photo various models hangers-racks on wheels:


Wooden hangers on wheels
The peak of popularity of wooden hangers came in the 20th century, but now they are gaining popularity again, they are often used in hallways and other rooms. Their advantage is decorative features: they fit perfectly into the interior of the room, made in both classical and modernist styles.
Modern hangers on wheels made of wood, produced industrial way, there are several types. They differ in purpose, size, appearance and type of wood from which they are made:
- suit hanger- usually of medium height, used for individual use. On it you can hang a jacket, trousers and other details. business suit. It is designed for one person, so most often these hangers are placed in a bedroom, office or hotel room. The advantage of the hanger is the indelibility of clothes during storage.

The same hanger can be supplemented with a shoe rack at the bottom:

The size of such a hanger and height are selected according to the age and height of the child, for example, for small child a low hanger "Kid" is suitable, with convenient drawers at the bottom for books, handbags and toys. Children's hangers are always beautifully designed, they are distinguished by bright colors, and the wheels make it easy to move such a thing to the right place for the baby in the room.

Children's wooden hanger on wheels
Reliability and stability of a children's hanger is provided with its case design. It will be convenient that you can approach such a hanger from any side. Hangers are made of wood, covered with polyurethane varnish to avoid scratches when using it.
For older children and in used rack models that can accommodate large quantity clothes hung on shoulders.

Wooden hanger on wheels for girls
There are also small models specially designed for hanging school uniform: a dress or trousers on such a hanger will not wrinkle, as they are hung on special crossbars.

Wooden hanger on wheels for school uniforms
How to choose a hanger on wheels
IN home interior hanger is used for outerwear, storage bags, umbrellas and other accessories. It saves space and can be used in various configurations suitable for this space.
The main question when planning and buying a hanger on wheels is its purpose. Depending on this, the owner of the apartment chooses the desired model. The hanger is also selected for the interior of an apartment or office:
- If needed hanger for one person, it is better to choose costume wooden hanger. It is better to put such a hanger in the bedroom for individual use or in the office of the head of the office.
- For shops and exhibitions better fit durable metal hangers, which can withstand a lot of weight (if there are a lot of things) and it will be convenient to move them indoors as needed.
- To choose a hanger in the hallway of an apartment or house need to get away from design in the interior. If the interior is made in classical style, the best options there will be a stylish forged hanger or a wooden hanger with decorative ornaments. In the interior of the house with more modern style a metal chrome hanger will do.
- The best option for children's room there will be children's wooden hangers, matched to the height of the child and decorated in accordance with the interior and its wishes.
DIY clothes hangers on wheels
Wooden homemade hanger. original solution to decorate the interior of your home there will be a floor hanger on wheels, made of wood with your own hands. Every House master can do this.
The design is very simple: width 1 m, height 1.3 m, see the plan in the photo:

- For work, you need to buy 2 beams measuring 40 × 40 × 2000 cm. For the upper crossbar, a shovel handle is well suited. Details are cut according to the plan:

- The biggest difficulty is to make a stable bottom of the hanger. To make the crossbars exactly at an angle of 45 to the bottom, it is better to align the joint with a square. Then you need to screw the rails. The design of the side part is ready:

- Similarly, the rail should be fixed at the junction of the two sidewalls at the bottom. For strength, all joints can be coated with PVA glue:

- The upper crossbar is screwed with long screws. Wheels are screwed to the bottom, which can be bought at a hardware store.
- So the hanger on wheels is ready - the dream of some housewives. Its cost was about 150 rubles ($5):

DIY pipe hanger on wheels

The hanger is made from metal pipes approx 22–25 mm in diameter. You will also need wheels, screws and a drill.
- For a vertical base, pipes 1.3–1.7 m long (2–3 pieces) are needed. Horizontal ones are made shorter - 0.7–0.9 m (4–5 pieces) and are used as lower crossbars.
- One of horizontal pipes connects two vertical pipes from the bottom with screws, the rest are fastened closely. Thus, these bottom pipes form the bottom of the hanger.
- The upper crossbar is screwed in the same way, holding the entire structure together.
- The whole structure can be put on wheels, they are mounted in the corners of the base.
See also video how to do floor hanger do it yourself:
The corridor of a cozy living space begins with an important attribute - hangers. Thanks to her, you can put things in order in the hallway. You can buy this irreplaceable piece of furniture, or you can make a floor hanger for clothes with your own hands. If you have elementary skills, a desire and a sketch of a finished attribute, then you should not stop, you need to make it yourself.
To make the hallway cozy, it is necessary that all the furniture in it be perfectly matched in color and style. This is a tricky business, and it must be approached with all responsibility.
The entrance hall in a standard apartment is very small, so it is not possible to put a closet or chest of drawers there. But a clothes hanger should be a must, it will be the only thing that attracts attention.
To make your hallway different from others, you need to make its main attribute with your own hands. This will not only increase the rating of the owner, but also create a unique atmosphere throughout the apartment.
There are many product models. They are used for clothing and for small accessories. There are wall and floor structures that "do their job" equally well. Any of the two options can be done independently, the main thing is to accurately imagine how it should look in finished form.
Advantages and disadvantages
 If in small corridor there is no space, then you can make a small, unusual hanger. It will serve both for clothes and for umbrellas or bags. It is very easy to make a wall-mounted clothes hanger with your own hands. From materials suitable:
- tree;
- plastic;
- metal.
The advantage of the design is:
- compactness;
- functionality;
- variety of forms.
This model is suitable for a small hallway. In addition to hooks, you can make shelves for storing hats, gloves and other accessories on it. You can put shoes under it, and you can hang bags and umbrellas on additional hooks on the side.
To make such an irreplaceable item, you can use various materials, combine them, thanks to your imagination.
Its disadvantage is the stationarity and the installation itself, during which it is necessary to drill holes in the wall. In case of incorrect or unstable installation, problems may arise in subsequent operation. And if during the rearrangement you want to move it to a new place, then you will need to dismantle the hanger and repair the wall.
The simplest model of such an accessory in the hallway is the plank on which hooks are nailed. The description turned out to be not colorful, but if you take an exclusive material for its manufacture, then the product will turn out to be exclusive.
 If a wooden plank is taken for the product, then it can be processed different methods: sanding, painting, etc. Hanger hooks can be real wooden hooks, metal hooks, door handles and other material. They can be all the same or different, which looks very unusual.
So that the child always undresses himself, he needs a funny hanger. In this case, you can look after children's hooks in the form of cartoon characters or favorite animals. Since children's things are not so heavy, any interesting plastic toys can serve as hooks for the product, for example: balls, cups, etc.
Small rubber animals can be attached to the bar with superglue or special rubber glue.
To make the hallway in the house look original, you can nail different hooks to the wall in a chaotic manner, where there will be hooks for the child at the bottom.
Old forks or spoons do not throw away, they can make excellent hooks for a hanger, if you slightly bend the end. If old useless skis take up space in the closet, then they can also be used as a hanger bar. It is worth refreshing them a little with paint, and nailing decorative elements, which will be the hooks. Seeing such beauty, made by yourself, your guests will envy you.
For those who do not know how to work with wood, but want to have an original product, there is a way out. In the store you need to buy a special decorative self-adhesive film that imitates a wall hanger and stick it on the wall. It remains only to choose the material for the hooks and attach them to the wall.
You can find many fresh ideas, as well as workshops on making a wall structure, on the Internet.
The designs of floor products are different, so not all of them will be suitable for living quarters. Let's consider their options in more detail:

Advantages and disadvantages
This item is not only functional but also stylish. Having shown imagination, you can give the product the most unusual shapes. The advantage of the hanger is:
- mobility;
- absence installation work;
- big choice forms.
 Mobility- an important feature of the design, which becomes more noticeable during repairs, when rearranging, and even with a complete change in the style of the room.
During the installation of the floor accessory, there is no need to make holes in the wall and damage decorative coating. If the hanger is not needed in the summer, then you can simply move it to another place or hide it in the pantry.
Models of floor hangers differ in size, material and shape. A handmade product will fully match your tastes and the chosen style of the room.
Most floor structures have one drawback - questionable stability. Before proceeding with its manufacture, it is necessary to provide for maximum safety and stability. TO reverse side support legs must be attached, the so-called sole, so that the material does not scratch or spoil the floor. The hanger should be free of pointed components that could damage clothing.
This model will be different from the wall, as its location will require a little space on the floor. Making the product yourself will be more difficult, but this will not stop a person who is trying to decorate the interior of his house with exclusive things.
From an old tree
 The easiest option is to use old wood painted with paint. Of course, on its trunk there must be strong branches that will serve as hooks. A stand for such a hanger can be any heavy flat object, the shape of which does not matter.
If after the repair you have left wooden stairs, then they will make a great hanger. The length of the bar that will fasten the stairs is selected. It is nailed on top so that one ladder is on one side and the other is on the other. At the height of the first or second step, a shelf is made from the bottom of the board. Its edges are also fixed with nails.
Depending on whether how many steps are there on the stairs, and what clothes will hang on this hanger, you can make another shelf. Things on such a model hang on hangers, which makes them always straightened, well-groomed. By the way, it can be painted in any color you like. The main advantage of this design is that it can accommodate a significant amount of clothing.
To make a floor lamp hanger at home, you can use round or shaped metal or plastic pipes. To get a stable product, 1.7 meters high, it is better to take sewer pipes 60 mm. The base is better to make a square. Detailed master class for the manufacture of such a design can be found on the Internet.
 If in stock old floor lamp
, then it can be used as the basis for the product. You need to remove the old lampshade and remove the wire. Come up with hooks, or use the wire frame of the lampshade. If the leg of the floor lamp requires painting, then you need to carry out preparatory work, and only after them - paint the product.
If in stock old floor lamp
, then it can be used as the basis for the product. You need to remove the old lampshade and remove the wire. Come up with hooks, or use the wire frame of the lampshade. If the leg of the floor lamp requires painting, then you need to carry out preparatory work, and only after them - paint the product.
A handmade product with forged metal elements will look very beautiful and original. Design models can be found on the Internet, forged elements can be ordered from the masters artistic forging. To assemble a hanger from the received parts, you will need welding machine. After connecting the parts into a single structure, you need to degrease it with a solvent, and then paint it.
Forged hangers always look stylish. They can complement the interior in a classic style. Openwork forged metal elements are perfectly combined with the attributes of various styles.
You can do without a hanger in the hallway or corridor only if there is a large closet, and then not always. In private houses, it is more convenient to have "duty" clothes at hand - to jump out into the yard. Those that are mounted on the wall are more convenient: they take up less space. One thing does not please: the prices for worthy specimens are considerable. Therefore, we will tell you how it is made wall hanger with your own hands. Models are different different tricks are used, but one thing unites them: they are easy to make, especially with detailed photos process and explanation. There are also diagrams and video tutorials.
From boards in the form of a tree
We need a hanger in our small hallway. I don’t want to buy the usual one in the form of a bar with hooks - I don’t really like them, and my little daughter won’t get it. Other options with a set of parallel boards are also not inspiring. There is a switch on this wall, so it won’t work without fitting, and it’s not clear what kind of look it will be. Therefore, it was decided: I make a wall hanger with my own hands in the form of a tree - a trunk, branches. It fits into the interior. I will process the wood with stain and varnish on water based, the color should be close to the color front door.
So, two were bought at the sawmill unedged boards 25 mm thick. They are marked - on one trunk, on the other - branches.
We take an electric jigsaw and cut out blanks along the applied contours. Next is the turn of very dusty work - we grind the wood, at the same time adjusting the thickness of the joints with the "branches". Used a drill with a rubber nozzle and sandpaper. First large grain, then medium and small.

Sanding is a dirty business
After the result was satisfactory - it became smooth and the wood pattern showed through well - it was the turn of the stain. This is mahogany color, applied in four layers. After drying, they covered everything with a water-based varnish. Three coats were applied with breaks of three hours.

Nails 200 mm were used as hooks. They were cut to the desired length (different ones - longer for the upper part of the hanger, shorter for the bottom). The caps and the rod were polished for smoothness, and a thread was cut into the thickness of the board (25 mm) on the lower part. Holes were previously made in the "branches", and "hooks" were screwed into them.

Now it remains to fix all the details on the wall. The walls are concrete, so we fix them with dowels. First we put the barrel, we drill holes through it. We set aside the wood for now, insert plastic plugs for dowels into the holes. Having put the "barrel" in place, we fasten it. Using the same technology, we fasten the "branches".

It turned out well, and the color almost exactly matches the door. The plans are to build a small shelf for shoes and bags. All costs for the manufacture of this hanger - about $ 6 for boards and $ 2 for nails, about the same amount was spent on dowels. Stain and varnish were, and consumption is small.
Simple wall hanger made of chipboard
The task is to make a cheap clothes hanger on the wall (for rented apartment). Two boards made of laminated chipboard () called " furniture board". Two, because the price turned out to be low, and in the accessories department, where they were looking for hooks, they found good brackets for very little money. We use them for the second board - we will make a shelf for small things.

From the tool you will need a screwdriver or screwdriver, a drill, a set of drills. Still - a tape measure and a pencil - mark the attachment points of hooks and brackets.
After the boards were unpacked, there were spots of glue on them, some other, incomprehensible stains. All this can be eliminated with a solvent. We take a soft white (not colored) rag and wipe everything well.


Next, mark with a pencil the places for the screws. Remove hooks, drill holes. Drill - 1-2 mm smaller in diameter than the diameter of the self-tapping screw. The hole is necessary so that the work goes easier, and also so that the surface does not crack when twisting. We put the hooks in place.
It's time for the shelves. Postponed equal distances on one side and the other, attached the brackets, marked the holes for the fasteners. Drilled holes, installed brackets. All.

Now we mount it on the wall. The technique is the same, but with dowels: we apply, mark the attachment points, drill. Drill - according to the size of the dowel. We insert the plug of the dowel into the hole, put the hanger / shelf on the wall, fasten it.

This do-it-yourself wall hanger was made in two hours (together with a shelf).
Hanger with shelf
You can take the idea as a basis, use any other "hooks" and stops. This DIY wall hanger is made from two 25mm thick planed boards, two carpenter's squares and five hammers.

Wood needs to be dry, otherwise cracks may occur. Instead of squares, even triangular pieces of a similar board can be used. Important condition- Availability right angle. And instead of hammers, you can even fix knots or, for example, cut wooden hangers, and any hooks. This one is just a gift.


Spare parts - hammers and squares
The two boards must be the same length. An exact match is important. Having adjusted the length, we process the edges with sandpaper. There is a drill - we take a nozzle, fasten the emery and grind first with a large grain, then with a medium one. Then we start marking. First, mark where the stops will be attached. Divide the remaining distance by six, put marks - there are five of them. Just by the number of "hooks".

Ruthlessly cut off the handles on the hammers. We cut it slightly obliquely to get a slight slope.

Using a drill, make holes in the center. The drill diameter is 1-2 mm less than the fasteners used, the hole depth is not less than the length of the self-tapping screw.

Two boards must be connected at right angles. The installation step of the screws is 10-15 cm. We mark the places on the sidewall, transfer them to the end. High accuracy is required. We apply one to the other and transfer the marks with a finely sharpened pencil. We make holes according to the markup.

Drilling holes
We fold the boards at an angle of 90 °, connect them with self-tapping screws. First we twist the two extreme ones, then one in the middle, and then all the rest. The length of the self-tapping screws is at least 75 mm (triple the thickness of the board).

According to the marking, we drill holes for the hooks.

Installing the corner brackets. Since joiner's squares were used, there were no holes in them. They were drilled - two on the top and bottom on each bar. On one stop, 8 screws are obtained. We take them small - more than 20 mm, so as not to pierce the wood. Therefore, a large number of them are required.

The wooden wall hanger is ready. It remains only to paint and hang on the wall.

Based on this homemade hanger, other options were made.


With larger shelves
Video lessons
A few simple homemade hangers for "handy" in video format.
Drawings and ideas for DIY


Easy DIY hanger

Decorating a space creates a cozier and more organized living space. After the front door, the hallway can be called the first part of the apartment that a person sees when he returns home. This is the interior that presents the whole house. But all too often the hallway becomes a "highway" where coats and shoes are thrown off at random. But how beautiful it is when this room, with love, is decorated with your own hands!
People have a lot of excuses for not equipping entrance group. For example, they say that the room is small or narrow. But in this case, it is all the more necessary to develop furniture according to individual sizes, while it is not necessary to order its production to specialists. Even women can easily handle the creation of some designs! There are many unique ways make furniture by hand in a way that saves time and money, it's just that most people don't think about it often.
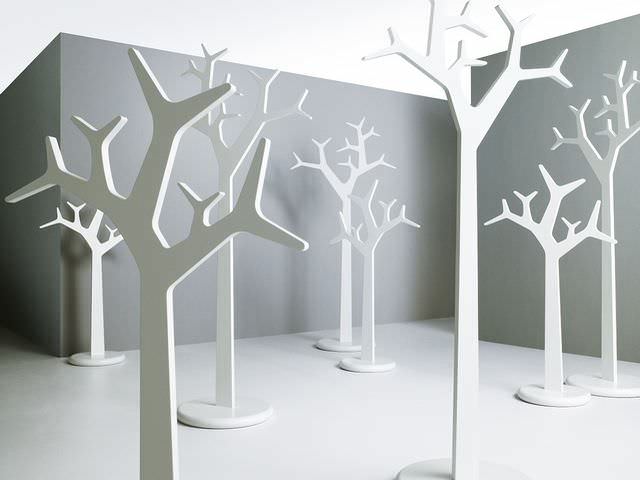
Throne or tree? Choose!
incredible tree
By by and large, the apartment should start with a hanger, this item can be exclusive, made according to an individual design. As you know, hangers can look different. There are many designs from various materials, different colors, styles and sizes. Some of them hide behind a mirror in the closet, others hang on the wall, and still others stand on the floor. Floor hangers compare favorably with the fact that they can be easily moved, they take up very little space.
For modern finishes interiors are ideal floor hangers in the form of birch. And you can make them from real thick branches. The new rack will bring unique accents and romantic feelings to the lobby or entryway, decorate children's rooms in a playful, interesting style, will become a kind of divine island of nature.
Of course, furniture in the form of wood will be loved in the house. Our ancestors deified trees, which occupied not the last place in rituals. Today there are oaks that have lived for more than one century, they are also considered special.

The natural-looking floor rack looks impressive, and its designs are ideal for small spaces. Elegant natural shapes can be cut from plywood.
Plywood is made up of three or more thin layers of wood glued together. Each layer is generally oriented, running at right angles to the adjacent layer to reduce shrinkage and improve strength. finished product. Pieces of plywood can be shaped into complex curves for use in producing beautiful natural designs:
- Before purchasing materials, a sketch is drawn. After that, the dimensions are calculated.
- Mastery is in the details - you need to saw, laying out sheets of plywood on a completely flat plane.
- To protect the material from chipping, the line along which the sheets will be cut is coated with PVA glue.
- Ready product covered with varnish or paint.
And even the king will envy!
The design created by one's own hands in the form of a chair is also interesting. In its production, you can use boards. original furniture handmade looks like a royal throne, in combination with any type of decoration, it will become not only a functional addition to the house, but also a central element of the hallway space.

The design of such a chair is very simple for any person involved in carpentry. The most interesting, useful detail of this model is a square mirror, which is indispensable for any room at the entrance, it makes the furniture richer. The robust model has 5 hooks, children can stand on the chair to take off or hang up their coat by themselves. The main condition is stability, it must be checked after manufacture.
Three brilliant ideas
Alicia Prusakovskaya's idea

Knowing that the most important detail enticing beautiful design hallway or hall - a convenient rack for storing clothes with a bench or a unique hanger, the designer from Krakow has developed floor furniture with a place to store shoes, on which you can sit. Designed for flexible use in the hallway, the freestanding item resembles a white box containing a collection of thin wooden skis. Probably, this is what skis sticking out of the snow would look like if the athletes turned over, making a somersault, and fell into a snowdrift. Curved hooks at the ends of the pine planks are positioned at different heights to hang coats and accessories.

Ergonomic shapes, roundings and curves in the design emphasize the beauty and nobility of the model. Shoe storage, acting as a seat, made of four sections of white lacquered fibreboard medium density (MDF), fastened with pine parts. Elements with hooks are formed from pine boards.
At work, we used traditional methods wood processing, for example, coat hooks were cut by hand, using a chisel. “My goal was to design an object that would be useful and visually appealing,” says the designer. The holes intended for the installation of pine boards are decorated with wood hoops.
The idea of German designers

Kristin Herold and Katarina Ganz have designed floor furniture with unique hooks, reminiscent of birds resting on power lines. Such a model will incredibly decorate any hallway. Clothes hooks are picturesquely located on a metal rail, and are directed upwards at an angle of 45 degrees. The legs of the furniture are made of birch, with a metal pipe of round cross-section neatly inserted between them, which looks very elegant, it really resembles an electric wire.
Removable coat hooks allow you to hang outerwear on both sides, similar forms can also be used to store hats, umbrellas and bags.

By the same principle, but using different materials and decor, you can develop many unique models. For example, do wooden structure from 6 boards and 3 wooden sticks, round in diameter. Such furniture, 70 cm high, is convenient to assemble and disassemble, it will look good in a children's room.
Idea from Japan
Japanese designer Yasu Mifune created a structure from a steel rod, curved back and forth and attached to a circular base. As a result, three horizontal stripes. The stand is compact, it does not take up space at all. Flat plywood hangers are neatly placed on the base of the furniture when not in use and are held in place with a short rod.
“Sometimes there are situations where clothing furniture is not really needed, for example, if you only need to hang a scarf,” says the designer. This floor hanger is ideal for summer clothes and decorates the room.
Out of nothing - something
Do not rush to throw away the old door

Do not rush to take the old, but strong door to the trash, if you had to change it to modern model. After all, with your own hands you can make a chic hanger for country house Provence style!
For the main structure, you will need ordinary boxes, 5-6 beautiful and reliable coat hooks, 2 pieces of thick plywood and 2 decorative metal brackets. After assembly, the hanger should be painted using crackle techniques. Drawers that will play the role of a shelf for shoes and at the same time serve as a bench (you can sit on it to put on shoes) should be decorated decorative pillows.
How to make furniture in half an hour
In the production of stylish, comfortable clothing furniture with your own hands, you can use fittings for water pipes, connecting them with parts made of wood or pipes directly. Many structures are created according to several schemes.

Copper details of handmade furniture look both vintage and very modern - it's still a beautiful trend. home design. Details made of metal, valued for centuries, decorate the space, make it elegant and stylish. Using copper plumbing accessories and round wood sticks bought from a hardware store, you can create a chic hanger in just half an hour.
- Purchase materials. The inner diameter of the copper adapters must match the diameter of the wooden sticks.
- Cut sticks. 2 pieces - 1300 mm, 2 pieces - 800 mm, 4 pieces - 200 mm, 6 pieces - 100 mm.
- Connect sticks with copper parts.
- If the design turned out to be stable, then the parts are fastened with glue.
- Using universal drawings, racks can be designed in any size.

When do-it-yourself furniture is made from metal pipes, you need to consider that it will be quite heavy. To make it easy to move, it is worth using the wheels.
Applying wooden box, the design is easy to supplement with a place for shoes.
One of the most interesting ideas creating furniture from unusual materials is the use of pallets in its production. Pallets are unusual in the sense that absolutely any furniture can be made from them. If the apartment is overloaded with things, and the person is facing certain problems, then the production of storage spaces from pallets will be of great help. Pallets turn ordinary apartment in fashion and stylish space that are decorated unusual models, including those designed to hang bags, hats, scarves and more.

Hooks for clothes will give a special character to such furniture; they, just like buttons matched to clothes, form the whole style.
This project can be DIY with pretty simple tools:

Brushes, paints and varnishes will come in handy in order to make your own clothes hanger even more unusual. Adding an interesting color to your entryway or foyer is a great idea. After the furniture is made, its surface is prepared and sanded, paints can be used in any shades, according to individual taste and the rest of the decor. You can also use the remnants of paints that painted the walls of the house. Enamel is applied in several layers.
Hangers are an important part of a person’s life; without it, organizing space in a closet is problematic. It’s easier to buy them in a store, but if you want to place clothes on beautiful, hand-made coat hangers, you should start making them.
Most interesting option- hangers made of thick wire, curved in the form of an inscription. They look original and successfully perform the main function.

Hanger with basket
Most practical option- a hanger with a wicker basket attached to its lower part. Hangers can be made from thick wire, and baskets can be used to fold scarves, gloves, keys, and other small things.

Board hanger
The easiest option to make a capacious hanger for outerwear, umbrellas and bags is to take a board. Is taken regular board, and many small hooks are nailed to it. The hanger is ready!

Coastal hanger
If you have minimal carpentry skills, you can make a coastal-style hanger. It differs in that right above the hooks there is a kind of shelf on which you can put wicker baskets.

Fork hanger
One of creative options floor hangers - pitchforks, or rather, several pitchforks interconnected. Forks (3 pieces) are taken and tied in the middle so that the lower part forms a tripod. The upper part of the fork with teeth will act as hooks.
Hooks are attached to the old backs for chairs. In this case, not the entire back is used, but only its upper part. To make the hanger look attractive, it is recommended to paint it with bright paint. For scarves, it is better to choose a back with vertical slats, and for coats - with horizontal ones.

Re-equipment of a floor lamp
The easiest way is to make a floor hanger from an old floor lamp. The support is already there, and it is enough to fix the hooks on the lampshade. The base of the floor lamp can be decorated as you wish.
Wooden floor hanger
It is cleaned of knots and bark, and then processed with sandpaper. 3 legs are nailed to the bottom of the tree for support. The top of the hanger is designed in the form of a crown. Branches act as hooks - they are cleaned and polished. The finished structure is covered with paint or varnish. Large beads can be used to decorate the hanger.

Floor hanger made of timber
The product can be made from a standard bar with a section of 10x10 millimeters. The length of the hanger is selected according to your height. As legs, 4 bars with a length of 35 centimeters are used. One end should be cut at a 45 degree angle. Small planks should be nailed between the legs and the support to make the structure stable. Hooks are nailed to the base in its upper part. The finished product is covered with paint or varnish.

Eco-style floor hanger
- 4 sticks or 4 cuttings from a shovel are taken. You will also need one long stick on which you can hang clothes.
- First, 4 sticks are tied so that 2 crosses are obtained.
- To make the construction strong, a plank is nailed to the bottom of each cross. All components are connected with screws.
- It remains only to treat the surface with an antiseptic and cover it with paint or varnish.
Important! For structural stability, the sides in the form of a cross are tied closer to the top.

You can make hangers yourself from anything. The shape and material for the production of hangers are selected based on your preferences. However, when using wooden products do not forget that they need additional processing otherwise the product will become a home for insects.
DIY clothes hanger from an old chair (video)