Do-it-yourself fences for summer cottages - simple budget solutions, original ideas and fence options. DIY fence
What is a fence for? What functions does it perform? How important is the quality of the fence to you? Is it possible to install a fence with your own hands. so cheap and beautiful?
One of the main functions of the fence is the protective function and security! Remember how, without having time to acquire your summer cottage, you immediately came up with the idea that it would not hurt to fence yourself in and, thereby, secure your rights to the newly acquired plot. The second thought that came to you was a picture of your site, enclosed by a beautiful fence. All sorts of fruits and vegetables, flower beds quietly grew on the site - and all this without the danger of being collected by "night guests", who often make their "ruinous" visits to poorly protected areas.
Your initial wish was very correct! You definitely need to put a strong and reliable fence around your site. Will you be building, or will you be engaged in gardening and horticulture - the fence will protect and keep your valuables from the “envying eyes” and “grabbing hands”.
Once the decision has been made, it's time to take action! But... on modern market Lots of different fences! Some require considerable financial costs, others require certain knowledge, others require experience, and others require a neighbor who has the same ...
This question is not easy to answer! Each fence has its own advantages and disadvantages. We will now try to describe in more detail the most popular fences, so that each of the readers can make a choice for themselves.
By the way, if you, the reader, do not belong to the number of happy owners of fat wallets, then this article will help you decide and put up a fence around your site yourself! This activity is fascinating, during the installation process you will learn many new skills, learn some tricks and subtleties! Self-education is always good! Another reason to raise your self-esteem and test your self-respect! A self-made fence will be proof of your thriftiness.

First of all, fences are solid capital and lattice decorative. Some completely close everything that happens in your yard, while others allow you to see everything, but do not allow inside.
What are the fences in our time?
- Wood;
- From concrete slabs solid and decorative;
- Plastic;
- Brick;
- Net;
- From corrugated board.
Let's take a closer look at each type of fence and how to install it yourself.

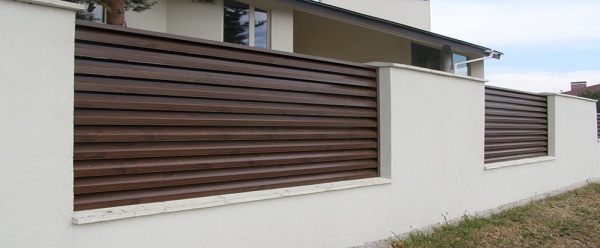
Wooden fences are very popular, they are easy to install and carry out. repair work. Let's get acquainted with the advantages and disadvantages of such a fence.
Advantages of a wooden fence:
Relatively inexpensive;
A wide variety of shapes and models;
Easy to install, even an amateur can handle it.

Flaws:
Requires constant personal care (painting);
Short-lived, service life rarely exceeds 10 years.
For DIY installation wooden fence You will need the following materials and tools:
- Hammer, nails;
- Level;
- Pegs and rope;
- Wooden or metal posts;
- cement mortar;
- Wooden bars 2-2.5 m long;
- Stafetins made of wood of the shape you like;
- Lacquer, drying oil, paint;
- Hinged hinges;
- Latch or lock on the gate.

In order to purchase the material necessary for construction, you can contact any hardware store, where you can choose the shape and dimensions of the blanks you like. The most suitable size for future staples is 85 x 145 mm. This option is less time-consuming, but more costly in finance. If you want to save a little on, then contact the timber warehouse, where they will offer you a cheaper, but requiring additional processing products - cut board. True, you will have to tinker with it a little - plan it, go through a grinder - but it will be possible to save a lot.

For columns, it is desirable to use metal pipes, a channel, but if this is not possible, wood treated with special mixtures will also come off to prevent early decay.
Whatever material you purchase, be sure to properly proliferate and dry it! The service life of your wooden fence will depend on this.

- To get started, mark the border along which your fence will pass with the help of a peg and a rope. Pull the rope evenly around the entire perimeter of the future fence.
- Decide where the gate will be located, its dimensions, mark the location of the columns.
- Mark the location of your posts at a distance of 2 - 2.5 m from one another. Dig holes for posts at least 30 cm deep.

- Install and dig in the posts, while be sure to set the posts strictly according to the level - they should stand straight and not fall to one side. If desired and possible, you can concrete the posts, so they will last much longer.
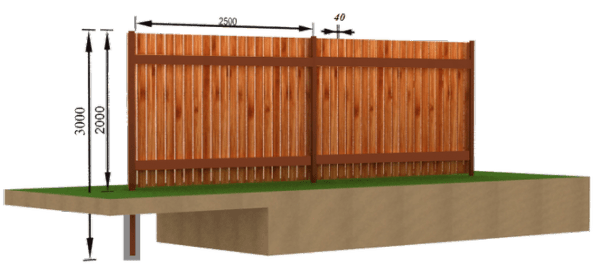
- For each column at the top and bottom, we fasten bars with a cross section of at least 50 x 50 mm with self-tapping screws.
- Between the posts above and below we lay the crossbars and screw them on both sides with self-tapping screws or nails.
- The turn came to the prepared skeleton to nail the crossbars. The distance between the staples can be at least 1.5-2 cm, however, if you want to make this wooden fence solid, nail one board close to the other.
- When your fence is already fully installed, you should start painting it. To do this, process everything again wooden elements fence with drying oil, and after it dries with varnish or paint.

For a richer color and enhanced protection against natural phenomena, paint over the fence 2-3 times. This will extend its service life.
Video: Overview of fences. Homemade wooden fences
Concrete decorative fence gained immense popularity in the last decade. The reason for the increase in popularity was the invention of collapsible structures that are convenient for transportation and installation. Designers have improved these concrete structures and filled the markets with all sorts of models of such fences. These fences are ideal for industrial enterprises, and for the private sector (houses, dachas).

Advantages of a concrete fence
- unpretentious;
- Long service life - more than 100 years;
- Easy and quick to assemble;
- Affordable price;
- Variety of models.
The disadvantages of such a fence:
- It is difficult to carry out all the operations for assembling the fence on your own; during delivery and installation, you will definitely need the help of 2-3 people.
Types of concrete fences:
Sectional typesetting - widely used for fencing private houses, they are diverse. They are assembled from small sections that are inserted into the grooves of the posts. Everyone can choose for themselves the height of the fence and a certain model. There are openwork sections, lattice and solid. 2-3 people are enough for assembly;

Self-contained - more often used for fencing industrial facilities, they represent a huge solid wall, with a large ornament. Such a fence completely hides from prying eyes everything that is on the other side of it. The peculiarity of an independent fence is that each section has its own support and does not need poles at all. The downside is that when installing and dismantling it, you can’t do without a crane.

Having decided to install just such a fence on your site, take care of airing the site. If you decide to fence yourself tightly, then the entire ecosystem of your garden may suffer from such a decision. Without regular ventilation, the soil becomes acidic, overgrown with mosses, and trees begin to rot. The situation will be saved by several lattice or openwork sections.

Marking the future fence with rope and stakes will help you clearly define the scope of work, calculate the required number of sections, and mark the places for future posts. Each section is 200 cm long, so the distance from one post to another will be 205 cm. Mark the place for the posts with stakes, and use a rope to check how even your fence will stand.
Unloading building materials. Sections of concrete fencing have a weight of about 70 kg. The pole itself weighs 90 kg. When unloading, it will be very important for you to take this into account and take measures to facilitate the stacking process. If you lay out sections and posts along the entire working area (future fence), then you will significantly reduce both installation time and physical activity.
Installing columns. This system does not require foundation pouring. Initially, the very first pillar and the very last are installed. After that, they dig in all the subsequent ones, strictly in the intended places. If the terrain is uneven, then the height can be adjusted using the height of the posts.

Sections are installed in special grooves located on each column. The lowest layer from below can be overlaid with roofing material.
If desired, the finished sectional fence can be painted in any color using special compositions for facades for painting.

Despite their high cost, brick fences are still very popular. A very large assortment of bricks encourages the construction of more and more new designs that emphasize the dignity of each brick.
Advantages of brick fences
- Strength;
- Reliability;
- Durability;
- Fire resistance;
- Beauty;
- Fundamentality.
Now it is customary to select a brick for a fence, under the brick from which the house is made - one complements the other! The fence can be solid and with forging elements, gratings - everything is at your discretion.

How to start installation?
Make a drawing of the fence (albeit a primitive one), this will help to calculate right amount building materials. Mark on the plan with dots the places of the columns. Mark the location of the fence on the site. Using a cord and stakes, mark the places of the posts. Do not forget to also mark out a place for a future gate and gate! Carefully measure all corners, each corner must be exactly 90 degrees!

The foundation is the foundation of your fence. The more correctly you put it, the more stable and stronger your fence will be. Initially, you should dig a trench under the foundation. For a strip foundation, a trench with a depth of at least 40-50 cm is ideal. But, the higher the fence, the deeper and wider the foundation should be laid. IMPORTANT: pour the foundation all at once, otherwise the joints will crack and the structure will not be so strong.
Before pouring concrete into the trench, you should prepare a place for the foundation - lay the so-called "bed". For her, sand must first be poured into the bottom of the trench, then gravel, everything should be carefully poured with water from the hose and tamped well. After that, make the formwork, lay the reinforcement. Fill the formwork with concrete, monitor the level. We give the foundation to dry well and acquire the necessary strength. After a week, the formwork is allowed to be removed.

Brick fence. On top of the foundation, be sure to lay a layer of roofing material, it is fixed with liquid glass and cement mortar. Every 2 - 2.5 m we lay out pillars 25x25 cm. Between the pillars a plinth 50 cm high and 25 cm thick is laid, above - the usual masonry in one or half a brick. For a fence, laying in one brick will be sufficient. But if you are laying a high fence, it is best to lay it in two rows. At your discretion, lay out openwork, single-row or combined masonry. When laying, be sure to monitor the level! At the end of the masonry, do the jointing, observing its width of 5-6 mm.
Video: DIY brick fences
Chain-link fences - cheap and beautiful!
The cheapest fence! Even a beginner can handle the installation! All installation work can be done in one day.

The advantages of such a fence:
Provides ventilation of the area;
Durability - service life up to 30 years;
Profitability - saving time, saving on labor.
Minuses:
The whole area is well visible;

1. Mark your site, use stakes and cord to mark the future location of the posts and grid;
2. Dig holes for the posts. The columns can be both metal and concrete, in the most simplified versions, wooden ones will do.
3. Depending on the soil, take care to strengthen the posts. If the soil is dense, reliable, it will be enough just to dig a column into it to a depth of 60-70 cm, but if there are any features, be sure to prepare holes. Pour sand to the bottom first, and then gravel, insert a column at a right angle (using a level) and fill it with a cement solution.

4. Stretch the net and attach it to the posts. The chain-link can be attached to wooden posts with nails, wire. But you need to attach the chain-link to metal and concrete with special fasteners. However, the most popular type of attachment to any poles is the same wire.

5. With the help of a reinforcing wire stretched between the cells of the grid, it is necessary to properly stretch the grid, to prevent it from sagging. It is recommended to stretch the reinforcing wire both above and below the mesh.
6. To protect the chain-link from metal corrosion, it is necessary to paint the mesh cells well with any oil paint on drying oil.

Do-it-yourself fence from corrugated board - an inexpensive option
Fences made of corrugated board are also very popular. A large assortment metal profiles and a huge range of colors contributes to this. In the presence of building materials and necessary tools work will not take much time and effort.

- Sheets of corrugated board;
- metal poles;
- Cross logs (2-3 pieces for each section);
- Screwdriver;
- self-tapping screws;
- Level;
- Welding machine;
- Sand;
- Gravel;
- cement mortar.

Front of work:
Always and everywhere, when installing any fence, you need to mark the location of the fence itself and the posts, as well as the presence of a gate and a gate.
Under the posts, drill or dig holes 1-1.2 m deep.
Using sand, gravel and water, prepare a pillow for each post. The height of such a pillow should be about 25 cm.
Install the prepared metal posts with a section of 50x50mm into the drilled holes directly on the gravel pad. Align the posts with a level and fill their base with cement mortar.

Using self-tapping screws, attach sheets of corrugated board to the resulting frame. But the best option fixing the corrugated board to the logs will be special riveting for metal. Using them, you will protect your brand new fence from intruders.
Installation of a fence from corrugated board, quickly and inexpensively
After reading this article, I hope you have a plan for arranging your particular site and you were finally able to make the right decision regarding the material for
The fencing of the suburban area is being built in the first place. It defines the boundaries of the site and hides it from prying eyes. You can make it yourself or order it on a turnkey basis. Often they choose the first option, since it is not at all difficult to build a fence in the country with your own hands. How to make a simple and beautiful hedge will be described in this material.
Garden fencing options
Types of fences for summer cottages can be divided into three categories: light, heavy and combined. Lungs are fences made of wood, mesh, profiled sheet. Heavy is stone, brick. In combined, both light and heavy materials are used.
If the question arises of how to make a fence in the country house inexpensively and quickly, then preference should be given to light fences. Such structures do not require the preliminary manufacture of the foundation, and it is very easy to install them with your own hands.

Fig.1.
Heavy fences are also not difficult to make yourself, but the construction time and costs will greatly increase. For the reason that you have to make strip foundation under brick or stone masonry.

Fig.2.
Quite often, heavy fencing structures are installed on the facade of the site, and light ones are used to distinguish between neighboring sections. Combined views can be applied in both cases.
How to make a simple site fence
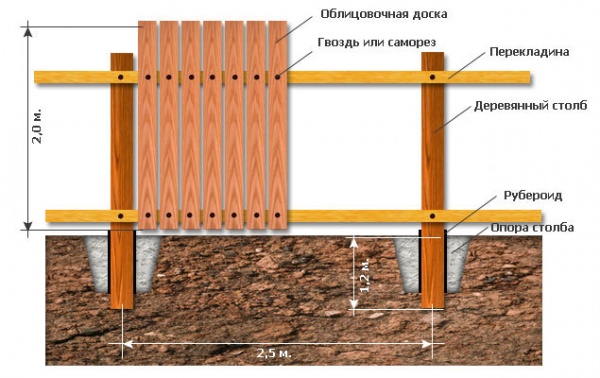
Having understood the types of hedges, you can proceed to the question of how to make a fence in the country with your own hands. Structurally, any fence consists of supporting pillars and spans. The entire construction process is divided into the installation of pillars and the assembly of spans. Depending on what materials will be used, the order of construction and design depends. The only thing that is common is the distance between adjacent pillars and is 2 - 2.5 m.
The simplest fence in the country can be made from a chain-link mesh. For this you will need metal poles 2.5 - 3 m long and 50 mm in diameter. You can use a regular water pipe or purchase ready-made fence posts, the latter option is preferable. Under the pillars with a step of 2 m, they drill holes with a garden drill 1 m deep and 150 - 200 mm in diameter. Pillars are installed in them and covered with earth, carefully ramming it, this option is well suited for heaving soils (clay, loam). If the soil is not heaving, then the pillars can be sealed with concrete, which is easy to prepare on the spot from cement, sand and gravel in a ratio of 1: 3: 5-7.

Fig.3.
The mesh can be attached to the supports using special hooks (possibly if special poles are installed), or with clamps if a water pipe is used.
Another option is to purchase a ready-made mesh fencing kit. It includes poles, mesh and fasteners. Putting a fence in the country with your own hands using a ready-made kit will not be difficult.
The main disadvantage of such a fence is that it does not hide the site from prying eyes. To eliminate this drawback, a camouflage net is used for the fence in the country. She pulls on supports on top steel mesh. The camouflage net perfectly hides the area and does not stand out against the general background of vegetation.

Fig.4.
The disadvantage of the camouflage net is its low durability; cats and other animals will easily penetrate through it into the area. In it, they can even get stuck and die. Therefore, the facade mesh for the fence in the country is very popular, which has the same ease of installation, but is devoid of the disadvantages of camouflage. Given the variety of colors, it can be a wonderful decoration not only for the fence, but for the entire site.
How to make a fence from a profiled sheet
Another equally popular option is the fencing of a summer cottage from a profiled sheet. Making a fence in the country from corrugated board with your own hands is somewhat more difficult to make than from a grid. This is due to the fact that for this version of the fence, only supporting pillars are not enough, but horizontal crossbars are also needed, to which the profiled sheet will be fixed.
For fixing the profiled sheet, at least 2 cross bars are required. In order for the profiled sheet to hold the wind load well, it is advisable to install them at a distance of 1 m from each other. Therefore, for a 2-meter fence, it is desirable to install 3 cross bars. The first is installed at a distance of 20 - 30 cm from the ground level, the second in the middle of the supporting column, the third on the top of the pillars.

Fig.5.
A square-section pipe ranging in size from 20x20 to 40x40 mm is well suited as a cross section or metal corner size from 30x30 mm.
Transverse to the supporting pillars are traditionally attached by welding. If there is no welding, then you can fix them with bolts. Of course, such a connection will have less rigidity, and you will have to tinker a lot.
The profiled sheet is attached to assembled structure using self-tapping screws. For this purpose, it is good to use roofing fasteners. It is galvanized and provided rubber gaskets which prolongs its service life and eliminates unpleasant sounds. Which can publish a profiled sheet in the wind. Before fixing the sheet, it is necessary to drill a hole, and then fix it with a self-tapping screw.
When installing a fence from a profiled sheet in the country, it is important to take into account one more point. It is not good if the profiled sheet touches the ground. From constant moisture, it will quickly rust and lose appearance, but leaving a gap is also not good. Therefore, the profiled sheet is installed with a gap of 5–10 cm with the ground, and a rubber strip 15–20 cm wide is fixed to the lower edge of the profiled sheet. The rubber strip is buried in the ground. Thus, the profiled sheet does not rot, and there is no gap left.
How to build a wooden fence
A beautiful fence in the country can be made from boards. There are many options for wooden fences of the site; they can be divided into two types with vertical and horizontal mount boards.
A wooden fence, as well as the previously considered types, is installed on support poles. However, in this case not metal poles, but wooden ones can be used.
As wooden supports, a beam with a cross section of 80x80 mm is usually used. Before fixing the beam in the ground, it must be treated from decay, otherwise the fence will not last long.
Only the part that will be below ground level is subject to processing. The first stage is the treatment with an antiseptic, then the timber is covered with mastic and wrapped with roofing material. Only after that it can be installed in the ground.
Under wooden poles, it is necessary to drill pits with a depth lower than the depth of soil freezing of about 1.2 -1.5 m. At the bottom of the pit, drainage is arranged from a layer of sand and gravel. After that, a wooden fence support is installed and poured with concrete.
Once all the pillars are installed, you can proceed to the lining of the spans. At this stage, it's time to think about how to decorate the fence in the country. The main decoration is a special order of fastening the facing board. There are many options, here are some of them.

Fig.6.

Fig.7.

Fig.8.

Fig.9.

Fig.10.

Fig.11.
We examined what you can make a cheap fence in the country. If you want to have a stronger, more durable and impregnable fence, then the only option left is to use brick or stone.
Brick fence on a strip foundation
Brick fences differ from the options considered earlier by the presence of a strip reinforced concrete foundation, on which brick or masonry is being erected. All the complexity and high cost of construction lies precisely in it.

Fig.12.
The strip foundation for a country fence is made in the same way as for a house. A shallow strip foundation is used. The depth of its occurrence is about 50 cm.
The order of its device is as follows:
- A trench is dug along the perimeter of the site with a depth of 70 - 80 cm, a width of 20 cm.
- A layer of sand 20 cm is poured at the bottom of the trench, then a layer of crushed stone 10 - 20 cm.
- A formwork 10–20 cm high is erected above the trench.
- The trench and formwork are laid with roofing material. It is necessary so that the concrete does not go into the ground.
- They make a binding. Reinforcement of concrete is carried out with a bar 12 mm thick. The bar is installed 10 cm from the bottom of the trench and 10 cm from the top. Fasten it with wire or welding.
- Pouring concrete. For 2-3 days, the formwork is removed and the foundation is left to dry and gain strength for another 30 days.
- After the strip foundation has dried, you can lay stone or brick.

Fig.13.
An analogue of a strip foundation, but a simpler option is columnar foundation with grillage. This foundation consists of piles buried below the freezing depth of the soil (1.2 - 1.5 m). Piles can serve steel pipes or special screw piles. The grillage is made of concrete. The advantage of a foundation with a grillage is that it is cheaper and less labor-intensive to manufacture.
As you can see, putting up a fence in the country is quite simple. It is important to decide on the design and purpose. If you do not want to spend a lot of effort on installing a fence, then preference should be given lightweight materials such as profiled sheet, mesh or wood. If you want to have a fundamental building, then you should consider building a fence made of brick or stone, or make a combined version.
Today, wooden fences are gaining popularity again. Modern analogues from other materials, of course, are no worse, but from time immemorial, mankind has appreciated and still appreciates naturalness. Nothing beats natural solid wood. Our site presents several varieties of wooden fences and fences for the house and detailed instructions on how to do it yourself.
The main types of wooden fences
For any owner of a private house, a hand-made fence is a special pride. But before proceeding with its construction, you need to choose the type of structure. Types of wooden fences for private houses and photos for them:
Wattle
Wooden wicker fence. By type, this is the most ancient variety - rods intertwined in a special way and knees driven into the ground. Antique wicker wooden fence (in the photo below you can see in more detail) is very unusual, it’s not difficult to make it with your own hands, but, unfortunately, it has a short service life.

Ranch
Although the name is reminiscent of American films about cowboys, it should be noted that in our country, such structures were erected a long time ago. They fenced gardens, orchards, in agriculture animal grazing areas. By design, these are several boards (poles) nailed to a wooden beam.

Palisade
This is also a kind of old fences that you can make yourself. Stakes at the top are sharpened at an angle of 40 degrees. Has an impressive appearance

Lattice
An attractive appearance, such an openwork wooden one is easy to make with your own hands, most often serves as an element of decor for a personal plot or for its zoning. The decorative wooden fence does not differ in special durability. You can make it by crossing directly or diagonally slats or narrow boards.

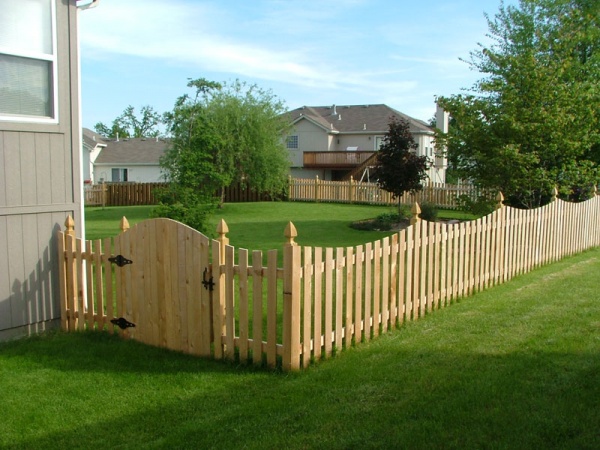
Fence
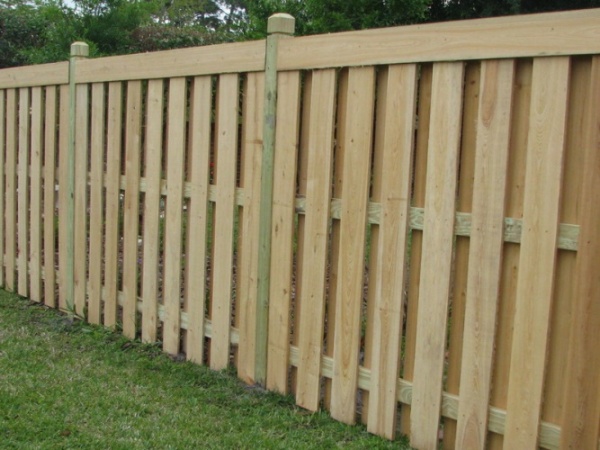
The traditional type of wooden fencing is a picket fence. The simplest manufacturing option: boards in a vertical position are attached to the veins, and those, in turn, to wooden poles driven into the ground. This is the most economical and fastest way to fence your site. Apparently that's why it's become so popular. Easy to use, do it yourself quickly and easily, and with proper care, it will last a long time.

One more hallmark of this fence is that it clearly outlines the boundaries, without obscuring the site itself.


Separation of wooden fences according to installation technology
Fences made of wood, in the photo above you can see, there are:
- No foundation. In this case, only wooden poles or metal supports are needed.
- On the foundation. The ground part of the foundation base is made simultaneously with a wooden beam.
As for the finish, it can be done using any material, taking into account your preferences: stone, corrugated board, brick. A wooden solid fence with a base always looks respectable, stylish, and thorough. To make it you need to spend a lot of money, there is an option to reduce the cost of the structure - this is to make a wooden fence with your own hands from start to finish.
Stages of installation of wooden fences
Rustic style (Country) has always been and still is at its peak fashion trends. Wooden fences are its bright element, and the simplicity of lines, even without embellishments, always looks modern and elegant. Do with my own hands not difficult at all. How to make a wooden fence of a more complex design? First you need to decide on the material of manufacture.
Important ! When choosing a material for a wooden fence, make sure that the solid wood is free from decay and other damage. Treat the wood with an antiseptic. Or buy ready-made material.
Step-by-step instructions for installing a wooden fence
If you have already decided on the material, select the proportions: the shape, the height of the wooden fence. Only after that it will be possible to proceed directly to the construction. How to make a wooden fence with your own hands, drawings and detailed instructions see below.
- The first step is marking the territory.

- Next, you need to calculate the number of wooden pillars, fences and veins.
- The earth part of the timber must be treated with tar.
- Then marking is carried out along a pre-stretched cord under the timber (recommended distance is 3 meters).
- Holes pop out. The depth of the holes should be equal to the depth of the soil - this is about 1.5 meters. Holes can be dug with a drill.
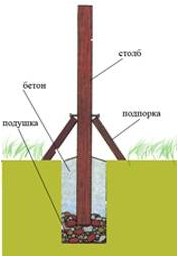
- Think over well one nuance: if you are planning to make a high and heavy wooden fence, then in this case, be sure to attach a metal plate to the base of the support. This is necessary for stability and so that the fence does not turn out under the influence of gravity.
- Wooden supports are installed vertically on a sand cushion of 12 cm, after which the hole is covered with small portions of soil with sand. Carefully rammed. To make the structure more durable, the hole can be poured with concrete.
- After installing the supports, you need to calculate and determine the attachment points for the veins of wood from above and below.
- The picket fence is selected according to a pre-selected template, but you can make it even by cutting it along a stretched cord.

To simplify the work, you can purchase a ready-made picket fence with or without drawings.


We offer you to watch a short video with a selection of beautiful wooden fences:
How to make a checkerboard fence with your own hands
The next type: do-it-yourself wooden fences checkerboard in the photo, you can clearly see the difference with the previous one.


Compared to the previous one, a wooden checkerboard looks more decorative. Main Feature installation is considered that, you can make it in any performance: dense or with gaps.
The pillars are installed in the same way as described above. After installation, you need to attach the beams. Can be cut into wooden poles grooves, in metal it is necessary to weld the corners on which the beams will be located by welding.
Decide in what position you want to make a checkerboard: horizontal or vertical, set the guides. With a vertical checkerboard, they are made horizontal and, conversely, with a horizontal checkerboard, they are made vertical.

Further, after installing the guides, you can proceed with the installation of the planks. Place them in a checkerboard pattern, as shown in the picture above (one on each side). You can fasten them either with nails or screws.
Very important ! Clearly measure and mark the attachment points, because small irregularities will give gaps, and this will significantly spoil the appearance of your fence.
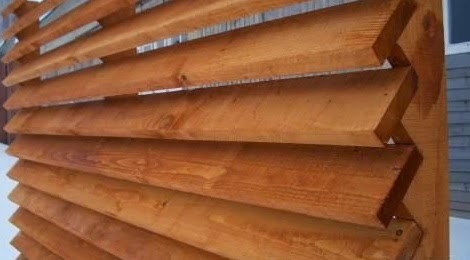
Do-it-yourself wooden fence ladder
A wooden horizontal ladder fence is also very popular, so let's dwell on it in more detail. Making such a structure with your own hands is as easy as the previous ones. Install the supports, according to a similar (described above) principle.
Next, you need to fix decorative wooden linings on both sides - these will be the guides. As a rule, a channel is used for this purpose, it is easier and easier to insert a board into it at an angle. In this case, it is up to you to decide at what angle you want to make a Christmas tree. The position is also chosen by preference. The direction can be either vertical or horizontal.
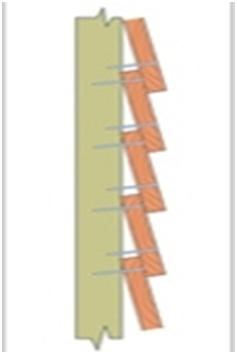
Important ! Do not forget to install gasket material between them along with the boards. This is necessary for ventilation and to preserve the material from rot.
Do-it-yourself wooden fence for giving a ladder. The photo shows some models of finished work.

At the end of the work, treat the fence with an antiseptic and paint the structure.
Pledge of longevity of a fence made of solid wood
As a material for the manufacture of wooden fences, you need to choose those types of wood that are characterized by strength: ash, mulberry, acacia, oak, aspen, Siberian larch.
By the way, the last option is a truly eternal material; when exposed to water, it does not deteriorate, but, on the contrary, grows stronger. It is also worth limiting the use of pine species to create wooden blocks. You should not use birch if you do not want to change it often, it has the lowest density among all the others.

Bars for fences are used from wood, and metal, or as an alternative to wood - overlays. The tree should not be discounted. Today thanks to modern technologies there are special metal consoles. Therefore, solid wood supports do not have to be dug deep. The consoles are concreted, and then a wooden beam is attached to them.
The most vulnerable areas of wood are those where the cut is built across the grain. To extend the life of wood in fence blocks, lay the boards horizontally or make canopies. Wood is vulnerable if it directly interacts with air:
- At high humidity, it swells and is affected by fungal deposits.
- If the air is too dry, it will dry out and crack.
How to process a wooden fence to reduce the risk of damage and damage? This can be done by impregnation with an antiseptic and painting with special materials: Swedish paint, soak with hot drying oil, yacht varnish.

You can make Swedish paint with your own hands at home. To do this, mix the following ingredients:
- Iron vitriol - 260 grams.
- Minium iron - 260 grams.
- Normal table salt-260 grams.
- Rye flour will need 580 grams.
- Drying oil, you can use linseed oil- 240 grams.
- Water about 4.5 liters.
The consumption of this mixture will be approximately 200÷300ml/m2. Expected color - golden. If you need a different color, then replace the red lead with ocher or manganese peroxide.
Since ancient times, people have tried to enclose their possessions with a fence, a hedge, unconsciously perceiving the fence as a symbol of reliability and strength. But many do not think about the fact that the fence has not only a protective function, but also a decorative one. There are many types of fences. When choosing them, it is advisable to resort to the help of contractor teams who perfectly know how to build a fence. There is quite big choice materials from which it is possible. For example, wood, concrete, stone, corrugated board, metal, net or plants (for hedges).
Types of fences: corrugated board, brick, stone, concrete, picket fence, chain-link mesh.
Consider the features of the main types of fences, options for their construction and some of the nuances.
And then we build a fence.
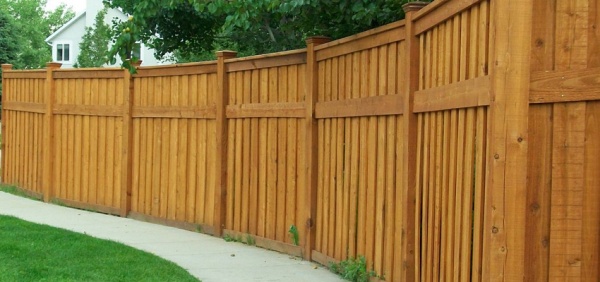
Building a wooden fence
One of the less labor-intensive options for fencing, as well as the least expensive financially. Even a wooden fence, with its wide distribution, gives you the opportunity to roam your imagination in choosing a construction method.

So, how to build a wooden fence? Mounted wooden fence is quite easy. The pillars go deep into the ground approximately 120 cm, after which they are poured cement-concrete mortar. The installation depth of the pillars is determined by the soil and terrain features. Profile pipes with a diameter of 60 * 80 mm are often used as pillars. Next, the pillars are connected by girders, which are attached respectively to the pillars, and lastly, the boards are attached - the main part of the fence. In order to install the posts evenly, first install the first and last. After that, pulling a rope between them, they mount the remaining ones, equaling the extreme pillars. When choosing such a fence, it is necessary to take into account the mandatory annual impregnation to prevent decay.
Back to index
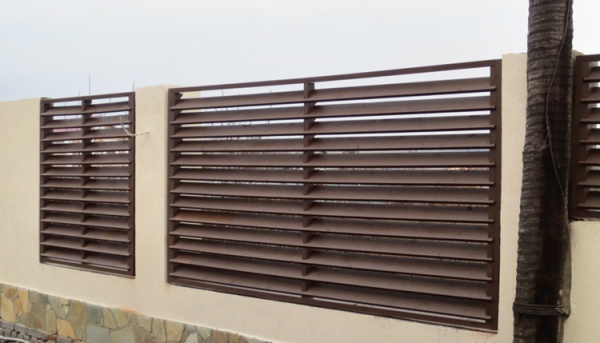
Building a metal fence

A metal fence is rightfully considered one of the most expensive, but also the least demanding of care (some types are desirable to be painted once a year). During installation, pits are dug for pillars with a depth of at least 1.5 m. After installing the pillars (they are poured with a cement-concrete mixture), horizontal railings from the corners are welded. Their number will depend on the height of the fence, the recommended distance is 50-70 cm. Holes for bolts are drilled in the corners, after which they proceed to fasten the sheets of the fence itself using self-tapping screws or special rivets. Sheets are overlapped. It should be remembered that for the opening of the gate, poles are installed with a larger diameter. A metal fence is very difficult to install yourself.
Back to index
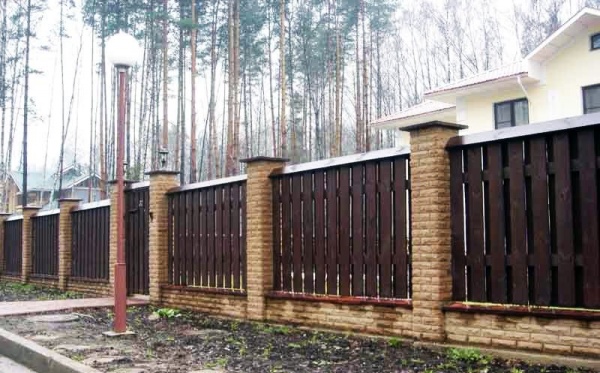
We build a brick fence

A brick fence on a strip foundation with blind masonry between the pillars: 1. Strip foundation 2. Ground level 3. Iron pillar 4. Brickwork
Of course, there are many ways to reduce the cost of a brick fence, but they are all used at the expense of quality. Under the brick fence, a strip foundation is made without fail, since brick fence- the design is quite heavy. Used for laying bricks cement mortar, and for better adhesion, the brick is pre-soaked in water. It is necessary to ensure that between the rows of bricks there is the same amount of mortar. Excess solution must be removed immediately. At the end of the work, the seams of the fence are processed special composition or protective coating.
Back to index
concrete fence

It is impossible to cope with the installation of the fence on your own without certain knowledge. How to build a concrete fence? Before installation, the site is marked, you need to calculate the total length of the fence, determine the location of the future gate and gate. This is followed by the calculation of the differences in ground level and the height of the fence. The method of installing the fence, the location of long and short openings will mainly depend on the quality of the soil. Then markings are made for the location of future pillars, gates, gates. Pits for poles are dug to the depth of soil freezing, approximately 1.5 m. Sand and gravel are laid in the pits to the height of the lower part of the pole. Water is poured from above, and only after that the supports are installed. A plinth slab is laid between all the pillars. And only after that the plates are poured with liquid cement. After the cement has hardened (usually 3 days), you can proceed with the installation of the remaining part of the fence. The wicket gates are hung last.
Foreword
As practice shows, putting a fence on the site is within the power of everyone. Even the most massive structures are easy to install if you approach the work responsibly and pre-perform the appropriate preparatory measures.
Content

Video fences.
As practice shows, putting a fence on the site is within the power of everyone. Even the most massive structures are easy to install if you approach the work responsibly and pre-perform the appropriate preparatory measures. Installing a fence in the country is not only an attempt to protect the territory from prying eyes and uninvited guests. It is also a decoration of the site, giving it completeness.
In the concept of "the right fence in the country" everyone puts his own vision of this fence. This can be both wire fencing, and fences made of logs, reinforced concrete, corrugated board and decorative concrete, sectional and forged fences, and much more. From such a variety you can always choose suitable option. At the same time, it is important that the fence is made of the same material as the gate and fits into the overall design of the site.
As well as the construction of the gate, correct installation fence or fence requires preliminary work - the preparation of the construction site and the concreting of the supporting pillars. Completion of all work - painting finished gates and fences.


Speaking about different types of fences, do not forget about such a variant of the fence as hedge from shrubs planted close to each other. A hedge not only limits space and protects the site from wind and dust, but also looks much more beautiful and aesthetic than a regular fence. From a design point of view, a hedge is preferable for small area, on which it is impossible to use more voluminous elements landscape design. This version of the fence is more practical and economical, since you do not have to spend money on building materials.
In this article, you will learn how to make a fence on suburban area with your own hands using different types structures.
Preparing to install a fence in a summer cottage
For concreting fence supports, you will need garden and earthen drills, a level, a bayonet shovel, a drill, concrete mortar, wooden beam, fittings, roofing material, as well as plastic bags.
The first thing to do is to prepare for the installation of a fence in a summer cottage, that is, to clear the place where the supports will be installed. To do this, using bayonet shovel at the chosen place, you need to cut the sod, remove the roots and dig a hole 1.5 m deep.


You can also use a garden drill, then the size of the well will depend on its diameter. But in any case, it is necessary to drill as deep as possible - by 1.5-1.7 m, i.e., to the depth of soil freezing. It is better to remove the extracted soil immediately to a place previously designated for this. If the diameter of the garden auger is small, an earthen auger should be used.


Having drilled a well of the required depth, it is necessary to immerse the expander on the plow into it - a device with which an anchor extension is made at the bottom of the well. This expansion is done so that in frost the pillar-support is not pushed out of it, but remains in place.
Before you put up a fence with your own hands, you need to take care of isolation from groundwater. To do this, a tube is made of roofing material, on one end of which is put on plastic bag, and the structure is placed in a dug hole. To keep the tube in place, you can build a low formwork box from scraps of boards and install it above ground level. After that, you can start concreting the supports.
The next section of the article is devoted to how to make a fence foundation in the country with your own hands.
How to make the foundation of the fence in the country with your own hands (with photos and videos)
Before putting up a fence, in order to increase the stability and strength of the structure, metal supports are first driven into the ground, which are then concreted by pouring the mortar into the well. This method of concreting significantly increases the resistance to loosening of the fence by the wind and its deformation due to seasonal swelling of the soil. This method is called spot concreting.


There are other ways to provide the fence with a reliable foundation, for example, dry concreting, when the fence support post is immersed in the well, covered with a mixture of crushed stone and sand, and then filled with water for better adhesion. But a heavy or massive fence on such supports may not withstand heavy loads and will loosen over time. Therefore, this method of concreting supports can only be suitable for a light, elegant fence.

Under the fence, it can also be tape, and although this method is more expensive and time-consuming, it is nevertheless very reliable. Before you make a fence with your own hands, you first need to dig trenches. Their depth depends on the height of the fence: the higher the structure, the deeper the trenches must be and the heavier the underground part of the fence, otherwise it will collapse if made of logs or other heavy material. For example, if the height of the fence is 1.8 m, then the depth of the trench should be at least 0.5 m and plus another 20 cm for a sand cushion.

Then, according to the correct technology for installing the fence, concrete is poured or a base of crushed stone is laid. The concrete foundation needs to be brought out only to ground level or slightly higher, then the above-ground part will become the base of the fence. To build a fence with your own hands, when laying a stone tape, you need to select pieces of rock so that they fit one to another as closely as possible.
If there are voids between large stones, they must be filled with smaller pieces of stone. After the stones are laid out in this way, the foundation is cemented.
These photos show how to make the foundation of the fence with your own hands:


All methods of concreting ensure the stability of the structure, make it more durable and protect metal support pillars from corrosion.
During the melting of snow, due to the close standing of groundwater to the surface of the earth, the water level rises and pushes the structure up. Then the supporting column sticks out of the ground along with the concrete, which cracks. And this is perhaps the only drawback of this method of strengthening the supports, but it is extremely rare. Therefore, before starting work, it is necessary to find out how close to the surface of the earth there are groundwater in a given area.
Watch the video on how to make the foundation of the fence with your own hands, observing all the technological rules:
Do-it-yourself chain-link fence installation technology
Chain-link mesh is considered one of the most popular types of metal fencing. This structure is inexpensive, easy to install and at the same time very durable.


The chain-link mesh, unfortunately, cannot hide the site from prying eyes, but in some suburban communities such a through fence between the sites is required. Where this is not necessary, a way out can be found by planting shrubs along the fence or climbing plants. They will create a green fence and help hide from prying eyes, and in addition, they will protect the site from wind and dust.
Before you install such a fence correctly, keep in mind that there are several types of chain-link mesh - black, galvanized and with polymer coated. The black chain-link is the cheapest and easiest way to protect the site. This mesh looks quite decent, and you can paint it once every 3-4 years. Galvanized mesh does not need to be painted at all, it will last a long time, but it costs a little more. Polymer coated mesh is the most expensive, but also looks expensive. Usually such a grid is green and goes well with the greenery on the site without spoiling its general appearance. In addition, you can buy this type of mesh complete with support poles, a tension device and ready-made wickets and gates.


Installing a chain-link fence on the site yourself, as practice shows, is not difficult at all. First you need to take all the necessary measurements (the perimeter of the site), then purchase the material. The chain-link is sold in rolls, you only need to measure the mesh of the desired length from the roll. Next you need galvanized iron pipes 70 mm diameter for supporting posts. To install the corner support pillars, metal supports are additionally used (two for each pillar).

To install such a fence with your own hands, you will also need intermediate poles (iron or wooden) with a diameter of 30-35 mm, a wire rod with a cross section of 3 mm and a length equal to the length of the fence, plus a small margin for attaching to the supporting poles. In addition, you will need bolts with a large eye for the screed, knitting wire with a cross section of 2 mm, as well as concrete mortar for pouring poles.

Before you install a chain-link fence with your own hands, you need to mark the fence, mark the contours of the pits for installing supporting and intermediate pillars. Typically, support poles are installed every 8-10 m, and the distance between intermediate ones is approximately 3 m.

Then pits are dug for supporting pillars with a depth of 0.6-0.7 m. For intermediate pillars, it is enough that the depth of the pit is 0.4 m. Not very deep pits are also dug for supports of corner pillars.

After that, the pillars are installed, the side supports are attached to the corner ones. In each tension pole with a drill, you need to do 2-3 through holes, through which transverse veins of wire rod will be stretched.

The next step in installing a chain-link fence on the site is to check how even the support pillars are, moisten the earth in the pits and fill them with concrete. Concrete must be poured into the pits up to half, and the rest must be filled with earth. concrete mortar will harden in a day, then it will be possible to continue work.

Insert one tie bolt into each hole drilled in the corner support posts and fasten them with nuts, and then pull the transverse veins of wire rod. First, the lower vein is pulled - one end of the wire is fixed in the ear of the first tie bolt, then it is strongly pulled, drawn to the next corner post and fixed in the second tie bolt, etc. The ends of all veins must be very tightly twisted. Veins can be tied to intermediate posts with soft wire. If wooden intermediate posts are used, then the veins can be attached to them using staples that are easily driven into the wood.

Having pulled all the veins, the chain-link mesh itself is attached to them. In accordance with the correct installation technology for such a fence, it must be fixed at regular intervals with soft wire. The edges of the net on the supporting extreme posts should be fixed with soft wire, wrapping it several times around the post and capturing the edges of the net.
After you have installed the fence, you can proceed to the device of the gate and gate.
Installing simple fences with your own hands (with video)
A wire fence is the simplest and cheapest type of fence you can install yourself. The wire fence allows you to exactly repeat the terrain, which is especially important for areas with difficult terrain. But over time, such a fence can sag, and gaps form, especially if the wire is not initially stretched very tightly. Such a fence will not look very beautiful, so it is important to do everything correctly and efficiently from the very beginning.
First, just as when pulling the chain-link mesh, the supporting and intermediate pillars are installed and concreted, and then the wire is attached to them in parallel rows. The distance between the rows of wire should be 20-25 cm.
As shown in the photo, when installing such a fence with your own hands, you need to stretch the wire and fasten it to the posts very strongly so that it does not sag:


For greater strength of such a fence, intermediate vertical wire broaches are sometimes made, which are fastened with horizontal rows of soft wire.
Sectional fences make the job much easier, as they are manufactured in the factory and sold in ready-made sections. As with the previous methods of work, support poles are first installed, to which they are then attached with screws or finished sections are welded.


The sectional fence serves for a very long time, in addition, it does not require special care - the metal spans of such a fence can be painted once every 3-4 years. Such a fence gives the site a refined and complete look, only its cost can confuse. Therefore, if the site is very large, you should think about how much such a fence will cost, and maybe choose something simpler.
This video shows how to put up the simplest fence with your own hands:
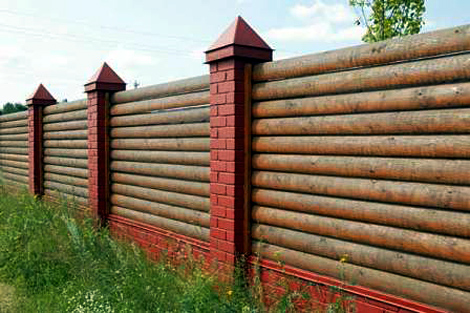
How to make beautiful forged and log fences with your own hands (with video)
Like sectional fencing, wrought iron fences took worthy place among other types of garden fences. They are very expensive, but once spent on such a fence, in the future you can avoid extra hassle. As they say, this is a fence for life, not to mention the fact that it looks flawless and majestic, complementing general form site. Such a beautiful fence is installed with your own hands in the same way as the fences described above, only to install the supporting pillars you will need to dig deeper holes so that the heavy fence does not collapse during operation. To strengthen the structure, you can even dig trenches under the strip foundation, especially if the fence is high enough.


log fence on modern site- this is both reliable protection, and environmental friendliness, and excellent design decision. The type of such a fence can be different, it all depends on your own preferences and capabilities. To make a beautiful fence with your own hands, logs or hewn boards can be installed vertically, like a palisade, or horizontally, close or at intervals. You can also make an elegant curly fence. Each option has its pros and cons.
In any case, before the construction of the fence, logs and other wooden details must be treated with antiseptics.

If, when installing a fence in a country house with your own hands, the logs are placed vertically, they are traditionally buried in the ground or poured with a strip foundation. It is also possible to install logs on a transverse beam raised above the ground, which, in turn, must be fastened at the ends to the supporting pillars that divide the entire structure into sections. In the latter case, it becomes possible to dream up, for example, to supplement the fence with a stone plinth, on which logs will then be laid out, or to make a foundation of red or white brick, dividing it into sections with pillars also made of bricks.

A significant disadvantage of log fences is that the logs dug into the ground sooner or later begin to rot, so the lower part of the logs has to be carefully processed. When pouring logs with concrete, also in order to protect the logs from decay, it is necessary to make a high strip foundation. All this means additional consumption of materials. The most profitable option in this case would be a fence with horizontally laid logs on a stone base. Such a fence will look beautiful, and can be kept in good condition for a long time.
If you want to protect against the penetration of strangers on the site, you need to build a very high fence. If a decorative fence is planned, then the fence may well be of any height in the style of a ranch.
As shown in the photo, for a beautiful log fence erected by one's own hands, it is better to use rounded logs:


Although this material is more expensive, it will allow you to better fit individual parts. Therefore, a finished fence made of horizontal or vertical logs will look more neat and sound.
In addition, snow does not accumulate between rows of horizontally laid and perfectly fitted logs, which means that during the thaw there will be less dampness at the joints. And the main thing is that such processed logs no longer require additional finishing.
When installing a vertical log fence, they dig a trench, the depth of which depends on the height of the fence, and put support pillars with concrete pouring or cement tape. Pillars between sections can be stone, brick or metal pipe large section.
See a photo of how to make a beautiful log fence with your own hands:


When using stone or brick support pillars, a profile must necessarily pass in their central part, to which thick metal rods are then welded. They must be welded horizontally, so that they come out of the masonry and fall on the central axis of the logs laid later.
In accordance with this, at the ends of the logs, it is necessary to make a hole for the rod on one side and cut it to the length of the radius on the other. When laying the log on one rod will be mounted, and on the other it will move from top to bottom.
To protect the logs from moisture and prevent their rotation, it is recommended to coat the joints with resin or mastic during the laying process.
The next section of the article is devoted to how to properly install a reinforced concrete fence in the country.
How to build a reinforced concrete fence in the country with your own hands (with video)
Reinforced concrete fences are both reliable and elegant, and even decorative thanks to modern production reinforced concrete products. They have a lot of advantages, but there are a few things to keep in mind when using them.


Reinforced concrete fence provides maximum protection. This is a very strong and impressive structure that allows you to protect a site of any size - both small and huge, with both simple and complex terrain. There are movable types of fences, which, if necessary, are easily disassembled and assembled, there are also those with which you can create intricate shapes and figures. There are also decorative fences from concrete, which have a variety of textures, colors and other decorative elements.
The fence made of reinforced concrete is heat and moisture resistant. It withstands any temperature fluctuations, which greatly increases its service life, is easy to install and does not require special knowledge and skills.
However, this type of fence has its drawbacks - for example, they are very heavy, which complicates their transportation and installation. But even with these disadvantages, a reinforced concrete fence allows, after all the troubles associated with its installation, to forget about it for many years.


There are two types of reinforced concrete fences - prefabricated and independent. Prefabricated are mounted in specially made concrete cups, where support pillars are first installed. Self-supporting fences are installed on a special platform, which is connected to the base of the fence slab itself.


To make a reinforced concrete fence the way it suggests right technology, it is necessary to mark its contours on the site. Then it will only be necessary to deliver the blocks to the intended places of their installation. And this will require a crane with a lifting capacity of 3-4 tons, a cable of the appropriate carrying capacity, a hammer-sledgehammer and scrap. After the blocks are placed around the perimeter, you can proceed with their installation on site.
To build a reinforced concrete fence in the country with your own hands, depending on the total mass finished product, special support pillars and a special foundation are used. A strip or pile concrete foundation is usually used.
A relatively light fence can be installed on a pile foundation. These fences include products made of concrete grade M100-M200.
Under installation on garden plot a fence made of concrete grade M150-M250 will require a strip foundation, on which the entire fence structure will rest. The brand of concrete M250-M350 indicates the presence of reinforcing elements in monolithic slabs. These are slabs top quality, respectively, and their mass is greater.


There are decorative plates that imitate brick, stone, wood, etc. They can be smooth or embossed, deaf or through, including metal sections. The possibility of dyeing also allows you to get an original and attractive finished product.


Such structures can be made to order, choosing at will the type, shape, and size of the sections. Thus, it is possible to purchase exactly the product that will fully satisfy the needs of the customer. In this case, it all depends on financial capabilities, but by spending money on fence material, you can save on its installation.
To build a reinforced concrete fence with your own hands correctly, watch this video:
How to put a corrugated fence on the site with your own hands (with video)
Another popular material for building a fence is corrugated board. It is inexpensive, but it looks quite presentable and can last long enough without requiring additional care. The main advantage of corrugated board is the ease of building a fence using it.
First, as in all other cases, it is necessary to measure the perimeter of the site, and hence the length of the fence, in order to determine the required number of sheets of corrugated board and additional materials. This will depend on the design of the fence and your own preferences. Metal supports dug deep into the ground are taken as the basis.


Sheets of corrugated board can be mounted on logs from a profile pipe. This construction option will be the easiest and cheapest. If the supporting pillars are made of brick, concrete or other material, then more time and money will have to be spent on the construction of the fence.
For steel supports, profile pipes with a cross section of 40 x 25 mm should be used, while corrugated sheets can be up to 2 m high.
Before you put such a fence on the site, you need to correctly calculate the amount of material. This is done as follows: the length of the fence is divided by 3 (by the number of pillars) and multiplied by 2 (by the number profile pipes). The pillars must be installed at a distance of 2.5-3 m from each other, at least two profile pipes are required for fastening metal sheets. This is a standard calculation, but the numbers can be adjusted at your own discretion.
The required number of sheets of corrugated board depends on their width, while it should be borne in mind that it is better to fasten the sheets vertically.
Before installing the fence yourself, watch the instructional video:
When everything you need is bought at a warehouse or a building materials market and delivered to the site, you can begin preparatory work - clearing the work site, leveling the ground, marking holes for poles. You can, of course, just drive the pillars into the ground to a depth of 1-1.2 m, but this is not at all easy, so it is better to dig holes and concrete the pillars in them. It is important that they stand even after the concrete has hardened, otherwise the fence will look lopsided.


When the concrete hardens, logs from small shaped pipes are welded to the support pillars. Pipes should be welded to the posts in two rows, although the number of rows may vary at one's own discretion.
The first line of lags should pass at a height of 25 cm from the ground, the second - at the same distance from the top edge of the fence. You can mark the attachment points directly on the sheets of corrugated board.


Now you can attach the steel sheets to the base. It is recommended to do this with the help of roofing screws, which easily enter the material and hold the corrugated board very tightly. If somewhere the sheets do not fit in width into the perimeter of the fence as an integer, they will have to be cut. It is better to do this on the hollows of the corrugated sheet and at a distance of at least 0.5 m from the edge, although this largely depends on the width and thickness of the sheet.
The corrugated board should be fixed as tightly as possible so that there is no free play between the sheets, otherwise in windy weather they will behave like sails.
To prevent water from entering the support pillars, it is advisable to weld metal visors to them. This completes the hard work of building the fence, it remains only to paint the posts and logs.


Fences made of wood and metal need protection from moisture. To prevent possible decay of wooden structures, you can treat them with creosote. This reliable means protection, but it should be borne in mind that creosote stains the surface in a brick color. Perhaps this is just what is required for harmonious combination architectural elements throughout the site. Otherwise, it is better to choose another tool. In addition, the surface of the product previously covered with creosote cannot be repainted in the future, since creosote always shows through any paint.
Metal structures can be protected from rust by painting with a special paint for metal.
This video demonstrates how to properly install a corrugated fence:
Painting after installing a fence in the garden
For each material used in the building, the most suitable coloring agent must be used.
There are a lot of types of paints and varnishes, so we will consider only the most popular ones that are suitable for the previously described materials for fences.


After installation, do-it-yourself painting of the fence is done with a brush, spray gun or paint roller. It is not difficult to paint a wrought iron fence, which cannot be said about a chain-link mesh, and the smaller its cells, the more difficult it will be to paint over them. mesh fence it is best to paint with a brush. The paint roller is suitable for painting solid surfaces - for example, metal sheets, solid sections or a solid wooden fence. A spray gun is also not suitable for painting through structures, since most of the paint will be wasted. This fixture is suitable for painting large parts or a solid fence.


Wooden fences are most susceptible to rot and mold, so they need constant careful maintenance. To protect them, coating and glazing antiseptics are used, as well as acrylate and oil paint.
Antiseptics penetrate deep into the wood and help protect it from destructive external influences.
Covering opaque materials allow you to completely hide the texture of wood, preserving only its relief.
Glazing materials are translucent, so they allow you to preserve the texture of wood, only giving it a light shade. Their service life is 3-5 years.
Oil paint penetrates deep into the wood and serves as reliable protection from atmospheric phenomena, but it dries slowly and burns out over time. Service life - 5-7 years.
Watch a video of painting a wooden fence built by yourself:
Acrylate paint protects wood well from dampness and mold, retains shine and color longer than oil paint. In addition, it is vapor-permeable, that is, it allows the tree to breathe and has a pleasant elasticity. Service life - 7-9 years.
The surface of metal and slate before painting must be cleaned with sandpaper, removing roughness, rust or old peeling paint.


For coloring metal structures a paint capable of protecting the surface from corrosion should be used first of all. There are a number of anti-corrosion paints and enamels that help preserve metal structures. Even if rust appears on the metal, this can be dealt with by using a special “converter” paint designed to cover the corroded areas.
To cover metal structures, epoxy, rubber, organosilicon, polyvinyl chloride, alkyd and traditional coatings are used. oil paints. In addition, special varnishes are used - asphalt, bituminous and pitch. Their only drawback is the black color.
It is customary to paint galvanized and aluminum fences with dispersion paint. The service life of such a coating is 5 years.
Slate fences are considered the lowest budget ones. They are often installed for temporary fencing of the site, although after painting, such fences acquire a more aesthetic appearance and look quite decent. For slate there is special paint both foreign and domestic production, which protects it from the appearance of moss and lichen on it. You can apply paint to the surface with a regular brush, spray gun or roller. Its service life is 8 years.
How is the painting of slate or metal fence after installation with your own hands, it is shown in this video:


