Shelves in the nursery made of plasterboard. Step-by-step instructions for assembling a plasterboard shelf on the wall. Instructions for making a drywall shelf
The direct purpose of plasterboard is covering ceilings and walls. This material is so pliable to work with that it is also used for organizing internal space. It is perfect for constructing partitions and various structures that can successfully replace massive furniture. Today we will try to describe in as much detail as possible how to make plasterboard shelves with your own hands that are durable, neat and beautiful, and with their help get a completely exclusive room design.
What should you consider before creating?
Before you begin calculations and installation of the shelf, you need to focus on several important points.

Make durable shelves that will delight you long years This is only possible if you take into account these small subtleties.
We make calculations before installing plasterboard shelves
On initial stage you need to think through the design of the shelves on the wall, imagine the end result in detail, and only then start making calculations. Start by drawing up a diagram future design. Don’t be afraid to show your imagination - with the help of arched plasterboard you can create the most incredible designs and bends, so the shelf can have any shape. Only after drawing up a detailed project with application exact dimensions you can start making calculations. For work you may need following tools and materials:
- Load-bearing profiles. Even if it is initially assumed that the shelf will have more of a decorative function, it is still better to choose a more durable profile.
- Guide profiles. They are designed to form the “skeleton” of a shelving unit or other structure. Here, too, it is better to choose a more durable option.
- An arched profile may come in handy. It is distinguished by the presence of cuts that allow it to be easily bent to give the desired shape. Alternatively, you can use a regular profile and make the cuts yourself.
- Regular or moisture resistant drywall depending on the humidity of the room.
- Self-tapping screws and dowels.
- Liquid primer.
- Mounting grid.
- Level, plumb line, plane and screwdriver.
- Spatula, brush, sandpaper.
- Tape measure, knife and metal scissors.
After drawing up a sketch and purchasing everything you need, you can begin assembling a frame for plasterboard shelves, which can be mounted in two ways: externally (on already finished wall) or internal (during the assembly of the partition). Here, too, you need to follow some rules. 
- Take careful measurements and place marks on the wall. In this case, it is better to use a level so that the shelves turn out smooth and beautiful.
- The frame must be secured using self-tapping screws and a screwdriver. The distance between the screws should not be more than 25 cm. The greater the load the shelf must withstand, the smaller this distance should be.
- After securing load-bearing profile proceed to the installation of guides that create the volume of the structure. Strengthening the frame is achieved by attaching the guides to the ceiling, floor and connecting them with a jumper profile.
Installation of built-in lamps
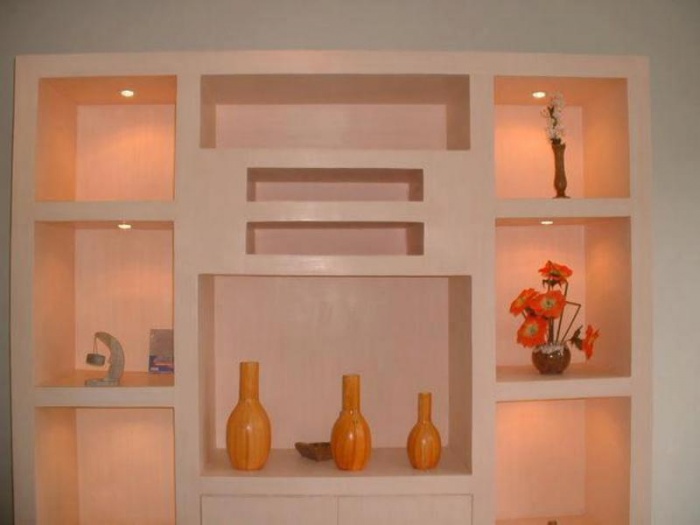
By making a plasterboard shelf with your own hands, you can create a unique project. For example, supplement it with lighting. This will give the design an attractive, stylish look and will become an additional source of light in the room.
All you need to install the lamp is a drill and a special round bit for cutting a hole.

The wiring must be done in advance, even before the sheathing, by hiding the wires in a protective corrugation. Instead of spotlights can be used LED strip, which, due to its flexibility, is perfect for shelves with curves.
Plasterboard covering and finishing
Installing drywall is much simpler than the extensive work already done to build the shelf frame. Before sheathing, you need to cut the sheets into parts. All dimensions are transferred to the material, a cut is made on one side, the sheet is bent and only after that the second layer of cardboard is cut.

All irregularities at the ends must be sanded. After this, you can begin installing the sheets using spacer dowels. The end part can be covered with a single sheet, having previously cut “windows” in it, or individual small parts can be used. The second method is simpler, but you need to be careful not to create too many joints.
If you want your DIY wall shelves to be perfectly smooth and neat, then pay Special attention processing of joints. They need to be sanded, apply a layer gypsum putty, cover with reinforcing mesh and repeat the treatment with putty. To strengthen and make the structure more aesthetically pleasing, the corners can be covered with putty corners made of aluminum or plastic.
The final touch - finishing putty. It is made in several layers and rubbed with sandpaper. Before painting or other finishing works finished shelves must be primed.
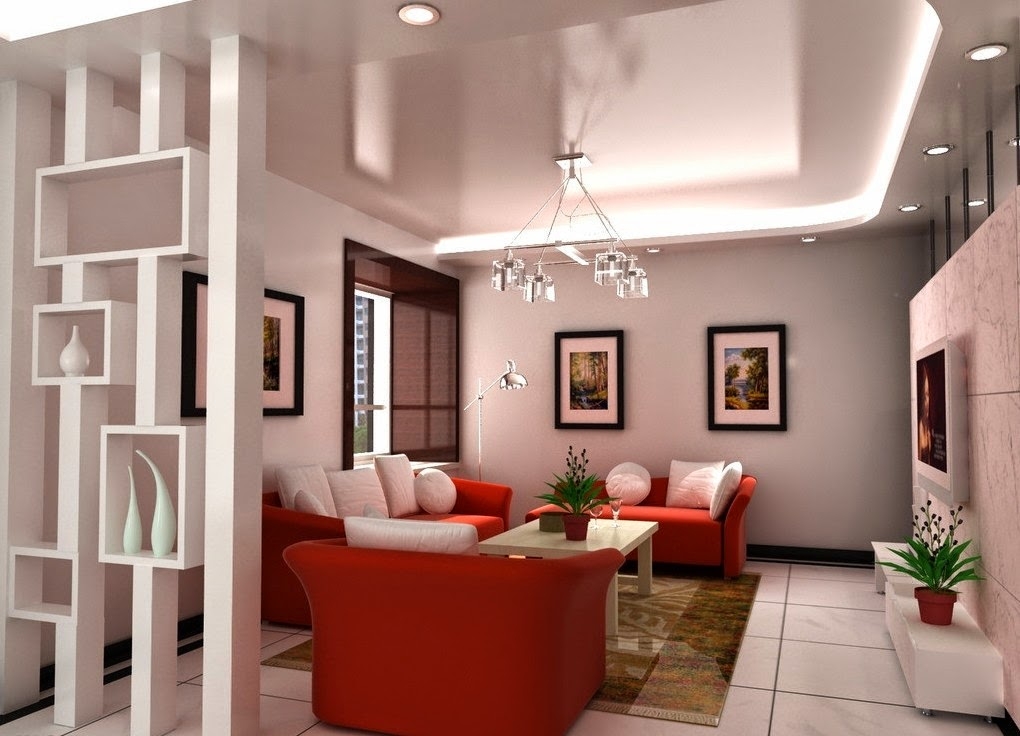
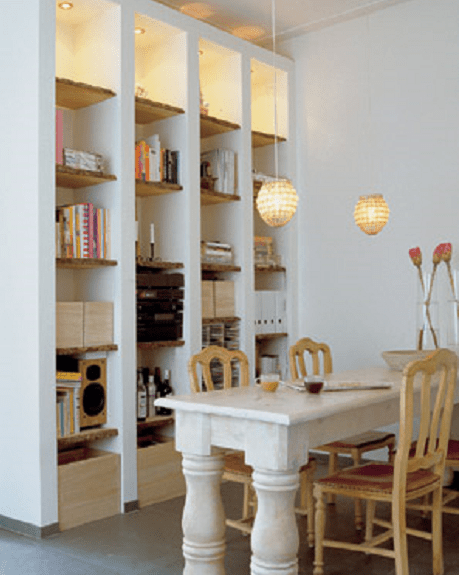
Using drywall, you can make a shelf for flowers or decorative items, as well as for more massive things - books, household utensils, TV. Depending on the style of the interior, the finished structure can be painted, covered with wallpaper, or any other finishing materials can be used.
The shelf can be of any design, but if you have not encountered such work before, then it is better to go “from simple to complex.” To give you a better idea of what plasterboard shelves can be like, we suggest looking at a few photos with examples.


In this article, we tried to explain to you in detail how to make a plasterboard shelf with your own hands. Shelving and partitions with decorative niches have recently become increasingly popular for two reasons simple reasons– originality and low cost of design. All you need is basic skills in working with drywall and a little imagination. Many designers consider shelves made from this material to be the most modern and good decision. What do you think?
To store things and various decorative items, there are different cabinets, special modules, chests of drawers, shelves and the like. That's what we'll talk about shelves in this article. Even a small family living in a house or apartment needs to place their belongings, dishes, interior items, and the like.
There are different storage modules for this, but there are always not enough of them. This problem can be solved by purchasing furniture for storage, but not everyone has enough space to place, for example, a wardrobe or chest of drawers. Therefore, many people decide to order furniture by custom sizes for their premises, but such a service is expensive.
A sheet of plasterboard can be from 2 to 4.5 meters long, and its width can be from 1.2 to 1.3 meters.
The thickness of the drywall should not go beyond the permissible limit, and this limit ranges from 6 to 24 millimeters.
These characteristics allow you to select required size sheet, will be designed for different loads.
The design and functionality of the shelf in the future depends on the choice of drywall.
Installation of plasterboard shelves
We begin installation of the frame. To construct plasterboard shelves, a UD profile is used; it is not wide.
Due to the fact that the profile is not heavy, the resulting structures are not bulky and light.
First you need to measure the distance where the plasterboard shelf will be.
After you take the measurements, you need to attach the profile to the wall using a level. The profile is nailed using 6×40 metal dowels, and nylon dowels can also be used as fastening.
You need to remember that you need to strengthen the frame of the shelves so that the structure is strong and reliable.
After metal structure ready, then proceed to .
This work is considered not as difficult as installing metal profiles. Attach sheets of drywall to metal or nylon screws. The size of the screws is twenty-five millimeters.
Sheathing a metal frame is not difficult, but you should make sure that its sheets are not skewed, otherwise this can lead to fragility of the shelf. At all stages of the construction of shelves, it is necessary to compare all design parameters with the drawing, and to avoid distortions of the drywall sheets, it is necessary to use a level.
The also illuminated one is still an additional source of lighting. can have any light and any intensity, and it depends on your idea or the designer’s idea.
To install the lamps on the shelf, you will need the following tools:
- Round crown for cutting holes;
The diameter of the crown depends on the size of the lamp. Determine the location for the lamp in advance.
 Installing the lamp is not difficult, but you will have to work hard with the wiring. If you do not have skills, then it is better to use the services of a professional.
You can also install an LED strip to illuminate the shelf, because it can be laid anywhere, even in hard to reach places. This strip illuminates the shelves evenly and can serve as a full-fledged lighting source.
LED strip has a wide range of colors and has energy-saving properties.
Finishing work
The final work on the construction of a plasterboard shelf is putty and further decoration.
Before  Once you start decorating the shelf, you need to fasten the shelves together with metal and plastic corners.
- The inner corners of the shelf are glued reinforced mesh to avoid cracks in the future.
- Then the shelf is puttied and the putty is applied in a number of layers.
- If the shelf will be painted a different color in the future, its surface must be sanded and then primed.
 You can see the options for finished shelves in the photographs on the Internet.
The idea of creating shelves from plasterboard arises approximately simultaneously with the thought of using this building material for wall covering. Indeed, why not create several shelves where you could store books, keys, paintings, figurines and other “small things”. Although when the right approach Such shelves can also be used for more bulky things, such as a monitor, microwave or TV. In any case, a plasterboard wall with shelves will help solve the problem of storing many things or simply decorate the apartment.
When the frame is ready and securely attached to the wall, you can begin covering it. This is done very simply and does not cause such difficulties as in the case of creating a frame. First, a sheet of drywall needs to be cut to the existing dimensions. It is necessary to calculate everything in advance so that the minimum number of sheets for covering is used. Shelves made of plasterboard will be perfectly flat if the cutting is done carefully so that the edges do not crumble.
To prevent the screws from falling into the plaster during fastening due to the high force exerted on the screwdriver, you can use a special bit. It's about about a bit with a limiter, which will rest against a sheet of drywall just so that the head of the screw goes to the required depth, flush.
To attach gypsum boards to the profile, 3.5 mm self-tapping screws are used. In this case, the fastening step can be the standard 15-20 cm. As for the length of the fastening, the point is ambiguous. It is generally accepted that the length of the self-tapping screw in this case should not exceed 25 mm. However, for those who are working with gypsum plasterboard for the first time, it is better to take longer self-tapping screws (35 mm), although they are more expensive. The fact is that self-tapping screws can bend the profile and move the plasterboard sheet away from it. This often happens to inexperienced workers who have not yet gotten the hang of working with drywall. Because of this, the minimum fastener length may not be sufficient.
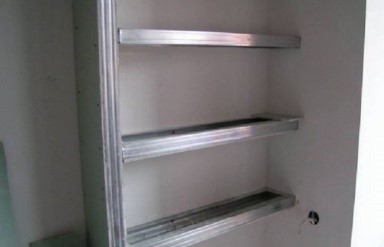
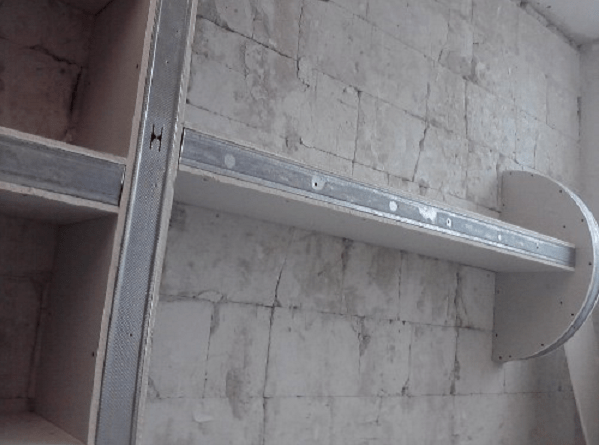
 By cutting the profile correctly, you can use it alone to create a frame for a shelf
  Sheath the frame from the top, bottom, and then from the sides
  The finished shelf can easily support a lot of weight
 By the way, for those same beginners, it is better to screw in the screws one after another, and not in different places to attach the sheet faster. If you drill them sequentially, then there is less chance that the profile will be pressed through, because next door there is already a fastener that holds it.
Finish coating of the finished shelf
How to finish a plasterboard shelf? For this purpose the most can go different materials, but most often they use paint and wallpaper. Working with wallpaper is very difficult and takes a long time. It will take a lot of nerves, but you may not achieve results. Although if you trim and hide everything correctly, it will turn out very beautiful. Moreover, the wallpaper will also hide drywall cracks if they arise. Wallpaper is usually used for painting.
 If you paint the shelves right away, you will need water-based paint. If you use thick paint, you can create streaks on the top of the shelf with a brush, creating unique patterns. In any case, before painting plasterboard shelves, they need to be prepared. To do this, all joints and screw heads are puttied. At the joints of the gypsum boards, you need to create a right angle, because problems with leveling the surface often arise there. It is the putty that will help make the shelves completely even, and not just top and bottom.
To make the edges more durable, paint corners are used, which are attached with putty. You can coat the edges with putty and then press in the corner. It will stick like that. If the shelves are arched, then the painting corner will not hold on so easily; it will have to be secured with a stapler, and then putty. This technique will allow you to get absolutely even shelves, ready for the further finishing layer. Their edges will become strong and will not crumble in the event of an accidental impact. After the putty has dried, you will need to sand it using sandpaper. The surface will come out completely smooth.
Check out examples of plasterboard shelves that you can make yourself.

Do-it-yourself corner shelves made of plasterboard are a chance to properly and rationally use the space in the room. Of course, you can invite a drywall specialist to assemble the structure. But the process is not too complicated, so there is an opportunity to save family budget and carry out the entire process yourself.  An example of designing corner shelves made of plasterboard. Reasons for self-assembly:
- easy installation process;
- budget savings;
- gaining new skills.
Everyone will be able to decide for themselves whether the shelf will be assembled by a drywall master or with their own hands. If you definitely decide to do this design on your own, you need to study the whole process in detail and prepare for work.  Design option for corner shelves made of plasterboard
At different stages of work, materials and materials will be required. The raw materials must be carefully prepared so that the process can proceed without interruption.
| Work stage | Tools and materials |
| Drawing up a drawing diagram | Paper. Pencil or pen. Ruler or tape measure. |
| Surface marking | Plumb or level. Laser pointer for measuring differences. Corner for marking profile joints. Pencil or marker. |
| Assembly and installation of the frame | Profiles (guides) for complex structures that carry a large load will also be required. selected diameter. Screws and screwdriver. You need to buy a knife or metal scissors. |
| GKL sheathing | Plasterboard sheets of selected diameter. Drywall knife. Screwdriver and screws (self-tapping screws). |
| Putty (dry, which needs to be dissolved or ready mix). Special for sealing joints. Putty knife. Sandpaper for smoothing out uneven surfaces. |
|
| Finishing | Dye. . . Putty knife. Glue. |
Having acquired all the above materials and tools, the process of creating corner shelves will be easy and quick.
Step-by-step instruction
To ensure that the process of assembling and attaching the corner shelves goes smoothly, you should proceed in the correct order. The order of work for manual assembly is as follows:


You should not deviate from the rules of consistency so that the corner shelf turns out beautiful and gives harmony and comfort to the space.
Create a drawing
It is necessary to draw a drawing, especially if corner shelving is being made. You can draw a diagram of the future shelf with your own hands, or you can print out photos from programs in which designs for plasterboard structures are created. Anyway corner shelves
- from plasterboard in the kitchen, bedroom, nursery or living room, it must be done according to the scheme, because:
- this will allow you to avoid errors during the installation of shelves;
- will help to make the most accurate shape of the structure;
Using the diagrams, you can create the most unusual corner shelves made of plasterboard, which will decorate and transform the interior of the premises.
Read also

Assembling a plasterboard TV stand
Surface marking
The main thing when drawing up a diagram is to strictly adhere to the measurements taken in advance.
In order for the corner niche to clearly fit into the interior and adhere to the wall, you need to correctly mark the surface. To do this, you need to put marks on the wall in those places where you plan to install a plasterboard niche. You will need to measure the differences in wall height to fix the shelf in the right place. Progress and innovations in the construction industry force us to use increasingly cheaper and safer materials in apartment construction, sometimes using a completely unexpected approach. Let us recall, for example, the buildings of the 50s of the last century - solid wood panels, timber, boards, ceramic and sand-lime brick particle board, fiberboard, alabaster blocks. Now the time has come for plasterboard sheets, metal profiles and all kinds of structures made from them. Why not try making your own plasterboard shelves.
As a material for homemade products, gypsum board is quite suitable for plasterboard shelves, despite its apparent fragility. Among the closest competitors are plywood, panels made of solid wood, particle boards and fiber boards, gypsum board sheets have lower specific strength and require increased accuracy in work.
But its main advantages are:
- The plasterboard sheet maintains an ideal surface plane and dimensional stability over a long service life;
- The price of gypsum plasterboard is significantly less than a sheet of plywood or OSB of equal area, not to mention solid wood;
- The material can be perfectly cut, drilled, puttied, painted, sanded, and at the same time is absolutely harmless to human health.
At the same time, working with the material, even in the case easy to manufacture DIY plasterboard shelves require the worker to think through the design in advance so that when assembled the shelf can withstand the planned load.
Important ! Techniques for processing drywall sheets are fundamentally different from processing wood or OSB. If you don’t have enough experience working with gypsum boards, rehearse any problematic operation using scraps or waste.
Which plasterboard shelf design should you prefer?
If you have certain skills, you can make more than just a shelf or stand from plasterboard. You can easily assemble the most intricate designs from it, as is easily demonstrated by the photo of do-it-yourself plasterboard shelves.
The main principle of constructing plasterboard shelves
In wooden or plastic products shelf material of the product usually provides decorative surface structure and works as a solid foundation, absorbing all the loads from things or objects located on the shelf.
WITH plasterboard sheet you can do the same, but the strength of a single sheet of drywall, even 18mm thick, may not be enough. In this case, the shelf is made of two sheets, and if the length of the product exceeds a meter, it is even possible to use a plywood or wooden insert. For a small decorative shelf of 40-50cm for a vase or a dozen books, a single sheet of plasterboard 12-15mm thick can be used. The shelf must be secured along the entire line of contact between the sheet and the walls using self-tapping screws, but appearance such a shelf does not cause much enthusiasm due to the difficulties in processing the end edges.
Advice ! Even for small, cantilevered shelves, use the frame design of the product. This will ensure its strength under any form of loading.
The separation principle is always used in plasterboard structures:
- The plasterboard sheet only provides decorative functions, the gypsum board’s own strength is sufficient only to resist loads directed parallel to the plane of the sheet. All other forces must be transferred to the reinforcing system from wooden slats or metal profile.
- GCR is always attached to a solid frame base using self-tapping screws or glue. Exactly frame construction will ensure the lightness and strength of the product - shelf, cabinet or wall.
This makes working with drywall much easier. Myself metallic profile for the frame, the shelf is made of thin sheet galvanized metal, easily cut with metal scissors, bent and curved in the most intricate ways.
Options for plasterboard shelves

Thanks to the wide range of reinforcing profiles, you can quite simply select and assemble the shelf frame on your own:
- corner shelf made of plasterboard, several options possible, combined into one small project;
- a very practical plasterboard shelf for a TV.

Among the many options, you should choose a scheme with a minimum number of joints and connections.
Important ! When working with drywall, a layer of fine alabaster dust is formed, even with certain guarantees of the safety of the material, try to remove waste and calcium sulfate shavings more often with a vacuum cleaner or a damp sponge.
The sequence of making shelves with your own hands
Most often, the corner areas of the premises remain free in the house, so to give a more sophisticated look or for utilitarian reasons, you can always make several shelves on the wall from plasterboard with your own hands.

For work we use a sheet of plasterboard, a 25x50 metal profile, putty for sealing seams and gypsum-metal fastening screws.
Unlike wood or metal, where the product is manufactured separately and then hung on the wall, when using plasterboard, the shelf structure is formed as a single unit, with supports, load-bearing frame and wall mounting.
Determining dimensions and connecting points
On the wall, draw with a pencil the attachment points, the length of the load-bearing surface of the shelves and the connection points of the frame elements. After that, fragments of wall mounting are cut out of the profile and secured according to the markings with self-tapping screws.

Installation of vertical racks
Next, the vertical profile posts are “sewn” along the edges of the shelves. Using a building level and a plumb line, we carefully align the horizontal and vertical positions of the external frame elements of each shelf. We sew up the vertical support post on both sides with sheets of plasterboard, cut to the size of the opening with a small allowance for processing of 1-2mm.

Installation of drywall sheets
Along the leveled horizons of the shelves, we cut out the remaining sections of the frame and secure them in the structure. We sew up the planes of the shelves with sheets of plasterboard, first the lower horizontal surface, then the upper.
Advice! Drywall sheets for the upper plane of the shelf can be cut a couple of centimeters larger, this will allow using ceiling plinth execute additional decoration end surface of the shelf.
After sticking the decor, carefully putty all the cracks and joints in the structure, and after drying, sand the surface for painting with water-based paint.

This method is universal and makes it easy to produce the most simple shelves from plasterboard in the bathroom.

After some practice, a complex but attractive version of a plasterboard shelf in the bedroom is quite possible.

Features of constructing a frame for the load-bearing structure of the shelf
As you can see above, working with drywall does not present any particular difficulties for neat and thoughtful people. The construction of even the most complex shelves or cabinets is more reminiscent of the “Lego principle”, and even a novice master can do it. But for professional work With shelves or partitions, there are a few things to consider.

Drywall sheets cut into thin strips are prone to breaking even under light load. Therefore, when starting any dizzying project, avoid using thin and long strips of material to cover the frame. For example, a piece of gypsum board with an aspect ratio of 1:5 or more is almost guaranteed to burst either when fastening it to the frame, or under load, after all the work is completed.
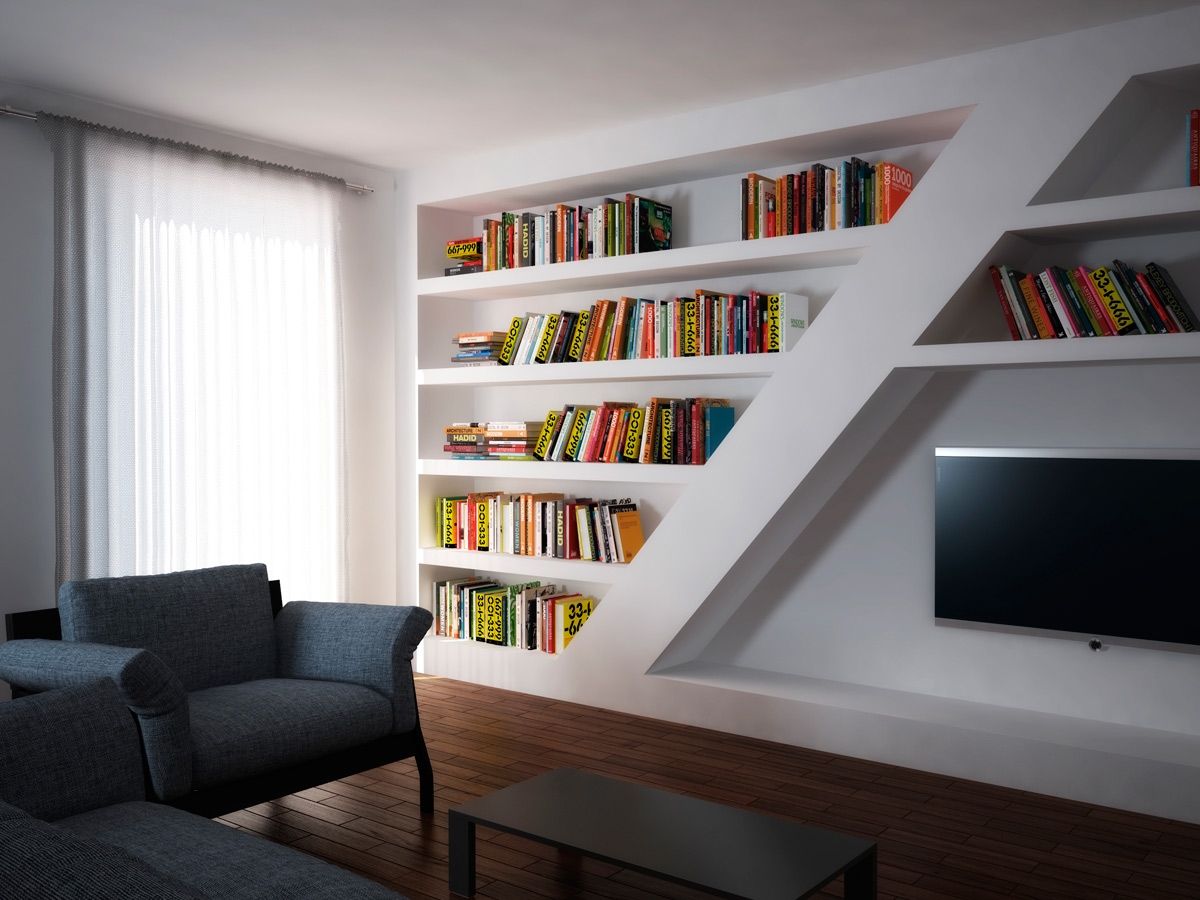
The thickness of the frame elements is commensurate with the overall dimensions of the structure. An example is a very competent construction of the size of the windows and the thickness of the racks of a plasterboard shelf for a TV. Thanks to optimal thickness vertical and horizontal partitions, this design is highly stable and will withstand significant loads.

Most difficult option, from the point of view of fastening, can be considered the installation of a single shelf on the wall without the use of additional support posts. Often, to ensure the longitudinal and vertical stability of the shelves, additional side canopies are installed. If you show some imagination, they will not only not spoil the appearance of the shelf, but will also give it a more attractive look.
As a rule, a structure made of plasterboard is heavier than one made of wood board or plastic, so you should use the maximum number of attachment points to hang it on the wall. If you need to fix the shelf on a wall lined with plasterboard, use a special fastener.