Making a feeder for broiler chickens. A simple chicken feeder. Detailed production with photos and videos A simple do-it-yourself chicken feeder
When raising poultry, an important role in addition to the feed you feed the chickens is the type of feeder you use. And here, especially novice poultry farmers, they face a number of problems. There are many different poultry feeders on the market, but if you have a large flock, buying them is quite expensive. Therefore, a do-it-yourself chicken feeder, for most farmers, has become great option and the ability to choose exactly the version that the best way suitable for his household and the room in which poultry is kept.

So, what should you pay attention to, first of all, when choosing a future feeder:

Important. A well-chosen feeder will help save you from many of the problems that arise in the process of breeding chickens.

Tray
This type of feeder is distinguished by a variety of sizes and mounting methods: it can be either a tray fixed with stainless steel clamps on the wall of the chicken coop, or standing on the floor autonomously. In any case, it allows not only to feed several birds at the same time, but also to supplement it with new food. High sides and a mesh with large cells fixed on top allows the chicks to freely stick their heads out, feed and not scatter food in different directions.

Tray feeders are often used to feed older chickens, fixing on outside cages in such a way that the feed supply itself and the feeding process are free, and the access of chickens to the feed itself in order to scatter it or trample on top is completely excluded.
When installing the feeder, consider the following points:

Important. Such a feeder is suitable for both loose and mushy feed and finely chopped greens.
Zhelobkovaya
A very similar design with a tray feeder, only instead of one feed container, several troughs are attached at an angle, each of which is filled with a certain type of feed. In this way, you create a varied diet for the chickens.

Bunker (automatic)
This type of feeder holds more feed, which is poured into the hopper every three days. Thanks to the dosing feed, grain or compound feed enters the feed chute only after the hens or chickens have eaten the feed already there. Such a system significantly reduces the loss of feed during feeding. Chickens do not scatter food, but eat most of it.
It is better to use it in dry chicken coops, otherwise there is a high probability of dampening of the feed and, as a result, its decay and attenuation right in the bunker. Therefore, do not forget to wash and clean the hoppers, as well as check for third-party smells.

In addition to those already listed positive characteristics there are others:

Please note that in this type of feeder, feed enters the feed chute, if the hopper is full, continuously. On the one hand, this is good, on the other hand, it can lead to obesity and overeating of birds.
Important. It is better to use for chickens of sinewy and not prone to obesity breeds.
Homemade chicken feeders
Before starting work on making a homemade feeder, decide on the type of feed that you plan to feed the chickens, the type of feeder and the material from which it will be made will depend on this.
- liquid feed consistency is best placed in metal and plastic structures;
- for grain and animal feed, feeders made of wooden materials are suitable.
There are many options for practical feeders, it remains only to choose the best option for your farm.

Important. You can use several variations at once, for example, for dry food and more liquid.
Consider a few ideas, from the most simple designs to extraordinary. From various handy materials, but all of them are united by ease of manufacture and low budget.
Plastic bottle feeder
A homemade plastic bottle feeder is the most massive and simple option for feeding very small chickens, perhaps it would be easier only to have a bowl of food placed on the floor. For its manufacture does not require special skills or tools, time and costly materials.

To make a feeder from two halves of bottles, you will need:
- 1.5 liter plastic bottle with cap
- building or stationery knife
- several pieces of wire
- pallet from flower pot or a low container larger than a bottle in diameter
Option number 1
Using a clerical or construction knife around the bottle just above its bottom, cut out rectangular or triangular holes. The bottle is installed in the center of the pallet or container, fixed for stability with a glue gun or fixed to a self-tapping screw.
To prevent chicks from trampling and pulling food away when feeding, limiters should be installed. To do this, with hot pieces of wire, pierce the bottle and the tray at the edge, fasten it, while maintaining a distance between sectors of about 3 cm.
After the design is ready, pour grain or compound feed into the bottle and close the lid.

Important. If you have a large livestock, then you can make several similar feeders. This way the chicks won't compete for food and will eat evenly.
Option number 2
Using a utility knife, cut open the bottle so that the chicks can reach the bottom of the bottle, usually less than half the bottle. On the front, cut a V-shaped notch, singe the edges of the candles, as soon as the plastic is melted, smooth the edge.

On the back of the bottle, cut holes for fasteners, then fix the feeder with a clamp at the edge of the cage or on the wall so that the chickens cannot climb into it, but at the same time receive food from it freely.
The video below shows another do-it-yourself plastic bottle option - a bunker feeder.
Video - Do-it-yourself bunker feeder
Feeder from a plastic bucket or container
A plastic bucket feeder is the second most popular option for feeding chickens. The manufacturing method is similar to the option of a plastic bottle feeder, but still has its own feature - in progress operation, such a feeder is more stable and suitable for feeding already grown young animals.

For its manufacture you will need:
- plastic bucket (no more than 1.5 liters)
- dosed container or flower tray larger in diameter than the bottom of the bucket
- stationery knife
- glue gun or screw
Step-by-step instructions for making a feeder
Table. Step-by-step instruction making feeders
| Step, No. | Description | Photo |
|---|---|---|
| 1 | A plastic bucket of mayonnaise, jam, honey or oil, or a container will do. Using a utility knife, cut out holes in a circle as shown below. Depending on the size of the bucket, the holes may be larger or smaller, in any case they should not interfere with the free flow of feed. |  |
| 2 | Using a glue gun, apply glue evenly around the bottom of the bucket on the bottom of the bucket. |  |
| 3 | Next, center the bucket and tray, press down and leave to dry. Try to choose the tray according to the diameter in such a way that the chicks do not have the opportunity to climb into the tray with their paws, trample and scatter food around, but at the same time, they have unhindered access to it. |  |
| 4 | Fill the bucket with food and add more as it is consumed. |  |
Wooden (plywood) hopper feeder
The proposed type of feeder is suitable for feeding a small number of grown chickens and it is intended for the floor of the cage. The design provides for a feed limiter, so it enters the container from which the birds eat not immediately, but as it decreases. This greatly reduces the loss of feed mixture during feeding, since, unlike open feeders, bunker-type feeders do not allow birds to penetrate into the feed container and scatter it.

To make it, you will need a sheet of thick plywood, a drawing of a feeder according to your size, an accompanying tool: a screwdriver, self-tapping screws and screws, a ruler, marker or pencil, tape measure, sandpaper, 90 degree loops, and more.
The working drawing is transferred to plywood, all the details are cut out. Under the screws, drill the necessary holes. For the safety of the chicks, all parts are thoroughly sanded before assembly. Further, all the elements are assembled into a single structure and fastened, as it should be with screws. At the final stage, the lid of the bunker is attached to the hinges and the entire feeder is covered with an antiseptic.

Important. As a rule, each poultry breeder during the feeding process notices certain moments in the operation of the feeder, therefore, over time, he refines its design and adds his own elements so that the result obtained meets all the necessary requirements.
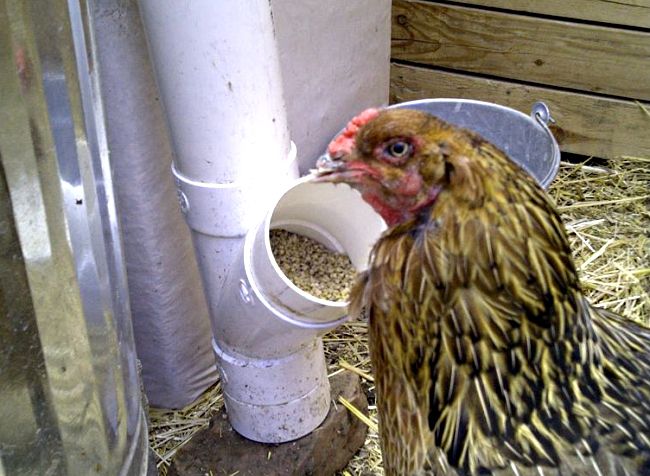
Feeder made of PVC plastic pipes
A self-made feeder made of PVC pipe is the most reliable and prefabricated type of long-term feeders. As a rule, such a structure is attached to the wall or the edge of the net with clamps or rims, therefore, during the feeding process, the grain will remain in the feeder and will not be scattered on the floor or damaged, and this plays an important role in keeping poultry.

On the basis of PVC pipes, several models of feeders and their modifications can be made, which was immediately used by enterprising poultry farmers:

As the practice of experienced poultry farmers shows, to maintain healthy growth and the development of chickens, it is enough to have one or two types of feeders: for grain bulk mixture and for more liquid feed.

So where to start? It is a pleasure to assemble a structure from pipes. No need to glue, drill or weld anything. Simply mark, assemble and fix in a horizontal or vertical state.
Option number 1
We cut a meter sewer plastic pipe with a diameter of 110-120 mm into three parts: 70 cm, 20 cm and 10 cm. Additionally, we select plastic tee(by 45 degrees), corresponding to the diameter of the pipe and a pair of plugs.
- On one side of the middle section of the pipe (20 cm) we put on a plug, this part will be the basis for the future feeder.
- On the second side of the middle section of the pipe, a tee is joined from above in such a way that the side outlet “looks” up.
- A piece of pipe (70 cm) is installed in the middle part of the tee and closed with a second plug at the end.
- From the side, we fit the last piece of pipe (10 cm) into the tee and insert it until it stops.
- It remains only to fix the design of the feeder against the wall and secure it with metal clamps.
The feed is poured into the upper part of the feeder, on average it is enough for a day. Then he enters the side hole, from where the chickens eat him. At night, it can be closed with a plug, this will protect the food from dirt and debris, as well as from rodents.

Option number 2
This type of feeder is made from sewer pipe, with a diameter of 110 mm and a height of 150 cm. Additionally, we select a tee, two 90-degree corners, two metal clamps and a pipe plug.
Important. From one feeder, without too much competition, four to six grown chickens can eat.
We carry out installation:
- Two bars 5 * 10 are attached to the wall so that the bunker pipe does not fit snugly against it and to prevent grain from sweating. The upper bar is located 15-20 cm to the edge of the pipe, the lower one is 15-20 cm from the connection of the pipe and the tee. At the same time, take into account the additional distance from the floor, it varies from 5 to 8 cm, depending on the age of the chickens.
- Then metal clamps are attached to the bars to fix the pipe.
- We attach the end of the pipe and the middle part of the tee, we install corners on the sides.
- We fix the structure with clamps, pour the grain into the pipe and close it with a plug
When cleaning the chicken coop, the corner holes can be covered with plugs, this will keep the feed clean. If you plan to general cleaning, with cleaning the feeders themselves, it will not take much time and effort. The design is well disassembled and washed, if necessary, its individual elements can be replaced.

Option number 3
We make this type of feeder from a sewer pipe with a diameter of 150 mm and a height of 1 meter. Additionally, we select a plug and a knee.

We carry out installation:

Horizontal feeders made of plastic pipes with a single hole, in addition to loose feed, it is convenient to fill with finely chopped green tops, mineral feed, cereals and crop waste. They are perfectly washed, disassembled and assembled back.
All the types of feeders considered are just a small list of models presented by poultry farmers, in fact there are many more. After all, each farmer, on the basis of any feeder, thanks to the changes and improvements made, creates a completely new model. Try and experiment!

Proper nutrition is the basis for healthy growth and development of chickens. Therefore, when choosing food, you need to focus on nutritional properties mixture, its balance and digestibility. It is forbidden to feed the chicks hard, heavy food. For each age it is necessary to choose a special diet. It must contain:
- Carbohydrates. Most of them are in grain. Chickens, actively moving, use up the supply of carbohydrates, and what they did not have time to use up is deposited in the form of fats.
- Protein. The most significant element for the growth of young animals. Moreover, almost a quarter of chicken meat itself consists of this microelement. To provide them with a growing bird, you need to add lentils and boiled meat to the menu.
- Fats and vitamins. As a rule, they are in sufficient quantities included in the composition of ready-made feed mixtures for birds.
Features of the diet
There should always be food in the feeder. Moreover, it is better to place containers with food and water in a warm place. You can start feeding 15 hours after hatching. Previously, it simply does not make sense, because, while still inside the shell, the chickens eat the rest of the yolk. So the feeling of hunger does not come to daily babies immediately.
Attention! Recently perfect first hard-boiled egg yolk was considered food for chicks. But experts recognized this product as too fatty for fragile stomachs of chicks. Therefore, it is now recommended to give the birds boiled corn grits. After a few days, you can enter the egg, and some other products.
For the first week, chickens will have to be fed once every 2 hours, even at night. Then the interval can be increased. It is important that not a single chick remains hungry. Therefore, it is necessary to check the goiter of everyone. If there are individuals in which it is not yet full, they must be fed separately.
Proper nutrition
When the kids are a little older, it's time to offer them greens and crushed worms. Don't rush into the latter. Too early introduction of them into the diet can lead to infection with helminths. It is better to wait until the chickens become adult independent chickens with a stronger immune system.
How to make a feeder
Before answering the question of how to make feeders and drinkers for chickens with your own hands, you should understand the types of these devices. Each of them performs its function, so all feeders are divided according to their purpose.
Basically, experts distinguish them by the method of feeding:
- A tray feeder is a long flat dish with sides and a mesh or a turntable on top. Thanks to this design, chickens are unable to scatter food near the tray.
- Bunker, or automated. With its compact size, it holds a huge amount of feed mixture. The chick feeder is organized so that the food itself enters the tray when the chicks peck the previous batch. The lid will prevent dirt and moisture from getting into the feed.
The first view is fixed from the outside of the corral. Its main advantage is the presence of cells, which allows you to simultaneously offer chickens several types of feed at once. But the grass is still better to give in a mesh container with a basket shape.
Tray feeder
When constructing any type of feeders, you must adhere to the basic rules:
- The container should be designed so that the chickens cannot climb inside or from above. Otherwise, the food will be constantly contaminated, not only with garbage, but also with droppings.
- Weight and design should not prevent easy cleaning and disinfection of dishes. Sanitary work must be carried out at least 3-4 times a week.
- To assemble the feeder by hand, it is better to choose plastic or metal.
- The volume is selected based on the number of chickens. It is important that each bird has free access to food, otherwise weak individuals will be malnourished. For adult chickens, a length of 15 cm is enough, for young ones a little less - 8 cm. When it is planned to make a round feeder, you need to measure such a diameter that there is at least 2.5 cm per 1 chicken head.
The simplest and therefore the most popular option is to make a feeder from a plastic bottle. The main requirement for the material is the preservation of shape. Usually poultry farmers use 2 ways to make feeders from these containers:
- The first option: holes are made on the wall of the bottle, about 3 cm in diameter, retreating from the bottom by 8 cm. The handle of the dishes is used to hang the feeder.
- The second option involves an automatic method of feeding feed. Holes up to 1 cm in radius are cut at the bottom of the bottle. The container itself is attached to a wide bowl. inside plastic containers feed is poured to the top. The chicks, located in a circle, will not be able to knock over their feeder, the food will independently come from the upper stocks when the previous portion is eaten.
Varieties
From downpipes
There are also other feeders and drinkers for chickens from improvised means. It all depends on what idea the fantasy tells the owner. It will help you decide short review options:
- From drainpipes. Such a unit is convenient in that it can be used to feed a large number of chickens, while using a minimum of funds. All that is needed is to make sufficiently wide holes in the pipe and pour food into it. Chickens will be able to eat freely and not interfere with each other.
- From a tree. As a rule, plywood is more often used in such works. You will need:
- 2 sheets for the sides, up to 20 cm high and 10 cm wide;
- 2 sheets for the front and back wall 80 cm long, 15 high and 10 wide;
- 1 piece of plywood for the base;
- crossbar;
- hammer and nails.
Connect the two side sheets to the base so that you get a right angle. Then attach the long walls. It should be an elongated box. Pin the crossbar to the top of the narrow walls. The feeder is ready. It remains to pour food and feed the chicks.
In addition to the food container, there should always be a container of water in the chicken coop. Similarly to the feeder, you can build an original drinker.
Do-it-yourself drinkers for chickens
Just as with feeders, plastic bottles are very popular as a starting material. But now the volume of 2 liters will not be enough. It is better to use five - and three-liter bottles.
Step-by-step instructions for assembling the structure:
- For containers of larger diameter, the upper part is cut off, retreating approximately 5 cm from the lid. A bowl should form.
- The second container of smaller volume is attached to the first with screws, directing the lid into the lid.
- Retreat 5-8 cm from the neck of the second bottle and make small cuts so that their height is not higher than the depth of the bowl.
- Using screws, the device must be attached to a wall, pole or other vertical object.
After that, you can safely pour water into the drinker. It should be noted that there is no easier way than this one. It allows even a large number of chickens to provide enough water. Although there are weak sides. Such a device is not very stable and can turn over if a chicken gets into it. In addition, the drinker from the bottle quickly becomes dirty, it is not easy to clean it.
Do-it-yourself drinkers for chickens
In contrast to this unreliable design, experienced poultry farmers came up with a more advanced system, which quickly became the most popular. It's about about the nipple drinker. It works like drip irrigation. Stable, strong, easy to handle and durable. Perfect for broilers as meat breeds more than others need to drink plenty of water. All you need to do is periodically add water to the tank. To assemble this model, you will need the following items:
- Nipples for 360.
- Bottle, bucket or barrel made of plastic.
- Plumbing teflon thread.
- Drill with 9 mm drill.
- Tap and fasteners.
In the container, it is necessary to make holes for each nipple, prepare the thread. Then mount the nipples and process the mount with Teflon thread. After fixing to a permanent place and disinfection, the drinker will be ready for use.
This method is considered the most profitable and requires a minimum of assembly time. But for those who prefer more practical design, you will definitely like a drinking bowl made of pipes. On the tap plastic pipe you need to make grooves for the nipples. The diameter of each hole is a little less than a centimeter. Do not place them too close to each other. Otherwise, the chickens will crowd and interfere with each other.
The optimal interval is 20 cm. The pipe should be plugged on one side. A hose that supplies water is mounted at the bottom of the water tank. If desired, you can connect directly to the water supply and sewerage. This will greatly facilitate the process of cleaning and filling the drinker. An approximate scheme of its implementation is shown in the figure below.
Drinker scheme
Those who have been raising chickens and other birds on their plot for more than a year already know some of the secrets of this difficult task.
Responsible owners are trying their best to disinfect all equipment in time, equip feeders and drinkers with separate cells. But even this does not guarantee success. Frequent processing of dishes renders them unusable, especially if they were inexpensive devices. Spend a large amount it is expensive to keep poultry. Therefore, experienced poultry farmers recommend collecting bird dishes with their own hands. In every household there is always a leaky bucket or other similar container that is no longer suitable for the household. A few simple manipulations, and a unique do-it-yourself chicken feeder is ready. Simple, effective and saves the family budget.
Growing chickens at home, you need to provide them with everything the necessary conditions. The most important thing is that chickens, especially growing chickens, are always full. It is best to separate the young from the adult bird. Firstly, this way each individual will get plenty of food. Secondly, it will be easier to keep track of who is not getting enough food, who is less active, etc.
Ideally, if the feeder and drinker are adapted to the needs and capabilities of poultry. Many poultry farmers point out that the best option than a wooden tray with a crossbar does not yet exist. It is economical to assemble, convenient and practical to use.
Feeding poultry in terms of labor and cash costs is in the first place in the process of breeding it. In this regard, the selection of ready-made feeders must be approached with knowledge of the matter.
You can save money by doing it yourself. In addition to the material incentive, you will get moral and aesthetic pleasure, seeing how the hens eat from feeders made with their own hands.
There are certain requirements for their manufacture:
- Strength: they must be made of a material that holds a certain shape, little or no deformation;
- Convenience in operation: it is convenient to clean, you can easily pour food into it, and it is convenient for the bird to eat from it;
- The number of units must ensure the fulfillment of its task - feed all the livestock(if you put one small feeder for 50-100 heads, you can only imagine what will happen in the chicken coop);
- A feeder made of a specific material must be used for a certain type of food;
- She must be sustainable(do not tip over or fall sideways from direct contact with the bird);
- Rational use(manufactured in such a way as to make it impossible for droppings to get into it and to minimize the ingress of debris).
- Manufactured not harmful to feed materials.
For information: this list of requirements is not complete and depends on the specific circumstances and tasks of the poultry farmer.
Types of homemade chicken feeders
One of the feedersAll feeders are classified according to the following criteria:
Depending on the method of feeding:
- bunker;
- grooved.
Depending on the material from which they are made:
- wooden;
- solid metal;
- plastic;
- from metal mesh or rods:
- combined.
From a plastic bottle
This model of the feeder is considered the easiest to manufacture. It is easier to just put a bowl of food in the chicken coop.
For its manufacture, you will need directly two plastic bottles of 1.5; 2 and 5 liters, any flat solid material, such as plywood.
The manufacturing technique is as follows:
 Plastic bottle feeder
 At 1.5 liter bottles cut off the bottom (food is poured through it) and closer to the neck around the perimeter we make holes so that grain pours through it.
From 2-liter bottles, the bottom is also cut off, but the sides are left at a height of 10 cm (they cover the bottles in which the food is located, against rain, other moisture and foreign bodies). 5-liter bottles are cut in such a way that there is a distance of no more than 15 cm from the cut line to the bottom.
In the center of the cut containers, a hole is made along the neck diameter of 1.5 liters. bottles. We also make holes in a 50x30 plywood sheet with a diameter of 1.5 liters. bottles. It remains for us to lower the 1.5 liter bottle into a container of a larger diameter so that the neck passes through 2 holes and exits from the bottom of the piece of plywood.
From a 5 liter plastic bottle
Make a feeder different ways. The simplest is to cut holes of a small diameter along the perimeter of the bottom, sufficient for pouring out grain, a different type of dry food, grain can be poured into the bottle itself through a watering can inserted into the neck. Below we substitute any vessel.
 From a 5 liter bottle
 In the process of eating, the grain will pour through the holes into a placed vessel. It can be made in another way: in the same container, we cut out small squares around the perimeter of such a size that the chicken can freely stick its head inside and peck the grain. With this option, you don’t even need a vessel as a pallet.
But if you need to tighten the structure, make it more massive, we screw a piece of plywood to the bottom of the bottle. This prevents the bottle from tipping over if the feed supply is low.
How to make a bird feeder
The above methods for making feeders from plastic containers are also a kind of bunker feeders, but without a mechanism for adjusting the feed supply.
An improved version of the bunker feeder is done in this way:
Plywood is cut into several pieces:
- front of the bunker 40x50 cm;
- rear end - 40x40 cm;
- 2 side walls cone-shaped to connect the front and rear walls;
- upward opening lid a little over size the top of the bunker.
 Bunker design option
 A gap is left at the bottom of the bunker for spilling feed into the tray for birds to eat it. As the feed is eaten by the hens, the feed level in the silo drops. It's easy to fill it up.
To do this, open the lid and add the required amount. It will be improved by making a mechanism for adjusting the grain feed at the bottom. The principle of its operation is to reduce the size of the slot (slit) or increase it, depending on the structure of the feed. This type of feeder is attached both indoors and outdoors.
If it is located outside, then the slot (slot) of the bottom side of the hopper should feed the grain through the wall into the chute, which is located inside the room.
Automatic feeder and drinker from a sewer pipe
It can be made from plastic sewer PVC pipes. It is better if you take the average diameter - 15 centimeters. In addition, for the arrangement you will need two plugs and a tee. Choose the length you need. Two pieces are cut from the pipe, 20 and 10 centimeters long.
Then the longest and 20-centimeter sections of the pipe are connected to each other by a tee, and a plug is installed at the ends. A 10-centimeter piece of pipe is connected to the branch of the tee - this will be the feed tray.
fall asleep in this design food (or water in the case of a drinker) and fix it on the wall of the chicken coop with the long side to the top.
 From a sewer pipe
Some suggest the following homemade design from improvised materials: Holes are drilled in the lower part of the pipe on both sides, expanding them to a diameter of 70 millimeters so that the birds have free access to food. A plug is put on one side of the pipe, and the second segment is connected with a knee at a right angle. Feed is poured into it and a second plug is placed. You can also make an automatic drinker.
In our opinion, such a feeder has a very big drawback: the feed will not be able to move along the pipe as it is eaten by the bird, but will be collected near the first hole, since there is no slope. The ideal angle of inclination this case difficult to do, since the coefficient of friction is different for each feed.
Wooden variant
One option for making a wooden feeder was painted above (bunker feeder). You can make another variety. To do this, you need boards or slats made of wood.
We take an arbitrary length. Let it be 1.5 meters. For the side walls, we prepare 2 blanks 150cm x 10cm in size, and 2 blanks 20cm x 15 cm in size. We hammer all this together as shown in the figure. To give strength to the structure and prevent the bird from getting into the feeder, a wide rail is nailed on top.
 from wood
 Instead of a rail, you can take any handle from the inventory, for example, a shovel. Attach on both sides in such a way that it easily rotates around its axis. This is necessary so that it is difficult for the chickens to sit on the feeder and keep their balance.
Please note: it is advisable to use a wooden feeder indoors to avoid getting wet and damaging the material. It is not suitable for wet feed, as it makes it difficult for the poultry farmer to clean it.
From metal mesh or rods
This version of the feeder is useful for greenery, because otherwise the chickens will take the grass all over the house. The feeder stays in the same place. To construct it, you just need to bend the welded metal mesh small diameter into a ring and attach the ends to each other.
This feeder has no bottom. But for strength, it is nailed to a wooden, plywood or any other plane. corresponding to the diameter of the ring. Cover with something on top. This design makes it easy to throw away all the withered contents and put fresh green mass. Naturally, it is not suitable for bulk feed, because it has a large cellular structure.
Do-it-yourself homemade chicken feeders
Chickens in the first days of life need to eat especially well. If their number is small, the problem with feed containers is quite simple to solve. To do this, install one feeder. But if their livestock is more than a hundred, then very soon they will grow up and in order to ensure normal access to feed, it is necessary to install several feeders or one large one.
If they are not used at all, but simply sprinkled on the floor or in some fenced-off corner, then a lot of food is trampled and spoiled, and the economic effect of raising poultry falls.
Bunker option from improvised materials
The simplest chicken feeder can be made from an ordinary plastic bottle. The essence of the design is to cut several windows in one row in it so that the chicken can stick its head in and peck at the food. On the side of the cut out windows at an angle of 90 degrees, we cut out one or two smaller holes to fit the size of the bottle neck.
The cut bottle, as shown in the figure, is inserted into the hole. It turned out a kind of watering can through which food is poured.
 Chicken feeder
 You can offer a different version of the bunker feeder for chickens.
To do this from any lung solid material(for example, the thinnest extruded foam) we cut out a circle in which we make holes along the contour so that the chickens can peck the food.
In the middle we cut a hole according to the diameter of the bottle or jar in which we fall asleep. We substitute any vessel under the bottom (you can use a plastic bowl). From the inverted jar, the grain is poured into the bowl as it is eaten. The diameter of the circle should be slightly larger than the diameter of the bowl.
If we take a glass jar as a bunker, then this design option has one significant drawback - in order to fill it, you need to turn the jar over and fill it with compound feed. Then put a foam circle on it, a bowl, and only then turn it all over and put it on the floor.
This design is only suitable for rearing chickens., because the grown young or adult bird will overturn the jar, and it may break.
Automatic chick feed
As a matter of fact, the automatic feeder is made in such a way that from the filled bunker (it doesn’t matter what it will be and what it is made of: from a plastic bottle, glass, wood, etc.) as the bird eats grain, it spills into a container under the bunker (bowl , cell other).
Almost all of the above types of feeders are built on a bunker basis. This is the auto feeder. That is, having poured grain into the bunker once, for example, in the morning, the owner does not worry that he needs to feed the bird after 3, 6 or 24 hours. When it is empty, the hopper is filled with feed again.
 Automatic feed supply
 All you need for its equipment is a bowl or disposable plastic utensils., depending on the size of the hopper itself (it can be a 20-liter bucket, or maybe an ice cream bucket).
We cut small holes in the bottom along the perimeter so that the food can be poured into the bowl when it is eaten. From above, this design is covered with a lid.
The bowl must be picked up in such a way that its diameter is larger than the diameter of the bottom of the bucket, but not much, otherwise the bird will climb into the bowl and trample its contents.
It can be made more mobile by attaching a handle to the structure.
As you can see, there are a lot of techniques for making feeders. We stop our choice based on the specific situation: the number of birds, its age, conditions of detention, the presence of certain materials in household, for what purposes it is grown (for example, if these are broilers, then the bunker feeder (it is also an automatic feeder) is simply irreplaceable, since broilers need to constantly eat, and from time to time during the day it is quite troublesome to add food to the bird).
In addition, the material of the feeder itself also depends on the composition of the feed. For example, for a wet mix better fit metal or plastic feeder open type. It's easier to wash. For bulk feed perfect option These are bunker feeders. They keep the food inside it dry and clean.
Housekeeping requires a lot of trouble and time investment. One of the main concerns that takes up the time of farmers is feeding chickens. The products that the market offers, although convenient to use, are not cheap. Do-it-yourself automatic chicken feeder is a salvation for those who count their money. In this article, we will consider what ways to quickly feed chickens are offered by factories and craftsmen.
Feeding chickens is an important part of the poultry industry
All feeders, homemade or factory-made, feed the chickens as the birds eat them. The farmer needs to pour the feed into a special compartment, from where it is fed in portions to the feeding tank. The compartment closes tightly, which ensures the safety of the feed: chickens will not eat it ahead of time, and especially violent ones, for example, will not scatter feed around the chicken coop.
With an automatic feeder, the farmer does not need to monitor the feeding time of the chickens and visit the chicken coop with feed, depending on the diet of the chicken flock. Therefore, if you are planning to have several bird individuals, this issue must be thought out in advance.
Automatic feeders are designed for dry food. Since chickens need a varied diet, consider having other mixing containers in the coop.

What automatic feeders does the market offer?
In stores, you can purchase both the simplest designs, for example, a bunker, and high-tech devices with a timer and a feed scatter function. The price of the former fluctuates around 500-1500 rubles, but for technical progress you will have to pay 5-6 times more. The body material of such feeders can be different: from ABS plastic (the price is about 6.5 thousand rubles) and to powder-coated steel (8.5 thousand rubles).
Also, store feeders can be conditionally divided into ready-made structures with a feed container and a tray, and separate trays with dividers, for which you will need to additionally find some kind of jar or bottle. If speak about simple products the second type, they are very cheap, around 100 rubles, but they have a small volume and are only suitable for feeding chickens. If you keep a flock of adult chickens, such a purchase will not be successful.


Expensive automatic feeders involve the installation of barrels or bottles with a capacity of around 20 liters. The device is mounted at the bottom of the barrel, it does not need to be connected to the network - it works on several D-type batteries or is powered by a battery. The whole structure must be fixed at some distance from the ground in order to ensure free scattering of grain.
The advantage of such an automatic feeder is the presence of a timer and the ability to pre-program the amount of feed to be spread. This allows you not to worry about whether the birds are eating well enough. But the chickens will not eat more than they should.
However, it is advisable to purchase such devices only if there is a large farmstead. If there are few chickens, then it is better to pay attention to simpler and cheaper products.

The principle of operation of the bunker (vacuum) automatic feeder
Perhaps this is the most popular option to feed a flock of hungry birds. Almost all the products described in the article involve the use of this particular principle.
The bunker feeder, as mentioned above, consists of a closed container, which is completely filled with food, and a tray into which food is supplied through a small hole. You can not be afraid that the chicken will climb inside the feeder - the hole is too narrow, and the food itself will interfere.
Before you start making a feeder in one of the following ways, consider how best to secure the container with the daily ration so that the hens do not knock it over and scatter the grain around the coop. At the same time, you must definitely have the opportunity to remove it, since the feeder must be regularly cleaned from the remnants of the old feed.
The bunker feeder is very easy to make yourself from improvised means. Let's consider several ways.
Before you begin any of the following instructions, please read them carefully to the end so that the feeder you have made will fully meet the needs of your birds and chicken coop.
Plastic hopper feeders
Making a vacuum feeder from a plastic bucket
This type of container is not suitable for outdoor placement. Moisture will get into the feed, which will negatively affect its qualities. But if you plan to feed the birds in a chicken coop, then this option may be very useful for you.

In order to make a vacuum feeder, you will need:
- a plastic bucket with a tight lid of the required volume (5-10 liters);
- tray - you can buy it in a store with dividers, or you can use some kind of basin, tray or other flat container. The diameter of the tray should be 20-30 centimeters greater than the diameter of the bottom of the bucket;
- plastic cutter or any other handy tool;
- screws and nuts.
| Step | Photo | Description |
|---|---|---|
| 1 |  | Take a bucket and make several semicircular holes at the bottom with a radius of about 4-5 centimeters. Choose the size and number of holes based on the required amount of feed intake. If you are using a tray with separators, the number of separators will match the number of separators. |
| 2 |  | Use the screws to connect the bucket to the container for the tray. |
| 3 |  | Fill the bucket with food and close the lid. |
So that the birds do not get hurt, it is desirable to process the edges of the holes, or to prevent burrs when cutting.
So that the food does not remain at the bottom and is available to the birds, something cone-shaped can be fixed inside the bucket - for example, the top of a plastic bottle. The feed will flow down the sloping walls to the edges of the tray, which will make it easier for the chickens to access it.
In a similar way, you can make a vacuum feeder from plastic bottles, metal buckets and other containers. A plastic bottle can be attached to the tray with wire, and dividers can also be made from it.

Small hopper feeder for chickens

Chicks need a special approach to feeding. Firstly, at first they are kept separately from adults, and secondly, the growth of chickens may not allow them to reach the feed. Therefore, separate containers are made to feed the chickens.
Tools and materials
- Two plastic bottles with a volume of 1.5-3 liters or another, depending on the amount of feed being poured. Choose bottles so that the top and neck of one bottle fit freely in the middle of another.
- Feed tray. To do this, you can use lids, plastic bowls and other flat dishes with not very high walls, otherwise the chickens will not reach the feed.
- A utility knife or other tool for cutting plastic.
| Step | Description |
|---|---|
| 1 | Take the smaller bottle and cut off the top cone. We no longer need the bottom of the bottle. |
| 2 | Take big bottle and cut off the top cone and bottom. |
| 3 | In the lower part big bottle make small holes with a diameter of about two centimeters. |
| 4 | Attach the middle part of the large perforated bottle to the feed tray. |
| 5 | Close the top cone of the small bottle and place it inside the resulting feeder. This is necessary so that the food does not get stuck at the bottom of the bottle. |
Instead of a larger bottle, you can use a small plastic bucket, such as mayonnaise, or a container for storing CDs. The procedure for such a feeder is almost the same as described above.


Automatic feeder from plastic bottles
If you often buy water in 5 liter plastic bottles, you can use them to improve your chicken feeding process. However, this design has the same drawback as plastic bucket products - they are not weatherproof.

For the feeder you will need:
- two plastic bottles;
- a stationery knife or other handy tool for cutting plastic;
- a flat bowl or basin slightly larger in diameter than the bottom of the bottles for the lid.
| Step | Description |
|---|---|
| 1 | Take the first bottle and cut it in half. We will need half with a bottom, the upper part with a cone will not come in handy. When cutting, be guided by the photo. |
| 2 | Cut holes on all sides so that the chicken head can freely crawl through them. Remember to finish the edges of the holes so that the chickens do not get hurt. |
| 3 | Take the second bottle and cut off the bottom from it. |
| 4 | Place the second bottle upside down in the first. Connect both parts of the feeder convenient way. |
| 5 | After filling the feed, close the bottom of the top bottle tightly with a wide bowl or basin. Pay attention to how easy it is to remove the cap from the bottle so that the chickens do not get to the feed. |
The neck of the top bottle should be a few millimeters below the bottom edge of the holes. If this condition is not met, the food will spill out.
Video - Bunker feeder for chickens in 10 minutes
In a similar way, you can make a bottle feeder for chickens. An example of such a product is in the video below.
Automatic feeders made of wood or plywood
Designs from plastic bottles, no doubt, spoil appearance chicken coop. Although this factor does not of great importance in poultry farming, since the main thing is the satiety of chickens, you can pay attention to plywood products. Another obvious advantage of such feeders is that you can design their capacity yourself, which is not so easy to do with the products described above.
On the other hand, working with wood paneling and plywood requires a lot of labor and not everyone can do them. But if you have the necessary skills in carpentry, then the following two options may be useful to you.
Autofeeder Option One: Without Pedal
Tools and materials for creating a feeder
- Thick plywood or wooden boards.
- Drill and drills.
- Screwdriver and screws.
- Loops.
- Sandpaper.
- Saw.
- Pencil or marker.
- Paper for creating a drawing.
- Roulette or rulers.
Prices for cordless drill/driver
Cordless Drill
Step Description 1 Before we start work, we need to make patterns, according to which we will cut out the details for the feeder. Take paper and draw the following details:
For the side walls - two figures 40 cm high, with an upper edge of 26 cm and a lower edge of 29 cm. Do not forget to cut two triangles on the walls (see drawing);
For the front part - two rectangles 28x29 cm and 7x29 cm;
For the lid - a rectangle 26x29 cm;
For the bottom - a rectangle measuring 29x17 mm;
For the back wall - 41x29 cm.2 Transfer the drawings to the boards and carefully cut out the details. 3 Now you need to make holes for the screws in the attachment points with an electric drill. 4 To make the surface of the feeder safe for birds, sand all the details. 5 Based on the above drawing, assemble the structure. Do not forget that the front top and back walls should be located relative to the horizontal at an angle of 15˚. 6 Hinge the top cover onto the back of the side walls. 7 Treat the resulting box with an antiseptic. It is undesirable to use varnishes and paints, this can adversely affect the feed and health of chickens. Auto feeder option two: with pedal
The principle of operation of the feeder can be seen in the video below. The chicken steps on the pedal, the lid of the tray opens and access to the feed appears. This design is convenient because, unlike the previous version, it is completely sealed, and if the tree is treated with a waterproof solution that is safe for chickens, it can be installed in the yard.
An automatic feeder with a pedal is an interesting and unusual option.
The principle of operation of such a feeder can be seen in the video below.
In order to design your own pedal chicken feed container, you will need:
- wooden boards or sheets of dense plywood;
- thin wooden bars;
- furniture bolts or other products for fastening elements;
- loops;
- electric drill and drills;
- sandpaper;
- saw;
- pencil or marker;
- paper for creating patterns;
- roulette.
Prices for popular models of jigsaws
Electric jigsaw
Step 1. Draw patterns for ten details of the future feeder: a cover for the tray, two side panels, a detail for the bottom, back wall(please note that in the finished box it is tilted), two rectangles for the front wall (or three, depending on which box you like best), top cover, pedal. When determining the dimensions, be guided by your needs and the drawing from the previous version of the feeder.
Step 2 wooden bars cut into six pieces. The two bars to which the pedal will subsequently be attached should be the longest (the length of the bar is calculated based on the width of the pedal and the width of the box). Two more pieces of timber - middle length(required for the cover over the tray). The third pair of short bars serves to interconnect the lifting mechanism.
Step 3 Using a saw, cut out pieces of plywood according to the patterns. Treat them with sandpaper to neutralize the product for chickens.
Step 4 Connect all the walls of the feeder together with screws. Please note that the back panel should be at an angle of approximately 15˚. This is necessary so that the feed does not stagnate in the far corner of the box. For greater tightness, use a clamp.
Step 5 Attach the top cover. To do this, use 2 loops. Subsequently, you will discard this lid to fill the feeder.
Step 6 Next in line is the most ingenious part of the product - the assembly of the pedal and bars. To understand how to act, be guided by the photo above. Attach medium length bars on the sides to the lid of the food tray. At the opposite end of the bars, you need to make 2 holes. The diameter of one of them should be slightly larger than the diameter of the bolt, and the hole itself should be located closer to the end of the bar. This hole should correspond to the same in the side wall of the box. Then we screw the bolt so that it allows the bar to move in the plane of the wall.
Step 7 In the same way, we attach the longest bar to the pedal of the automatic feeder. The hole for connecting the bar to the wall must be made approximately 1/5 of the length of the bar. Don't forget the hole at the very end of the bar.
Step 8 We still have two free holes on each side (one on the top and bottom bar). It is necessary to fasten the shortest pieces of bars to them. Unlike the previous steps, this connection must be rigid and strong or the pedal will not work. Make sure that when you press it, the lid of the feed tray rises. If this does not happen, adjust the tension of the bolts.
Step 9 Treat the box with an antiseptic. As in the previous case, it is undesirable to use varnishes and paints in order to avoid harm to chickens.
Feeding through pipes
A number of poultry farmers claim that PVC pipe feeders are the most convenient to use. Firstly, the pipes must be fixed on the walls of the chicken coop, so you can not be afraid that the birds will knock over the container and all their food will be on the floor. Secondly, among the home-made automatic feeders, the pipe design has the largest volume - it includes about 10 kilograms of feed.
Of the minuses of such structures, it is worth noting that the pipe cannot just be taken and washed running water under the faucet, so if you decide on this option, you will have to invent your own ways of cleaning.
Automatic PVC pipe feeder with tee
You will need the following materials:
- three pieces of PVC pipes with a diameter of 110 mm and a length of 70 cm, 20 cm and 10 cm;
- two plugs of the corresponding diameter;
- a tee of the appropriate diameter, the angle of which is 45˚;
- brackets or other material for attaching the pipe to the wall.
Step Description 1 Attach a cap to one end of the 20 cm pipe. This will be the bottom of the feeder. 2 Attach a tee to the other end of the pipe so that the side elbow looks up relative to the bottom. 3 Attach a piece of pipe 10 cm long to the side knee. Do not forget to process the edges of the pipe so that the chickens do not get hurt - this is where they will receive food. 4 Connect the remaining 70 cm pipe to the third hole of the tee. 5 Attach the pipe in the chicken coop in any convenient way, for example, on brackets for attaching ventilation pipes. After filling the feed into the pipe, it must be closed with a plug so that precipitation does not get there. The disadvantage of such a feeder is that the feed will remain at the bottom, and it will have to be raked out manually.
Automatic pipe feeder with knees
This design is perhaps the most practical. It is easy to assemble and install and is relatively inexpensive - all materials for it will cost around 1,500 rubles. If you have recently installed ventilation in the house and you have one and a half meter pieces of pipe left, then this option will be the most budgetary for you.
Necessary materials for the feeder
- A piece of pipe with a diameter of 110 mm and a length of 1.5 meters.
- Two knees - one at 45˚ and the second at 90˚.
- Brackets or other material for attaching the pipe to the wall.
- Stub.
Prices for plastic pipes
Plastic pipes 110mm
Step 1. Assemble the structure in the following sequence: pipe, then 45˚ elbow and 90˚ elbow. Make sure that the edges of the last knee do not have burrs and are not traumatic for birds.
Step 2 Attach the structure to the wall in the way that is most convenient for you.
Step 3 Use a jar to fill the feed inside the pipe and, if necessary, cover with a plug.
Video - Automatic pipe feeder in a private household
Automatic feeder options for advanced poultry farmers
Sure to be happy plastic bottles And pipes are not for everyone. Therefore, in skillful hands everything is used - from meat grinders to self assembly mechanisms.
Video - Automatic feeder for chickens from a meat grinder
Video - Automatic feeder for chickens using a relay


If you decide to have chickens, ordinary or, then the work will increase noticeably. To make it a little easier to care for chickens, you should take care of the feeder in advance. In specialized stores you will find a great variety of them. But the principle of operation for all drinkers is approximately the same. So make it homemade feeders for chickens, it is quite possible at home from improvised materials.
How to make a small chicken feeder?
For work you will need a plastic bucket and a plate. They can be purchased in the disposable tableware section. This method is suitable for chicks that you have just acquired.

Here is a similar option on how to make a chicken feeder. It is designed for slightly older individuals.

Feeders for broiler chickens
If you decide to start broilers, then you will have to pay attention to feeding Special attention. This type of poultry needs constant access to food. It is clear that things accumulate during the day and it is quite difficult to constantly add food to the bird. The problem will be solved big feeder for chickens, made by hand.

Large homemade chicken feeders
For a large number of poultry, you can make another version of the feeder. For manufacturing, you will need a small plastic basin or bowl, a container for food (this can be plastic canister or water tank).


