Hammock made of wooden slats with your own hands. The technology of creating with step-by-step instructions for a do-it-yourself fabric and wicker hammock. Necessary materials and tools
A handmade hammock can be a great place to relax. The history of the appearance of this product is rooted in the distant past. The design is used not only in nature, but also at home. Relaxing on the design, which is made by hand, is very pleasant and comfortable. To do the thing yourself, you do not need special knowledge.
The history of the hammock
Everyone knows the traveler Christopher Columbus. It is with his name that the history of the appearance of this product for recreation is connected. He brought the design from the Bahamas. Thus, all Europeans learned about it. The people of the Bahamas used cloth bags hung between trees or poles to sleep.
Subsequently, "bags" began to be widely used among sailors. They were more comfortable sleeping in them than on the hard deck floor.
Now such products are often used by gardeners and nature lovers to relax and unwind after a busy day. working week. But hammocks are used not only in suburban areas, but also at home. Now in stores you can find a wide variety of these products, but they are expensive, so not everyone can afford to buy them. But this is not scary, because a hammock can be made with your own hands at home. Such a thing is not inferior to the store, but compares favorably with it.
Products that are made independently will be a unique addition to the interior. In addition, a person will become the sole owner of a thing that other people do not have. Pros of using:

Using a hammock, you need to know some of the nuances in order to avoid mistakes. You can not lie down in the product, located along its length. In this position, a person will not be able to fully breathe and enjoy the rest. In this case, the structure will wrap around the lying one and, as it were, compress it.
The correct position in a hammock is diagonally. Only in this position you can feel all the benefits of the product.
Varieties of designs
Hammocks are classified according to various parameters. Now there is a wide range of them in stores. They are divided into the following types:


And also hammocks differ in shape. They are round, cocoon-shaped and in the form of hanging chairs. Cocoons are the simplest device configuration. They have many benefits. For example, they are light in weight. If desired, the product can be easily placed in a backpack and taken with you on a trip. In a dream, it is impossible to fall out of a cocoon. It tightly fits the human body, so you can relax in nature. But the cocoon has disadvantages:
- It will take some skill to get into it.
- The hammock tightly fits the body, so it is very difficult to change position in a dream.
Hanging chairs and round hammocks are suitable for relaxing in a sitting position. Very often, such designs are used for the manufacture of swings. Some are large sizes to accommodate the whole family or friends.
Depending on the history of origin, several types are distinguished. They don't look alike. Each person will be able to choose for himself a product that he will like. The following types are distinguished:

The choice of manufacturing technique and material
Products that are sold in modern stores are often offered to be purchased together with a stand. Such hammocks meet the requirements of comfort and reliability. modern man. The product looks original and unique, will fit into the interior of any home or complement the beauty of the suburban area. The device with a stand is mobile, easily transferred to any convenient place. Without a doubt, any person for himself in the store will choose suitable look products. But the craftsman has work in his hands, so such a person will want to make a hammock on his own. Various techniques are suitable for work:
- Weaving macrame with your own hands;
- Knitting;
- Sewing.
 You can weave a hammock with your own hands from fabrics of various qualities. You can also knit a product from strong things, such as jeans, ropes or strong threads. In addition to the adult version, you can make a children's hammock at home. In order for the work to be successful, you need to adhere to step by step diagram. Knitting a hammock is not difficult at all, as it might seem at first glance.
Production depends on the skill of the person. If you want to sew from fabric, then you can use this option. And if a person likes to knit, then the choice stops on a knitted product. And if the craftsman loves to weave macrame, then in this way you can make a hammock. If there is no difference in which way to make the design, then you need to weigh all the pros and cons of the future product. A fabric item has a solid canvas, it has no gaps. Such a product is not blown through, you can put any small thing here, it will not fall between the gaps in the hammock. For example, you can place a phone, watch or tablet on a hammock.
A design made of threads can become a pleasant place for relaxation in nature. Guests who see such a structure will remember it for a long time. The threads used for weaving a hammock must have increased strength. Experts recommend using cotton material. If the threads are of synthetic quality, then it is not very convenient to sit on them. In any case, no matter what material the product is made of, attention is drawn to the following parameters:
- When in contact with the material, a person should not experience negative emotions.
- A hammock should be aesthetically pleasing. The person who sees it should want to lie down or sit on the product.
- The structure must be solid.
Create a hanging variant
Every craftsman can make a hammock with his own hands. Preparatory work is the choice of material. You also need to prepare necessary tools, create a product diagram or pattern if the hammock is made of fabric. Step by step product street version without the use of a framework, it is very simple:

If the product is planned to be made using the macrame technique, then you need to decide in advance on the weaving pattern. For example, the fabric may be mesh or patterned. It all depends on the skills of the craftsman. Products are knitted not only with knitting needles, but also with a crochet. Thick and strong threads are bought for a hammock. It must be borne in mind that the hook or knitting needles must be of the required size. As an experiment, you can try to make a thing out of a strong cord or ropes.

For example, a hammock is knitted from simple double crochets or garter stitch. To decorate the product, beautiful openwork threads or fringes are sewn on the sides. Before proceeding with the manufacture of a hammock, the dimensions of the structure are calculated in advance. The material must be stock.
The fabric is purchased at the store or old things are torn apart. It is very important that the design is not dilapidated.
Step-by-step instruction
If you wish, you can weave a hammock from a rope with your own hands in a day. For this you will need:
- Three meters of dense fabric.
- 25 eyelets.
- Two wooden bars.
- Two metal rings.
- Two hooks and 30 m thick cord.

The execution of the work consists of several steps: first you need to formulate an idea, and then cut the fabric required sizes. Each edge of the product is tucked inward by 7 cm. The fabric is sewn on a sewing machine around the entire perimeter. If the quality of the material is strong, it does not crumble, then the thing is sewn only from the fastening side. Next, markings are made for installing eyelets. There should be at least 10 of them on each side. Then holes are cut under them.
The work is done with stationery knife or small scissors. Then the grommets are installed in their places. When doing work, the main thing is not to confuse the front and back sides. Bars are prepared in advance. Holes are drilled in them, at the same distance as the eyelets on the fabric. The cord is pulled, while the tension is controlled. The lace is sequentially threaded through the ring and eyelets.
To secure the cords, a special wooden frame. Hooks are driven into the support, on which the canvas is subsequently hung. You can see the scheme of weaving a hammock with your own hands on the Internet. There are detailed descriptions in the pictures. When knitting, the main thing is not to get confused, then the pattern will turn out to be clear and competent.
Adding decor elements
 Everyone wants to have something that others don't have. Such a product will favorably emphasize individuality and give the interior a finished look. A DIY hammock can be decorated with some unusual elements. For example, you can sew on a synthetic winterizer and place it between two layers of material. Thus, it will be convenient and comfortable to sit on a hammock. The threads of the product will not dig into the skin. Some put a blanket and pillow on the hammock. Then on a hammock you can relax and unwind.
For functionality of a product on each side pockets are sewn. There you can put various little things, for example, a water bottle, glasses, phone, tablet or book. If the hammock is connected, then a beautiful openwork border can be sewn to it. Effective stripes are made with a hook or knitting needles. If the canvas is made in the style of macrame, then it is appropriate to add brushes or fringes to it. Additional accessories are made from the same material as the hammock itself. Then the thing will look organic.
Attention, only TODAY!
Hammock with your own hands. Ideas, strapping scheme, master classesHammock models are different. But the requirements for all of them are common.

1. The most important thing is the reliability of fastening and supports. The hammock can be hung between two garden trees, poles or supports of a children's swing. If these are trees, then with a trunk no thinner than twenty centimeters in diameter. If the supports are poles, then they are deepened into the ground no less than a meter. Exactly the same as for installing a swing. It is important to know that the more the hammock sags, the less the load on the supports.
2. A hammock is hung on standard height 1-1.5 m above the ground. The distance between the supports is up to 3 m. If we dig them in, then we calculate the distance between the supports of the hammock as follows: the length of the hammock + 30 cm. more deflection.
3. Hammock mounts. Ropes should be thick and strong. Not less than eight millimeters in diameter. And do not be too lazy to strengthen the fabric with eyelets, if necessary according to the model.
4. Hammock fabric is good to use tarpaulin, mattress teak, camouflage and the like. Synthetic fabrics lighter, stronger and cheaper, but after spending the night in such a hammock, you will realize that you made a mistake. The body must breathe. Moreover, a hammock made of natural fabrics takes the shape of the body much faster. quality hammock not meant to live for decades. You have to change every two years.
5. If the hammock is made of cords, then cotton threads. The knots on them are tightened tighter, and it is more pleasant to touch them than slippery nylon ones. In places where the rope can fray and where it comes into contact with a tree, we put on it a collar from a nylon tube.
Let's look at a few popular models and how to make them right.
DIY Mexican hammock

It is made without crossbars, just from a piece of durable fabric. Like a cocoon, a Mexican hammock envelops a person completely, relaxes every centimeter of the body.
It is impossible to fall out of it. It is also difficult to get into it :) Therefore, it is not recommended to use such a hammock for elderly or sick people. For everyone else, this is the most beautiful model. I folded it into a case, threw it into a backpack. The weight of a Mexican hammock is not more than a kilogram. And a house is ready for you under every tree, like a real Indian hunter.
In order to make such a miracle, you will need 2 pieces of fabric 1.5 m wide and 3-3.2 m long. Tuck each piece and stitch around the perimeter. Then follow the instructions, focusing on the diagram, which is shown in the photo.

1. We sew 2 m along the long sides (green line in the figure).
2. What is marked with a yellow line in the figure, do not sew. So it will be very convenient to put a rug or “foam” inside the hammock, which will increase comfort.
3. Tighten the narrow side (red line in the figure) by 2-3 cm and sew.
4. We pass the cord into the formed "tunnel".
5. We cross the cord and tighten its ends. The fabric will gather into a knot.
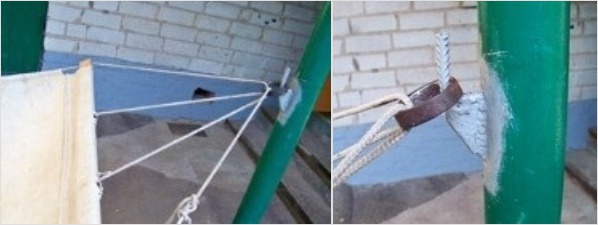
6. With the ends of the cord, we wrap the place of contraction 2 times and tie it in a knot.


7. Wrap the tree with a rope for hanging several times, placing a cloth or putting a tube on the rope. This will protect both the tree and the rope. Next, the suspension rope is attached to the knot, which fixes the fabric of the hammock with a knot.
It remains only to check the strength, adjust the tension and have fun!
If you leave the hammock as it is, it will wrap you in a cocoon. And you will feel like a baby in a sling. If you put a rug inside, the design will be more rigid and spacious. Both options are good!
Brazilian hammock on wooden sticks

If you hang it low enough, you can safely use it for children and the elderly.
You can make a Brazilian hammock with your own hands in this order:
1. We take two pieces of fabric 90x200 cm. Two wooden sticks (many recommend handles for shovels) 90 cm long, a drill, two packs of 10 m linen cord. So it will not come into contact with the body, you can take nylon.
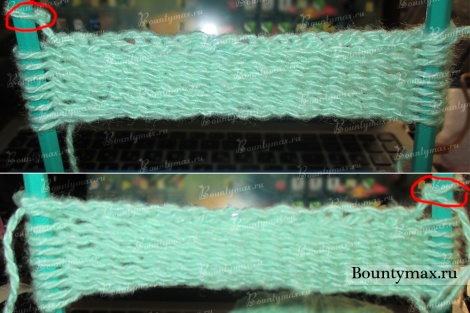
2. We sew two panels of fabric together. We bend short sections by two centimeters and sew. We make markings for eyelets every 8.5 cm.
3. We install eyelets on the marked places. We do 10 on each side. If you do not have access to such benefits of civilization, make loops from the same fabric by cutting 20 squares of 20x20 cm, folding in half, stitching and sewing securely to the edges. The rope will pass through them in the same way as through the eyelets. But metal mounts still much more reliable. Insert them if possible.
4. We also make markings on sticks: we retreat 2.5 cm from the edges and further 8.5 cm.
5. We drill holes with a diameter of 20 mm so that a 8 mm cord can freely enter in two additions.


6. We cut the cord into meter-long pieces and pass each one through a hole in the stick, then through the grommet, again through the stick. Align the ends.
7. At a distance of 0.5 m from the stick, we collect all the cords in a bundle, tie it into a knot and tighten it securely.
8. We braid the knot. The hammock is ready.
DIY wicker hammock
You can easily create it if you are familiar with macrame skills. In this case, you will need strong wooden slats without a single flaw (cracks or knots). We make holes in them every four to five centimeters. The diameter of the holes is equal to three diameters of the cord.
A cotton cord with a diameter of 8 mm is required. The length is calculated as follows: the distance from the rail to the rail multiplied by 3, multiplied by the number of holes. For example, if we choose a hammock length of 2.5 m with standard width 90 cm, then the body of the hammock will take about 150 m of the cord and 20 m for the mount. We fix each cord in a stick with a loop and weave the fabric. Each knot is woven from four cords. We try to make cells no more than 7 cm. The simplest weaving for a hammock is shown in the figure.


We draw the finished mesh through the holes in the bar, and connect four into knots. For strength, metal rings can be used.


Making a hammock

The round cradle hammock belongs to the design delights of our time. In order to make it, you will have to sacrifice a metal hoop. In addition, we will need:
- 3 m of fabric with a width of 1.5 m;
- the same amount of synthetic winterizer;
- 8 m of reliable belt tape;
- a little patience and a free evening.
And in this article I will tell you how to weave a network with your own hands with a shuttle.
An easy way to weave nets by hand for beginners
Hammock - captivating nets for sleeping and comfortable rest at the dacha or in the apartment (to whom it is more convenient). Let's start our selection of master classes on weaving hammocks from the very simple option(it is shown in the photo below). The network of such a hammock is woven from a single cord, while it is intertwined without a single knot on the canvas.
If you wake up to weave a wide net, you can additionally add a rope. But not in the middle of the canvas, but first of a new row. In the future, when the turn comes to the schemes, you will understand what I mean.
Before proceeding to a step-by-step photo master class, watch the Discovery video on how to make a hammock with such a seat. By the way, this is a very good video tutorial.
And another great video. Here, a hammock is woven at home and from a different material. In addition, pay attention to the design on the wall, thanks to which it is very convenient to weave nets.
Of course, I would not recommend making holes in the walls in the apartment, but in the garage you can. For those who want to weave a hammock at home, you can build a U-shaped structure from rails or pipes (it is not necessary to take iron pipes - pay attention to plastic / polypropylene ones).
In addition to hammocks, excellent hammock chairs come out of such a network - we mentioned them in the article: "".

Netting for beginners
So, let's move from lyrics to actions. Before weaving a hammock fabric, you need to tie the base chain with small links.
Video tutorial with weaving a warp chain with small links.
And a small step-by-step photo instruction from me. I have ordinary yarn and two pencils as a base (a mini version for demonstrating the weaving technique in the photo).
Before knitting a chain, we make a knot with a loop. My version of the node is shown in photo No. 1-4. As a result, I got a knot that slides along the thread, i.e. loop size can be adjusted.
You can use any other knot - the main thing is to fix the thread.
I tightened the loop on the pencil and started knitting the warp chain directly. The course of the threads was marked with arrows. And then we simply duplicate the actions until we get a chain of the desired length.
The finished chain should be equal to the desired length of the hammock + the free end of the cord for attaching to the base. Therefore, you can not immediately cut the cord from the main skein. Tie the chain and then cut it off - so you definitely have enough rope for the length you need, and on the contrary there will be no surplus.

View of the finished base.

Now you need to weave the main cord into it, the beginning of work is shown in the video.
Since I have yarn, I resorted to using a hook. In the video from Discovery and presented just above, the thread is threaded into every 6 loops. On my mini version, this is too much - I threaded through one (photo No. 13). So from left to right we take away the end of the thread and tie its end (on the right) to the base.
If you wake up to weave a large hammock from thin threads, then it’s also better not to make a big indent. So the chain links will look neater, and the network will be stronger.
A thread with a ball (shuttle with wound threads), we wrap around the base as shown in photo 15. Below, in the supplement diagram, I will focus your attention on how to start the thread behind the base on the left and right.

The lace on the left and right is displayed around the base in different ways, and the rows themselves too. When you go from left to right (top of photo), the ball must be pushed into the loop from the bottom up. Accordingly, when you go back (from right to left), you push the shuttle from top to bottom.

On a scale, the network looks like this: we drive the thread back and forth.

We continue to weave until we get the desired length. If you need to add a thread to the canvas, tie the end to the base by tying a full row. Tie a new one to the base on the same side and continue to weave the network according to the pattern (you can also fly in threads of a different color).

Video with netting.
I prefer how the young man in the video below weaves a web (from 2 minutes 31 seconds). Pay attention to how, having knitted a row, he immediately tightens the cords. The result is a beautiful and very neat network.
The hammock seat ends as well as it began. It is necessary to weave another chain, the same as weaved at the very beginning, and tie a canvas to it.
Video tutorial on completing the network.
Since I wove an inferior hammock, but only a mini net, I did not complete it. Please note that the finished canvas has neither the wrong side nor the front side - it is the same on both sides.
At the beginning of her network, she specially made a raised loop (wrapped in red). As you can see, the network looks the same from both sides.
It was a little stretched between the pencils. Here it lies at rest.

Stretches very cool.


In general, a hammock from such a network will turn out to be chic. And if you weave a hammock chair (the network is narrow, but wide), then, as for me, the result will be even better. In the captivity of such a network, it will be possible to bask in full growth.

Below are some examples for inspiration. Please note that both on a hammock and on a hammock chair, you can crochet a beautiful fringe - this will greatly improve appearance finished hammock and give it personality.


How to weave a Mexican hammock with your own hands
Thanks to the inventive Mayan Indians, we can admire the hammocks below.

Watch a video from the production of hammocks.
Well, what are you afraid of? Amazing technique and speed!
Don't worry, the devil is not as scary as he is painted.
To get started, watch a trustworthy video tutorial with instructions on how to weave a Mexican hammock with your own hands. Don't worry, I'll comment on everything step by step photos and add diagrams.
So, for starters, step-by-step photos from the video. In the Mexican hammock, threads are wound on the pillars of the base (they are called sleepers), and they are braided by others - workers (their specific name is dancer). The author in the video braids five sleeping threads in 2/3 steps.


Schematically, it looks like this: we thread the thread under 2 sleepers, draw it from above over 3, then, on the contrary, we start it under 3, we draw it over two. We alternate actions to the end of the row.
The next thread (red) goes down one row relative to the first (blue). But we need five threads again, so in each new row from the bottom we add one new cord (marked it in green).
At number 2, she showed the course of weaving, if you will face the network, weaving rows in that and in reverse side. And at number 3 is the view if you walk around the hammock.

Network at scale. Pink is the initial five threads wound, green and yellow are added with each row.
In blue, those with which the warp threads (sleeping) were braided.


And now the correction: the hammock is higher than the gossip of dense twine, so it is woven without a warp. However, the Mexican hammock is often woven from thin soft threads, and they cannot do without a warp. In the photo below, soft mesh hammocks with a specially designed base.

How is it done? Bearing / sleeping threads are first knitted with special knots, in several rows - we form columns. We make columns along the length at a distance of eight to ten centimeters. The instructions in the photo show how they are tied. We tie two threads, in the next row we add one new one and take one from the previous pair, etc.

For more clarity, watch the video tutorial.
By the way, the network in this hammock is woven according to the 2/1 principle - three threads at the base per row (in the previous version, 3/2 was considered - five threads per row). As you understand, you can change the number of braided threads to your taste.

Strictly speaking, the first network can be woven according to this principle. And by the way, this way you can easily make it colorful. For example, you wind white threads on the base, and braid with blue cords.

So it is more convenient to weave a multi-colored network for a hammock.

Well, a drop of inspiration: if you wish, you can weave a “family” hammock in which you can fit the whole family!

Besides hanging chair this technique is also beautiful.


What to choose threads or cord
A few words about what yarn or cords to weave a hammock from. All in all, external difference between hammocks of thick cords and thin threads you should have caught. If you dream of a soft, enveloping, incredibly cozy hammock, give preference to thin threads.
If you wake up to weave a hammock for a house / apartment (room), you can take cords / threads from natural fibers(cotton threads). But for outdoor hammocks, it is better to choose a more reliable material, for example, polyester cord, nylon threads or best option weather resistant acrylic yarn.
How many threads does it take to make a Mexican hammock? - on average, for a hammock measuring 1.27 m wide and 2 m long, you will need 900 m for sleeping and the same for dancing. Those. about 1800 m. is approximately. Big role plays the thickness of the selected yarn. The thinner the threads, the more they will be needed.
That's all I wanted to tell you about wicker hammocks. For more insight into the material, take a look at the article: how to make a hammock with your own hands.
Inspiration to you and successful experiments!
Any person who has own house or country cottage area, dreams of at least occasionally lying in a hammock, hiding from the hot rays of the sun. However, many people tend to think that it is almost impossible or very difficult to weave a hammock with your own hands. But this is absolutely not true. under the power of everyone. It just takes a little patience.
Therefore, consider different ways how to weave a hammock.
Today, there are many types of different hammocks. Accordingly, the materials used for them are also different. The most popular is Brazilian. It is distinguished by the relative simplicity of weaving and high strength and durability.
Brazilian hammock weaving
Before you begin to weave a hammock with your own hands, purchase the necessary materials. There are only two of them: this is a very thick cord that can withstand up to 200 kg (it will take about 25 meters), and a large canvas of strong fabric, the average size which is about 230 × 120 cm. Nothing more is needed to weave this type of hammock, except for your skillful hands.

So, we start by taking a piece of fabric and carefully sewing it on all four sides. This is necessary so that the edges do not fray. Next, we make blanks from the ropes. To do this, cut off about 12 pieces from the rope. At the same time, the length of each is 15 cm. This will be a kind of basis for the initial loops.
On each side of the hammock, you need to put 6 such ropes, after folding each one in half, with a grip of 2-2.5 cm, and sew. You will get something similar to a fringe about 3 cm long. Remember to keep a distance of 10 cm between the ropes when applying and stitching.
And in order to have more confidence in the reliability of the hammock, it is also advisable to additionally stitch the edge of the fabric with loops with a thick ribbon. Now, through the resulting loops, we pass a cord 75 cm long, the ends of which are then tied. It turns out that all the loops are connected with a cord at the edge into one.
You also need to do on the second side of the hammock. After that, we take the rest of the cord, make a couple more knots and twist the two tails into one according to the pigtail principle. At the end, we tie all this several more times, leaving about 25 cm free. With these ends we tie the rope to a thick tree branch. We do the same on the other side and also tie the other end of the canvas to the tree. So you get a hammock in which you can lie, swing and enjoy the fresh air.
Back to index
Hammock with full wicker base

The next type of hammock is more complex, since its entire base is completely woven from the cord. To work, you will need as many meters as possible (minimum 150) of a very strong cord, scissors and two wooden planks 80 cm long each.
Let's start with planks. In each piece of wood, it is necessary to make 6 holes at a distance of about 5.5-6 cm from each other. The thickness of the holes must be such that the double cord can pass through them normally. After that, cut the cord into 12 equal segments. The length of each such segment is at least 3 times the estimated length of your future hammock.
Now we take two segments and stick them into the hole on the wooden block. We do this with all cords. Now we take the outer tips, the length of which should be at least 1.5 meters, tie them all together, twist and make a loop, for which the hammock will then be attached on one side.
All other ends of the cord, which are located in the inner part, must be tied two by two to each other in the form of knots, as shown in the diagram. At the same time, it is important that in the finished knot one lace is from one hole, and the second is from the next nearby one.

Stages of making a hammock: 1 - Assembling a hammock, 2 - Tying the cords, 3 - Fastening the rope.
So we get the first finished row of a hammock. All subsequent rows are made according to the same principle. It is very important not to forget to tie only those ends of the ropes that come out of adjacent holes, and not from one. Also try to get the resulting cells were the same and not too large. After all, a hammock with smaller mesh cells will withstand significantly greater loads.
After you weave the length of the hammock you need, you need two ends of the remaining ropes from different holes stick into one on the second prepared wooden plank. After that, the ends must be tied, and the outer tips should be connected together and also tied into several knots. After that, twist them and make a loop for which the hammock will be hung from the other side. Now you can safely use such a hammock for relaxation.
The invention of the hanging bed is attributed to the Indians of South America. Traveling through the endless jungle, they came up with an easy-to-carry bed - a hammock.
Suspended at a low height between the trees, he protected a person from mosquitoes and poisonous living creatures crawling on the ground.
The advantages of a compact hammock design were quickly appreciated by the sailors - the discoverers of the American continent.
They provided hanging canvas beds for their ships and shared with the European inhabitants the invention of the natives.
Today, the hammock is loved by summer residents who prefer to rest on fresh air stay within the four walls of a city apartment. Modern designs hanging lodges have become much more complicated and more convenient than a simple "cocoon" of the Indians. The choice of materials for their manufacture has also expanded significantly.
In this review, we will look at what a hammock is for a summer residence and what options for ready-made designs are on sale. Lovers of homemade waiting short instruction on the topic of self-assembly.
Design options for hammocks
The simplest type of hammock is the one used by the Indians. This is a piece of durable fabric, the ends of which are gathered into a tight bundle and tightly intercepted with ropes tied to trees or poles. A strong fixation of the ends of such a bed is provided by a rope knot, which received two names: "cow" and "lark's head".

The construction of a simple hammock and knitting a cow knot
Simplicity is good, but the comfort of such a hanging bed is not enough. Fans of spinning in a dream will not be comfortable resting in such a dense "cocoon". For this reason, a web with end rails is more often used, expanding and leveling sleeping area.

Classic wicker slatted hammock on the veranda
By the way, regardless of the type of hammock, placing it on the veranda, you will get a wonderful place to relax and read books.

However, openwork weaving is beautiful, but not practical. Hard knots press on the body, and a cold breeze blowing from below can chill the back muscles. Therefore, the rope base of the hammock structure is often replaced with a fabric - dense, even and windproof.

The fabric bed of a hammock is more comfortable than a braided rope
In addition to the base material, there is another fundamental difference between hanging beds - the type of fasteners used. There are hammocks that are mounted on a frame. On next photo we see a hanging bed, the ends of which are attached to two inclined wooden posts.

Hammock on the frame is simple, mobile and reliable
The main advantage of this design is mobility. The wooden frame can be moved to any place convenient for rest. The shape of the hammock stand can be not only straight, but also curved in the form of an arc.

Original frame made of bent wooden segments
A reliable stand for a hammock does not have to be bought in a store. You can build it yourself. This will require several meters of steel pipe and the skill of a welder.

Frame from steel pipes easy to move around
In addition to single frame systems, hammock beds suspended from the frame at four points are currently very popular.

Double hammock bed wooden frame with a canopy
A light tent-roof is a useful addition to this design, protecting the bed from the sun and rain.
The suspended bed gives the chance not only to have a rest comfortably, but also to have a good time. That's why garden hammock swings are popular with adults and children.

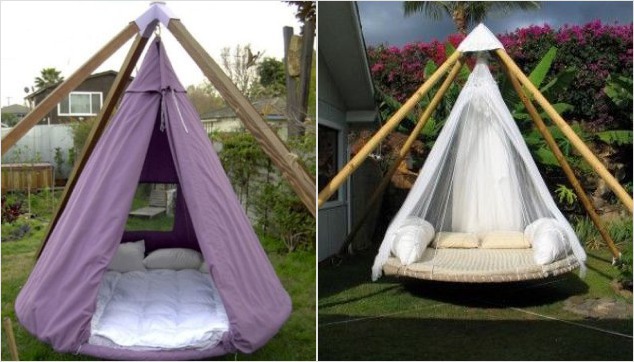
Sleep on outdoors on a warm summer night, it is not only romantic, but also very pleasant. Only mosquitoes can disturb the idyll. So make your choice, give preference to systems that can be completely closed mosquito net.

Hammock on a frame in the form of a house - best defense from mosquitoes, wind and scorching sun
The idea of a hanging bed has found application in other original designs. An example is a hanging hammock chair, which, by the way, is not so difficult to make on your own.
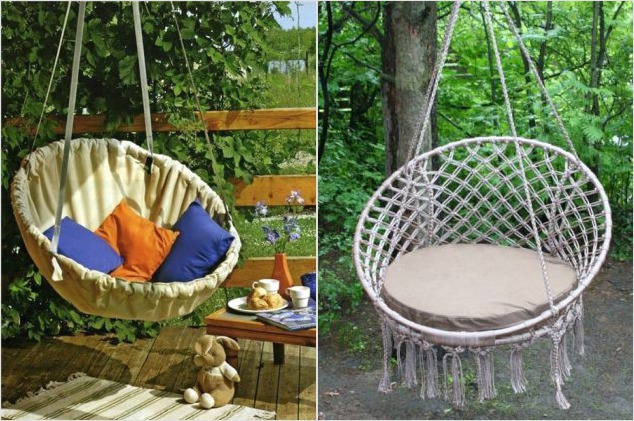
Hanging chair in a round shape - a comfortable place for reading and sweet dreams
Taking as a basis a steel hoop of a suitable diameter, durable fabric and several strong beams, you can build a round bed for adults and a cozy cradle for a baby.
Round hammock with awning, suspended on inclined supports
The idea to make a hammock from a hoop turned out to be very fruitful. The easiest and easiest way to make such a design is using a small trampoline. Hanging it on cables to a powerful ceiling beam in the gazebo, we will get a comfortable bed for rest.
Children will not suffer from such alteration, since the structure can be used not only as a sleeping place, but also as a platform for jumping.

Trampoline hammock. If you want - rest, if you want - jump
We should not forget that a hammock is not just a comfortable hanging bed, but also an original element for decorating the site. By fixing it on the posts of a decorative pergola and providing it with a stepped podium, you will create a picturesque corner for privacy.

Estimated prices
The most low cost at hanging hammocks without load-bearing frame. High-quality single models (woven from rope and fabric) can be purchased at a price of 1,800 rubles.
A hammock with a frame for giving is much more expensive. Price tags for it start at an average of 10 thousand rubles.
For a two-three-seat swing hammock, equipped with an awning and a mosquito net, you will have to pay about 18-40 thousand rubles, depending on the model.
Popular among lovers of countryside recreation, hammock structures made in the form of an armchair can be bought for 5-7 thousand rubles (without a frame) and more. A hammock chair complete with a frame will cost no less than 16 thousand rubles. The prices of the most sophisticated models reach 50 thousand rubles.
How to make a hammock at home?
Anyone who owns the technique of mesh weaving will be able to make a hammock with their own hands completely out of rope. For those who are not familiar with the art of knotting, we offer a variant of a fabric bed fixed on wooden slats.
Before starting work, you must carefully study the step-by-step photo instruction or thematic video. Sewing machine capable of working with thick cloth you will also need. In addition to durable material, you need to buy a coil of thick rope (the footage depends on the design of the hammock) and two planed wooden bars (section 3x3 cm).
The first step is to make a stock pattern. It will require a piece of dense upholstery or canvas fabric measuring 1.20 x 2.10 meters. At the corners of the pattern, you need to cut four square pieces of material measuring 15x15 cm to turn the edges of the fabric along the long and narrow side. Inside the gates, we will skip the ropes (along the panel) and insert the hammock bars (across the fabric).

Having smoothed the chalk line marked with chalk with an iron, it must be sewn on a typewriter. After that, we move on to the bars. They need to drill 4 holes for the ropes (two at the edge and two inside at an equal distance from the center).

Rings for skipping ropes and hanging a hammock can be made from water pipe, cutting off several pieces from it with a grinder. By grinding them on an emery wheel to remove burrs, we will protect the ropes from chafing.
The last operation is to adjust the position of the ropes and level the hammock. It is most convenient to carry it out by hanging a hammock on hooks driven into poles or tied to tree tables.
If making a hammock seems too complicated and time consuming to you, then you can buy ready product, and make a frame for it yourself from wood. As an example, consider the simple construction discussed at the beginning of the article.

You need to buy 3 to work. wooden beams with a section of 10x10 cm and a length of 3 meters each. Two of them will go to the manufacture of inclined racks. We cut the third beam in half and get two supports. The struts and the lower part of the frame cross member can be made from planed boards with a section of 5x10 cm.
Assembly starts with the bottom support frame. Two boards are cut into two short pieces of timber (lower supports) and fixed to them with bolts, nuts and washers. After that, struts are symmetrically attached to the supports at an angle, leaving space between them for the passage of inclined beams.

The support beams are temporarily fixed with self-tapping screws to the struts and frame boards, after which holes are drilled in place for installing bolts.

Pulling off the structure threaded connections, on the beams mark the installation points for hooks for hanging the hammock.
Holes for hooks are drilled in the marked places, with a diameter of 2 mm less than the thickness of the screwed rod.


