Is it advisable to repair an interior wooden door? Do-it-yourself door restoration: step-by-step restoration of an old door Repairing a door frame in a wooden house
Are you sadly looking at a sagging door with a jamming lock and peeling varnish? Are you planning to as soon as possible replace it? Do not hurry! Making such a drastic decision is the easiest way. But why not try to cope with the problem? Majority door defects successfully “treated” at home, without the help of professionals. DIY door repair - real opportunity save a decent amount of money and once again make sure that a born master lives in each of us.
Do-it-yourself wooden door repair: eliminating typical defects
When do doors need repairs?
While the doors look presentable and there are no difficulties with their operation, the absolute majority does not even think about the need for regular maintenance of the structure. But from time to time, even the most excellent and high-tech samples need inspection and preventive manipulations - cleaning the surface, adjusting and lubricating hinges, coating special compounds. If you don't do this, one day you will find that the doors:
- sagged and scratched the floor;
- creaking;
- hanging on hinges;
- do not close well, fitting too tightly into the box;
- dried out, cracks appeared in them;
Problems with the box (wobbly), decorative exterior finishing canvases (the veneer has peeled off, the paint has peeled off).

Worth knowing! The cause of malfunctions or damage to the appearance of a structure is not always due to improper operation. Often the “root of evil” lies in the quality of the door itself, in violation of its production technology.
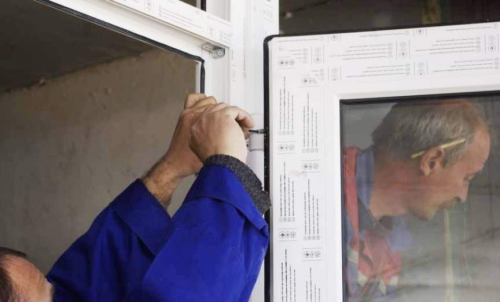
Strengthening door frame
A box that does not hold well in the opening can be strengthened using this simple algorithm of actions:
- Remove the trim and door leaf.
- Level the box.
- Secure the box in the correct position.
- Drill two or three holes each in the hinge and lock posts (be sure to go deep into the wall).
- Drive wooden dowels (hardwood) or steel pins pre-lubricated with epoxy glue into the holes.
- Re-hang the canvas and attach the trim.
Note! It is necessary to correct the position of the box taking into account the door leaf - the convenience of opening/closing the door should not suffer.

Troubleshooting hinges
If the door touches the threshold or floor, closes poorly, or hangs loose, then the hinges may need to be replaced, adjusted, or re-hanged.
First of all, check how firmly the top hinge is held: tighten the screws if necessary.
A slightly sagging door can be “returned into place” using a metal washer or a wire ring placed on a hinge pin (this advice is relevant for structures equipped with removable hinges).
None of the tricks help? You can try to deepen the recess for the hinge plate (in the strapping beam).
When working with hinges, it also happens that the screws turn and it is impossible to tighten them - especially if you are making repairs old door with your own hands. What to do in this case? There are several options here:
- Replace the fastener with a longer standard size.
- Seal the holes for the screws with matches.
- Move the stitches a little higher or lower.
Adjusting the web geometry
Sometimes even a cursory inspection helps to understand that the faults of the door “lie” not in the frame, or even in the hinges - but in the door leaf itself. More precisely in its geometry.

The canvas may swell from moisture or dry out. Also, after several staining or varnishing, a too thick layer may form on it. protective equipment. What to do?
Be careful! Before planing, it would be a good idea to make sure once again that the problem is definitely not a deformed box.
Large gaps are not a problem
A door made of unseasoned wood will inevitably dry out during use. And this can lead to a lot of problems. Large hinges between the canvas and the box, a latch tongue that does not reach the strike plate, and a generally sagging design - you must agree, this is not very pleasant. What to do?
- Rearrange the hinges to pull the door up.
- Attach a strip to the bottom end of the canvas required sizes, trim it flush.
- Eliminate side gaps using a strip screwed to the hinged end of the door.
- Fill the gaps between the trim and the slats and clean them.
- Paint the trims.

Strengthening panels
A dry door isn't just about gaps. These are also panels that do not hold well in the grooves of the trim.
In this situation, it is recommended to re-glue the strapping bars. To do this, the door is removed from its hinges, disassembled, and thoroughly cleaned of old glue and dirt. Then the bars are connected (glued), the panels are inserted into place and the transformed structure is placed in the clamping device.

Cracks in the door
Repairing interior doors with your own hands often involves sealing cracks. You'll have to tinker, but the result is worth it.
Algorithm of actions:
- Place the door on the table/trunks.
- Remove any existing coating from the surface - you can use sandpaper, special liquid products, etc.
- Sand the canvas using fine sandpaper.
- Fill small cracks and scratches with wood putty/a mixture of epoxy glue and sawdust.
- Sand the dry surface again.
- “Mask” large gaps (including through ones) with wooden inserts coated with glue.
- Fill any visible imperfections.
- Prime the entire surface of the door.
- Cover the canvas with varnish or paint. If it is not an interior door, but an entrance door, the varnish should be applied in at least two layers.
Repairing metal doors - what can you do yourself?
Metal doors are a more reliable structure than wooden ones, although repairing them on your own is sometimes not so easy.
The door is skewed
It is impossible not to notice the distortion of the door - it begins to scratch the threshold, stops closing well, its sound and thermal insulation properties deteriorate sharply. There may be several reasons for this phenomenon.
The first one is too heavy weight metal sheet. If the door is made of thick laminated steel, even the best quality hinges will one day fail. Repair front door doing it yourself in this case is extremely difficult. You can try your luck by cutting off the old loops and replacing them with new ones.
The second is natural wear and tear of the hinges. If they are “screwed” and not welded, then it is not difficult to correct the situation. The main thing is to find high-quality fittings with a suitable “design” among the assortment of stores.

The third is the skew of the door frame. They can be eliminated by driving wedges under the base of the structure.
The door is rusty
It especially “gets” its lower part.
To put rusty metal doors in order you will have to whole line quite labor-intensive manipulations.
- Prepare the structure for repair - remove seals, fittings, etc.
- Use a wire brush to remove any rust and any loose paint.
- Sand the surface.
- Degrease the doors with solvent.
- Putty the damaged areas (it is recommended to use a product for cars).
- Sand the surface again, aiming for perfect evenness.
- Prime the door with aerosol primer.
- Apply the first coat of paint.
- Sand (if necessary) any stains that have formed.
- Apply a second coat of paint.
- Install the fittings and seal on the dry, repaired door.

How to repair a plastic door?
Plastic doors are considered exemplary, aesthetically pleasing and reliable. But with a long service life, some “failures” in their operation are not excluded. Therefore, know how to make repairs plastic doors with your own hands it’s still worth it.
Door handle malfunction
This breakdown is one of the most typical for plastic construction. To replace the fittings, turn the decorative plate at the base of the handle ninety degrees and unscrew the two screws.
If the handle is intact, but turns with great difficulty, it is quite possible that the lubricant has simply dried out. To save yourself from suffering, purchase a lubricant and treat all moving parts of the mechanism with it.
Door sagging
To fix this problem, you should adjust the door position using a hex key. It is inserted into the lower loop and turned clockwise - thus, the canvas rises.

DIY door closer repair
Door closers are extremely popular mechanisms recently. They are responsible for the quiet and smooth closing of the structure. The devices, contrary to popular belief, are installed not only on massive and heavy office doors or entrance doors, but also on entrance and interior doors.
What malfunctions can occur? faithful assistant silence and comfort"? Can you deal with them on your own?
Leakage of working fluid
This failure is the most common among door closers. The working fluid begins to flow out through the depressurized seals. Most often this phenomenon is observed in winter period. It leads to the door closer losing the smoothness of closing the door - the device turns into a very ordinary spring. Since it is not possible to disassemble the closer, in such a situation replacing the mechanism is indicated.
Broken rod (lever)
The rod is one of the few parts of the closer that, if broken, can be repaired with your own hands. What usually happens to her?
- bend;
- jamming in joints;
- break;
- damage to the fastening point.
Minor damage to the rod can be repaired by welding. In case of serious malfunctions reasonable decision the part will be replaced. This will cost less than replacing the entire mechanism.
If you have a working rod that matches the parameters from another closer, you can use it.

Subtleties of adjustment
Long-term operation of the closer clearly affects the quality of its work. Fortunately, most minor defects can be eliminated with proper adjustment.
- if the door closes too quickly or, conversely, unusually slowly, turn the adjustment valve clockwise/counterclockwise;
- the “after-clap” speed is controlled by the second adjustment valve;
- The tension force of the spring is adjusted with a nut;
- To use the closing delay function, you must tighten the lock with the door open at a right angle.
Summary
As you can see, many door faults are not difficult to fix. It can be more difficult to decide on the appropriateness of such actions. If the condition of the doors is too critical or repairs require expensive equipment that you do not have, it will be easier and more correct to acquire a new interior element.
Typical problems that our craftsmen encounter when repairing interior doors are defects associated with the aging of materials and structures door block. These are various gaps, cracks, sagging and curvature of the geometry of the doorway, bad job accessories.
As a rule, they are all complex. Drying interior door leads to the appearance of cracks and prevents tight closure, the appearance of gaps between the elements of the door leaf. This violates the heat and sound insulation properties of the structure and, moreover, looks unaesthetic. And this problem also needs to be dealt with comprehensively.
If you simply cover such cracks with putty and cover them with a layer of paint, very soon the problem will manifest itself again - after all, it has not been solved. Unfortunately, in this case by simple means not enough. You will have to disassemble the door into elements, clean them and glue them back together under pressure. This is the only way to cope with further drying out.
And after this you can do aesthetic “cosmetics” - level the surface, fill cracks, sand and paint (varnish) the surface.
Another frequently occurring problem is sagging doors. There is only one symptom of this “disease” - the door sags and closes poorly, resting against the bottom bar of the door frame or the floor. But there may be several reasons:
- loosening of bolts and, as a result, lag of hinges;
- curvature of the geometry of the canvas or box;
- hinges that are not suitable for the weight of the door.
You need to get rid of sagging interior doors by eliminating its causes. Therefore, the solution can be either simple: strengthening the hinges, or complex: removing the door frame, eliminating the distortion.
The shortest-lived elements of the entire door block design are the locking mechanisms - the handle and the lock, which are used much more often in interior doors than in apartment doors. For repairs, all mechanisms are removed from the door and checked for functionality and troubleshooting capabilities. If repairs are possible and practical, we will repair the fittings on site.
"Weakness" sliding doors- a roller mechanism that needs periodic checking and adjustment. We repair all types of sliding doors, including book, accordion, radius and cascade sliding doors.
Replacement of glass, if it is carried out outside of scheduled repairs, is also carried out without removing the door leaf. We simply prepare a suitable size and color glass part and the master installs it on site. This work will not cause any inconvenience and is completed in a short period of time.
Repair of an interior door from the OknaDel company can give it a second life. Very often, the doors we repair not only look decent, but become an interior decoration. Don’t rush to throw away your old door - call OknaDel!
If your wooden door has lost its presentable appearance appearance or you find any faults, do not rush to throw away the product and spend money on buying a new canvas. You can fix a number of defects yourself. Repair wooden doors does not require the performer to have special skills - you just need to put in a little effort and do everything according to the instructions.
- Electric drill.
- Hacksaw.
- Construction hair dryer or special remedy for quick paint removal.
- Sandpaper.
- Putty.
- Matte white enamel.
- Paint the desired color.
- Brushes.
Door restoration guide
The most popular option for repairing doors made from the material in question is restoration of the door leaf, which includes removing the old paint coating, eliminating existing defects and applying new paint or other finishing material.
The first stage is preparation
Remove the fabric from the loops and lay it on flat surface. Remove old upholstery if available.


Stage two – paint removal
Get rid of the existing paintwork. The most convenient way to do this is with an ordinary hair dryer or at least a liquid to quickly dissolve the paint.

When using a hair dryer, be extremely careful - it heats up the product to extreme temperatures. high temperatures, so do not get too close to the surface being treated.
Heat the area of the coating and remove it with a spatula. Approximately every 20 minutes, the hairdryer should be given some time to rest. You will find recommendations on this matter in the instructions for your instrument.
In the corners of the canvas and others difficult places work extremely carefully so as not to damage the door material with a spatula.
Get rid of all the paint.
The third stage - grinding

Start rough sanding the door. Your goal is to remove any remaining paint that could not be removed with a spatula.
You can sand by hand or use a special sanding tool.
The fourth stage is the elimination of existing defects
At this stage you will need wood putty. Carefully apply it to the surface of the product in an even layer. Let the putty dry, and then carefully sand the canvas using medium-grain sandpaper, which can be nailed to a wooden block - this will make the work easier and faster.
Sand in accordance with the direction of the wood grain, excluding diagonal sanding and transverse movements - this will ensure that no sanding marks remain on the surface of the material.
If in the future you are going to varnish your wooden door, sand it as efficiently as possible, because... Even the most minor defects will be visible through the varnish.
After finishing sanding, wet the surface of the blade clean water, and then additionally go over the door with fine-grained sandpaper.
Fifth stage - painting
Before applying paint, the surface of the door must be cleaned of dust. To do this, simply wipe the wood with a damp cloth.
Proceed to painting the product. In this tutorial, the door will be painted in two stages. You can apply the paint with an ordinary brush. Apply the coating in the direction of the wood grain. One finishing coat will be enough.
Cover the canvas with white enamel. Apply paint of a different desired shade to the dry coating. Matte enamel should not be very liquid.

Allow the paint to dry (you will find the specific drying time in the instructions for your paint and varnish composition), and then sand the surface with fine-grained sandpaper. This will even out the coating and remove fine dust.
Stage six - tinting

Performed at the request of the owner. Usually, very liquid paint is used for tinting, so the artist needs to be extremely careful and careful, otherwise unsightly smudges will occur.
You can use a regular brush to apply paint. Select the number of layers individually in accordance with the required saturation of the coating. Typically, two layers of coating are sufficient to obtain a uniform and rich color.

Tinting paints dry on average within 6-12 hours (check the instructions). After the paint has dried, sand the door with zero-grade sandpaper.
Finally, all you have to do is reinstall the dismantled handles and return the door to its place.
Other decoration options
Instead of painting, you can use other finishing methods. Check out the features of popular options and, if desired, select the best way from the presented list.
Pasting

Self-adhesive photo wallpaper for doors Doorfix
Wooden doors covered with photo wallpaper specially designed for this type of decoration look great. Available for sale huge selection photo wallpapers originally manufactured in accordance with standard sizes wooden doors. You can also order the production of wallpaper according to an individual design.


Instead of photo wallpapers, you can use others Decoration Materials. In general, focus on the purpose and design features of the room.

If you plan to decorate your door with paper, let it sit for a while in advance. cold water, then cover each sheet with a thin layer of PVA and attach the paper to the surface of the door.
Smooth each sheet thoroughly to remove any air bubbles. Let the glue and paper dry and then coat the surface with clear varnish. It will protect the finish from fading and other damage.
Various types of fabrics can be used to cover the door. At this point, everything is limited solely by your imagination and preferences.
Stained glass design
To decorate a wooden door with glass inserts, you can use stained glass design methods. Available for sale a large assortment stained glass paints, so there will be no problems with decorating the door.
Pre-prepare stencils for applying the desired images to the door inserts. Draw the outline of the design, let the paint dry, and then fill in the planned areas with paints of the selected colors.


Vinyl stickers
With easy-to-use vinyl stickers You can give a wooden door absolutely any appearance. Before such decoration it is not necessary to remove the old coating. You don't even have to remove the door from its hinges.

To apply such a sticker, it is enough to carefully separate the backing from it, and then stick the material to a previously cleaned door surface.
Make sure that the sticker is securely attached and remove the outer protective film. If the film is difficult to remove in some places, warm it up a little with an ordinary hairdryer.
Unusual design options
To update the appearance of an old door, you can use a variety of unusual decorative methods. For example, some owners use a variety of bulk materials such as rice, buckwheat and other cereals.

Buckwheat allows you to create quite beautiful and very original designs. PVA glue is well suited for gluing bulk materials.
Apply glue to the surface of the door, sprinkle grain in accordance with the selected pattern, let the glue dry, and then cover the surface with several layers of varnish.
You don’t have to worry about the durability and safety of the finish - the grain does not deteriorate or rot, and the varnish will provide additional protection from the harmful effects of moisture and will not allow it to swell.
Other types of repair work
In practice, just by restoring the door renovation work are not limited. During the operation of a wooden door, various breakdowns can occur. Some of them can be eliminated with your own hands without any problems, while others cannot be dealt with on your own.
We present to your attention brief instructions for self-remediation simple problems with doors of different types.
Laminated doors
The most common problem laminated doors is peeling of the coating. This defect occurs especially often in the case of low-quality products of questionable manufacture. Therefore, it is better to initially try to avoid excessive savings and buy high-quality wooden doors.

If a problem arises, the only possible option its solution is complete replacement decorative edge. The edge itself can be purchased at a specialized door and covering store.
Remove the old edge and attach it in its place new finishing. To attach the new edge, it is recommended to use the same method that was used to attach the old trim.
Sliding doors
A traditional problem with all sliding doors is the upper rollers popping out of the guide rails. Rollers may pop out for the following reasons:

In the first case, for repairs it will be enough to re-fasten the top bar. Remove the old fasteners and re-fix the product using new dowels and screws. The bar can be moved or fixed in the same places - be guided by the situation.
To solve the second problem mentioned, the door must be readjusted and the locknuts placed under the adjustment bolts.
The importance of a door stop is often underestimated, and completely in vain. The presence of this simplest element can significantly extend the service life of a wooden door, especially its handles, hinges and other fittings. Therefore, you should not refuse to install a limiter.

If the door stop breaks, it is enough to simply dismantle the old product and install a new one in its place.

Often wooden doors warp. The following reasons may lead to this:
- loosening loops;
- swelling of wood.
In the first case, all repairs come down to adjusting the hinges until normal condition. In the second situation, you will have to put in much more effort. You will need to remove the door from its hinges, remove any excess wood with a plane, and then re-sand and paint the finished areas or the entire door, depending on the placement of the treated areas and their size.
Thus, with just a little effort and imagination, you can repair your wooden doors and update their appearance without any problems. Follow the recommendations received and everything will definitely work out.
Happy work!
Video - Do-it-yourself wooden door repair
Restoring a door: how to repair a wooden structure
Old wooden doors are sometimes easier to replace than to repair, which is what many designers suggest doing. But very often it is possible to repair wooden doors, so do not rush to replace them - try restoring them first.
The reason for repairing an old wooden door can be either the loss of its original appearance or problems that have arisen with its functioning. Many of the reasons that lead to problems with the door are quite easy to fix with your own hands. Therefore, do not rush to save money to buy a new product; first make sure that repairing a wooden door is impossible.
While the structure looks good and does not cause problems with opening and closing, few people think of caring for it (see. But from time to time, even the highest quality structure needs preventive inspection and care - lubrication and adjustment of hinges, cleaning, coating with special compounds.
If you don't do this, one day you may find the following:
- The door has sagged and is scratching the floor.
- hangs on its hinges, creaks.
- It closes poorly, fitting tightly into the box.
- On the contrary, it does not close because large gaps have formed between it and the jamb.
- The box itself is wobbly.
- The structure dried out and cracks appeared in it.
- The panels do not hold well in the harness.
Repair may also be required when the outer decorative finishing- the paint has peeled off (see), the laminate has swollen, the veneer has peeled off, etc.
How to strengthen and repair a box
If you notice that the box does not hold well in the opening, you can fix it like this:
- Remove the trim.
- Align the box vertically and fix it in the correct position.
- Drill 2-3 holes in the lock and loop posts, going a few centimeters into the wall.
- Drive steel pins or dowels into the holes, made from hardwood. Before this, they need to be lubricated with epoxy glue.
- Reinstall the trims, stepping back from the edges of the box by 1–1.5 cm.

How to fix: strengthening the box
Attention! If the door is in the opening concrete wall, you will need to remove the box to drill holes in the wall with a hammer drill.
How to troubleshoot hinges
If the structure is pinched at the top, touches the floor or threshold, closes poorly or is loose on the hinges, it most likely requires not repair, but adjustment, replacement or rehanging of the hinges.
First, check that the top hinge is firmly attached and, if necessary, tighten the screws. If this does not help, it is necessary to deepen the recess in the strapping beam under the hinge plate. But first, if the door has not settled very much, try putting a metal washer or a ring made of wire (in the case of detachable hinges) on the hinge pin.

How to straighten: adjusting the door using a washer on the hinge
Important! The hinges and washers must be lubricated with machine oil before hanging.
Sometimes the screws turn and cannot be tightened.
In this case, you can do one of the following:
- Replace the screws with longer ones.
- Seal the holes for the screws by inserting matches into them.
- Remove the hinges from the jamb and coat the holes for them with glue. Also lubricate the new screws with glue, let them dry and put the hinges back in place.
- Move the hinges lower or higher than the previous attachment point.
If it's not the loops
Sometimes, even with a quick inspection, it becomes clear that the cause of the door malfunction is not in the hinges, but in a violation of the geometry of the door leaf. It may swell from high humidity or, conversely, dry out. And sometimes, after several paintings (see), too large a layer of paint forms on the edge of the product and the folds of the box, which does not leave a gap between them. What to do in such cases?
Close the door tightly, if possible, and check for gaps. If there is none or it is very small, you need to remove the paint or remove the product from the hinges and sew the binding, ensuring that the gap around the entire perimeter is 2-3 mm.

Broken door: repairing gaps
If the door does not fit into the folds of the frame at all, stand on the side of the rebate, press it against the frame and draw a pencil to draw its gap directly along the canvas. This way you will get the correct contour of the door leaf and will be able to cut off the excess using a plane.
Attention! Before planing the door, make sure that the frame is level and has retained its configuration: measure its corners and diagonals.
How to eliminate large gaps between the door and frame
If the door was made of unseasoned wood, it may dry out and shrink in size during use. And the passage has nothing to do with it at all. As a result, between the canvas and the box, large gaps, the door begins to hang on its hinges, and the latch tongue does not reach the strike plate.
In such cases, repairs are also required, which is carried out by attaching slats of the required thickness to the edges of the door.

How to strengthen panels
If the panels do not hold well in the grooves of the trim because the door has dried out, restoration can be done in two ways:
- Reinforce the door with steel angles. They are attached to the strapping bars with screws on both sides.
- Re-glue the strapping bars. To do this, the product must be removed from its hinges, disassembled and thoroughly cleaned of dirt and old glue. Then connect the bars together, lubricate the tenons with wood glue, insert the panels in place and place the structure in the clamping device.
How to fix cracks in a wooden door
Methods for eliminating cracks and scratches depend on their size and depth. Below is given detailed instructions, how to repair the structure in such cases.

Attention! If the door faces the street, at least 2-3 layers of varnish must be applied to it to form a weather-resistant coating.
How to repair wooden sliding doors
The main reason for the repair is poor performance of the rollers in the guide rail (see). This can happen due to the fact that the mounting bar on which the guide is attached has become loose, or due to unadjusted carriage mechanisms.
In the first case, the beam needs to be strengthened in approximately the same way as the box. And in the second - adjust. Sometimes it is enough to place locknuts under the adjusting bolts.
We hope that our article will help you repair wooden doors according to all the rules.
You can repair an interior door with your own hands. The biggest difficulty that can lie in wait home handyman- this means dismantling the door leaf and correcting the geometry of the frame. Other types of work are cosmetic in nature and do not require professional skills or tools.
Types of faults and defects
All types of faults or defects in interior doors can be divided into two large classes: damaged appearance and improper functioning.
In the first case, restoration will be required. decorative covering. The methods of such repairs use the same technology as for cabinet wooden furniture.
In the second case, the nature of the malfunctions can have different manifestations:
- the door is sagging and “clings” to the floor covering;
- uneven gap around the perimeter of the vestibule (on one side there is a gap, on the other - the door leaf rubs against the frame);
- the door does not lock in the half-open position (it closes or opens itself);
- the latch lock does not work well, etc.

The reasons for malfunction can be subjective or objective:
- installation errors;
- poor quality or weak hinges for heavy door leaves;
- wear of the hinges or loosening of their fastenings;
- poor fixation of the door frame in the opening;
- shrinkage of the building.
If the hinges are at fault, then repairs are easy. It is much more difficult to correct installation errors or eliminate the consequences of shrinkage - in most cases, you will have to dismantle and reinstall not only the leaf, but also the door frame.
How to remove and repair a door leaf
Minor scratches in the paintwork of a wooden or veneer door can be repaired without removing the door panel. It is enough to choose a shade of paint to match (for example, for artwork) and do local staining along the scratch mark. The top of this area is varnished (if the door is varnished) and polished.

To eliminate serious and extensive defects in the decorative coating of the door leaf, it must be removed. This is done by unscrewing the screws securing the hinges to the door frame.
Advice! It is more convenient to dismantle if you first remove the trims, because usually their decorative coating also suffers. And the restoration of the canvas and trim so that they do not differ in color must be carried out simultaneously.
Then the door is placed on the table (or workbench) and the following procedures are performed:
- degrease the surface (oil stains have a bad effect on the adhesion of repair compounds and fabric material);
- clean the entire surface with sandpaper with P60-P80 grain (“matt”);
- putty deep scratches, cracks and chips (it is better when the putty is tinted);
- dried;
- sanded (start with sandpaper P100-P120, finish with sandpaper P200-P240);
- remove dust;
- prime;
- apply finishing layer(varnish, one-stage wood paint or “base” + varnish).

Repair and replacement of hinges
The most simple reason door sagging is fastening with short screws or large diameter holes for them drilled in the leaf and frame. In this case, it is necessary to replace the screws with longer ones (if the thickness of the box and wall material allows) or thicker ones (if the diameter of the holes in the hinge allows). In the second case, you can insert choppers into the holes by dipping them in PVA glue.

It may also turn out that two hinges are not enough to withstand the load of a heavy door. This is usually noticeable by the condition of the upper fastening points - it is in this place that the weight of the door leaf “works to pull away.” The elimination method is simple - an additional loop is cut into the top (by the way, this installation method is typical for most modern doors solid or laminated MDF).

Weak or damaged hinges must be replaced with new ones.
Repair and replacement of platbands
Repair of decorative covering of platbands follows the same rules as door panels.
The most difficult stage is to remove the platbands without damaging them. Modern products made of solid wood, veneered wood and laminated MDF are attached with screws (and mask the attachment points) or with a finishing furniture nail (which has practically no head). Removing them is not difficult - you need to find and unscrew the screws or, lightly pressing the trim from the box (through the gap on the side of the wall), pull out the nails with pliers.

It is almost impossible to remove the trim of old doors (with several layers of paint) without damaging them. But if this succeeds, then we must take into account that cleaning and polishing them will take a lot of time. It's better to put new ones instead.
How to repair a door frame
Cosmetic repairs to the door frame are carried out “on site”. To putty and mask scratches on small area visible part of the box, you should not remove it.
One of the simplest types of repairs is adjusting the closure of the latch lock. A frequently encountered defect is rubbing of the “tongue” of the lock against the end plate on the box. This can happen even with minor and imperceptible violations of the geometry (leaf or opening), slight sagging of the door, after repair or replacement of hinges. Sometimes a few gentle blows with a hammer on the end of the record window on the “rubbing” side are enough. A more radical method is to remove the plate, increase (if necessary) the size of the recess in the box, seal the old mounting holes, and install the plate again.

Incorrect or poor quality installed box, as well as shrinkage of the house, which led to deformation of the geometry of the doorway, will require dismantling and new installation doors. If the dismantling work is carried out carefully and accurately, then all the elements of the interior door (frame, leaf, trim) can be reinstalled.
Note! The removed trims open installation seam, and the hinges and end strip on the box “hide” the places where it is attached with anchor bolts or self-tapping screws in the opening.
After the mounting seam is cleaned, unscrew the fasteners and remove the box.
If the box is fixed in the opening only with polyurethane foam, then dismantling is easier.

But it also happens that anchor bolts cannot be twisted. You will have to cut them off with a grinder and move the box a little so that the new attachment points do not fall on the old ones.
Then the door frame is reinstalled, observing the requirements for levels in the vertical and horizontal planes, the size of the gaps between the leaf and the frame. You need to leave a gap at the bottom between door leaf And flooring(or threshold), sufficient for natural supply and exhaust ventilation.

On last stage hang the door, check its functioning, attach the end plate of the latch lock and platbands.