How to make a layout of a hut out of a box. Russian oven made of paper. Master Class. Choosing the best idea
Hello, dear readers, guests, friends. Today I want to show you and tell you about how we made a model of an old Russian hut. This is not the first time we have had games about that, but now Dasha and I wanted to do something special. This special was the old Russian hut.
We took a cardboard box (we kept it from the Elephant in a Box set) and painted it to match the tone of the hut. Dasha painted the logs from the outside inside and with a semi-dry brush we painted the floor (also lined it with slightly crooked stripes).
The house was always surrounded by a fence, so we also decided to make a fence - wattle. To do this, we took a piece of foam and inserted wooden toothpicks into it in a row. I gave Dasha woolen, gray threads (we didn’t have brown ones) and she began to twist the toothpicks with threads so that such a wattle was obtained.

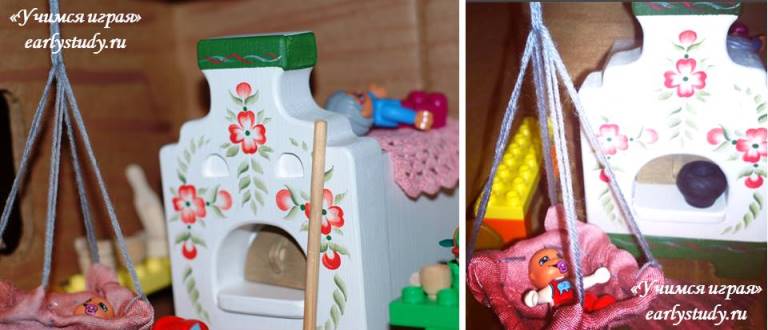
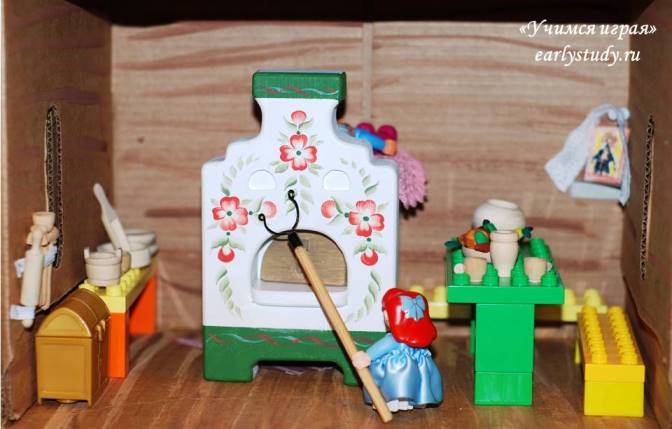
The stove has become the heart of our home. I bought it for Dasha last year (Gu-ga store). The old and sick usually slept on the stove. So we put a lace blanket on top of the stove and put Grandpa (a Lego duplo figure) on top of it. Small children slept in cradles, so we also needed it. I took plastic mold from a toy (you know such transparent plastic boxes, which are made in the form of a toy that lies in them). I sheathed such a mold with a pink cloth to make it look like a cradle and sewed thick thread-holders on 4 sides. I connected the threads at one point and attached them to the ceiling of our house. Ideally, the cradle should be hung on a wooden spinning stick, but we already didn’t have room for the stick, so we attached it to the ceiling. The cradle swings and our baby falls asleep.
There was very little furniture in the old Russian house: a table, benches and chests. We made a table and benches from Lego parts. The chest was also taken from Lego (but it is easy to make it yourself from ordinary cardboard or a small box).
Small wooden utensils were placed on the bench behind the stove and on the table (we also bought it last New Year in a handicraft store near the house). Also, next to the stove, on a stapler, I attached an elastic band to the wall and behind it we plugged rolling pins, pushers and other cooking tools. For the table, Dasha fashioned food from plasticine.
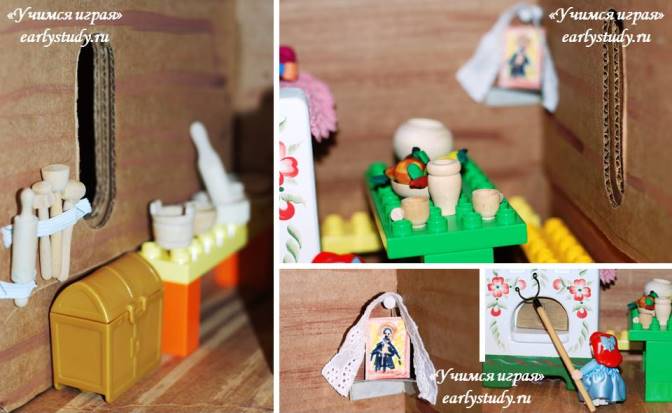
We made a “red corner” above the table. I drew a small icon. Dasha made a shelf out of cardboard and glued it to the box. They put an icon on it. A paper clip on a long leg was stuck over the icon, and a piece of lace ribbon was hung on it.
Since there was not enough space in our box, Dasha suggested that the roof of our house play the role of the roof, I agreed and “a completely different life began in the village.” For several months now, we periodically return to our house and play it. We have a whole family living in it. She has her own life. Mom and eldest daughter are engaged in housekeeping, dad and sons work either in the field, or in the forge, or in the pottery workshop. Our family got a cart, horses, built a well next to the house, but this is already.
P.S. This article is copyrighted and entirely intended solely for private use, publication and use of it on other sites or forums is possible only with my written consent. Commercial use is strictly prohibited. All rights reserved.
Municipal educational institution
Novopokrovskaya secondary school
technologies in grades 8-9"
VIIIAll-Russian Internet competition of educational projects in the educational field "Technology" named after
DIV_ADBLOCK97">
The Novopokrovsky School Museum of Local Lore has a section “Peasant Life”, which presents the subsistence economy of the peasants of the 19th century, and an excursion “Peasant Hut” has been developed. Jr. sightseers school age it's hard to imagine a real village an old hut, in which the Russian stove occupied most of it, except for benches and a table, there was no other furniture. Our ancestors slept on beds or on the floor on mattresses stuffed with straw. Fresh straw was used to stuff homespun mattresses once a year. In any hut there was a Red (God's) corner, in which icons were placed, decorated with homespun towels. All the utensils in the house were placed in their places, there were no extra things, they lived poorly, the families were large.
So the idea was born to build a layout peasant hut with the designation of the main places in it: Red (God's) corner, large dining table with benches, a cradle for a baby, a large Russian stove, a golbets (underground), a platter.
It is necessary to imagine a traditional Russian family in the hut, consisting of at least three generations, each of which has its own household duties.
The made model will become one of the main exhibits in the school museum of local lore in the exposition "Peasant Life".
Brief statement of purpose and objectives
Goal of the work:
build a model of a Russian peasant hut, typical for Povetluzhye early XIX century, as well as the time of settlement of the territory of the Pronovsky village council.
Tasks:
1. Explore according to the memoirs of old residents, according to the documents of the Novopokrovsky School Museum appearance and the interior decoration of a Russian peasant hut.
2. Build a model of a Russian peasant hut.
3. Bring the arrangement of the peasant hut closer to the appearance of the diorama of the same name: the Russian stove must be heated, the hut is inhabited by residents.
4. Donate the constructed model as a gift to the Novopokrovsky School Museum for the Peasant Life exposition.
Criteria to be met
hut layout
1. The layout of the hut must correspond to a scale of 1:20.
2. The layout of the hut must be made of wood.
3. Inside the layout, the features of the decoration of the Russian peasant hut of the 19th century should be reflected.
4. The Russian stove must be heated.
Initial Ideas
Before choosing a sample hut for the project, we studied the materials of the museum, interviewed the old-timers of the village, drove around the village of Novopokrovskoye, went to the disappearing village of Berdnichat, where you can still see wooden buildings XIX century. Among them is the house of Berdnikov, a local timber merchant (Fig. 1). It stands out among these houses with a balcony and an elaborate roof. In the village of Novopokrovskoe there is an old two-story building, once owned by the merchant Korolev (Fig. 2). But these houses are not typical for the village. Peasant huts were simpler and more practical. Few of these houses have survived to this day, and besides, they are located in bad condition, it is dangerous to live in them (Fig. 3, 4)
The settlement of the territory of the Pronovsky village council began in late XIX century, at that time, five-wall houses began to appear, when the hut was divided by a main wall, chopped simultaneously with the construction of the entire log house, as well as houses with six chopped walls for a large family.
We managed to find a house that is still under the roof and meets our requirements: a five-walled log house with a simple plank roof, no foundation, with a small area. It was him that we took as a sample for our work (Fig. 4)
Houses numbered 1, 2, 3 have quite complex structure both buildings and roofs. In addition, they are large in area, they do not fit our scale.

No. 1. House of Berdnikov

No. 2. House of the merchant Korolev

№3 Big house with six chopped walls.

No. 4 Five-wall house
Choice best idea
The total area" href="/text/category/obshaya_ploshadmz/" rel="bookmark">the total area of the house is 54 m, the living area is 36 m. will help in the future to use it for exhibitions.
The interior of the hut will reflect the most basic attributes of a Russian peasant family: a large adobe stove with the possibility of heating, God's corner, where icons are placed, big table, many benches, underground, shelves, platter, cradle.
In order to show a residential hut, they decided to make dolls and populate the hut with them, blind a stove with a chimney, sew curtains on the windows, hang a white towel in God's corner, make dishes, make a trap for the underground.
A removable roof, as well as holes in the ceiling, will help to consider the decoration of the room.
General view of the product
The sequence of operations.
Graphic image.
Tools and fixtures.
On the basis of the house, install mortgage logs. Install the tar pillars with glue and assemble the frame of the house to the floor.

Ruler, brush, Moment glue, hacksaw, large rasp, sandpaper.
Cut translations for the floor in the house and in the hallway. Lay the floor. Mark and saw out the trap, install the stairs to the cellar. Make a hitch and a handle for the trap.

Moment glue, hacksaw, ruler, pencil, chisel, mallet, plastic, brush, steel wire.
Assemble the frame to the height of the windows, mark and cut openings in the walls for the windows. Install birch bark under the windows and glue the windows. Mark and cut out a place for doorways in the house and hallways.

Glue "Moment",
brush, ruler, hacksaw, rasp, pencil, file, Superglue, sandpaper.
Hang doors with handles. Assemble the log house to the ceiling, cut the beams, place the stove, benches, chest, hanger, Red corner, hang curtains, lay the ceiling, install the stairs to the hut.

Moment glue, brush, ruler, hacksaw, rasp, pencil, chisel, Superglue, sandpaper.
Install the rafters on the spacing. Cover the roof with boards.

Hacksaw, ruler, pencil, Moment glue, brush.
Glue the pediment with boards on both sides and install the frosting on the roof. Cover by ready product varnish.

Moment glue, brush, ruler, pencil, PF varnish.
Specification
Name | Material | Note |
||
Base | ||||
Mortgage poles | ||||
Long log | ||||
The log is short | ||||
Floorboards in the house | ||||
Floorboards in the hallway | ||||
Podkaten | ||||
Translation for gender | ||||
ceiling beam | ||||
plexiglass | ||||
Spacing for rafters | ||||
rafters | ||||
window casting | ||||
Zavalinka | ||||
Emphasis of the dam | ||||
Gable plank | ||||
Roof board | ||||
ohlupen | ||||
Aluminum | ||||
Cornice board | ||||
wool yarn | ||||
Staircase to the cellar | ||||
Staircase to the house | ||||
Casting cornice | ||||
Bench | ||||
Tablo (Holy Corner) | ||||
rocker | ||||
curtains | ||||
Cupboard for dishes | ||||
Pine, yarn |
Appearance of the finished product

Front view
https://pandia.ru/text/80/270/images/image016_16.jpg" width="296 height=222" height="222">
Left side view
Insulation "href="/text/category/utepliteli/" rel="bookmark">the insulation of the hut was thoroughly suited. Between the embedded tree and the ground, they made troughs from spruce, after which they sprinkled the hut with sand. To insulate the hut, moss was laid out between the logs in the log house. We used woolen thread.To save heat, the doors were made low, with a high threshold that did not let cold air into the hut.We entered the house with our heads bowed low.To insulate the ceiling, the builders used sand or anthills.This is not reflected in the layout, because holes are provided in the ceiling in order to view the interior of the hut through them.
Description of the interior of the hut
In the setting of the hut there is not a single superfluous object, each thing has its own strictly defined purpose and a place illuminated by tradition, which is feature people's dwelling.
One of the significant elements of housing was a stove (Appendix 3). The first ovens were adobe. Therefore, we made a clay oven. They brought a pipe to the roof so that the stove could be heated. Sometimes a corner for cooking was arranged near the stove, resembling a painted cupboard. The painting wore geometric character(motif of the sun). To the right of the door in the floor there is a trap leading to the underground, where supplies for the winter were stored.
At the front door were men with their work. At the window, on a bench located along the wall, they spun.
Diagonally from the stove (to the east) there has always been God's corner (Red corner). Icons (images) hung here, therefore, entering the hut, a person immediately looked into God's corner, bowed and was baptized at the images of saints. Lampadas were burning near the icons - small lamps suspended on chains and filled with lamp oil. In this corner they prayed, gathered at the table for a family meal. The table was usually of considerable size, based on a large family. The table top is rectangular, made of good boards without knots and carefully processed to a special smoothness. There was a bench next to the table. It was slightly longer than the table. In addition to benches, stools were used, characterized by rigidity. Chests, in which clothes, canvases and other household utensils were stored, were an obligatory accessory of the hut. Shelves, fixed tightly to the wall, were widely used in the hut. For dishes, a platter was used. Above front door did a hinged flooring - lay. For sleep they used benches, chests with a flat lid, mattresses stuffed with straw. Hanging cradles were intended for infants (Appendix 3).
Russian furniture peasant dwelling characterized by immobility, as it is solved as an organic element of the interior of the hut, taking into account living conditions. The interior of the hut is united by a single material, while maintaining its natural color - the color of wood. leading colors was golden-buff with the introduction of white and red colors. Golden-ocher tones are characteristic of the walls of the hut, wooden furniture, dishes. The towels on the icons were white, the red color sparkled with small spots on clothes, towels, and in the paintings of household utensils.
Thus, the layout reflects all the main attributes of a Russian peasant hut: a stove, God's corner, a table, fixed benches, shelves against the walls, a platter, a cradle, and household utensils.
The model of the hut is varnished in two layers for long-term exposure in the school museum and at exhibitions.
Self-esteem
1. Appearance of the layout.

The layout of the hut turned out very beautiful. All connections are strong, parts are polished. After manufacturing, the layout, as planned, took its place worthy place in our school museum of local lore, becoming one of the main exhibits in the exposition "Peasant Life" (Appendix 4)
2. Difficulties in work:
cut windows and doorways due to small size;
make beams for the ceiling and cut floorboards with flooring;
to make notches on logs, since the diameter of the logs was different, as in the construction of an old Russian hut.
3. Disadvantages in manufacturing:
the symmetry of the log house is slightly broken, since the logs are connected with glue and it is impossible to align them.
We believe that the goal set at the beginning of the work has been achieved, and the tasks have been completed.
Bibliography
1. Materials of the school museum of local lore from the exposition "Peasant Life".
2. Materials of the school local history museum from the exposition "Literary local history".
3. Materials of the rural museum of local lore from the exposition "
5. . Textbook for students of educational institutions. Grade 9 – M.: Ventana-Graf, 2006. – 272 p.
6. . Drawing. - M.: AST: Astrel, 2008. - 221 p.
7. . Handbook of labor training. – M.: Enlightenment, 1991. – 239 p.
8. . Plumbing: Tutorial for students in grades 8-11. - M.: Enlightenment, 1990. - 176 p.
9. , . Turning and milling: Textbook for students grades 8-11. - M.: education, 1990. - 208 p.
Annex 1

https://pandia.ru/text/80/270/images/image021_8.jpg" width="553" height="344 src=">
https://pandia.ru/text/80/270/images/image023_5.jpg" width="288 height=216" height="216">
red corner

cymbalist
https://pandia.ru/text/80/270/images/image026_5.jpg" width="221" height="294">
Chest, cradle, bench


Master class "Model of a Russian hut"
Description: I bring to your attention a master class on making a model of the "Russian hut, for educating children's interest, respect for history, culture, the Russian people.
This year, one of the main tasks in our kindergarten was the introduction of children to spiritual culture, the awakening of the foundations of national identity. The competition Mini-museum "Russian hut" was held.
To make a hut, I made a layout for which I needed cardboard box. Cut off one side of the box. Cut out the windows. I rolled "logs" out of paper different diameter. The outer side of the walls is pasted over with larger logs, and the inner walls of a smaller diameter. I glued paper on the floor, drawing boards. Then I painted everything inside with yellow gouache, and brown outside.
At the windows she made platbands from brown colored paper.


To close in front and on the sides of the house, all the irregularities were pasted over with brown colored paper. The roof was made of bamboo skewers. It took two packs. I made platbands on the roof of the house, cutting them out of paper. She hung curtains on the windows, in the “red corner” she made a shelf for the icon, laying on it a piece of fabric the same as for the curtains.


The stove is made of small cardboard boxes covered with white paper, the pipe is made of foam plastic and also covered with white paper. Behind the stove is a shelf for utensils, a piece of cloth is laid on it.
She fashioned utensils from salt dough: a cast-iron with a lid, kettles, jugs, a tong, a poker. After drying everything, I painted it with gouache, and then varnished it. The damper for the stove was cut out of cardboard and pasted over with white paper.


Of course, you can’t do without a table and a bench in the “red corner”. They are also made of cardboard. Matter on the table and benches, rugs on the floor. Here's what I got.
Irina Lavrishina
Kind, dear colleagues and guests of my blog!
To convey to the understanding of children the features of life Russian people of the past how they lived and arranged their life, working on one of the sections of the topic on self-education, together with their parents, we created layout« Russian hut» , which contains mini - antiquities.
Target: to get acquainted with the history Russian peasant life and the traditions of our ancestors.
Tasks:
To acquaint with the device of a peasant dwelling, household items, their names and purpose;
Enrich children's vocabulary with new words;
Develop interest in Russian folklore;
Bring up careful attitude to ancient things, traditions, customs of hospitality;
Help children to realize the relationship of the present and the past, to feel themselves in the flow of time.
The husband sawed logs and connected them. She laid tow between the logs, covered the roof with a bast from a washcloth.

In old times attic space served to store various household utensils: tubs, barrels, troughs, empty baskets, tools, etc., herbs, mushrooms and berries were also dried there. We placed all this on the roof attic.


The interior of the peasant hut is the upper room; it is both a kitchen, a living room, and a bedroom.

The stove is a nurse, a protector from the cold, a healer from diseases. The stove was sawn out by Arseniy Efimov's father, covered with modeling paste and painted with acrylic paint.


"Red" the corner is located in the far corner of the hut, on the east side, in the space between the walls, diagonally from the stove. This is the brightest part. Houses: both walls forming the corner have windows.

main decoration "red" corner is a goddess with an icon.

In the old days, everyone gathered at the table peasant family all questions were discussed. There, in "red" in the corner of our hut there is a table with a bench (all wooden furniture was made by Artem Badeev's mother)


Required attribute Russian hut was a chest in which clothes were stored. Our chest was made from a straw napkin. There are shelves for dishes on the wall. The floor is covered with a self-bonded rug.


In our hut you can see a festively seasoned wooden bed covered with a stitched patchwork quilt.


A cradle hangs next to the bed (the work of Artem B.'s mother, suspended on a long wooden pole.


Children had the opportunity to visually see how they lived Russian people how they worked, how they decorated their life.


Thank you for your attention!
Related publications:
Photo report of the teacher Khaleeva Oksana Ivanovna kindergarten "Forest Fairy Tale" Savasleyka village, Nizhny Novgorod region. Theme number 1 "Gatherings" (gen.
Synopsis of the NOD "Russian hut". Program content: Continue introducing children to the traditions of the Russian people, examining Russian.
Synopsis "Russian hut" Synopsis of GCD in the second junior group"Russian hut" Program content: To give an idea of the Russian hut. Enrich children's vocabulary.
Model "Russian hut" To acquaint children visually with the traditions and life of the Russian people, interior decoration Russian hut, I did.
The layout of the Russian hut "My hut" I listen to your attention, I present the layout of the Russian people's hut. The layout was made in order to demonstrate.
In this article we will tell you how to make do-it-yourself furniture for the Russian Hut mini-museum in a kindergarten from available materials in just one day.
For work we take matchboxes, cardboard, tree branches. The tools are also the simplest - a knife, a hammer, small cloves, a skin, any file or a jigsaw, glue, paints. The proposed method of manufacturing wooden furniture in no way claims to be professional carpentry work. But even a completely unprepared person will be able to make a minimum set of furniture for the mini museum of folk life "Russian hut". All furniture is made for interior design mini museum "Russian hut" with an area of 30x30 cm. We talk about how to make such a house out of cardboard in the article. But furniture can be used without a house, simply by placing it on a table or shelf.
Furniture for the mini museum Russian hut is suitable not only for the museum, but also for gaming activity children both in kindergarten and at home.
Table and stool from matchboxes. Do-it-yourself furniture for the mini museum Russian hut.
For the manufacture of table legs, we need four empty matchboxes. Slightly push the boxes, grease two of them with glue. The places of lubrication with glue are shown by shading. 
Connect both legs-corner. To do this, slightly crush one of matchboxes.


The legs for our table are ready.
Paint the table legs and glue the table top. The tabletop is cut out of cardboard. Size 13x7 cm 
The table is almost ready, it remains only to paint the countertop. Now let's start making a stool. The technology is very similar to a table, but the stool should be lower. Therefore, matchboxes are cut into two parts. 
This is what the base for a matchbox stool looks like. 
We glue the seat, paint, and the stool is ready. 
In this way, you can make a Russian hut and benches for a mini museum of folk dolls and folk life. You can try it yourself. And now we will tell you how to make wooden benches with your own hands.
Bench. Do-it-yourself furniture for the mini-museum "Russian hut"
To make a bench, we need a straight tree branch with a diameter of 3-3.5 cm.
We saw off a blank 15-16 cm long from a branch. Using a knife and a hammer, split it in half, and then split it again to make a plank. 
Knife and sandpaper straighten the board.
We saw off 4 cm rounds from the same branch. We split it in half. We got two legs for our shop. 
We will nail the seat to the legs with small carnations. 
Bench for the mini museum "Russian hut" is ready

Thus, you can make benches of any size for your mini museum. If there is a desire and opportunity, you can cover the benches with stain or paint. 
Distaff. Do-it-yourself furniture for the mini-museum "Russian hut"
Let's make a reservation right away that our spinning wheel is not an exact imitation. The correct spinning wheel should have a bottom, which is placed on the bench, and then the spinner sits on it and holds the spinning wheel in a stable position with the weight of his body. But making a spinning wheel with a bottom is more difficult and, moreover, it will not be stable. Therefore, we made a spinning wheel on a straight basis with an emphasis on the floor. Which is wrong, but convenient.
Cut out a spinning wheel from wood, cardboard or plywood. We paint or tint the spinning wheel, apply patterned drawings. 
Spinning wheel template for the mini museum Russian izba
Let's make a short bench for the spinning wheel, just like the benches for the hut were made. Glue or nail the spinning wheel to the bench.

Let's make a spindle. To do this, take a toothpick and cut off part of it. Wrap the toothpick with thread. We fix the end of the thread with any glue - so that it does not unwind. 
We tie the tow to the spinning wheel. We used flax tow, but if you don't have it, you can take sanitary flax or woolen threads, having previously “ruffled” them. Mohair is also good. 
We twist the thread from the spinning wheel and wind it on the spindle.

Do-it-yourself spinning wheel for the mini museum Russian hut is ready.

Ladder Do-it-yourself furniture for the mini-museum "Russian hut".
We take two sticks of the same length, corresponding to the desired length of the stairs. We outline the cuts for the steps. 
We cut cuts for steps. To do this, we make two parallel cuts at a distance of 0.5-0.7 cm to about half the stick, and then with a knife we break out a part of the tree between the cuts.

We cut the required number of sticks-steps.

We insert sticks-steps into the cuts. For strength, we fix the junctions with threads. 
The ladder for the mini museum Russian hut is ready. 
The necessary set of furniture for the mini-museum Russian hut, which you can do with your own hands from improvised materials, is ready.
But the most important thing in a Russian hut is missing - a stove. How to make a stove with your own hands is dedicated to the post


