How to make beautiful shelves from plasterboard. Making shelves from plasterboard with your own hands. Different tasks - different designs
To store things and various decorative items, there are different cabinets, special modules, chests of drawers, shelves and the like. That's what we'll talk about shelves in this article. Even a small family living in a house or apartment needs to place their belongings, dishes, interior items, and the like.
There are different storage modules for this, but there are always not enough of them. This problem can be solved by purchasing furniture for storage, but not everyone has enough space to place, for example, a wardrobe or chest of drawers. Therefore, many people decide to order furniture by custom sizes for their premises, but such a service is expensive.
A sheet of plasterboard can be from 2 to 4.5 meters long, and its width can be from 1.2 to 1.3 meters.
The thickness of the drywall should not go beyond the permissible limit, and this limit ranges from 6 to 24 millimeters.
These characteristics allow you to select the required sheet size, which will be designed for different loads.
The design and functionality of the shelf in the future depends on the choice of drywall.
Installation of plasterboard shelves
We begin installation of the frame. For the construction of plasterboard shelves, a UD profile is used, it is not wide.
Due to the fact that the profile is not heavy, the resulting structures are not bulky and light.
First you need to measure the distance where the plasterboard shelf will be.
After you take the measurements, you need to attach the profile to the wall using a level. The profile is nailed using 6×40 metal dowels, and nylon dowels can also be used as fastening.
You need to remember that you need to strengthen the frame of the shelves so that the structure is strong and reliable.
After metal structure ready, then proceed to .
This work is considered not as difficult as installing metal profiles. Attach sheets of drywall to metal or nylon screws. The size of the screws is twenty-five millimeters.
Metal carcass Sheathing is not difficult, but you need to make sure that its sheets are not skewed, otherwise this can lead to fragility of the shelf. At all stages of the construction of shelves, it is necessary to compare all design parameters with the drawing, and to avoid distortions of the drywall sheets, it is necessary to use a level.
The also illuminated one is still an additional source of lighting. can have any light and any intensity, and it depends on your idea or the designer’s idea.
To install lamps on a shelf, you will need following tools:
- Round crown for cutting holes;
The diameter of the crown depends on the size of the lamp. Determine the location for the lamp in advance.
 Installing the lamp is not difficult, but you will have to work hard with the wiring. If you do not have skills, then it is better to use the services of a professional.
Shelves can also be installed as lighting LED strip, because it can be laid anywhere, even in hard-to-reach places. This strip illuminates the shelves evenly and can serve as a full-fledged lighting source.
LED strip has a wide range of colors and has energy-saving properties.
Finishing work
The final work on the construction of a plasterboard shelf is putty and further decoration.
Before  Once you start decorating the shelf, you need to fasten the shelves with metal and plastic corners.
- The inner corners of the shelf are glued reinforced mesh to avoid cracks in the future.
- Then the shelf is puttied and the putty is applied in a number of layers.
- If the shelf will be painted a different color in the future, its surface must be sanded and then primed.
You can see the options for finished shelves in the photographs on the Internet.
Over time, there are more and more things in the apartment, but the space does not increase. Great solution in this situation there will be shelves made of drywall.
Availability in the house niches or plasterboard shelves on the wall will help:
- make practical use of the available space in the house;
- avoid piling up furniture along the walls;
- significantly improve the design of any room - from the living room to the kitchen;
- equip niches or shelves with lighting, which will further illuminate the interior space of the house;
- create both a functional and decorative element in the living room. On the shelves you can place both souvenirs and dishes or other things necessary for everyday life.
There will be a shelf the best solution than buying bulky furniture, and it will cost much less than ordering custom-made cabinets. Almost anyone can make shelves from plasterboard with their own hands. The main thing is to follow the installation technology - and your apartment will sparkle with new elements.
Drywall is a universal construction material, which is used for a wide variety of purposes: cladding walls and ceilings, constructing partitions, allows you to create built-in shelves, niches and cabinets, and various ceiling structures.
Such popularity of the material came due to its following qualities:
- ease of installation;
- wide choice of both sheet options and thicknesses;
- allows you to make an unusual and original design;
- environmental friendliness;
- availability.
Drywall sheets
The advantages of drywall also include the fact that it can be finished in a wide variety of ways: painting, wallpapering, using decorative stucco or using artificial stone.
Thanks to this, plasterboard shelves can have a wide variety of looks and fit perfectly into the design of the living room or any other room.
Design selection
Plasterboard shelves can have different designs:
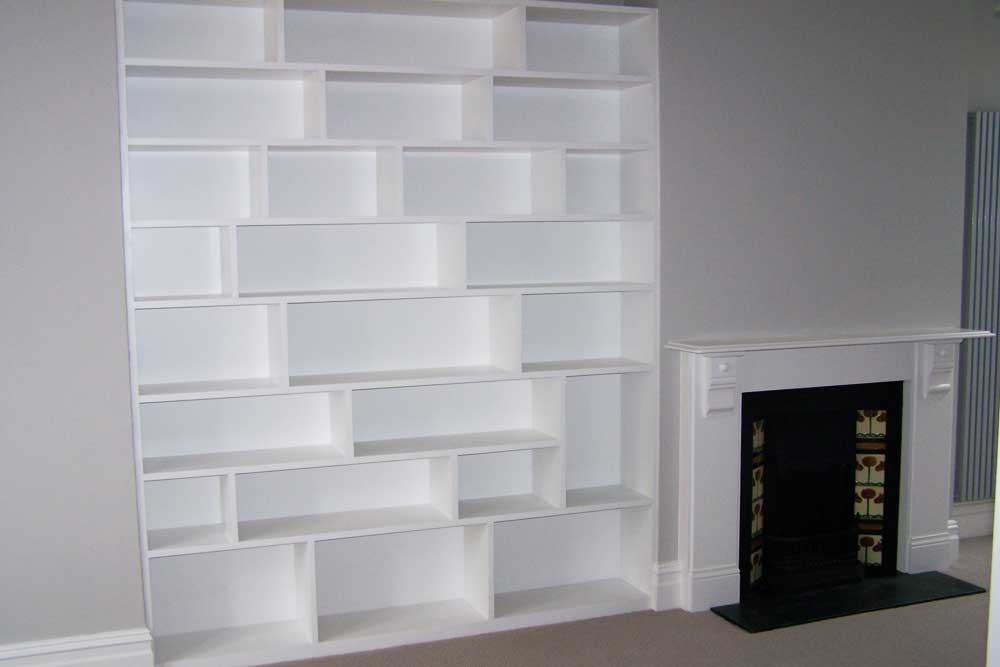
- open. They are most often used as decorative elements of the interior. Great option for the living room;
- closed. They carry rather a functional load and are often installed in bedrooms or corridors. Usually they are made very roomy.
According to localization, plasterboard shelves can be:
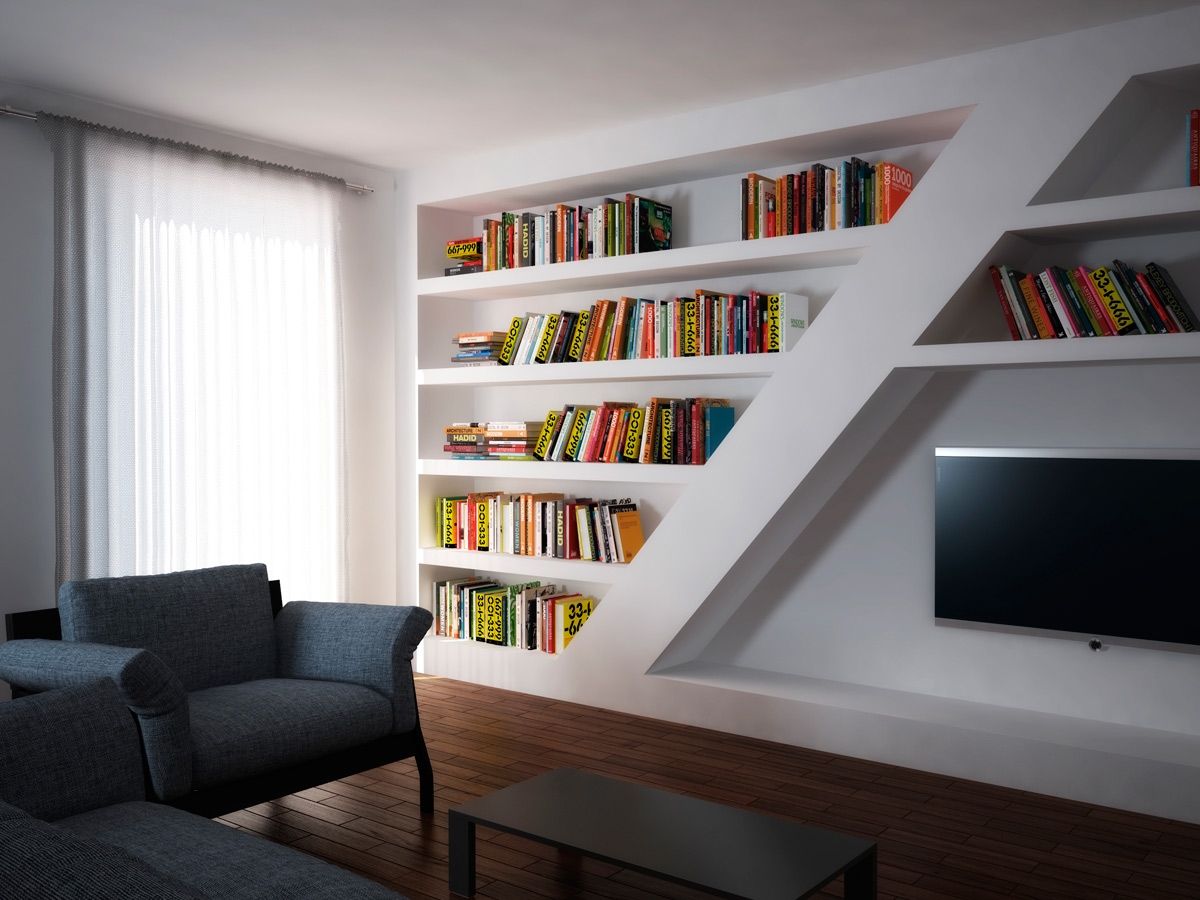
- centers. They are located in the center of the room. They often contain a whole ensemble of niches and shelves. They look very nice in the living room, since very often the central element of such a design is the TV;
- corner shelves made of plasterboard. They are used if the room is small in size. They can be decorative and functional.
In addition, you can make your own plasterboard shelves like this:
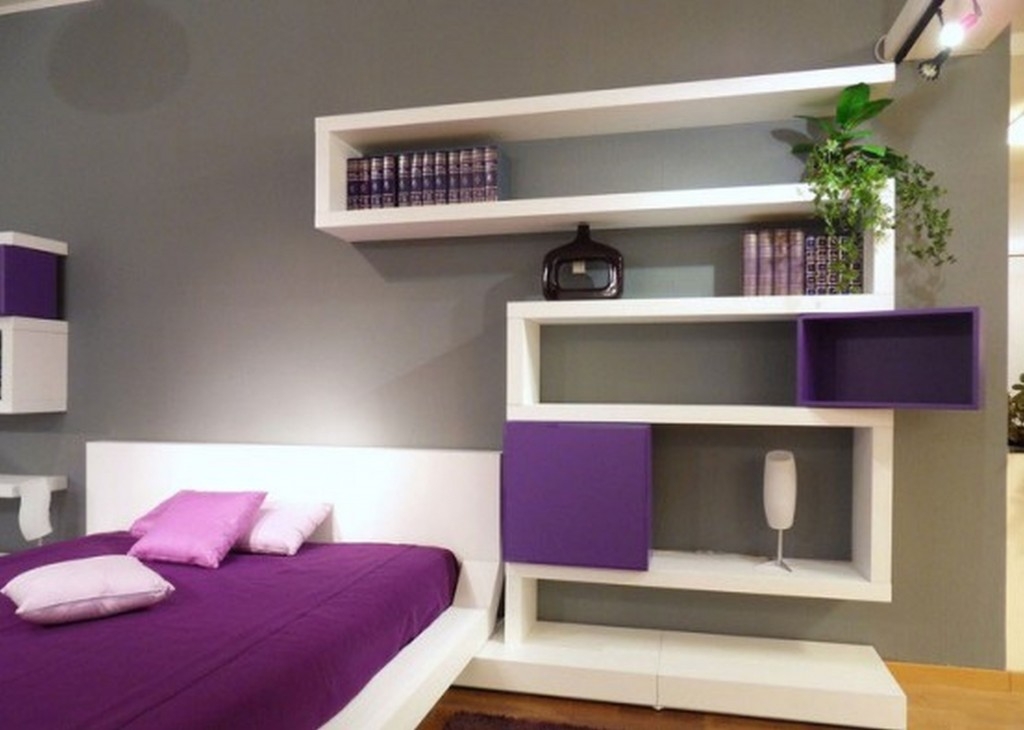
- with backlight. Depending on the size of the niches, built-in lamps can be either single or multiple. Built-in lamps can significantly improve the illumination of the living room or any other room;
Note! You can use not only spotlights as lighting, but also LED strips along its perimeter. At creative approach you can create an indescribable play of light and colors.
- without backlight. They are no less common than illuminated niches. Their design and arrangement, for obvious reasons, are much simpler than those of illuminated shelves.
The design of a plasterboard shelf can also be:
- decorative. In such a situation, it will be light and will not have additional fastenings;
- functional. If you plan to place a significant load on a shelf or niche (installing a TV, dishes, etc.), then it should be strengthened additional elements frame.
When decorating a plasterboard shelf, you can use a wide variety of finishing methods, and also decorate the niche inside with mirrors. With lighting, you can make a unique shelf that will become a real highlight of the living room or bedroom. This will create a romantic and fairy-tale atmosphere in your home!
Creating a shelf project
Constructing a plasterboard shelf with your own hands requires creating a drawing future design. Remember, it is better to measure seven times and cut once. Therefore, everything needs to be taken into account at the stage of creating the diagram, so that when installing a niche, you can avoid unpleasant moments when something does not fit together.
A drawing of a plasterboard niche is created as follows:
- choice of shelf design. Here you should consider whether the shelf will have a partition, the number of elements, etc.;
- decide on the location of future installation in the room;
Note! The shelf should fit into the space of the room, be functional and practical. Therefore, when choosing its design and location, rely on the existing design in the room.
- draw the dimensions of the room to scale;
- indicate the location of the niche, as well as all its dimensions: depth, width and height;
- the diagram must necessarily reflect the partition of the niche;
- if the shelf will contain lighting, put it on the drawing in the places where it is planned.
 Shelf drawing
Note! The drawing should be made taking into account the thickness of the plasterboard sheets and metal frame.
Having created correct drawing, you will be able to evaluate the profitability of the chosen location, calculate the amount of material needed, and also avoid various inconsistencies at the stage of fastening and installing the frame. All this will allow you to make the perfect shelf, as intended.
In addition, the drawing can be transferred to whatman paper and attached to the place of further attachment to make sure that the design will be appropriate in the chosen location. Thus, plasterboard shelves will be an excellent addition to the design of your living room or bedroom.
Materials and tools
To create a plasterboard shelf you will need the following materials:
- guides and rack profiles;
- arched profile - if a curved niche design will be used;
- cross beams to strengthen the frame - if the shelf will bear a significant load;
- dowels and screws;
- plasterboard sheets. Their type should be selected based on the purpose of the room. Can be used in the living room and bedroom standard sheets, but in the kitchen, bath and toilet it is better to use moisture-resistant ones;
- materials for final finishing: primer, putty, mounting mesh.
Remember that to achieve the highest quality results, experts recommend using materials of the same brand. Today is the most the best manufacturer on construction market counts German company Knauf.
From the list of construction tools you will need:
 Materials and tools
- hammer drill, screwdriver and electric planer;
- Bulgarian;
- building level and plumb lines;
- pencil and tape measure;
- hammer, pliers, drywall knife, metal scissors;
- spatula, brush and sandpaper.
This set of tools will help you quickly and efficiently make plasterboard shelves with your own hands.
Preparatory work
Before attaching a metal frame for a plasterboard niche, it is necessary to carry out a series of preparatory work which include the following procedures:
- remove all irregularities from the wall that may interfere with the smooth mounting of the metal guides;
- cover all holes and cracks in the starting wall to increase its strength;
- prime the walls deep penetration to prevent further shedding of the plaster of the starting wall;
- transfer the drawing to the wall at the future location of the niche in the wall.
 Primer of walls
It should be noted that when finishing walls with plasterboard, it is recommended to simultaneously plan plasterboard shelves in order to do all the necessary preparatory work at once.
When all work on preparing the working surface has been successfully completed, you can begin installing the frame.
Installation of a metal frame
There are several ways to attach a frame for plasterboard niches:
- simultaneously with the construction of the frame for the walls;
- separate design.
The first method involves the following operations:
- install guides along the drawn lines of the diagram;
- we fix them with self-tapping screws;
- we install rack profiles and further fasten them with self-tapping screws;
- in the place of the proposed shelf we make a niche from guide profiles around the perimeter;
- We create the depth of the shelf using rack profiles.
 Finished shelf frame along with wall structure
Note! If a load is expected on such a shelf, then at this stage the structure should be strengthened. To do this, we attach additional hangers in the corners of the frame. Such a partition will be very strong and will not damage the shelf under high loads. This will make the frame more rigid and stable.
The second option involves mounting the shelf separately from the wall. To do this you will need to do the following:
- preparing the basis for the niche;
- the base is created from a guide profile;
- apply it to the drawn lines and secure with self-tapping screws;
Note! When marking and fastening profiles, be sure to use a level. Thanks to this, you will avoid distortion of the structure.
- Next, we attach the rack profiles with self-tapping screws. This creates the future partition. With its help, in the future it will be possible to divide the shelf into several sections;
- if necessary, special ones should also be used in the corners of the structure. fastenings(jumpers) to stabilize it.
 Ready-made separate frame for a shelf
At this stage, with the planned illumination, we carry out electric wires for further connection.
Upon completion of the work, you will receive a finished metal frame either for one shelf or for an entire wall with a niche.
sewing the frame with plasterboard
Upon completion of installation of the frame, it should be sheathed with plasterboard sheets. To do this you must do the following:
- if the niche is built into the wall, then first we cover the entire wall with solid sheets, and only then we attach the pieces to form partitions;
- if the niche was mounted separately, then first cut the drywall into required size pieces;
- First we cover the outer walls of the shelf. To do this, we place the pieces in the right place and if they fit perfectly, we fasten them with self-tapping screws. The partition can be sheathed either in one piece or in several;
Note! It is not important to use cut-up whole sheets for sheathing the shelves. The partition can also be sheathed with pieces that remain after finishing the walls or ceiling with plasterboard.
- Next, we fasten the inside of the niche;
- if there is a backlight, then we cut out holes in the pieces for it and attach them with the spotlights already inserted.
It would also be appropriate to mount it here inner part mirror shelves.
 Ready niche
As practice shows, even in a small family, over time, there is not enough space for things. You can solve the problem of lack of space by purchasing a new shelving unit, cabinet or chest of drawers. But this is not an easy decision, since bulky furniture needs to be “fitted” into the room so that it is in harmony with the interior. One of the simplest solutions is custom-made furniture. Of course, you can order a suitable niche or shelf, but usually such a service is expensive. We will tell you how to make plasterboard shelves.
Shelves can separate the kitchen from the living room, emphasizing their decorative effect with spotlights
Drywall – unique material, it can be used not only to build partitions or install a suspended ceiling, but also to create a variety of niches, shelves and built-in cabinets. They will become a functional and practical place for storing things or kitchen utensils, as well as an original interior detail. If after the renovation you still have scraps of drywall, don’t think about throwing them away. Even if you don't have a shortage of free space, a convenient shelf can become a highlight in your interior.
Why drywall
Plasterboard sheets are very easy to process and install. When working with plasterboard material, you do not need to have any knowledge about construction and assembly work. For this, elementary accuracy and ingenuity are enough. Another “plus” in favor of drywall is its lightness. Moreover, not only the sheets of plasterboard material are light in weight, but also the metal profiles that are used to construct the frame.
From ordinary sheets of plasterboard you can create unusual, very beautiful designs.
During any work, attention is paid decorative finishing material. Under plasterboard construction almost all existing ones can be used as decoration Decoration Materials.
How to make plasterboard shelves with your own hands
First you need to decide on the purpose of this shelf? If it will bear a large load, the shelf must be made strong. If you decide to place a stereo or TV on it, you need to strengthen the frame with profiles. The standard profile is not suitable for this matter. It is better to use metal corners, onto which plasterboard blanks will subsequently be attached. This precaution should not be neglected. Over time, a weak shelf may not be able to withstand the load and break, which can be fraught with injury or lead to not very pleasant experiences from broken decorative dishes or a chipped vase. If it is used only for decoration, there is no need to strengthen the structure; it is enough to use a metal profile of a rack plan.
Having decided on the strength of the structure and design, you need to begin preparing the necessary tools and calculating the amount of materials spent. To make a plasterboard shelf you will need the following tools: a screwdriver, metal scissors, a hammer drill, a plasterboard knife, a fine-toothed hacksaw, a square, a level or a long strip. In addition, the following materials are needed: drywall (a whole sheet or scraps), dowel-nails, self-tapping screws, direct hangers and a guide profile.
Shelf design
Now you can get to work. It is best to start designing a shelf with a drawing. This allows you to increase or decrease its future size at the initial stage of work. By attaching the drawing to the wall, you can figure out how the shelf will look. After you decide on its size, you need to calculate required quantity drywall, profile, number of screws, etc. Such calculations do not take much time and are very simple.
As you know, drywall can be different sizes and thickness. Its length ranges from 2 to 4.5 meters and width from 1.2 to 1.3 meters. Sheet thickness - from 6 to 24 millimeters. These parameters allow you to select a sheet of drywall designed for any load. The future design of the shelf and its functionality depend on the selected material.
Frame installation
Now let's start mounting the frame. Typically, when installing shelves, a UD profile is used. Its advantage is that it is not wide, so the design does not look rough. It is necessary to measure the distance at which the plasterboard shelf will be located. Then, using a level, you need to nail the profile to the wall. This is best done with 6x40 metal dowels. Instead of metal dowels, you can use nylon ones. Before you start drilling a hole, you need to accurately mark the mounting location. Do not forget that to strengthen the frame, several jumpers are installed, which make the structure more durable.

Fastening metal plates is one of the most important stages in the process of creating plasterboard structures
Drywall installation
After the frame is installed, you can begin installing drywall. This is much easier than the previously done work on mounting the frame. Using self-tapping screws, you need to screw the lower and upper parts of the shelf. It is best to use 25 mm metal screws. Sheathing a frame with plasterboard is not at all difficult, but you need to make sure that the sheet of plasterboard is not warped, as this can lead to its fracture or deformation. At all stages of work, check the design with the drawing to avoid inaccuracies. During work, you must have a level on hand to prevent unevenness during installation.

Shelves made of plasterboard do not look very presentable before finishing work begins, but that will soon change
You don't have to limit yourself to standard angular lines. Drywall is a pliable material, using which you can create unusual bends, curved surfaces. You can make unusual compositions, for example, shelves in the form of a tree, honeycomb shelves, Tetris shelves. When choosing a design, you need to think about how this shelf will fit into the interior of your kitchen. The main thing in this is imagination, patience and accuracy.
If a heavy load is planned on the plasterboard shelf, such as installing a TV, use wall plasterboard mounted in several layers. In addition, you can’t do without profiled steel slats. Fasten them with minimal increments. Many people, using several sheets of drywall at once, believe that this will give the shelf strength and reliability, and additional slats are not needed. As usual, after a while the structure begins to break down. No matter how much material (sheets) is used, without a metal support the shelf will not be strong enough. There is no need to overdo it, a very large number of metal slats will make the shelf very expensive.

Glass shelves can be inserted into the plasterboard base, which will give the structure lightness and grace.
Most designers have begun to combine drywall with other more durable materials. For example, when making shelves you can use chipboard, MDF, tempered glass, polished metal. This gives the design reliability and makes it more sophisticated, stylish and unusual.
Shelf lighting
Very often, plasterboard shelves are made with lighting. This gives them an attractive appearance, and it is also light. Properly installed lighting not only illuminates part of the shelf, but also illuminates the interior of the entire room with diffused light. Depending on the choice of the designer, the backlight can be various colors and different intensities. Soft bedding colors are usually used to give a cozy feel. But don't be afraid to experiment. For example, multi-colored lighting will fit perfectly into a high-tech interior.

Shelves made of plasterboard with top lighting are increasingly used in interiors today due to their decorative effect.
To install the lamp you will need a drill and a special round bit. The diameter of the crown is determined by the diameter of the lamp. By inserting it into the drill, a hole is cut. Naturally, you need to decide in advance on the place for the lamps.
Installation of lamps is simple and quick. More difficult work The installation of electrical wiring and their connection is considered. The shelf with LED strip looks very nice. Its dimensions (8-20 mm) allow it to be installed in hard-to-reach places: shelves, sofas, cabinets, etc. The LED strip evenly illuminates the surface on which it is laid. This lighting module is very flexible, allowing it to be mounted on surfaces that have curves and rounded lines. An LED strip can be not only a backlight element, but also a full-fledged lighting source. The main advantages of the tape are compactness, low energy consumption, easy installation, high color gamut, and uniform illumination.
The final stage of work
The final stage of making a plasterboard shelf with your own hands is putty. Before puttying, you need to fasten the corners of the shelf with plastic or metal corners. Ends plasterboard shelf you need to circle it with a plastic arched or metal perforated corner. A plastic (plastic) arched corner is used if the shelf has a round shape. To prevent cracks from appearing, it is recommended to glue internal corners reinforcement mesh. The shelf is ready for putty. The putty should be applied in several layers. If the shelf is to be painted a certain color, its surface must be sanded down. sandpaper. After the structure has dried, the surface of the shelf is primed.

To give the shelves an even more unusual look, some of them can be made rounded
Plasterboard shelves: photo design examples
A lot of different designs can be made from drywall. In order to decide on the options for shelves and niches made of plasterboard, you can familiarize yourself with the photographs. Shelves made of plasterboard, photos of which are presented on the website, have different purposes and designs. Each of the models fits perfectly into the interior of the room, giving it uniqueness and style. Despite the fact that the material itself does not represent any aesthetic value, all structures that are made from plasterboard deserve interest. Their undeniable advantage is low labor and financial costs.

Plasterboard shelves placed in the corner become an important decorative element in this interior.

To achieve more decorative effect You can use different colors for finishing

Unusual smooth lines of the partition, finishing with multi-colored glass blocks, original triangular shelves give this room a unique charm

The non-trivial shape of plasterboard shelves combined with cute trinkets is an excellent option for kitchen design

From plasterboard you can make not only shelves and partitions, but also an imitation of a wall

Drywall niches are successfully placed in the lower cabinets of the bar counter of this kitchen
Plasterboard shelves in the kitchen are a bright “highlight” in the interior. As a rule, the area of a modern living space is limited to several dozen square meters. Furnishing design usually comes down to arranging furniture in the corners of the room. The interior of such a space should accommodate a fairly large amount of furniture and related objects. Making the environment harmonious and functional, and even with your own hands, is not an easy task.
Plasterboard shelves in the kitchen interior
Small items, decorative dishes and books are usually placed on shelves or in a wall niche; this is perhaps the only way to make a large number of utensils accessible and visible and at the same time get some more free space. Shelves made of various materials can be purchased or made to order, as required by the design of the room.
Working with wood or glued wood-based materials requires a certain skill. It is much easier to make shelves from plasterboard - practical material, easily processed even with the simplest tools.
Drywall, as the name suggests, is a material made from gypsum, artificial stone. When hemihydrate calcium sulfate is treated with water, the result is a soft, fragile white stone like chalk, but gypsum does not crumble and get dirty like chalk. Gypsum is non-flammable, does not cause allergies and is quite durable, but is hygroscopic.
 A niche in the wall in a small kitchen will help harmoniously arrange the interior
Gypsum in flat white sheets, covered on both sides with several layers of thick mounting cardboard, is plasterboard. The density of gypsum stone is about 1300 kg/m3, i.e., one and a half times more than that of wood. The standard thickness of plasterboard sheet (GKL) is 16 mm. If the humidity in your room is high, then you can use GKLV brand plasterboard.
Cardboard in this material performs the following functions:
- preventing plaster from chipping and subsequent human inhalation;
- it functions as a base on which special primer, varnishes and paints are applied, since they cannot be applied directly to plaster;
- on cardboard surfaces you can make markings with a simple pencil;
- it holds pieces of stone together as it cracks and breaks.
 An excellent alternative to upper cabinets can be gypsum plasterboard shelves above work area
 Partition separating dining area working kitchens will harmoniously complement gypsum plasterboard shelves
At the same time, gypsum is very soft and pliable, it can be processed with a hacksaw, files, and is easily drilled; the design of the product can include any, even very whimsical, shape. Usually this facing material with even smooth surfaces for walls and ceilings, but many make cute and comfortable shelves from plasterboard.
Shelves made of plasterboard (video)
Straight and corner shelves made of plasterboard - functional and spacious
Alternatively, you can adapt shelves to close the corner, especially if there is a corner sofa with a table. In this case, it would be reasonable and correct from a design point of view to hang them above the sofa. Corner shelves are preferable to straight ones because corner configuration gives the shelves additional rigidity, plasterboard sheets will sag less. In this case, a stylish lamp is placed on the top shelf.
 Corner shelves made of plasterboard will become decorative element empty corner kitchens
  A plasterboard shelf structure in the corner of the kitchen can be equipped with lighting
 A plasterboard structure can completely replace the upper modules of a kitchen unit
Free-standing and built-in plasterboard shelves: which do we prefer?
Shelves can be made either as a separate piece of furniture or as a structure built into the wall, something like a niche. When making a choice in one direction or another, you need to be guided by your artistic taste, considering and taking into account the size and configuration of the room and its filling with furniture.
Separate shelves are great because they can be moved anywhere in the room, but they take up a specific space.
In contrast, built-in shelves seem to free up some area of the room, but due to the design features they cannot be large and deep. Additionally, once placed in one place, they cannot be moved. Of course, built-in furniture is generally preferable for small, cramped spaces.
Two options for installing plasterboard shelves (video)
Design and drawing of plasterboard shelves
To make shelves from plasterboard with your own hands, you must first create a certain design so that they look harmonious in your interior. This requires special spatial thinking, so it would be a good idea to invite a specialist for this procedure.
As a rule, shelves are adjacent to the walls, suspended from them, or placed on the floor.
Having carefully measured the available space with our own hands, we draw a drawing using special programs. In this case, you need to remember about the proportionality of the product, symmetrically placing the same number of niches from the central section.
 From plasterboard you can assemble a full-fledged shelf for the kitchen of any configuration
Moreover, if you personally design plasterboard shelves, you need to imagine what load they will bear. If you plan to put something large and massive on them such as a TV, small aquarium or system unit, then it is necessary to provide transverse stiffening ribs from aluminum corners, as well as a method for masking them. The design and style of the entire room also requires that the shelves be painted in specific color or stylized to resemble some expensive material such as solid boards of precious wood, marble or precious stones.
Any responsible design includes a number of mandatory stages:
- establishing a very specific image of the entire structure;
- carefully measuring the area where the shelf is located or attached to plasterboard;
- development of a drawing or diagram of your design.
Based on the project, you can make calculations of the exact quantity Supplies and purchase them.
 The frame for a plasterboard shelf can be assembled from slats or metal profile
We create shelves with our own hands from plasterboard
So, you have decided what space and volume in your interior will be occupied by plasterboard products - shelves, racks or stands.
Now we have to implement the wall structures with our own hands. If drywall is used only as a finishing material, then the frame is something like a niche. In this case, it is recommended to cover not only the resulting frame with plasterboard, but also the entire adjacent wall - this way it will look harmonious and holistic.
But still, more often than not, the drawing involves the construction of shelves, where plasterboard sheets are load-bearing. In this case, we make a frame from an aluminum corner, which is attached to the wall using screws and a screwdriver. As a rule, this is enough, because the shelves will not carry much load.
Of course, the adjacent wall must be carefully leveled and plastered.
To be sure of the strength of the structure, you need to:
- use drywall no thinner than 16 mm;
- position fasteners frequently.
After securing the load-bearing elements, you need to assemble and secure the entire structure provided for in the drawing. Perhaps it will turn out to be something similar to a niche.
 You can use a construction knife to cut drywall
When cutting and sewing corner fragments, do not forget exactly where your shelves on the wall, made from sheets of plasterboard with your own hands, will be attached.
Soft drywall is attached to the corners using self-tapping screws, which then fit into the holes in the profile. Since the places where the sheets are pressed against the frame by screws give strength to the entire structure, they need to be placed quite often, but screwing the screws in too close will lead to cracking of the material.
If the design involves installing lighting in a niche, then you will have to lay the wiring yourself, hiding it in the bends of the structure. Since the power of the bulbs is clearly low, you can use thin, inconspicuous wires.
 Using a knife for cutting plasterboard, you can easily cut out fragments of any geometric shape
 When using a utility knife to cut drywall, you need to be careful
Finishing plasterboard shelves
Before actually forming and gluing shelves or a niche from plasterboard, you need to cut out the sheets and process them in accordance with what the design dictates. This is not difficult to make with your own hands, like all the details of the previous stages. Drywall can be easily sawed with a hacksaw with fine teeth (for metal) so that the plaster crumbles and cracks as little as possible. You can also cut through one layer of cardboard and half gypsum stone and carefully break off the remaining layer in the same way as cutting and breaking glass.
Sawn or cut ends are sanded with fine-grained sandpaper. After that, all that remains is to fix the resulting parts in the frame and make lighting and paint or varnish the shelves.
DIY plasterboard shelves (video)
Thus, when modeling shelves or other similar structures from plasterboard, you must have at least basic design skills, as well as material processing and plumbing. Floor or wall structures can be of any shape and configuration; it is important that they fit organically into the design of the room and do not take up much space. Drywall is widely used for making shelves or niches due to its availability, low cost, and ease of processing. In the interior of any living room, plasterboard shelves, as a rule, look beautiful and harmonious. If they are made with your own hands, then they also bring aesthetic satisfaction.
Plasterboard shelves in the kitchen interior (photo)


Photo gallery (24 photos):


The process of manufacturing structures based on plasterboard is divided into successive stages and does not require special skill. Let's consider the procedure for constructing shelves with your own hands and the features of working with this material.
Materials and tools
To build shelves you will need:
- Drywall sheets;
- Galvanized profile;
- Dowels and screws;
- Primer;
- Reinforcing mesh;
- Perforated corner;
- Putty.
Tool used:
- Screwdriver, drill;
- Plumb, level;
- Metal scissors;
- Hammer;
- Roulette;
- Hacksaw;
- Brush and spatula;
- Emery cloth;
Paint or wallpaper - all this is prepared depending on the intended design.
Preparatory stage
To calculate the amount of materials needed, a diagram of future shelves is drawn up. First, they estimate possible configurations on the wall and choose the right option. Determine the load affecting the structure of the frame. Placing heavy objects on shelves will require a reinforced structure using metal corners, while for decorative purposes you can get by with conventional rack profiles. The thoughtful structure is drawn on paper, the dimensions are completed and recorded. The result should be a drawing showing the shapes and locations of all shelves.

Frame installation
Creating a base for plasterboard sheets begins with markings, which are transferred from the diagram to the wall, using a level when drawing vertical and horizontal lines. The holes marked for fasteners are drilled with a drill and made using nylon dowels. The main guides on the floor and ceiling are installed first, then the vertical and wall racks are installed. The last to be secured are the transverse slats and reinforcing elements, for which hangers or profile trims are used. The connection of frame parts is carried out using self-tapping screws or hollow rivets. This stage ends with the installation of electrical wiring, if lighting or sockets are intended to be placed on the shelves.

Covering the frame with plasterboard
The dimensions of the shelves are taken from the frame and drywall is cut along them. Drawn details rectangular shape cut with a knife complex elements cut out with a hacksaw, curly lines are pre-drilled with a drill. The edges of the blanks are sanded and the sheets are secured to the profile frame with self-tapping screws, paying attention to joining the drywall in the corners. In areas of expected heavy load, the material is installed in two layers.

The final stage of work
The joints between the plasterboard sheets and the recesses from the screws are sealed with gypsum-based putty with the obligatory gluing of the seams with fiberglass tape. External corners are reinforced with perforated corners. carried out in two passes: the dried first layer is lightly treated with coarse sandpaper, the finishing coating is sanded with fine sandpaper. At the end of the work, the structure is coated with a primer and the finishing of the shelves proceeds.

The use of plasterboard allows you to implement any interior ideas and create original shelves, niches or stands that refresh your home environment.
The furniture industry offers to the market a large assortment goods. You can choose almost everything according to your taste and capabilities. But sometimes ready-made furniture for some reason does not suit the buyer, then the solution would be to make the item to order. The furniture itself and the materials for it can be varied. More often they order from a master or create with their own hands such simple, but necessary elements interior, like plasterboard shelves that can fit into any interior design.
Advantages of plasterboard shelves
Without drywall it is difficult to imagine the renovation and arrangement of modern housing. Its advantages: lightness, ease of processing and subsequent installation. No special knowledge or skills are needed. You can make interior items and furniture of any shape from plasterboard. Shelves made of this material are durable and easily fit into the home design concept. Another plus is that almost all finishing materials can be used with it. There is no shame in putting a photo of a finished plasterboard shelf on display by posting it on a blog or social networks. Products can hide existing defects in the premises, design flaws, and communications.

List of things needed for work
You can order the necessary interior item from professional craftsmen or make it yourself. In any case, before starting work, you need to decide on the purpose of the item in order to correctly draw up the project and select materials. Pick up best option Shelves made of plasterboard can be created using photos on the Internet and thematic magazines. Most often, the living room is the place where the product is placed, although there are many examples good location and in other rooms.
 Drywall differs in its thickness, so before purchasing you should find out whether the selected sheet is suitable for your purposes
![]() How to cut drywall correctly
How to cut drywall correctly
 Types of profiles and their purpose
If you decide to make plasterboard shelves in the kitchen or bathroom, do not forget about the high level of humidity in this room; choose sheets of moisture-resistant material.
You can order furniture from professionals or make shelves from plasterboard yourself. Select the necessary tools and materials for yourself:
- drywall;
- perforator;
- metal scissors;
- drywall knife;
- screwdriver;
- square;
- level, plumb;
- dowels, screws;
- guide profile, corners, hangers.
 Tools for making plasterboard shelves
The amount of materials depends on the load on the plasterboard shelves. For light objects, a lightweight frame is made and sheathed with one layer of material. For heavy ones, the structure is reinforced additional profiles and use two layers of drywall.
Stages of work
Getting to work, amateur craftsmen are puzzled by the question: how to make shelves from plasterboard. Decide on a project, then purchase the necessary tools and materials, and then get to work. The process can be divided into the following stages.
| Stage | Work progress | Materials, tools |
| Creating a Project | Plan including calculations, image (photos may be used) |
|
| Marking | Drawing lines on the wall at the location of the desired placement of shelves |
|
| Frame installation | Creating the basis of the design |
|
| Drywall installation | Creating a Form |
|
| Working with joints | Making the surface even |
|
| Finishing | Complete the project based on existing photos or drawings (color, texture, etc.) |
|
Having determined on which wall the plasterboard structure can be hung, they create a project and make final settlements. The photo will help you imagine the final result and accurately indicate all the elements on the plan.
Frame installation
When installing the structure, do everything plumb, taking into account that walls and ceilings are not always perfectly level and hanging a shelf can be problematic. Whatever option is presented in the photo of the project - regular or corner shelves made of plasterboard - carefully level the surfaces. You can't fix the flaws with putty.
 Embedded lintels in shelves
Fastening metal plates is one of the most important stages in the process of creating plasterboard structures
 Attaching a metal frame to the wall
 Metal frame for a future shelf
 To attach shelves to drywall, use special butterfly dowels, which, due to larger area allow you to hold the fastener without damaging the drywall
To avoid booming sound in the constructed product, it is necessary to fill the cavity with a sound insulator - mineral wool, insulation. The wall for placing the plasterboard shelves is marked according to the level, and holes are drilled at the fastening points. The structure is assembled from a standard UD or UW profile measuring 50x25 mm. Using metal or nylon dowels (length and diameter depend on future loads), the profile is connected to floor slabs and/or load-bearing walls. To strengthen the frame, several jumpers are installed. Then you need to hang the hangers on the dowels, and screw the guides (transverse and longitudinal) onto them; they will become the basis for the shelves.
To create a solid foundation, the mounting step of the rail should be minimal.
 Metal profile frame for a future shelf
 Metal frame for corner shelf
Drywall installation
Having created the frame, we begin to install the drywall. To begin with, the sheets are cut out according to design calculations. The joints are cut at an angle of 45 0, which helps to better fill them with putty during processing. The edges of the patterns are sanded, and the shelves are covered with plasterboard on all sides, its sheets are screwed with self-tapping screws. It is advisable to use expansion dowels, as they can withstand a fair amount of weight.
 The frame is sheathed on all sides
 Frame covered with plasterboard
 All shelves above and below are covered with plasterboard
Processing joints between sheets and corners
The joints are treated with putty, glued with reinforcing mesh (40 mm) and the putty compound is reapplied. After drying, proceed to finishing. For mechanical protection and a clear line, the corners are glued with a protective perforated corner, and the internal ones are reinforced. Remember, the attractive appearance of your future shelves directly depends on how smooth you can make the corners of the structure.
The final stage is finishing, plasterboard shelves are puttied in several layers, then sanded and primed. The product is ready for painting or wallpapering. Shelves are used as stationary structures or can be hung on the wall.
 Processing joints of plasterboard sheets
Curved shelves
Drywall allows you to make curved structures. A template is made from a more durable material and a moistened plasterboard sheet treated with a needle roller is laid on it, fixing the edges. Allow to dry overnight. The part is fixed to the profile with self-tapping screws. To do this, take a semicircular one or bend a regular one. Otherwise, the manufacturing process is the same as for a regular shelf.


Lighting in plasterboard shelves
Lighting gives an attractive appearance and functionality to a plasterboard shelf. Before covering, wiring is done and the wires are hidden in a protective corrugation. Using a round bit and a drill, make holes in in the right places, fix and connect the lamps. You can install an LED strip; it has proven itself especially well on curved surfaces.
Making shelves from plasterboard with your own hands is a great solution for those who want individuality and functionality in the interior of their home. Such designs are distinguished by strength, reliability, and durability.
- Properties of plasterboard sheet
- Place of plasterboard shelves in the interior
- Tools and materials
- Installation of a steel profile frame
- Frame covering
- Surface finishing
- Decoration of gypsum plasterboard structures
In order to create beauty and comfort in the apartment, there is no need to spend a lot of money on purchasing expensive furniture and household appliances. As a rule, in order to radically change and refresh the interior of a living room or bedroom, the simplest and most available materials, which are available in any hardware store. Such a material is drywall. It can be used to make arches, columns, dropped ceilings, walls, partitions and all kinds of shelves. The combination of various unique properties has made it an indispensable material for DIY repairs and construction.
Plasterboard shelves will add individual design room, and will also help you get rid of furniture that takes up significant space.
Properties of plasterboard sheet
A plasterboard sheet is a product consisting of two strips of thick mounting paper and a solid plasticizer on gypsum base between them. GCR has many unique features.
So, it has the following advantages:
- environmental Safety;
- flexibility allowing the creation of curved structures;
- affordable price;
- ease of processing and installation;
- no thermal expansion;
- water resistance after appropriate treatment;
- non-flammability;
- possibility of equipping with lamps of various types;
- strength to withstand significant loads.
By installing plasterboard shelves in the hall, you can not only decorate it, but also hide some defects and unevenness on the wall.
The direct purpose of plasterboard is covering ceilings and walls. This material is so pliable to work with that it is also used for organizing internal space. It is perfect for constructing partitions and various structures that can successfully replace massive furniture. Today we will try to describe in as much detail as possible how to make plasterboard shelves with your own hands that are durable, neat and beautiful, and with their help get a completely exclusive room design.
What should you consider before creating?
Before you begin calculations and installation of the shelf, you need to focus on several important points.

Make durable shelves that will delight you long years This is only possible if you take into account these small subtleties.
We make calculations before installing plasterboard shelves
At the initial stage, it is necessary to think through the design of the shelves on the wall, imagine the end result in detail, and only then begin calculations. Start by drawing up a diagram of the future design. Don’t be afraid to show your imagination - with the help of arched plasterboard you can create the most incredible designs and bends, so the shelf can have any shape. Only after drawing up a detailed project with exact dimensions can you begin to carry out calculations. For work you may need the following tools and materials:
- Load-bearing profiles. Even if it is initially assumed that the shelf will carry more decorative function, then it is still better to choose a more durable profile.
- Guide profiles. They are designed to form the “skeleton” of a shelving unit or other structure. Here, too, it is better to choose a more durable option.
- An arched profile may come in handy. It is distinguished by the presence of cuts that allow it to be easily bent to give the desired shape. Alternatively, you can use a regular profile and make the cuts yourself.
- Regular or moisture resistant drywall depending on the humidity of the room.
- Self-tapping screws and dowels.
- Liquid primer.
- Mounting grid.
- Level, plumb line, plane and screwdriver.
- Spatula, brush, sandpaper.
- Tape measure, knife and metal scissors.
After drawing up a sketch and purchasing everything you need, you can begin assembling a frame for plasterboard shelves, which can be mounted in two ways: externally (on already finished wall) or internal (during the assembly of the partition). Here, too, you need to follow some rules. 
- Take careful measurements and place marks on the wall. In this case, it is better to use a level so that the shelves turn out smooth and beautiful.
- The frame must be secured using self-tapping screws and a screwdriver. The distance between the screws should not be more than 25 cm. The greater the load the shelf must withstand, the smaller this distance should be.
- After securing load-bearing profile proceed to the installation of guides that create the volume of the structure. Strengthening the frame is achieved by attaching the guides to the ceiling, floor and connecting them with a jumper profile.
Installation of built-in lamps
By making a plasterboard shelf with your own hands, you can create a unique project. For example, supplement it with lighting. This will give the design an attractive, stylish look and will become an additional source of light in the room.
All you need to install the lamp is a drill and a special round bit for cutting a hole.

The wiring must be done in advance, even before the sheathing, by hiding the wires in a protective corrugation. Instead of spotlights You can use LED strip, which, due to its flexibility, is perfect for shelves with curves.
Plasterboard covering and finishing
Installing drywall is much simpler than the extensive work already done to build the shelf frame. Before sheathing, you need to cut the sheets into parts. All dimensions are transferred to the material, a cut is made on one side, the sheet is bent and only after that the second layer of cardboard is cut.

All irregularities at the ends must be sanded. After this, you can begin installing the sheets using spacer dowels. The end part can be covered with a single sheet, having previously cut “windows” in it, or individual small parts can be used. The second method is simpler, but you need to be careful not to create too many joints.
If you want your DIY wall shelves to be perfectly smooth and neat, then pay Special attention processing of joints. They need to be sanded, apply a layer gypsum putty, cover with reinforcing mesh and repeat the treatment with putty. To strengthen and make the structure more aesthetically pleasing, the corners can be covered with putty corners made of aluminum or plastic.
The final touch - finishing putty. It is made in several layers and rubbed with sandpaper. Before painting or other finishing works finished shelves must be primed.
Using drywall, you can make a shelf for flowers or decorative items, as well as for more massive things - books, household utensils, TV. Depending on the style of the interior, the finished structure can be painted, covered with wallpaper, or any other finishing materials can be used.
The shelf can be of any design, but if you have not encountered such work before, then it is better to go “from simple to complex.” To give you a better idea of what plasterboard shelves can be like, we suggest looking at a few photos with examples.


In this article, we tried to explain to you in detail how to make a plasterboard shelf with your own hands. Shelving and partitions with decorative niches have recently become increasingly popular for two reasons: simple reasons– originality and low cost of design. All you need is basic skills in working with drywall and a little imagination. Many designers consider shelves made from this material to be the most modern and a good decision. What do you think?
3444 0 0
Plasterboard shelves: design and surface protection methods
Greetings, comrades! Today we are going to learn how to make plasterboard shelves with your own hands and how to protect their surface from abrasion, mechanical damage and unwanted contact with water. Let's get started!
Features of the material
Why, in fact, do plasterboard shelves need any additional protection?
Due to several specific features of gypsum boards. He:
- Does not tolerate prolonged contact with water. Even GKLV (moisture-resistant drywall) swells and becomes loose when immersed in it;
- Not resistant to abrasion. It is not surprising: the outer layer of gypsum board is a product of cellulose processing, in essence it is ordinary thick paper;
- Cannot boast of strength with respect to shock loads. If you drop a hammer, vise or any other heavy and hard object on drywall shelves, they will most likely require repair.
Please note: to align the edges and seal the seams of a plasterboard shelf, gypsum putty is used, which with its mechanical properties practically no different from the gypsum plasterboard core. The outer corners of the shelves are especially vulnerable.
In addition, thanks to the double-sided casing and supporting frame the shelf, willy-nilly, will have a significant (50-75 mm) thickness.


Design
What ensures the rigidity and load-bearing capacity of a plasterboard shelf on a wall?
The frame and the method of attaching it to the main walls. About them - a little more detail.
Frame
Materials for it can be:
- A block with a cross-section of 30-40 millimeters, treated with an antiseptic;
- Galvanized profile, produced specifically for the installation of plasterboard structures.
Important: shelves in the bathroom or elsewhere damp room It is worth assembling only on a profile frame. Wood warps with fluctuations in humidity and temperature, which will inevitably lead to cracks in the plasterboard.

The beam can be connected by insertion with fastening with self-tapping screws or using galvanized mounting angles. The profiles are connected to each other with 9 mm sheet metal screws.
Two types of profiles are suitable for assembling the shelf frame:
- Rack-mount (PS) size 50x50 mm;
- Ceiling (PP) 27x60. As a rule, profiles of this type, due to insufficiently high rigidity, are connected in pairs (nested into each other).
The PN 50x40 and PNP 27x28 profiles are responsible for attaching the plasterboard shelf frame to the walls. The first type of profiles is used with rack-mounted PS, the second - with ceiling-mounted PS. To fasten guides to main walls, dowel-nails or wedge anchors are used; if the base of the shelves is a plasterboard wall, then the guides are attached to its frame with metal screws 25-32 mm long.
Built-in plasterboard shelves in a wall with a niche (for example, above the toilet in a toilet) have the greatest rigidity.

Almost equal to them in load-bearing capacity are corner shelves mounted on two main walls or light partitions. If you need a straight wall with shelves without niches, you should think about either reinforcing their frame with welded corners, or constructing side vertical walls.

Sheathing
The finished frame is sheathed with locally cut sheets of plasterboard. For their fastening, 25 mm phosphated self-tapping screws are used. The fastening pitch is no more than 150 mm.
There are few rules and restrictions here:
- Fastening a sheathing element with self-tapping screws screwed in closer than a couple of centimeters from the edge is bad manners. The edge may crumble;
- The head of the screw should be recessed relative to the surface (it will be hidden later by putty), but it should not break through the cardboard shell of the sheet;
Hint: achieve optimal depth screwing without loss of speed is possible using screwdriver bits with a limiter.

- Don’t be afraid to leave gaps in the shelf trim: putty will hide them;
- When cutting drywall onto a shelf, it is better not to saw the sheet, but to break it along the cuts previously made with a knife. In this case, much less dust will rise into the air.

Pre-finishing
It comes down to reinforcing the seams, filling them, sanding them and priming them for painting. And there are several subtleties here:
- If the seams are thick due to the serpyanka reinforcing them, a continuous millimeter layer of gypsum is applied to the entire surface of the shelf. If it is difficult for you to make it uniform, successively apply two extremely thin layers “on a peel” perpendicular to each other;

- Sanding is possible only after the putty has completely dried. In a dry room it dries for at least 6-12 hours;
- GCR needs to be sanded under oblique lighting, emphasizing the unevenness;
- Before applying penetrating acrylic primer, the shelves should be dusted with a broom or vacuum cleaner.
Surface protection
How to protect a plasterboard shelf from water, abrasion and chipped corners?
Here are a few solutions that I have personally tried.
Corner reinforcement
Before puttying external corners they are reinforced with perforated plastic or galvanized steel profiles secured with self-tapping screws. The putty is applied over the reinforcement in a layer approximately millimeter thick.

Pasting with a plastic corner
A decorative plastic corner can replace a reinforcing profile. It is glued onto liquid nails or silicone after finishing the finishing of the shelves. Price linear meter corner approximately corresponds to the cost of a perforated profile of the same length.
Tile
Shelves in a bathtub or toilet are often finished with tiles or porcelain tiles. The coating can be laid using ordinary tile adhesive, sealant or liquid nails. When using a waterproof grout for the joints (epoxy or silicone), this finishing method guarantees unlimited service life of the shelves and their absolute resistance to abrasion and moderate impact.

Laminate
Like tiles, laminate can be glued with mounting adhesive or silicone. The edging of the shelf is done in a manner already familiar to us plastic corner(external and internal).
Waterproofing paint
It will not protect the gypsum board from damage, but will prevent its contact with water and swelling. For this purpose I used rubber paint “Rezel” produced in Sevastopol. It is applied in the same way as any other water-based emulsion - in 2-4 layers with intermediate drying, using a brush or roller.