Decorative wooden shelves on the wall. Wall shelves in the interior - which style to choose? (70 design photos). Shelves on countersunk anchor bolts
Finding storage space is one of the biggest challenges people face when thinking about a design, and after that too. Sometimes even in big room another bulky closet will look out of place, but what if you need to place a collection of figurines or a dozen books? Salvation in such a situation is wall shelves, which will be discussed today.
Types of shelves
Wall shelves, although they are a variety in themselves, they also differ in location. Conventionally, they are divided into the following types:
The lightest and most common option, which is attached to flat wall. But precisely because of their simplicity, they provide a wide field for imagination: shelves of different geometric shapes, sizes arranged in the form of honeycombs or creating complex compositions.
Such structures can be a single plank nailed to a wall, or they can form a silhouette of a tree with each "branch" serving as a storage space. Bookshelves are slanted or asymmetrical. In the ocean interesting ideas there are even round ones, only in the case of unusual figures it is necessary to think over every moment in advance: location, content, fulcrum.

This place is usually empty due to its impracticality, however, corner shelves not only rehabilitate the space, but also help transform the interior. Fastening is carried out on two adjoining adjacent walls. In this case, not only the inner, but also the outer corner can be involved.
The variability in the design of corner wall shelves depends more on materials and decor, but even in itself this solution looks unusual. More often, shelves are used for books or household items in the bathroom, as well as in storage rooms.

As the name implies, these shelves are not attached directly to the wall, but are suspended on ropes - from the ceiling or beam. This design is not very stable, so it is used to store books, not crystal vases. But it is ideal for creating original accents in the room.
It can be installed as one shelf, or several. The first option is often created in the form of a triangle or fit a shelf into a circle. The main thing is to make sure the storage is reliable.


Materials for wall shelves
A wooden plank nailed to the wall is the easiest shelf option that immediately comes to mind. But for modern design this is not enough. The choice of material, even for such a simple product, is wide enough - as well as their capabilities.
Wood and derivatives
Even if this is an obvious basis, it should not be immediately discarded. Complex shapes and fastening will help to diversify a wooden wall shelf. For minimalism or a loft, such a solution would be very appropriate. And if you want to fit an element into classic interior, it is recommended to pre-process the details, and maybe even decorate with carvings.
To save on material, you can use MDF, chipboard or plywood - beautiful, simple, practical.


Metal
But metal wall shelves will definitely attract attention and harmoniously fit into the interior, especially if it is high-tech, fusion or, alternatively, minimalism. Only for their installation will need special skills.
Such a base has high characteristics - durability, reliability, strength. And pre-treatment will save you from corrosion.

Plastic
Cheap, malleable versatile material, which can look simple or luxurious, imitating natural options, but leveling out their shortcomings. Especially if such a shelf on the wall is full of objects, so guests will not have the opportunity to get to know its details better. For the bathroom - a very good solution!


Glass or mirror
Such a basis has a significant drawback - fragility. A sharp push or impact can damage the shelf, but this will not happen when storing light items. Is it worth mentioning how elegant the glass looks, and how glamorous the mirror surface is? This will give the interior a feeling of weightlessness.

What are the types of fasteners?
You will also have to choose the method of attaching the shelf to the wall on your own - from three options. The reliability and mobility of the structure depends on your decision.
Installation is done with dowels or anchors to the wall. This provides a strong fixation of the entire product, increasing its load capacity and strength. If the shelves are supposed to store heavy items, then this type is perfect. But there is a big minus - it is very difficult to dismantle it without consequences for the wall or structure.

Moderately rigid fastening with brackets and mounting hooks, which is easy to implement at home, unlike the first type. If necessary, they can be dismantled without damaging the shelf, after which a new one can be installed.

Fully in line with modern trends in functionality and mobility, such wall shelves are installed according to the principle of building up: the lower tiers become a support for the upper ones. A variety of combinations of shades or shapes that complement each other look appropriate.

We select shelves for the style of the interior
At quality work shelves turn into full-fledged furniture, which, like any other item, must be harmoniously entered into the style of the room.
Modern style
Everything here is simple and at the same time diverse: suitable as concise products from different materials, and whole ensembles of various geometric shapes. Instead of empty embellishment - conceptual aesthetics. The priority is modular or mobile types of wall shelves.
It is necessary to focus on wall decoration: in the case of a neutral coating, you can enter bright designs, and on the side with a bright finish, it is better to do without shelves.


Classic style
Turn around in classical style won't work very well. Wooden shelves on a flat wall, in extreme cases - corner. Brackets can be brought to the fore if they are used and fit the design.


Provence
Provence makes similar demands. Only the processing of the base needs to be approached more carefully. First, use a tree or its derivatives. Secondly, cover them with white paint and, if possible, create the effect of antique furniture. Some carelessness in installation will add charm to the design, but we must not forget about its strength.


Minimalism
To begin with, we note that with this style it is unlikely that it will be possible to set on open shelves a lot of any "small things" - that's why he is minimalism. To fit a lot of items, it is recommended to provide shelves with doors, thereby hiding disharmony from the eyes. Good looking glass or wooden surfaces- even, smooth, directed strictly horizontally.


Loft
The freedom-loving loft offers us the greatest variety. At the same time, it is not at all necessary to fanatically grind the boards to perfection - slight negligence is quite organically combined with brick walls characteristic of this style.
An excellent option is shelves suspended on a thick rope or an angular structure based on a pipe brought to the fore. In general, the loft allows you to turn the disadvantages of space into virtues, and technical elements- decorative and aesthetic.


Shelf decor
In addition to the fact that you can choose wall shelves with interesting design, they can also be further decorated for greater effect. To avoid the effect of clutter, make sure that the practical content of the products does not conflict with the details.
The simplest option that is suitable for standard wooden shelves- surface decoration. Everything can be used here available tools: stencils, decoupage, decorative tape and so on. This solution will look good on neutral walls, for example, painted white.
The Provence-style interior is characterized by the use of textile elements, so why not decorate the shelves with them by laying a few beautifully hanging scarves with patterns? Cozy and practical.
A romantic mood will be given by candles arranged singly or in groups. However, you can experiment with light sources by entering some modern tendencies. For example, wall shelves with backlights look unusual - mounted lamps that gently illuminate the details located on them.
Tubular fasteners on the shelves can be used as a kind of "hanger": for example, for a lamp, towels or a garland. At little effort a simple storage space turns into an elegant element of the interior.


It would seem that such a simple product, but so many options! But not all of them are easy to implement on your own and, let's admit, even for simple form certain skills are required. Before moving on to creating a shelf with your own hands, check out the basic recommendations that will help beginners in furniture business or experienced craftsmen.
So, before the main process, it is necessary to think over the design in detail and make a sketch. Determine for yourself the purpose of installing the shelf, the intended things that will be stored on it, the location, shape and size.
After evaluating the load, select the material and method of fastening. After that, marking is carried out on the surface of the base, and the material is also cut.
The resulting modules are assembled, a re-measurement is made, which is compared with the markup for fasteners. Next is carried out finishing elements, namely, grinding, tightening and painting, if necessary.
Fasteners are installed on the surface of the wall and on the shelf, after which the parts are fixed, as well as leveling with finishing fixing.


In addition to the options listed, here are 30 more wall shelving ideas to help you decide. interesting solution. inspiration and beautiful interiors!
To organize the space in the premises, as well as to decorate the interior, there is nothing better than shelves. comfortable, functional, original form, they help to conveniently arrange a lot of things and give the rooms a more comfortable look. Making shelves on the wall with your own hands is not at all difficult, and you can use a wide variety of materials - wood, fiberboard, glass, pieces of tin, plywood.


| Types of wall shelves | Description |
|---|---|
| Classic | This type of shelves is the most common because of its simplicity, aesthetic appearance and ease of installation. They are a huge flight of fancy: from simple squares to creative asymmetric shapes. |
| corner | This type of wall shelves differs in the method of fastening - it is carried out on adjacent adjacent walls. Most often they are mounted in utility rooms and bathrooms |
| Suspended | This original way creating a shelf involves attaching a simple structure to the ceiling using cables or vertical racks |
| floor standing | This wall shelf is a floor support structure. This type of product is especially relevant in the hallways, as well as large rooms where you don't have to think about wasting space |
| Open and closed shelves on the wall | Wall shelves can be designed, for example, with or without glass |

The tree is the most comfortable material for work. Wooden shelves are simple, complex, open and closed, vertical, horizontal and angular. Based on basic version, you can assemble a shelf from several modules and give it the most incredible look. In order for the product to serve for a long time, you should choose the right wood: the boards must be perfectly even, completely dry, without cracks, voids and mold.

During the assembly process you will need:
- hacksaw;
- drill;
- building level;
- pencil and ruler;
- boards 16 mm thick;
- stain;
- varnish for wood;
- grinder;
- screws, brackets, dowels.
As an example, a simple rectangular shelf 250 mm wide, 300 mm high and 1100 mm long is used.

Step 1. Markup
The boards are laid flat on the table and measurements are transferred from the drawing. The height of the side walls should be 268 mm, since they will be located between the top and bottom: wall height + board thickness x 2 = 300 mm.
Step 2. Cutting the boards

If the markup exactly matches the pattern, you can start cutting. It is best to use a jigsaw for this, then the cuts are perfectly even and neat. You should get 2 long blanks and 2 short ones.
Step 3. Processing blanks

Before proceeding with the assembly, each workpiece must be sanded, stained and varnished. If you plan to simply paint the shelf, the blanks are processed - this way the service life increases, and the paint lays down more evenly.
Step 4. Assembly of the product

The bottom board is laid flat on a flat surface. 8 mm retreat from the ends of the workpiece and draw 2 straight lines parallel to the cuts. Now on these lines you need to mark two points at a distance of 5 cm from the edge, and drill holes for the screws there. Do the same with the top piece. When all the holes are ready, side blanks are installed on the bottom board and screws are screwed in. A second board is applied on top and also fixed with self-tapping screws. side walls.

Brackets are fixed at the ends of the side walls, holes for dowels are drilled in the wall, self-tapping screws are inserted and twisted so that they protrude by about 5 mm. The dowels must be located strictly horizontally, therefore, before drilling, a line is drawn using a level. Now it remains only to attach the brackets to the fasteners and hang the shelf. If desired, the back wall of the product can be hammered with a piece of plywood, and glass can be inserted in front.


To such simple shelf has become more original, you can replace one side wall with a stump of a thick branch. To do this, choose an even branch with a diameter of about 7-8 cm with a smooth clean bark, saw off a piece 28 cm long, cut off all the lateral processes. Chock is treated with a primer, dried and varnished. The bark does not need to be removed. After the varnish has dried, the workpiece is inserted between the upper and lower boards and screwed tightly with self-tapping screws.

Based on this drawing, you can make various variations of wall shelves. For example, reduce the length to 400 mm and make 3-4 blocks at once. Then install them on top of each other in a checkerboard pattern and secure them together with metal plates. Or simply fix them on the wall separately, placing them at a short distance from each other.

Often, to save space, shelves are made angular, and they can be mounted both in the inner and outer corners.


The blanks are made according to the scheme described above, only the upper and lower boards consist of two elements, with ends sawn at an angle. The process of making such a shelf is quite simple:
- the halves of the top board are smeared at the ends with glue and clamped with clamps;
- repeat the same steps with the bottom board;
- when the glue dries, all the workpieces are stained or primed;
- fastening lines are marked on the upper and lower blanks and holes are drilled;
- insert the side walls and fix them with self-tapping screws.

| Wall shelf materials | Advantages and disadvantages |
|---|---|
| Wood: plywood, chipboard, MDF and others | This material is relatively easy to work with, it looks beautiful, natural and spectacular, its service life is quite long, especially if pre-treatment is carried out. |
| Plastic | This material is the most versatile, it can imitate both wood and stone, while removing their imperfections. |
| Metal | Such wall shelves will be very strong, reliable and durable, but they will hardly fit into a classic interior. In addition, corrosion can also be a problem, so for metal products required special processing and conditions |
| Glass | Transparent wall shelves will create an atmosphere of lightness and comfort in the house. Of course, it will be difficult to make a glass structure with your own hands, but if you nevertheless decide to do all the work yourself, then you will have to work with glass for quite a long time and very carefully, especially if various cutouts are planned in the design of the shelf. |
Original book shelves
Shelves non-standard shape are in increasing demand, so if you wish, you can try to collect something original. For example, a bookshelf in the form of a simplified labyrinth is used.
For manufacturing you will need:
- edged board 20 mm thick;
- wood glue;
- clamps;
- roulette;
- hacksaw;
- miter box;
- Sander;
- stain;
- furniture screws, self-tapping screws;
- decorative shelf holders.
If you have everything you need, you can start making the shelf.
Step 1. Markup
On the prepared boards, cut lines are marked with a pencil under the ruler. Measurements should be transferred very carefully, since all horizontal parts have different lengths.
Step 2. Trimming blanks
The ends of each workpiece are cut at an angle of 45 or 90 degrees. The diagram shows the first option, so you need a miter box for sawing. It is very important to correctly install the miter box on the board so that the cuts are symmetrical. If the ends are cut off incorrectly, it will not work to fold the shelf.
Step 3. Assembly of the structure
The ends of the parts are smeared with glue, tightly compressed and additionally fixed with slotted furniture screws. Ordinary self-tapping screws do not fit here. At least 2 screws are required for each joint. Both parts of the shelf are applied to the wall, leveled and the attachment points are marked with a pencil. After that, holes for dowels are drilled, brackets are screwed to the shelf with self-tapping screws and the structure is hung on the wall. Instead of brackets, decorative pelican shelf holders are often used.


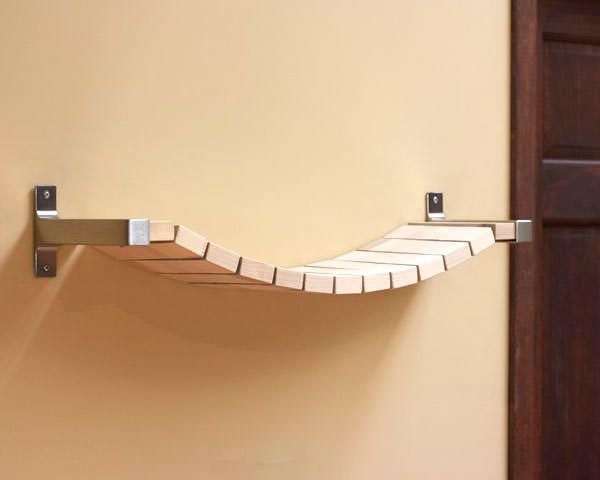
Hanging shelf with straps
If you want to decorative shelf for small items, the next option is perfect - a board suspended on belts.


To make a shelf you will need:
- 2 edged boards 300x750 mm, 30 mm thick;
- 4 leather belts 75 cm long;
- 4 long screws with plastic dowels;
- 4 short screws;
- building level;
- ruler;
- sharp knife;
- drill.
Step 1. Preparing the straps
The cuts of the belts must be perfectly even, therefore, if necessary, they are cut with a knife. Fold each belt in half, press the ends to the table, step back from the edge 2 cm and drill a neat through hole. Do the same with the remaining three.
Step 2 Attach the straps to the wall
On the wall, using a level, two points are determined at a distance of 60 cm. Holes are drilled and plastic dowels are inserted. A belt folded in half is applied to one of the holes and fixed with a long screw - a large loop is obtained on the wall. Another such loop is attached nearby.
Step 3 Installing the Shelf
A polished board is inserted into the loops and aligned horizontally. To prevent the shelf from moving, the parts of the belts adjacent to the wall near the board itself are screwed with short self-tapping screws. Now another one is hung under this shelf, exactly repeating the steps described above. The result is a light and neat bunk shelf. If desired, you can add 1-2 more tiers.
For the manufacture of the shelves described above, you can use not only wood, but also plywood, as well as chipboard sheets. The latter option is used most often, since chipboard is light in weight, high strength, practicality and durability. When assembling shelves from this material, all sections must be pasted over with a melamine edge to match the color of the sheet.


Making a glass shelf

Glass shelves harmoniously fit into any interior, and the installation process does not take much time. For work you will need:
- strained glass;
- hammer;
- electric drill;
- building level;
- aluminum profile;
- dowels;
- adhesive tape;
- ruler;
- pencil.
Not everyone knows how to cut glass correctly, and therefore it is better to order cutting blanks in the workshop. They will also perform grinding and polishing of the edges, so that when installing the shelf, you will not be cut on sharp edges. Everything else can be done on your own.

Step 1. Marking for fasteners

The section of the wall where the shelf will hang should be as large as possible. Using a building level, draw a horizontal line on the wall with a pencil. On the line mark the location of the fasteners, drill holes.

Step 2: Install profiles


An aluminum profile is applied to the wall surface and the conformity of the mounting marks is checked. Then dowels are inserted into the holes, the profile is baited with one screw and leveled horizontally. After that, tighten the rest of the screws.


Instead of a drill, insert the bracket screw

Screw in the bracket screw

Leave the bracket screw protruding from the wall


Checking the position

We have shelves
Step 3 Attaching the Shelf
The rear edge of the glass shelf is closed with adhesive tape. You can use separate spacers from the tape, placing them where the glass will touch the heads of the screws. The shelf is inserted into the profile, the edges of the profile are closed with protective caps. If two shelves touch on the sides, their edges are fastened with metal fittings.
If there free time and the desire to experiment, you can create a very unusual shelves on the wall from improvised materials. For example, the corner shelf made of plastic pipes looks original. For its manufacture, segments will be needed sewer pipes and corner cuts. The shelf is attached to the wall with screws and dowels.


Old suitcases and diplomats also make great wall shelves. To do this, they are cut in height to half, cover the back with plywood and fix on the wall with screws or on brackets.

Drawers from unnecessary bedside tables are quite suitable for making shelves. To give them an elegant look, the boxes should be carefully sanded, primed and painted in bright colors. Then they are leaned back wall to the surface, mark the attachment points and drill holes for them. Even one such shelf looks very original, and a composition of 2-3 drawers will become a real decoration.


Video - Shelves on the wall with your own hands
Interesting wooden shelf. Master Class

You will need:
- Rope;
- Board at least 2 cm thick;
- 2 corners (mounts) for shelves;
- Steel washers;
- Lighter;
- Drill;
- Saw.


A place for books, souvenirs, trinkets dear to the heart - this is the main purpose of the shelves on the wall. Someone has a collection of candles on them, someone has volumes of their favorite poet, and someone keeps photo albums on the shelves. It is important that the shelves themselves should be no less aesthetic than the items stored on them.
Making a shelf out of wood is the first thing that comes to mind when self-manufacturing shelves Indeed, this option is the most common.

Wooden shelves are good for the availability and cheapness of the material, ease of processing, and the ability to experiment with design. And start learning to do similar creative designs it is possible from a simple and versatile shelf, which will not be superfluous in the kitchen, and will come in handy in the living room and in the nursery, and other options for its placement can be considered.
Shelf materials:
- Wooden trimmings of different lengths;
- Rope cut;
- 5 furniture boards;
- Wall fasteners;
- 2 rope rings;
- Electric jigsaw;
- Drill;
- Roulette;
- Pencil.
On the shelves (shields) you need to make holes. They should be drilled at a distance of 6 cm from the edge, and 12 cm between each other.
Wooden trimmings need to be sawn, their length may be different, but the height must be made common. Inside the sawn scraps, it is necessary to drill holes for the ropes (through).
First of all, the lower knots of the ropes are tied. The lower shield (lower shelf) is strung on them, between the shields along the edges, as a gap between the shelves, there will be stacks of scraps. It is better to divide all trimmings into parts, and lay out the same number of equal segments between each floor of the shelf.

The procedure is repeated, above the topmost shelf on the wall, the ropes are tied in knots. This must be done firmly so that the wall structure cannot be deformed either by one's own hands or by any other forceful action.
It will turn out a nice shelf on ropes inside stacks of scraps, you can place it in any room.
Do-it-yourself wooden shelf, the easiest way (video)
Chipboard shelves on the wall
Chipboard is chipboard, a truly versatile material for construction works. Plate dimensions, Smooth surface allow to do various designs with your own hands, including wall shelves.
Perhaps, only cutting chipboard causes difficulties, since the material is impregnated with resins. Most suitable tool to work with chipboard - an electric jigsaw.

The following tips for working with this material will not be superfluous.:
- For wall shelves, laminated chipboard is often purchased;
- Often, self-made shelves are pasted over laminated film or paper imitating various patterns (including natural ones);
- In order to seamlessly tighten screws and self-tapping screws in a chipboard structure, you need to get an electric drill;
- In the kitchen, shelves of this material are often made, since it is convenient to store containers with spices, cereals and pasta, jars of herbs collected by oneself in them;
- In the hallway, such shelves serve as a place to store important household items;
- Such a shelf on the wall in the nursery may have the purpose of book storage.
In small closets, which are included in the layout of many apartments, you can do original shelves for domestic needs - do it yourself, quickly and inexpensively.
Round shelves on the wall
Round cardboard shelves for the kitchen or bathroom - the squeak of interior fashion. They are usually made from cardboard plastic pipe, which is cut with a saw into circles 10-15 cm wide with its own hands. The edges of the circles are sanded sandpaper, and then the future shelves are painted over in several layers.

It turns out quite original round shelves, for the kitchen - very interesting option design. They can store:
- Kitchen towels;
- Various brushes and sponges;
- Decorative trinkets;
- Herb bags for making tea with your own hands;
- Other beautiful kitchen appliances.
In the bathroom, round, unusual and very comfortable shelves on the wall will also be in place: jars of cosmetics, towels, washcloths can also be stored in these pretty shelves.
How to make a round shelf (video)
Square wall shelves
Wall compositions from square shelves on the wall in the living room look great. Shelves of different sizes are painted in one color, or in contrasting ones, and combined into one wall drawing- small with large in one line, vertically or horizontally, diagonally.
Square shelves tend to be small and hard to fit a lot of items in. Most often these are various souvenirs, miniature vases, books..
Often these shelves are decorated with antiques, vintage gizmos.
And to make such an interior decoration with your own hands, you can use standard materials. The tree in most cases is painted with matte bright paint, varnished. Or a self-adhesive film decorates the surface of such shelves.


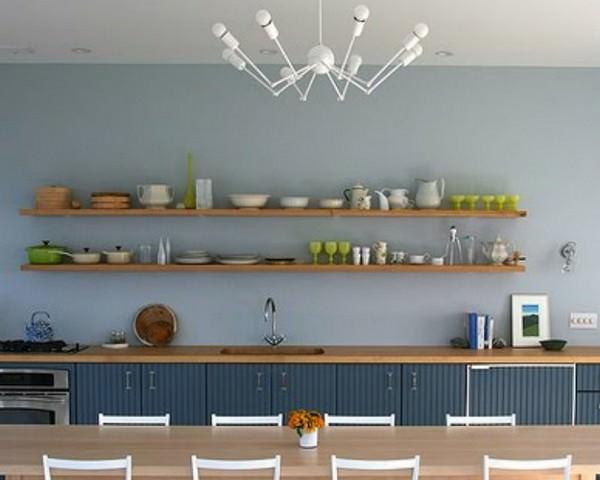
small shelves on the wall
The kitchen wall often requires small shelves. They do not take up space, do not weigh down the interior, but emphasize the overall mood of the kitchen. The wall shelf can be used to decorate the room.
If the shelf is made in the kitchen, you can place on it:
- Bright jars for spices;
- Cookbooks and notebooks;
- Canvas bags with spices;
- Beautiful dishes.
You can make such shelves from wood, plastic, glass, and even stacks of painted and glued books.
Designer wall shelves
Such designs are rarely used in the kitchen, yet these exquisite things often decorate the living room, study, and nursery.

Now shelves on the wall in the form of:
- labyrinth;
- asymmetries;
- Bookshelves-turnovers;
- modules;
- Forged designs in Provencal style.
Some shelves seem to continue the furniture, some look like projections on the wallpaper, so they are disguised as a wall. There are fancy shelves that are made to order, often they have something in common with the pattern of curtains or the parquet pattern.
DIY bookshelf (video)
Conclusion
Shelves in the kitchen, in the living room, or in the nursery - all of them can be made independently, armed with ideas from the Internet and your own imagination. Of course, such designs will outperform store counterparts due to their hand-made origin. Yes, and in monetary terms, they can be cheaper.
Examples of shelves for the house with their own hands (photo)


An excellent decoration of any interior will be light, neat, interesting wall shelves, which are an excellent alternative to bulky cabinet furniture. Assembled from specially purchased ready-made blocks, or made from improvised materials available in every home, these products will bring comfort and originality to any room.
Beautiful shelves will find their application in any of the rooms of the apartment, whether it is a kitchen, living room, bedroom, hallway or bathroom. With their help, the room will look more habitable, interesting, there will be additional storage space for any useful gizmos.

At the beginning, decide for what purposes the wall structure will be used, this will help you not to make a mistake with required dimensions and durability of the device.

Shelf for heavy items such as books, aquarium, collectible tableware, potted plants, should be as reliable as possible, made of solid materials.
You can find a wide range of wall shelves at attractive prices in the First Furniture store.


Shelf in the bathroom for storing various cosmetics and bath accessories may not be as strong, but be sure to consider that the materials for its manufacture must be moisture resistant.

If the wall shelf will only be used as original art object decorating the interior, to perform the function of decorating a room, it is not supposed to exhibit objects and things on it, then it is permissible to use any, even the most fragile materials for its design.

Therefore, before starting the shelf design process, be sure to consider the following details:
- full load on the structure;
- fastening method;
- compliance of the materials used with the purpose of the premises in which the installation is planned;
- style and design of the product;
- functional.

Types of shelves
Having wondered how to make a wall shelf with your own hands, first decide what kind future design will be more suitable for the selected room, will fully comply with the assigned functions and your preferences.

Based design features, shelves are:
- closed and fully open;
- linear and l-shaped;
- with or without side railings;
- through, or with a rear limiter;
- single-tier or having several levels;
- rounded and rectangular;
- unusual shape, steeply inclined, diamond-shaped;
- limited on all sides or consisting of one base, etc.


If you pay attention to the materials used for manufacturing, then wall shelves can be:
- glass;
- with elements of a mirror surface;
- wooden;
- made of MDF, chipboard, plywood;
- polymer and plastic;
- combined - using several types of raw materials.

Think about what materials will be the most preferable for self-designing a shelf, more wear-resistant and reliable, and choose the option that suits you with all its characteristics.

Having studied numerous photos of the shelves made by yourself, you can choose the option that suits your taste the most and take it as a sample, try to make the most similar design, adapted specifically to your apartment.

Let's start designing
After you have decided on the model of the wall shelf, you have found and prepared everything necessary materials, it's time to move on to the process of creativity, that is, the creation of a product.

It is best to adhere to the following algorithm of actions:
Draw a rough sketch on paper, indicating the planned dimensions of the shelf on it, or even better - a full-fledged sketch of how the future shelf will look on the wall, indicate its dimensions.

Decide on the type of fastening, whether it will be building dowels, anchors, brackets that can withstand heavy loads, or the shelf will be mounted on a flexible base, for example, flagella, braided ropes, belts - these fasteners are only suitable for light ones, used mainly as a decorative element , shelves.

Carry out the cutting of materials according to the right size, or, in the case of using store blanks, prepare them for assembly. Proceed with the direct assembly of all parts and components, attach brackets, hinges or other prepared fasteners to the shelf.

After the complete assembly of the structure, if necessary, proceed to decorate it with the help of various elements: appliqués, buttons, beads, paints and varnishes, etc.

Make horizontal markings on the wall surface to ensure even attachment to the wall. Attach the finished structure to the place allocated to it, check the strength of the structure.

The process of making a shelf with your own hands has come to an end, now you just have to put your favorite collection on it, lay out a set of books or any other items for which the shelf was intended.

I would like to identify a few unusual, original and simple ideas for wall and floor shelves. It is not necessary to do standard design, you can decorate the interior of the room:

Shelf with straps - to assemble it, you will need two flat boards and two strong leather straps.

Invisible bookshelf - you will need a few steel brackets on which books are placed. Looking at this design, it seems that the books are just floating in the air.

A shelf of branches and curved snags - wooden details are assembled into a multi-tiered structure, and the direct base for arranging objects is made of glass or plastic.

wall shelf made of water pipes- will be an excellent decoration for interiors of special styles.

Floor shelf made with glass bottles and base boards.

There are a lot of variations in the design of wall shelves, because such a piece of furniture can be made from almost any material at hand. Turn on your imagination and start the creative process of creating an unusual, aesthetic and functional piece of furniture.

DIY shelves photo


A universal subject of any interior is ordinary (and unusual) shelves. They easily fit into any design - from the most standard and unpretentious to the super-futuristic. Shelves can be a typical modular element or be a piece design option. They are especially good when the apartment cannot boast of superfluous square meters. And no less good when you need to fill a large amount of space. In a word, shelves are a truly versatile and indispensable design tool for decorating residential and office space.

Photo of unusual corner shelves on the wall
This kind of extensive clan of shelves is indispensable for saving space in any small space: in the room, in the kitchen, in the pantry, on the balcony and loggia. Corner shelves occupy the most non-functional parts of any room and allow them to be used with maximum efficiency.


In addition to the usual placement of shelves in inside corners it is possible to install them on outside corners the perimeter of the room or supporting elements. Optimal Design for such shelves there will be rounded corners and their end edges.


In the bathroom, shelves in general and their corner variant in particular are especially in demand. Shampoos, balms, soaps, bath salts, creams and other hygiene items should always be at hand. In addition, the open surface of the shelves, unlike cabinets tightly covered with doors, does not create conditions for the reproduction of mold fungi.


Photo of creative book shelves on the wall
We are all used to the fact that wall shelves are usually used to store books. And bookshelves stretching along the walls in orderly rows are the most familiar use for this interior detail. Designers, furniture makers, and just lovers of making furniture with their own hands categorically disagree with this. The main thing here is creativity, both to the process of manufacturing shelves, and to ways of their non-standard application.
In fact, creative bookshelf models are no less functional than typical modular designs. They also effectively free up additional living space, adding an attractive personality to it.


A fashionable design move today is the use of obsolete and vintage items. There is more than one collection of ideas dedicated to the creation of retro shelves, and the list of source items for such ideas is quite extensive:
- old stairs;
- boxes and boxes;
- suitcases;
- cases of old TVs and much more.


The main thing is to fit the future bookshelf into general style premises. However, sometimes the design of the shelves itself can inspire the creation of an interesting interior style.


Particularly relevant are the numerous options for bookends, from strict classics and minimalism to the frills of modern and techno art.


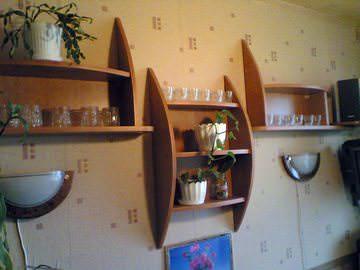
Photo of decorative wooden shelves on the wall
Initially, shelves for any purpose were exclusively wooden products. Later, with the development of new technologies and the emergence of new materials, shelves began to be made from plywood, glass, drywall, chipboard and fiberboard. There are many different opinions regarding the beauty and decorative qualities of such shelves. They are successfully used in high-tech, loft, minimalism, contemporary interior design. However, beauty and warmth natural wood it is still so difficult to replace with such materials that many of them are decorated with a natural wood texture.


Do I need to say what these styles are? How:
- eclecticism;
- provence;
- country;
- African;
- English Arts
- Japanese and other ethnic styles
are simply unthinkable without shelves made of natural wood of various species.


Photo of unusual and beautiful glass shelves on the wall in the interior
Thanks to the courage of designers, many of us have long ago got rid of the “fragile as glass” stereotype. Modern impact-resistant and tempered glass in many respects can match other traditional "shelf" materials, and sometimes even surpass them in a number of characteristics.
The main advantages of glass shelves:
- water resistance;
- inert to most chemicals;
- non-hygroscopicity;
- durability;
- aesthetics.
No one modern style not without glass. And shelves are no exception.


Light, elegant, weightless structures, capable of withstanding significant loads at the same time, will become a worthy decoration of any interior. They fit well with the design. modern kitchen. Will be indispensable in the bathroom. In addition, some options glass shelves can become an independent decorative interior composition.


You looked at a selection of photos of shelves on the wall. Big photo can be seen in the section


