Leveling the floor under the laminate. Do I need to level the floor under the laminate - leveling the wooden and concrete floor, the right materials and best technologies How best to level the floor under the laminate
Laminate is a floor covering made on the basis of HDF (wood fiber material with a high density - 0.8-1.1 t/m3). The product has a layered structure, the front side, as a rule, is decorated protective film resistant to various adverse effects. Thanks to its aesthetic appearance and low price, he took a leading position among all floor coverings in private houses, apartments and office space. The article will discuss how to properly level the floor before laying the laminate.
Information about laminate
- A modern laminate board consists of four main layers, which are interconnected with a special, highly durable adhesive composition. bottom layer necessary to prevent deformation of the canvas, it also provides special rigidity to the product and protection from moisture. It is made of moisture-resistant paper and may additionally contain a soundproof substrate.

- Further there is a carrier or base layer, burned out of fibreboard. It has the most significant weight in the entire structure, performs heat-insulating and noise-absorbing functions. The locking system is also located here (on the one hand, a recess for the groove is made, and on the other hand, a comb is made). At quality laminate all side faces are impregnated with moisture-repellent compounds.
- The main layer that defines the pattern of the product is decorative paper impregnated with a special composition. A wide variety of images are applied to its surface, most often it is an imitation of wood or stone textures, but there may be many others, including including exotic textures.
- applied over the paper acrylic or melamine resin layer with the addition of mineral particles, most often corundum powder. These substances are designed to provide protection against mechanical damage and fast abrasion, extending the life of the laminate board. The thicker and stronger upper layer, the higher the class of goods in terms of wear resistance. Modern laminate can almost completely imitate the texture of various natural materials. Including due to the application of various decorative irregularities on the top layer, repeating the texture of wood or stone.
In the products of some manufacturers, between the main layer and decorative paper a film can be placed, the main purpose of which is to increase the moisture resistance of the product.
- There are several main laminate classes, differing in their purpose, the higher the value of the class, the greater the strength of the product. So, products labeled class 31 and 32 are considered household products, that is, they are used in apartments and private houses, and products labeled class 33 and 34 are most often used in public institutions, offices, as sports coverage and so on.

- In addition to the product class, there is a marking that indicates the degree wear resistance of the top layer- AC1-AC5 (the larger the number, the stronger the material), so when choosing a laminate, you should pay attention to both indicators. On average, commercial laminate flooring (class 33 AC3-4) will last 3 to 6 years in public buildings and 10 to 15 years in the home. The most resistant class 34 AC-5 will last under increased load from 7 to 15 years, and in apartments and houses it can lie without changing its qualities for up to 30 years.
- The main feature and advantage of the laminate board is that this flooring does not require adhesive compositions. The plates are interconnected by a reliable locking system and, when assembled, form a single "monolithic" structure.
When purchasing a laminate as a floor covering, you must be prepared for the fact that the base for this material will have to be prepared very carefully.
Types of bases for laying laminate
- Laminate flooring must only be laid on a level, dry, clean and solid surface. The main disadvantage of any wooden products is that they are afraid of exposure to moisture. Therefore, when preparing a subfloor for a laminate board, it is necessary to take care of additional protection of products. Experts recommend covering the base with a vapor or waterproofing film (with a density of 200 microns or more).

- On top of the film, as a rule, a special substrate made of polystyrene foam, cork material or polyethylene foam with a thickness of 2 mm to 1 cm is laid. This measure will help to avoid small differences in height (up to 2 mm per 1 m2) and prevent the possibility of unpleasant sounds (squeaks) , Khrustov). The film and substrate will also serve as additional noise and heat insulation.
- With height differences of more than 3 mm, the base will have to be prepared in a special way, since the laminate is one of those coatings that repeat all the existing irregularities over time. If the subfloor has large pits, cracks or tubercles, then there is a high probability of the formation of bends on the plates, up to the failure of the interlock.
- As for the cleanliness of the subfloor, this is also an important point, since any grain that gets under the laminate will make a crunch and can also cause damage to the flooring. Therefore, it is extremely important to thoroughly vacuum the base or sweep out all debris before starting the installation of the product.
The most common types of foundation are:
- concrete floors, including cement-sand screeds and floor slabs;
- old wooden floor in good condition;
- raised floor made of chipboard;
- other substrates such as linoleum.
Each type of subfloor should be said separately, since different grounds suggest their own ways of leveling the floor under the laminate.
Leveling a concrete floor under a laminate
All types of cement-based floors can be classified as concrete bases, as they will have identical properties and features, and must also meet the same requirements. This is the most popular substrate for laying laminate flooring, but typically concrete surfaces (a mixture of cement, gravel and sand) or reinforced concrete slabs overlaps most often are not perfectly even, which means that they will have to be leveled without fail.

The most frequently encountered are types of defects:
- deep or small cracks;
- potholes and chips;
- peeling and crumbling;
- influxes;
- plane differences of more than 3 mm (according to the manufacturer's instructions, it is allowed to lay the laminate on the base with a height difference of up to 2 mm);
- big slope.
All of these issues need to be addressed. And for this, a coarse leveler can be used, distributed over the entire area or only in places of the defect. The main components of such mixtures are cement and sand. The prepared solution can be applied as a screed on beacons without a substrate, or as a floating screed.
Stages of work
- In order to start leveling the floor, you should clean concrete base from dust and debris.

- Also, if necessary, the previous floor covering is removed without residues. Existing oil, paint or bituminous stains are cleaned with solvents. Large cracks are separately filled with the prepared mortar, if there are sagging high altitude, then they will have to be knocked down with a puncher.
- The cleaned concrete surface is primed special composition preventing water absorption of the material. A damper tape can be glued to the walls around the perimeter. If necessary, a substrate is laid on the base. Beacons are set according to the level and fixed with mortar moldings. Then, a leveling mixture is poured between the lighthouse profiles and leveled using a rule. The guides can be removed after a slight setting of the solution, or left, but then they should have been treated with a special protective compound before installation.

- Many rough levelers make an almost perfectly even and smooth floor and it is already possible to mount a laminate on it. If the evenness is still not satisfactory, then the dried cement-sand screeds are primed and filled with self-leveling mortars, which include cement and various plasticizers.
- For complete drying cement screed sometimes you have to wait 14 to 28 days. Self-leveling mixtures dry somewhat faster, on average from 3 to 14 days, but there are also types that are ready in a few hours. This time must be maintained, otherwise the laid laminate will quickly become unusable due to the moisture released by the base. This time should be taken into account when starting repair work.
- When there are local differences or small cracks on the surface of the subfloor, it is enough to apply mixtures pointwise to seal them. That is, carefully clean the crack or hole so that there is no dust and greasy spots, and then fill with a self-leveling compound, which is smoothed flush with the rest of the floor using a rule. After the required drying time has elapsed, the embedded areas are carefully sanded, and the entire floor is covered with a primer.
- Applying a primer on a cement-sand base will help avoid crumbling of the top layer, that is, the appearance of sand, which rustles and creaks very unpleasantly under the laminate, in addition, the substrate laid on the sand will rub off very quickly and become unusable. It is better to choose a primer with the addition of antibacterial components to the composition.

- When filling the floor with a self-levelling mixture, it is imperative to follow the manufacturer's instructions. In order for the surface to be perfectly even and smooth, a special needle roller is used, it removes air bubbles from the solution. If, after drying, the bubbles remain and look like small pimples, then you can simply sand them with sandpaper, and then vacuum the coating, removing the resulting dust.
Laminate floor leveling video
Leveling a wooden subfloor under a laminate
The problem with wood floors is their creaking. If you lay a laminate on such a floor, then the new coating will begin to make sounds that are unpleasant for hearing. In order to eliminate squeaks, you can use several options:
- glue the boards with an adhesive for wood;
- foam problem areas with mounting foam;
- lubricate with sealant;
- tighten the boards to the lags with self-tapping screws or bolts.
Stages of work
- Each specific method is selected based on their situation. Blocks should not bend, but should be strong and rigid. The cause of wobbly boards may be an insufficient number of used logs or a small thickness of the wooden floor. Correcting the situation will help remove the coating and add a lag, or laying a thicker board.
- If the subfloor has small irregularities, then this is easily eliminated by laying the substrate or scraping (leveling the surface by scraping using a scraper or a manual scraper).

- If the irregularities are more significant, then in order to get rid of them, you will have to cut the boards with a planer. Before starting alignment procedures wooden blocks, it is necessary to deepen all the existing nails a little inside the boards (using a tool such as a puncher). Cracks can be sealed with a simple acrylic putty.
- Rotten boards should not be used as a base in any case; such a floor is immediately dismantled. If a small amount of the floor is damaged, then it can be replaced with new boards. It must be taken into account that laying laminate on wooden base occurs perpendicular to the location of the boards.
Leveling the subfloor from chipboard under the laminate
When the existing bases are not suitable for any reason, then experts advise laying the laminate on the mounted raised floors, that is, the structure fixed on the logs.
Stages of work
- On the base, which can be a concrete or wooden floor, special racks are installed, and logs are already attached to them with the help of bolts. It is possible to align such a base in a single plane using the building level and adjusting the bolts, as well as by lining special mounting wedges.

- From above, sheets of plywood are laid on the logs, the thickness of which is from 1.5 cm or more. They must be fixed very rigidly with self-tapping screws so that no shifts occur during operation.

- It is best to lay the slabs in two layers, with overlapping seams, or simply lay out the material with offset joints. At the same time, chipboard should not be stacked too tightly to each other, since during operation a slight change in the size of the sheets may occur and in best case the floor will begin to creak, and in the worst case, the laminate will swell.
Floor leveling with raised floors has its advantages and disadvantages. So, for example, the advantages include the fact that this is a dry method, in which the amount of dirt is minimal, as well as the fact that additional time is not required to dry the floor and the laminate is on a relatively warm material. The main disadvantage of such a base is raising the floor level by several centimeters, and this is especially acute in rooms with low ceilings.
Preparing other substrates for laminate flooring
Linoleum
- Almost the only material on which you can easily lay a laminate is linoleum. . This product features high noise absorbing and thermal insulation properties. It is soft, but at the same time quite durable and reliable. Therefore, if there is a floor with linoleum laid in the room, then a laminate can be safely laid on top of it, of course, provided that there are no differences in height of more than 2 mm.

- The rough coating must be glued over the entire area so that during operation it does not gather and wrinkle. As a rule, when laying linoleum this procedure is not carried out, so you should lift the entire coating and coat the material with a special adhesive composition.
- It is not required to prepare linoleum in any special way, that is, it is enough to clean and dry it, after which you can start laying the substrate under the laminate, which, among other things, will be able to even out minor existing defects. If linoleum began to crumble and exfoliate, then it is best to refuse to use it.
carpet

- Substrates such as carpet are not suitable for installing laminate flooring. If the flooring is made of soft fleecy materials, then it is best to dismantle them, since, firstly, the laminate board will sag on such a base, which will eventually lead to damage lock system, and, secondly, dirt, dust, bacteria and other microorganisms will accumulate in the pile, which will simply be impossible to get rid of.
Tip: in order to choose the right way to level the subfloor, you should answer a number of questions:
- How flat is the existing floor?
- what is the height of the ceilings in the room;
- how much time is allotted for repairs;
- how much money you plan to spend.
And, based on the answers received, choose one or another option for leveling the base.
How to lay underlayment under laminate flooring
- The substrate under the laminate can be of several types, distinguished by the material of manufacture. The most popular are products based on polyethylene foam (thickness 2-4 mm) and polystyrene (thickness 2-8 mm). These pads are resistant to moisture, chemicals, have antiseptic properties, and are also quite easy to use. Among the disadvantages of polyethylene foam can be called the fact that during operation it can roll.

- There is also such a kind of bedding under the laminate as a cork backing. It significantly improves such characteristics as thermal insulation and sound absorption. But the price of leveling the floor under the laminate cork coating will be significantly higher than when using isolon.

Experts name several rules for laying the substrate, which it is desirable to follow so that the laminate lasts as long as possible.
- Before laying on a concrete base cork backing it is necessary to cover the base with a vapor barrier film, if the width of the film does not correspond to the width of the room, then it should be increased with adhesive tape (glue all joints). The vapor barrier will protect the cork material from possible moisture evaporation. Substrates based on foamed polyethylene or polystyrene can be laid on concrete without additional protection against moisture.
- Any material used as a substrate for a laminate does not require fixing to the base, it fits freely. In no case should several sheets be overlapped, as this forms an unevenness that will adversely affect the laminate board. Such a procedure can only be carried out with those sheets that have special thinning along the edges, designed to be superimposed on each other. All joints are sealed with tape.
Proper care of laminate flooring
If you qualitatively level the base and properly lay the laminate, then it can serve much longer than the period declared by the manufacturer. But for this to be true, laminate flooring must be properly cared for.
- Since the laminate is wooden products, then, it means that it has all the disadvantages inherent in wood, in particular, it does not tolerate moisture. Many manufacturers are trying to produce moisture-resistant products, reliably covering the top layer with special protective equipment, and open sidewalls, impregnating with water-repellent compositions. But in spite of everything Taken measures Keep the laminate dry and wipe up spilled water immediately. If it is necessary to wash the floors with a damp sponge or cloth, then after that it is best to wipe them dry. soft cloth. It is not allowed to use too much during cleaning hot water. Since the laminate can be deformed from elevated temperatures.
- This coating does not require special care, it is enough to clean it from dust with a vacuum cleaner and wipe lightly once a week wet wipe or a rag. Also, many experts recommend using mastics for laminate to maintain the coating in the proper form. In no case should the material be treated with products intended for other coatings, in particular for parquet, as they may contain substances such as beeswax or glycerin, which are detrimental to the laminated layer.
- In order not to damage the material with furniture legs, you can stick soft fabric or rubber pads on them. Small chips or scratches that have appeared can be easily repaired with a wax pencil or wood preservative specially designed for this purpose, which is matched to the color of the laminate.
- You should take care of the product especially carefully, if it seems that any bar can be replaced at any time, then this is not so. Because in order to remove one board, you will have to disassemble the entire floor, and then reassemble it.
Leveling the floor under the laminate is not just a whim of the master, but an urgent need. Since the material has such a feature that laid on an uneven base after a few years it loses its performance. The laminate board begins to sag, blisters and cracks appear, the seams diverge, and the lock joints fail altogether. In order to avoid all this and throughout for long years to enjoy high-quality flooring, you just need to take care of leveling the subfloor in advance. And there are enough ways and methods for leveling the floor and laying the laminate, any surface can be made perfectly flat, and you can do it yourself.
When choosing laminate flooring as your new flooring, be aware that laying it requires an almost perfectly even base. If the surface has defects, depressions or bulges, over time, the laminate locks may loosen, a creak will appear, and then the panel may crack. When choosing a way to level the floor under the laminate: with a screed or plywood, consider the design features of the floor, the effort and finances that need to be spent.
How to level the floor under the laminate
Methods for leveling the floor under the laminate vary depending on the starting conditions, which floor: wooden or concrete. Some methods are universal for both types of sexes.
How to level a concrete floor under a laminate
If the concrete floor is a slab/floor slabs or simply a poorly poured concrete base, it must be leveled. To do this, first of all, we remove the old floor covering, clean the floor from debris, concrete chips and dust.
Leveling with concrete screed
This method is used when the floor has significant defects and irregularities that cannot be corrected by half measures. The difficulty of leveling with a cement-sand screed lies in the need to install "beacons".
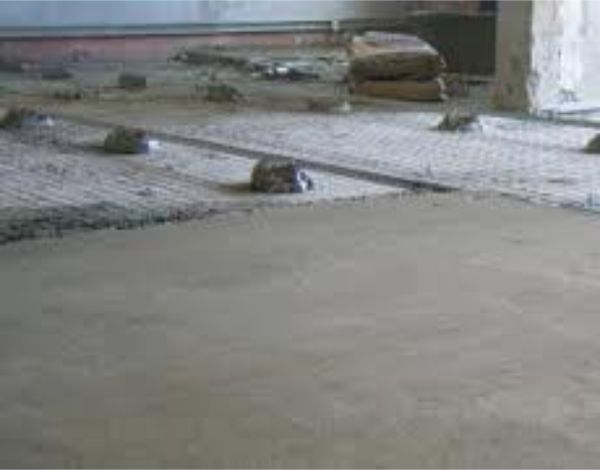
A concrete screed is necessary if the floor has significant defects
To level the floor with a concrete screed:
- Using the level, determine the highest point of the floor. We outline a line along the perimeter of the walls, to which we will pour concrete and pull the cord.
- We install special "beacons". We fix them on the floor with slides concrete mortar, which is kneaded to the consistency of thick sour cream. We control the horizontal level of the "beacons" and correct it.
- We knead the solution: 1 part of M500 cement + 3 parts of sifted sand + water. For better kneading, we use a drill with a special nozzle.
- Pour the concrete screed to the marked level. Let's focus on the lighthouses.
- We level the screed. We take the rule, press it to the neighboring lighthouse rails, pull it towards ourselves. Excess mortar will spread through the voids or collect at the end of the floor.
- With a spiked roller, we remove bubbles from the concrete, rolling it over the entire surface.
- While the concrete dries, for 2 days, constantly wet the floor with water.
- After two days, we take out the beacons.
- The voids formed after the extraction of the "beacons" are filled with fresh mortar and overwritten.
- We cover the floor with polyethylene for 2 weeks.
After the screed has completely dried, after a couple of weeks, you can lay the laminate.
Leveling with self leveling compound
This method is used when the floor does not have too obvious defects, potholes, but there are small bumps and height differences. A maximum difference of 5 mm is allowed.
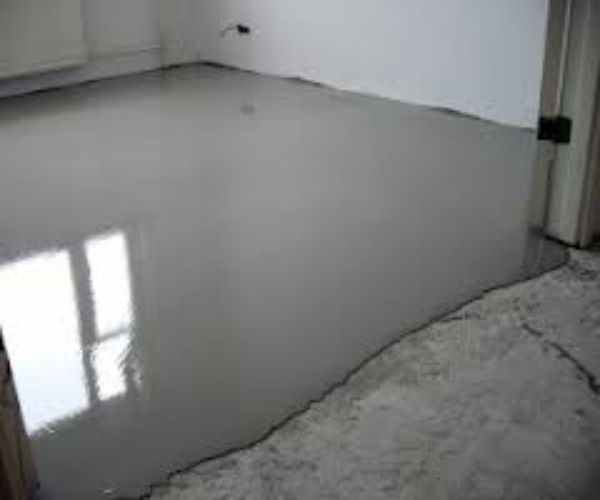
Leveling the floor with a self-leveling mixture is a modern and effective method
To level the concrete floor with a self-leveling mixture, you do not need to install "beacons", you just need:
- Use a level to determine the highest point on the floor. Mark the line on the walls to which we will pour the mixture.
- Prime and waterproof the floor.
- Prepare the self-levelling compound according to the manufacturer's instructions.
Important! Most often, to prepare a self-leveling mixture, it is necessary to pour the mixture powder into water, and not vice versa.
- Pour the mixture in a small strip, smooth with a spatula.
- Knead the next portion and also pour and level.
Important! The prepared self-leveling mixture must be used within 15 minutes, after which time it will be unusable. That is why it is recommended to knead and pour it in parts.
- Wait until the mixture dries. This will take 3 days. All this time there should be no drafts in the room.
After complete drying, you can lay the laminate. If the floor humidity is less than 5%, then lay the laminate directly on the mixture. If more, then first we lay a layer of waterproofing and a cork substrate.
The so-called dry screed with plywood or chipboard can only be done if the ceiling height allows you to reduce the space by 10 cm, because plywood cannot be laid directly on a concrete base, but only on logs.

Leveling with plywood or chipboard - dry screed method
To level the floor with sheets of plywood or chipboard, we perform the following steps:
- Using the level, we make marks on the walls, to which the top of the floor should reach.
- We lay waterproofing, soundproofing and a shock-absorbing lining under the logs.
- We buy lags. You can use adjustable lags, then we buy them ready-made. Or you can use the usual wooden bars. Dimensions 40 * 100 mm, 40 * 80 mm, 50 * 60 mm for a concrete floor and plywood sheets on top will be enough.
- We lay the lags. The distance from the walls should be 3 cm, between the lags 40-50 cm.
Important! We constantly control the horizontal level of the location of the lag. If necessary, we put wedges in places of depressions, and in places of bulge we cut off the excess.
5. We fix the logs with anchors or dowels.
6. We lay sheets of plywood or chipboard. The gap between the sheets is 0.2-0.4 mm. The end joints of the sheets must necessarily fall in the middle of the lag.
7. We fix the plywood with self-tapping screws in increments of 50-70 cm.
An important feature of this leveling method is that you can lay the laminate immediately after all work is completed.
How to level a wooden floor under a laminate
If the wooden floor has obvious dips, it must be disassembled and the lags adjusted. It is even possible to replace some logs or boards. If the floor is relatively flat, it is enough to use one of the following methods.
Cycling

Cycling - the only way leveling, which is suitable exclusively for wooden floors
Sanding a wood floor will create a level surface for laminate flooring. It is produced either by hand, but this is too complicated and time-consuming work, or with the help of a scraping machine.
In order not to damage the knives of the machine, all the heads of nails or self-tapping screws must be “drowned” in the tree deeper with the help of a puncher.
The scraper removes the top layer of wood, creating a flat subfloor. Then the surface must be thoroughly cleaned of dust and you can lay the laminate.
Leveling the floor with plywood or chipboard
The same method is used to level the concrete floor, which we have already described above. Design feature is that the logs must be laid on top of the wooden floor and secured with self-tapping screws. Between the lags, it is desirable to lay an additional layer of waterproofing, insulation and sound insulation.
Puttying with a mixture of sawdust and PVA glue

The method of leveling a wooden floor by puttying with a mixture based on PVA glue and sawdust raises the level of the floor by an insignificant amount.
This method is the cheapest, but can only be used if the floor does not have significant flaws and failures.
Another significant advantage of puttying a wooden floor with a mixture based on PVA glue is that the rise in the floor level in this case is insignificant.
Stages of work:
- If the floor boards are “dry” and slightly deformed, arched, in this case it is necessary to use “beacons”. We install wooden "beacons" using the level. Fasten with nails.
- We knead sawdust and PVA glue to the consistency of thick sour cream.
- We fill with a mixture all the space between the "lighthouses" and all the cracks.
Important! The mixture based on PVA shrinks very much, so we perform the puttying procedure in two or three steps.
- After the glue has completely hardened, we lay thin plywood 5 mm. We fix it with self-tapping screws with a countersunk head.
After evaluating the condition of the surface of your floor, you can choose any suitable way leveling the floor under the laminate above. The durability of a laminate flooring will directly depend on the quality of the work performed.
Laminate is a modern floor covering with good performance. It looks aesthetically pleasing, easy to fit, long-lasting, forms a thin layer. But such flooring requires careful preparation surface, so when carrying out repair work Often the question arises, how to level the floor under the laminate. Alignment is solved in several ways, differing in time and cost, as well as aspects of changing the characteristics of the room.

Works with medium height differences
If the existing flooring is in an average condition (there is a height difference of about 20 mm, damaged areas), but is strong and reliable enough, there are options for leveling the floor under the laminate, depending on the base material.
1. Wooden floors
Preparation for work includes all the steps listed above for cosmetic procedures. Further, the decision, the better to level the floor under the laminate, is made depending on the available options.
- if there is a destruction of the boards, they are replaced;
- to level differences in height up to 10 mm, you can use special mastics for wood;
- if you need an inexpensive solution, you can use simple recipe: small sawdust mixed with PVA glue. Such a mixture is easy to apply, smoothes, dries relatively quickly, and forms a strong, even surface.
If the drop in height reaches 15 mm or more, it is rational to use plywood. The question of whether it is necessary to level the floor under the laminate using such material is not even worth it. The cost of carrying out work large areas, which have a significant drop in height - will change little in comparison with the options for using other methods.
Plywood is laid and screwed with screws around the perimeter. Arranging individual elements is worth a pattern of brickwork, cutting standard sheets relatively small parts will reduce the percentage of waste. In low-level areas of a large area, it is possible to lay laths or partially pour a mixture of PVA with sawdust to avoid deformation of the plywood when walking.
Video leveling the floor with mastic:
2. Concrete floors
For concrete floors, the beating of the heights of which is in the range of 5-25 mm, it is rational to use self-leveling liquid mixtures. Such a fill is quickly done, even a beginner can cope with the task. The work steps look like this:
- the existing base is polished, cracks and noticeable depressions are sealed on it;
- the surface is treated with bituminous mastic;
- waterproofing is laid, in the simplest case it can be a polymer film;
- a self-leveling mixture is prepared and poured;
- the filled layer is smoothed, stretched, passed by needle rollers to remove air bubbles.
The decision whether to level the floor under the laminate with expensive liquid mixtures is made taking into account positive qualities this procedure:
- Firstly, it is faster, requires simple preparation, generates little dirt and debris.
- Secondly, a thin layer of pouring dries in an uncommonly shorter amount of time than a concrete screed.
- Thirdly, a perfectly flat and durable surface is formed.
- Fourthly, it often does not require high qualification of the performer of the work.
In practice, in most apartments and houses of relatively new construction, the methods listed in this section are used to prepare the base for laying the laminate.
Filling a thin screed
Very poor laying bases
If the floor in the apartment or house is in bad condition, it is more rational to remove it to create good foundation under modern coating. After that, you can proceed with the following methods:
- In housing with wooden flooring on beams, an inspection is carried out and, if necessary, a log is replaced. It is recommended to cover the floor space with expanded clay or polystyrene granules - this will improve the performance of thermal insulation and noise protection. After that, a board or plywood is sewn onto the logs (when replacing them, a beam can be used). If necessary, for wood flooring scraping is carried out for finishing alignment.
- In apartments with wooden flooring on reinforced concrete floors, after removing the existing base, debris is eliminated, the slab is inspected, and cracks are sealed. The next stage is the laying of a log from a bar, their level is displayed with pads or special anchor bolts. Plywood is sewn onto the formed lattice.
- For housing with reinforced concrete floor screeding available different format. This applies to both houses with wooden flooring and screed. The latter should be removed to the plate itself. After that:
- you can create a classic cement-sand screed up to 40-50 mm thick;
- pour on lighthouses made of expanded clay covered with gypsum fiber board;
- lay a lattice of timber and sew a surface of plywood.
Expanded clay semi-dry screed improves thermal insulation performance, reduces noise levels. Styrofoam, polystyrene granules can be used as a filler for the space between the lags. Expanded clay also works well. Such measures to improve the characteristics of the room will not affect the quality of the surface for laying the laminate flooring.
The combination looks great. A thin, about 35 mm screed is made from cement-sand mixture with the addition of fiber. A layer of the minimum possible thickness is poured over it (depending on the characteristics of the mixture).
Such a composite structure has an acceptable cost, smooth and smooth surface, excellent indicators of durability and term of operation. Any class of laminate with substrates of minimum thickness is laid on it. At the same time, the coating exactly corresponds to the characteristics declared by the manufacturer.
Laminate is one of the most popular flooring today. It costs a lot. Therefore, it is a shame when the new coating cracks or creaks unpleasantly or the locks open. And the cause of this trouble can be an uneven floor. In this article we will tell you, under the laminate in the apartment with your own hands.
When laying laminate on the floor surface, you need to carefully level it. If you are in doubt about whether it is necessary to level the floor in your apartment, we advise you to take some measurements. Take a meter ruler and walk around the area of \u200b\u200byour room with it, checking for a gap between the ruler and the floor. If the gap is more than 2 mm, alignment must be done. Also, if, when checking with a building level, you see a height difference of more than 2 mm, this floor also needs to be leveled.
In the event that you and it are supposed to, you need to check the strength of the floor. Rotting and sagging boards will need to be replaced. The surface under the laminate should be perfectly smooth. Therefore, you still need to process it with a grinder so that there are no protrusions and irregularities left. If it is supposed to be left under the laminate old linoleum, you don't have to do anything.
Advice! It is advisable not to use chipboard sheets for leveling. It must be remembered that this material does not have a sufficient level of environmental friendliness and emits formaldehyde during operation.
Concrete floor
To level an uneven concrete floor, you will need to make a screed. Work is carried out in the following order.
- First you need to remove all the coating to clean concrete.
- We check how wet the floor is, examine it for bumps, voids, cracks. Only after that we acquire materials.
- We prime.
- We prepare the rough base - we seal the cracks and holes with a dry mixture.
- With the help we give horizontality to the floor. We install special beacons, which serve as a designation of the height level of the screed. Then we make a cement-sand mortar and apply it, leveling it with a building level. For standard room with a wall length of 3-4 meters, two beacons are enough (the main thing is that there are enough rules to level the solution between them). The thickness of the layer at the thinnest point should not be less than 7 mm.
- After the layer has dried cement mortar re-priming is done.
- Pour in the self-levelling compound. After that, the room is closed until completely dry for at least a day.
- We make hydro and.
You can use only a concrete screed or only. In this case, the layer thickness must correspond to the requirement ideally. flat surface. Laminate screed is the usual way floor leveling.
Note! Drywall guides, which are sold at a hardware store, can serve as beacons. They are placed 60-80 cm apart. If it is necessary to correct their position, pieces of plywood, boards are placed.
It is not recommended to place fiberboard or other moisture-absorbing materials under beacons for leveling, otherwise there is a risk of concrete destruction. It is best to use metal or plastic.
Features of a wooden floor
 A wooden floor, the boards of which have been repaired, the unusable floorboards replaced, sanded, as mentioned above, does not require special preparation, if it is sufficiently even. If he still needs to carry out such work, you can put additional sheets of plywood.
How to level a plank floor that is badly damaged or rotten is not worth thinking about. The best option will rip it off completely and make a thorough leveling with a concrete screed or dry screed.
To level the wooden floor with your own hands under the laminate, you can use special cement particle boards(DSP), which greatly simplifies the procedure. In this case, there is no need to install beacons, since there is already a wooden base for the floor. DSPs are laid out on it, they are cut according to the size of the room, attached to wooden boards with self-tapping screws. The cracks are closed with a rotband. The level checks how even the base turned out.
Advice! Remember that when making a screed, you raise the level of the floor and you will have to change the position of the doors. Therefore, pre-calculate the height of the screed and provide for changes in the doorway.
Modern alignment materials
 Floor leveling mortar can be made in the old proven way by mixing cement and sand. However, modern building technology brought into our life convenient mixtures that have not only excellent bonding properties, but also heat-insulating, sound-proofing. Laying a leveling floor from a ready-made special mixture is greatly facilitated.
Before deciding how best to level the floor, you need to familiarize yourself with the list of commercially available building mixtures and choose the right one. Basically, the main dry mixes are made from cement, quartz sand, modifying additives. There are special leveling compounds for wooden floors and for concrete surface. In addition to them, there are mixtures:
- primers - for preparing a concrete surface,
- repair - to repair serious defects,
- sealing - leveling mass for sealing cracks and holes.
If you want to speed up the hardening process of the mortar and improve its properties, you can purchase a special plasticizer at the store.
Do-it-yourself floor leveling
At first glance, this seems like a complex process that only professionals can perform. In fact, knowing the basic rules of how to level the floor in an apartment, it is quite possible to perform such work on your own. To do this, you need to have some knowledge of the modern assortment. building materials, tools and desire. The main skills you will need:
- arrange beacons for screed,
- know how to mix properly.
From the tools for creating a concrete screed you need to buy:
- building beacons,
- level,
- rule
- mortar mixer,
- kneading dishes.
 If you are interested in how to quickly level, it should be said that it depends on the magnitude of the surface irregularities. Small irregularities: if the distortions are not more than 1-2 cm, only a self-leveling mixture can be used for the concrete floor. This will turn out faster than a full-fledged screed.
And if a floating method of fastening is chosen for laying the laminate and the floor differences are less than 5 mm, it is enough to lay a vapor barrier film and soft backing. This will be the fastest way.
Having identified large irregularities, you should put a laser level on the highest point of the floor and mark the alignment line along which to pour the solution. If not laser level, but there is a construction one, another method is used. We mark from the highest point of the floor 5-6 cm up the wall.
Then, parallel to the floor, we apply a rail to the mark, align it with a level and transfer the mark to parallel wall. We do this around the entire perimeter of the room. We stretch the ropes along the marks, we get a plane along which the alignment should take place. Then, according to the instructions above, work on leveling the floor in one of the ways.
Before carrying out work on leveling the floor, it is advisable to enlist help, since it is difficult to prepare a concrete floor for a laminate alone.
How to prepare a solution
- A container for mixing the solution is taken at least 20 liters.
- The mixture is poured at the rate of 5 kg of the mixture 1 liter of water.
- The solution is mixed with a mixer or spatula for 5-7 minutes.
- Let the solution stand for 1-2 minutes and mix again.
To get a good homogeneous mixture, it is necessary to pour the dry part into the water, and not vice versa. Thus, using the above recommendations, you can independently carry out expensive floor leveling work. As you can see, they do not require special skills, but only your physical strength and desires.
Kirill Sysoev
Calloused hands do not know boredom!
Content
It is useful for any master to know how to level the floors under the laminate in the apartment. This expensive coating requires careful preparation in order to get a result that pleases the owner for a long time. Due to uneven flooring, the coating may swell and crack. It is important to consider the features of the procedure if you want to perform it yourself.
How to level the floor under the laminate
To know how to level the floor under the laminate in the apartment, you must first decide how to do it. For those who want to do without the help of workers, for a free result, you will have to invest in materials. There are several options, the choice of which depends on the type of coverage:
- If the subfloor in a private house is concrete, then it is leveled with a mixture of sand plus cement, or finished materials with increased noise and heat insulation properties.
- If the floor is wooden, it is better to level it with plywood, but when it is old and rotten, then a concrete or dry screed will be required to help the surface self-level.
The screed is long and difficult to carry out, so you should take into account all the nuances of its implementation - raising the floor level, monitoring the absence of a slope near the surface. In addition to plywood, wooden floors are leveled with cement-bonded CSP boards or chipboard, simplifying the procedure. The alignment process includes the placement of beacons for the screed, proper cooking mixtures. The rest of the processes are easy, require minimal knowledge.

Preparing the floor for laminate
This material is whimsical in terms of operation or maintenance, so it should be placed on a carefully prepared base. This process includes the elimination of cracks, tubercles, cracks, irregularities. If they are not removed, the coating will be damaged due to the increased load in the places of the remaining defects. Also for the material is terrible high humidity in the screed, rotten boards, cracks in the concrete base.
The preparation itself consists of the following steps:
- Dismantling of the old coating. It is not always necessary - parquet, tiled, linoleum or carpet can become the basis for a laminate if their height differences are minimal and amount to 3 mm per square meter. If the differences in level are higher, then the coating is removed as carefully as possible so as not to damage the screed. IN wooden floors rotten and creaking boards are replaced.
- alignment- is carried out in accordance with the basis. Concrete floors can be leveled with a self-leveling screed, and wooden floors can be leveled with plywood. Before these processes, you need to clean the base well so that there is no debris or dirt on it. If a screed is carried out, then you need to prepare a homogeneous mixture without lumps.

How to level a wooden floor under a laminate with plywood
If you don’t know how to level a wooden floor under a laminate, then pay attention to plywood as the most affordable and easiest way. It does not require extensive knowledge in construction, it is carried out simply and quickly. Thanks to this, leveling the floor with plywood becomes an operational process, and the owners are able to short term get the desired result.
Leveling a wooden floor under a laminate is carried out according to the following technology:
- Determination of height differences using a laser or water level. This is done by measuring the entire room with the installation of marks on the walls. With differences of more than 3 mm, plywood will have to be laid to level and secure the base.
- The simplest way alignment - without mounting the log (additional boards) and installing support bars. In this case, you need to make indents from the walls by 2 cm, lay sheets of plywood with a gap of 5 mm. With two layers done brickwork, and the mount runs along the highest points, distributed evenly.
- If the differences are large, up to 8 cm, then you will have to install mini-lags, mount slats and wooden planks to create a unified network of supports. First, precise calculations are made, measurements are made, the dimensions of the elements are calculated, then gratings are laid and plywood sheets are laid on top. The lags are fixed with glue or self-tapping screws, and the gaps between them are filled with sealant or sealant.
- The third way of laying is called lathing, using turned supports. First, they are cut out of boards or plywood, and their thickness takes into account the height differences in the field. From the supports, a grid is made in the form of a square, laid on the floor, covered with plywood sheets. Sheets are fastened with self-tapping screws with dowels, varnished on top.
- To level the floor, plywood with a thickness of more than 1 cm, grades FK or FSF, which can withstand mechanical stress, is water and wear resistant, is suitable. It is better to choose the first grade, which does not contain defects and deformations, pre-treated with an antiseptic.
- Before laying plywood, it is advisable to check the condition of the communication pipes, if any, because after leveling the floor, access to them will be closed. Before laying, it is better to pre-fold the sheets of plywood, see how they look, and only then proceed to the final fixation.


