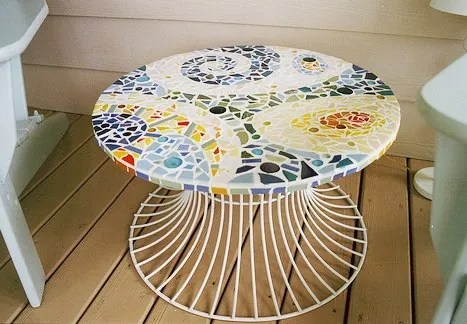
Handmade mosaic table. How to make a mosaic garden table. Metal garden table with blue glass-pebble pattern
A beautifully designed interior depends on many details. One of the difficult moments was and remains the decor. Exactly decorative elements make the style unique. Many people think that decoration is only figurines, dishes and textiles. However, furniture decoration is also considered decor.
An interesting design idea is a mosaic countertop. Such a finish will not only decorate, but also update kitchen set. Mosaic will make the interior luxurious and exclusive, adding Italian flavor.
Advantages and disadvantages of mosaic countertops
Mosaic in kitchen interior looks very organic. This cladding will be a real highlight. But the most important thing is mosaic tiles have excellent performance which allows it to be used in any type of premises.
Peculiarities! Mosaic is a durable material that is not afraid of mechanical damage and external influences. It perfectly tolerates high temperatures, so the finish is used for surfaces near stoves, sauna heaters or fireplaces.
Like any decoration Mosaic has its pros and cons. Consider the advantages of the material in more detail:
The features of the mosaic are really impressive, but there are still disadvantages:
- Laying complexity. Need to keep track correct location each element. If one tile is laid even slightly unevenly, then the whole pattern will be broken.
- Lots of seams. This leads to a long and painstaking cleaning, because dirt likes to accumulate in the seams.
Despite the small disadvantages, the mosaic countertop will serve the hostess faithfully for decades.. The work surface will not only protect the headset, but also decorate it.
Manufacturing features
Mosaic pieces are made different forms and sizes. They can be not only square, but also round, diamond-shaped or hexagonal. Before choosing a shape, you should pay attention to the material of the cladding.
Attention! Laying mosaics in the kitchen is a painstaking task. To make the process easier, tile manufacturers have created chips, or in other words, tesserae. These are separate modules, the size of which varies from 10x10 to 100x100. There are several small plates on them at once, which form part of the overall pattern.
Mosaic types - dozens. Consider the most common of them:
 glass. Glass tiles have a unique structure. Thanks to decorative inclusions, the surface of the tabletop will surprise you with the depth and color saturation. How brighter color mosaic, the higher its cost, since it is more difficult to create a rich shade. TO budget options include beige, gray and pale blue material.
- Smalt. Smalt is a type of glass, but with a modified composition. In the manufacture, instead of sodium salts, potassium salts are used, which makes the surface of the tile absolutely matte. Smalt mosaic is characterized by increased impact resistance, resistance to temperature extremes and resistance to aggressive cleaning agents. Facing will turn the countertop into a work of art, because thanks to a special production technology, it is impossible to find two identical tiles.
- ceramic. Such a tile is similar in characteristics to a tile - this is, in fact, its miniature copy. Ceramic mosaic is made from clay, quartz sand and other natural ingredients, so it is striking in its variety. color design. The material is wear-resistant and durable. The tabletop will not lose its brightness under the influence of ultraviolet light or aggressive chemicals.
metal. This type of mosaic was created for modern interiors, but this did not prevent its implementation in various styles. The material harmonizes well with the dishes and household appliances which makes the cladding versatile. Chips are made from copper, brass, bronze, aluminum and of stainless steel. The tabletop looks original and makes the interior shine thanks to the iridescent surface.
- Wooden. Mosaic made of wood will fit almost any headset. The material looks stylish and unusual, creating the effect of wooden parquet right on the table. Among other things, the peculiarity of the tile is that it brings warmth and comfort to the interior, which is important for creating a special homely atmosphere.
- mother-of-pearl. Mother-of-pearl is used much less often than the listed materials. This finish looks truly magical, creating the effect of "underwater". A mosaic is made from uncut pieces of mother-of-pearl shells. She shimmers and plays different shades even in poor lighting.
- Stone. Stronger than a stone mosaic is not to be found. The finish is beautiful and durable. Tiles are made from natural marble, tuff, granite, onyx and other rocks. For countertops, do not use porous rocks. They will absorb moisture. Used to protect the surface special composition, which fills the pores, creates a dense coating.
Experts advise using a mix of materials. The combination of colored glass with flexible tiles is considered optimal. This is a product made of crumbs processed to look like a brick. Due to its elasticity, flexible tile allows you to create a surface of any shape.

Finishing Benefits:
- moisture resistance, mechanical damage, frost and ultraviolet;
- long service life;
- strength.
This material is ideal for do-it-yourself countertops.
Do-it-yourself mosaic kitchen worktop
"Nothing lasts forever" - says the well-known worldly wisdom. No matter how hard we try, kitchen furniture sooner or later it will fail. First of all, the working surfaces are under attack.
Changing furniture is completely expensive, as its cost increases every year. You should not be upset: it is not difficult to carry out the reconstruction with your own hands. Mosaic tiles will save, refresh and update the countertop. Finishing will not only decorate the product, but will add originality to the entire interior.
Important! Remember that a mosaic countertop has a lot of weight. Take Special attention foundation stability and strength. The design is made of wood or metal profile. It is preferable to use metal, as it is not afraid of high humidity.
Mosaic is used not only for decorating countertops.. It is perfect for decorating a living room, bathroom or creating kitchen apron. Masked with a mosaic washing machine, decorate the walls, connect the sink to the screen.

It is advisable to lay the mosaic on a new set. The old one may not support the weight of the cladding, as it was not designed for such a decor. Sturdy construction you can do it yourself. It is important to properly prepare the base.
Stages of work:
- Creating a drawing. Any construction works start with diagrams and calculations. At this stage, it is necessary to provide for the presence of shelves and cabinets for storage. Then determine the amount required material. Finished drawing transferred to the walls and floor with a ruler.
- Frame manufacturing. To do this, use wooden bars with a section of 50x50 mm or metal profiles. The choice of material depends on the conditions in which the furniture will be kept. For rooms with high humidity metal is used, as the wood will begin to rot.
- Preparing the elements. The beam or profile is cut into segments of the desired length and fixed to the floor and walls. Vertical guides are screwed to the contours of the frame, connecting them with the upper contour. Then the tabletop is given desired thickness.
- After installation work the frame is sheathed. Professionals advise to use moisture resistant drywall or CSP. The details of the cladding are cut out according to the scheme and attached to the frame with screws in increments of 10-15 cm. Holes for the sink, stove or communications are created in the plane of the countertop.
- The final stage - countertop finish.

Mosaic pasting
Before decorating the countertop with a mosaic, prepare everything you need. Work will require:
- grout;
- primer;
- putty;
- antiseptic;
- tools: spatula, rag, sandpaper;
- containers for mixing grout and glue.
In order for the mosaic to be firmly fixed on the surface, use plastic adhesive mixtures white color . For opaque tiles, any adhesive mixtures are suitable.

Consider installation process step by step:
- Surface preparation. It is important to carefully process the countertop and rid it of irregularities. This will require putty. The surface is then cleaned and degreased. To protect against mold and fungus, the countertop is treated with an antiseptic.
- Primer application. The surface needs to be primed in two layers.
- Making a mosaic. Before applying glue to the surface, lay out the tiles on the table and make the necessary pattern. So you can evaluate the options and correct something in time. After that, you can safely use glue. The solution is applied in a thin layer with a special comb spatula.
- Laying out the mosaic. To facilitate work, a special grid or paper is laid out on the countertop, and tiles are laid on top of it. Details are aligned and adjusted in level, forming a pattern. It is recommended to start laying the mosaic from the near edge of the countertop. Why? It happens that the details need to be trimmed, and it will be less noticeable near the wall. If you want to lay out a specific pattern, then work begins from the center of the tabletop.
- Skirting sticker and grouting. The final stage is the most important, since the attractive appearance of the mosaic depends on it. Ceramic plinth is selected to match the tile, but if the joint with the wall is well sealed, then this detail can be dispensed with. The grout is also different in color. Apply it with a soft spatula, carefully working through the seams. High-quality grout will extend the life of the coating and make it more durable. Next, the countertop is left to dry completely. Do not use heating devices to speed up the process. The longer the tile dries, the more firmly it adheres to the surface.
- Tile polishing. After drying, the excess composition is removed with a dry soft cloth. If the mixture has hardened too much, use sandpaper. Then the tabletop is polished with furniture wax and left for a day to dry.
Conclusion
Decorating furniture with mosaic tiles requires patience and painstaking work, but the result will meet all expectations. Originally designed surfaces will become the center of attraction for admiring glances and will cause a lot of compliments.
Mosaic looks luxurious and elegant on different surfaces, so don't stop your imagination flying on the countertop - do a mosaic finish on other interior elements.
Decorating furniture can not only add personality to it, but can also give a second life to interior items that have served their purpose. One of the oldest, but by no means less popular ways to decorate, transform a table, wall, garden path, bench or other things is mosaic.
Anyone can make a mosaic decor with their own hands. A little imagination, effort - and there will be original item, one of a kind. The table is probably the most functional piece of furniture. It can be dining, coffee, tea, play, toilet, decorative, garden or just serve beautiful stand for lamps, flowers, etc. Therefore, it is countertops that are most often updated and decorated. What is a mosaic made of? To create it on the table, they use both ready-made special material (decor, mosaic) and various raw materials that are at hand. These are broken tiles, glass, ceramics; eggshell; shells, pebbles, old CDs and more.
garden table
Dishes beat for happiness! So why throw away the pieces? Collect them slowly - one day you will make them with your own hands beautiful thing, which will give rise to Have a good mood and a witness to your future happiness

A table with a tabletop decorated with a mosaic of pieces of porcelain, as well as a small ceramic tile, - perfect solution for garden. You can put a vase of flowers on it, arrange a family tea party, have fun. Such colored ceramic beauty on the table is not afraid of wind, water, it will not fade in the sun.
Materials and tools
To get started with your own hands, you should have prepared:
- moisture resistant plywood 25 mm thick,
- rope,
- pencil,
- hacksaw,
- sandpaper,
- drawing pin,
- wood primer,
- paint brush,
- fragments of broken porcelain dishes with and without patterns,
- mosaic ceramic tiles,
- tile cutters,
- knife with a blade (flexible),
- tile grout,
- tile adhesive,
- cement Pigment,
- sponge,
- a piece of soft cloth.
Sequencing

A table with a beautiful mosaic top will decorate your garden, cottage or apartment.
Simple and elegant
To turn your hands simple wooden table in a bright interior detail, you will need desire, a little time and money. But everyone can do such work, and its result will please everyone.

What do you need to work?
- Wooden table.
- White paint.
- Mosaic that will be in harmony with your interior.
- Glue.
- Grout.
Step-by-step instruction

There is nothing easier than decorating a table with your own hands in this way. Now you can safely put a pot of flowers - water spilled on the surface will not spoil a beautiful countertop.
Brilliant result
Do not rush to get rid of old CDs. Their shiny surface can also serve as an original mosaic table cover. To make the design more interesting, alternate the front and back sides of the disc pieces.

Tools and materials
For work you will need:
- old table,
- about 23 discs,
- scissors,
- building mosaic,
- sandpaper,
- glue "Moment",
- acrylic lacquer,
- sponge, rag.
Description of work
- Prepare wooden surface to decoration. Wipe the table, sand uneven areas sandpaper medium grit. Wipe well again.
- Cut the discs into small pieces, approximately 3x3 cm.
- Glue the disc pieces to the table with glue. Place the elements on the table so that the distance between them is about 2 mm. Remember to alternate the back and front sides of the mosaic particles.
- With construction putty, carefully fill in all the empty spaces and indents resulting from the design. Wipe excess material off the surface with a slightly damp sponge.
- After 12-24 hours, coat the mosaic table with two coats of acrylic lacquer (with a drying break).
In this article, the news portal "site" wants to offer you to make a table with your own hands, the tabletop of which will be decorated with mosaics.
Making a mosaic table can be an inexpensive way to restore old furniture, as well as a simple and cheap activity that you can do in free time.
 To create a table, you will need the following materials, which you can easily buy at any craft store:
— old countertop(an old table will do);
- small tiles (alternatively, you can use broken plates);
- grout for tile joints;
- glue on cement base;
- rubber gloves to protect your hands .
Table preparation
 In order to properly glue the tiles to your future table, you need to make sure that the countertop is completely free of dirt that may have accumulated on the table.
Use a soft sponge and a small amount of warm, soapy water to thoroughly clean the countertop, then dry it thoroughly. Sand the surface if necessary.
Before you start gluing the tiles, you should think carefully about where you are going to place the tiles. You may want to create some kind of pattern or even a pattern.
Tile application
You can use small tiles, or you can beat a large one.
 To glue the tiles to the countertop, you will need to use a cement-based adhesive. Remember to wear rubber gloves to avoid getting glue on your hands.
 Once all the tiles are glued to the countertop, you will need to use a soft tile grout to close the gaps between the tiles. You can apply the grout with a spatula or with rubber-gloved hands.
 After applying grout, wipe off excess as quickly as possible. Do not wait for the grout to dry as it will be very difficult to remove.
 Your mosaic table is ready.
 Do you want to be original? Then instead of tiles, try using tin caps from beer bottles or wine corks. In a word, any materials and your imagination are suitable for decorating a table.

From Keith Riley, who will teach you how to make this gorgeous mosaic table in just one day! We give the word to the author and get inspired by a great DIY idea.
Do-it-yourself mosaic table for summer cottage and garden
So, you have already seen the mosaic table that I made this week for the seating area in my garden. It was just such a DIY project where I couldn't find what I was looking for, so I decided to make it myself, combined with a "figure it out as I go" strategy. I knew what length, width and height of the table I needed. And I also wanted it to be unique and luxurious. So I just came up with it and began to implement what came to mind.
I call it a "coffee table" but this design would work great for a bench too. You can make the frame as you like and better fit to your style, such as tiles or treated wood. The advantage of making something with your own hands is that you get exact dimensions that you want, as well as a completely unique thing.
I made a table, painted it and decorated it with mosaics in just one day, starting with buying lumber. I used pine and mahogany only because I was in a hurry: the store had huge selection, so I just grabbed the parts of the size that suited me.
Wooden parts for a table measuring 46 x 127 x 46 cm:
- two pine boards 19 x 127 cm;
- one pine board 7 x 127 cm;
- two bars 245 cm long and 5 x 10 cm wide, cut into the following parts: 2 elements 36 cm long for the upper support, 4 legs 33 cm long, 2 elements 38 cm long for the lower support.
I used a saw to cut the timbers and wood screws to join the boards together (see photo).
After that, I took up the legs. I wanted the table to be stable, and I planned to make cross-shaped legs (letter X), as in this master class, but in the end I settled on more simple design"Roman numerals". To make the table 46 cm high, I subtracted from this the height of the top and bottom supports and the thickness of the tabletop, resulting in a leg length of 33 cm, and attached them to the top of the table with wood screws at a 45 ° angle.

This is how the assembled wooden base of the table/bench should look like. As you can see, this is a very simple design: boards joined together form a tabletop and rest on two legs on each side. We didn't put a stabilization board between the legs because it's a relatively small piece of sturdy construction. But if you are making a longer piece, consider installing a board like this for maximum stability.
If you want to decorate your craft with a mosaic, choose the size of the table / bench surface so that it matches the size of the mosaic perfectly, then you do not have to cut it with a tile cutter. I bought a blue and green mosaic for $9 per sheet and calculated the dimensions. wooden elements, knowing in advance the length and width of the mosaic sections, and also taking into account that I can fill small seams with grout.
I primed the legs with a primer and then painted them with the same brand of super-resistant white paint. I came up with the idea of decorating surfaces with mosaics gradually, thanks to several successful completed projects, but the basic principle of work is always the following: first, the mosaic is glued to a white glue for stone and ceramics, which is applied with a spatula to the surface to be decorated. Sometimes I buy glue in large packages (you need to stir it yourself), but this time, for convenience, I already used ready mix.

Since the ability to lay tiles is a very useful life skill, I involved my student in this occupation.
We close the rough ends of the tabletop with mosaic strips - masking tape fixes them in right place until dry. Tip: instead of long strips of 12 tiles, I cut the mosaic into strips of 4 pieces so that they become lighter in weight and do not move down.

When the glue is dry, apply the grout with a special trowel (for small pieces I use a narrow trowel). Remove excess grout with a sponge and let it dry.
I really like the combination of color and iridescent glitter that this is. unique product decorate the seating area. This is how the idea of "we'll figure it out as we go" turned into an elegant and bright mosaic table in our garden!

Original text and photos: Kate Riley (centsationalgirl.com)
A mosaic tabletop will make your interior luxurious and exclusive. A wide selection of mosaic tiles in hardware stores will help you finish your kitchen or bathroom in Italian or oriental styles, to give the countertop strength and durability. This decor can be done with your own hands, if you follow the advice of professionals.


Peculiarities
Ceramic mosaic tile has excellent performance. In the first place - resistance to mechanical stress and abrasion. Mosaic made on modern equipment and according to advanced technologies, it practically does not give in to chips and is not damaged by scratches. In addition, it is absolutely not afraid of moisture, which allows it to be used in rooms with high humidity: kitchens, bathrooms, saunas.

Mosaic has a large coefficient of stability when exposed high temperatures, therefore, surfaces adjacent to the stove or heating device of the sauna or fireplace with an open fire are finished with it.
Hot objects (pots, pans) can be placed on the countertop without fear of burning the surface. The tile has good frost resistance, so it can be successfully used for finishing a balcony, summer house or barbecue area.


Trading networks offer a wide range of mosaics with high decorative qualities, a variety of colors allows you to choose the ones you need to create stylish interior. Numerous compositions and mosaic panels are presented to the choice of consumers. For ease of installation mosaic tiles they are attached to paper sheets or grids, they are glued to tile adhesive in blocks or cut out the desired shape with a construction knife.
The manufacturing technology of the mosaic makes the color and pattern of the tiles unchanged throughout the operation, the color does not fade or fade from external factors: ultraviolet radiation, high temperatures, aggressive chemical household products care. This material is easy to keep clean.


Finishing technology
Durability and service life mosaic tabletop depend on a well-prepared surface for finishing. The first step is making the frame. The design can be made of wooden bars with a section of at least 50x50 mm or a metal profile. Metallic profile in rooms with high humidity it is preferable, since the wood can rot. Before starting work, a frame diagram is drawn on a scale on a sheet of paper, it is calculated right amount material. After that, marking lines for the ruler are made on the walls and on the floor.
Then cut the desired length of the beam or profile segments. The frame contours are fixed to the screws on the floor and walls, vertical guides are screwed to them with screws and a rigid connection is made with the upper contour. Give the desired thickness to the countertop. If the countertop is thin, then the edge of the profile will serve as an edge. The profile is available in various widths: 28x27, 50x40, 65x40, 75x40, 100x40 mm. Choose the right size.


The design of the frame can provide shelves or storage space. For the manufacture of curved elements on the sides of the profile, cuts are made in steps of 2-5 cm and bent by hand to the desired radius. Curved elements may require additional stiffeners.
After installation electrical wiring, sewer, water pipes proceed to the second step - sheathing the frame. Professionals advise choosing drywall with high moisture resistance or DSP. According to the scheme, the details of the cladding are cut out and attached to the frame with screws in increments of 10-15 cm; for complex shapes, the fastening step is made smaller. A hole for the sink is cut in the plane of the countertop, cooker or communications for supplying gas, water, electricity.


Radial details can be found in the frame - they are best done with arched drywall.
Flexible GKL is moisture resistant and has a thickness of 6.5 mm. It also bends well in a dry way due to the presence of a layer of fiberglass in it. With steep relief lines, a wet method is used: one side of the GKL is rolled with a spiked roller and moistened until saturated with moisture, preventing wetting reverse side. On a pre-prepared template from the most convex part, the GKL strip is gradually bent to the edges, fixed, left to dry and then attached to the right place.
Arched GKL is a thin material. To give strength to the structure, it is laid in two layers. It is necessary to cut parts from a sheet along the long side: the arrangement of fiberglass fibers does not allow bending in the transverse direction. The edges of all joints are cut at an angle of 45 degrees to a depth of 0.5 cm, glued with a sickle using plasterboard putty, primed and puttied to hide joint defects, since the mosaic requires an even base. The frame is now ready for finishing mosaic.

The third step is gluing the mosaic. The selection of mosaics is huge.
- Mirror tiles. Visually increase the space and hide irregularities.
- Smalt mosaic- opaque glass, melted under special conditions in a mixture with a persistent pigment. Gives richness of color refraction. One of the most durable materials.
- Venetian glass- the most expensive and spectacular type of tile. It has a beautiful transition of color and transparency.
- Mosaic made of natural stone. It will add nobility to the finish, but not all types of stone can withstand high humidity in a bathroom or sauna - this information must be obtained from sellers before purchase.
- Mosaic from porcelain stoneware. A win-win option for durability, wear resistance and resistance to various temperatures and moisture. Has the widest palette of colors and textures.


The simplest option is pasting with a tiled mosaic fixed on a grid, paper or silicone. Tiles are selected by color, texture and composition already at the stage industrial production- the master only needs to paste the finished fragments. The surface is primed, tile adhesive is applied with a special comb spatula. The glue is moisture resistant, in the presence of a vibration factor, for example, the proximity of the subway, a deformative glue is selected.
It should be borne in mind that transparent tiles will make the adhesive layer visible, so white tile adhesive is selected for glass.


They start gluing from the front edge of the countertop, trimming the details near the wall. The end part is finished last: the appropriate location of the tiles at the junction is selected, observing the accuracy and thoroughness of sizing - this will be the most visible part, which will be most affected. All work is carried out using the building level and constantly check that there are no voids under the mosaic tiles.

The fourth step is to stick the baseboard and grout the seams. Ceramic plinth for tiled mosaics is selected to match the tiles. It is also attached with glue. You can do without a skirting board if you seal the joint with the wall well cement mortar. Overwrite the seams special means for the grout that happens various colors. After that, you can install the sink, faucets and connect communications.

Italian sink
Those who are familiar with the architecture of Italy have probably paid attention to the beautiful mosaic ensembles in the interiors, where everything is made of mosaic: tables, sofas, flower vases, bathroom bowls and sinks. Today, anyone can lay out an Italian sink at home. The execution technology is the same: they decorate an old faience sink with a mosaic or install a bowl cast from concrete. It can be cast independently by applying instead of silicone mold two dishes of different diameters.
You will have to lay out the mosaic on the inside of the sink manually one by one, making sure that the edges of the tiles are in the same plane and do not protrude - do not create roughness. This is painstaking work, but you will be rewarded with a luxurious interior.


Mosaic from improvised means
Mosaic does not have to be purchased - you can use broken ceramic tiles, shards from dishes. You can try your hand at the old wooden country table. The main condition is a solid countertop. Sand the surface, treat with a wood primer, putty deep cracks or chips. For ceramic mosaics, cut and paste fiberglass.
After that, apply tile adhesive and cover the surface with pieces, adjusting them in size and color. To perform a complex drawing, it is first applied to paper in life size or paint directly on the prepared surface. You can make an ornament from a pattern along the edge and in the center, or arrange pieces of the mosaic along color scheme- here you need to use your creative inspiration.

Even easier to repair dining table by decorating from computer disks. The discs are cut into pieces of the desired size, laid out by color, the pattern is determined. By the way, shiny fragments of disks do not need any particular pattern: they look beautiful even in a chaotic arrangement.


