Laminate laying uneven floor. How to lay laminate flooring on uneven wood floors. Leveling uneven floors with various mixtures
To create a quality flooring that will last long years, it is necessary to ensure the evenness of the rigidity of the base. If this is not done, the floor of piece parts will begin to creak, shift, the connections between the elements will break and cracks will appear. Laying laminate on uneven wooden floors must be accompanied by certain preparatory work.
Bump detection
Before starting work with your own hands, it is worth assessing the condition of the coating, identifying the presence of damage and deformation. It is important that the surface is not damp or exposed to rot and mold. If such areas are found, they will have to be replaced.
uneven wood floor
It is important to determine which types of irregularities adversely affect the laminate. Laying on an uneven floor in the presence of cracks and cracks is possible. It is only important to control that the opening does not exceed 5 cm, otherwise repairs will be required. Differences in height are a big danger. It is they who lead to a violation of the fastening between the parts of the laminate and the appearance of cracks in it. Such defects will need to be eliminated with your own hands, leveling the old floor before laying a new one.
There are several tools that are designed to check horizontality. To identify how uneven the floor in the room can be using the following devices:
- Laser level. Most accurate and improves execution speed. It is important to learn how to work with this device. In most cases, it is not suitable for do-it-yourself work, since not everyone will be able to handle it. In addition, the device is expensive, it makes no sense to buy it for the sake of one repair. It is best if the laying of the coating on an uneven floor is carried out using simpler tools.
- Hydraulic (water) level. It also differs in accuracy. The device is as simple as possible. In principle, such a device can be made by hand. All you need is a thin transparent tube of a sufficiently long length and water. It is more convenient to work with the hydraulic level together. The essence of the method lies in the principle of communicating vessels, the water level in which is always the same. One end of the tube is fixed and the zero mark is marked, and deviations are determined with the help of the second.
- bubble level. The device consists of a body with different lengths (in order to lay the coating with your own hands, it is convenient to use a device with a length of 1 or 2 meters). The rail has a hole and a bubble chamber. By applying the device to an uneven old floor, the scale of the problem is determined with the help of a bubble.
- The simplest version of the evenness tester is the rule. It is a long rail. The principle of operation is similar to the previous version. The rule must be placed on an old uneven floor and checked for gaps. You can measure them with a ruler.
Further actions should take into account the size of the elevation changes and the type rough coating.
Base Leveling Methods
Preparing a wooden floor for a laminate with your own hands can be done in several ways. Laying on an uneven floor involves the use of the following methods, depending on the defects of the base:
- substrates from various materials(small irregularities);
- alignment with mixtures;
- PVA glue and sawdust;
- cycling;
- plywood laying.
Each method should be considered separately.
Substrate laying
You can even out small deviations with materials such as:
- isolon (or polyethylene foam, the cheapest options);
- polystyrene with a layer of foil on top;
- wood tiles;
- porous polymer masses;
- cork technical substrates (not resistant to moisture, require additional measures).
 Substrate laying
 Laying on an uneven floor involves placing the laminate panels perpendicular to the direction. It is important to choose the right thickness. On sale there are materials from 2 to 10 mm. It is best to give preference to a layer of 2-5 mm. In addition to the main function, the substrate will play the role of shock absorption and sound insulation. It is not necessary to lay the material in several layers to improve these characteristics, this is a violation of technology. When laying too thick a substrate under the laminate, the risk of breaking the points of attachment of one plate to another increases. This is due to the fact that the thicker the material, the greater its deformation during compression.
When choosing the thickness of the substrate also take into account the thickness finishing board. For example, to level the floor under a laminate with a thickness of 8-10 mm, you can use the thickest material with a thickness of 10 mm.
The use of mixtures for leveling
In this case, you can apply ready mixes for self-leveling floors or cement-based compositions. The purchased mixture is prepared according to the instructions on the package. To make a cement mortar, you need to take 1 part of the binder to 4 parts of sand and move them between each other. After that, water is added.
 Using a floor leveling compound
 To level the floor with cement, it is necessary to set the level of the top of the fill. This is usually done by screwing in screws. Fasteners lead into an uneven floor so that the caps are on the same level. After that, a thread is pulled between them, which will allow you to control evenness. The laying of the mixture between such paths is carried out with a shovel and a trowel. When completed, you will need to apply a rule that will create a flat surface. This tool is a metal profile, which is carried out over the surface, removing excess. The solidification of the solution depends on the temperature in the room. On average, work can be continued after 2 weeks.
The self-leveling floor hardens faster, but the cost of a self-flowing mixture is higher. It is poured with a layer of 1 to 7 mm, depending on the complexity of the surface. Before hardening of the top layer, the surface is rolled with a spiked roller many times. Drying time is from 3 hours to 3 days.
Cycling
The method consists in cutting off the top layer of the coating and forming flat surface. The advantages of the method include:
- speed of work;
- simplicity of technology;
- low cost (costs are required only for the rental of equipment, which, without it, may be required for repairs).
 Cycling
 The disadvantage is a decrease in the thickness of the boardwalk. This can lead to a decrease in its bearing capacity and strength. When performing work, it is important to drive the machine smoothly, without effort and pressure. If this is not done, then the work will not be carried out qualitatively, and new irregularities will appear.
plywood laying
The method is suitable for leveling serious differences. Laying can be done in two ways:
- on glue (if you need to equalize differences up to 1 cm);
- along the lags (if you need to equalize differences of more than 1 cm).
Adhesive bonding is performed after degreasing the surface and priming to increase adhesion. After the glue dries, the plywood sheets are additionally fixed with self-tapping screws to increase reliability.
 plywood laying
 When laying along the lags, the process is more complicated. First you need to clean the base. Fasten boards with a section of 15 by 40 mm in one direction with a step corresponding to the dimensions of the sheets. Logs are attached to the wooden flooring with self-tapping screws. Next lay out the plywood. This must be done so that the joint between the sheets falls on the log.
For both methods, preliminary cutting of sheets is performed with their subsequent numbering. The distance between adjacent parts is 2-4 mm, between the flooring and the wall - 10 mm. This is necessary so that no waves appear when the plywood expands.
If you level the base correctly, you can start laying the laminate in the usual way. It will only be necessary to take into account the features of the leveling material, since it will be the basis for the floor covering.
Laminate flooring is becoming more and more popular and in demand. With all its merits, there is one fairly common situation - the laminate requires careful preparation and evenness of the base on which it is to be mounted. Is it possible to put a laminate on an uneven floor, is this permissible in principle? Consider the installation features this material which must be known and taken into account when performing it.
How to lay laminate on an uneven floor
In the process of repair when dismantling the old floor covering, under it, as a rule, an unsightly base of an improper state opens. It may have irregularities such as chips, depressions and bumps, if it is a concrete base; unevenness and damage to the boards - with a wooden base. In addition, the base may have a height difference in different places. Naturally, the question arises: is it possible to lay the laminate on an uneven base and is it necessary to level the floor under the laminate? 
Professionals will answer categorically: laminated panels should absolutely not be laid on uneven floors, the base must be carefully prepared and leveled.
This is actually so, because after laying the laminate on an uneven base, all sorts of surprises gradually begin to appear, not always pleasant ones. Such a laminate floor sags when walking on it from the load in the form of human weight. This is explained simply: in the presence of irregularities in the form of recesses and tubercles, the lamella simply hangs over the recess in the absence of a load.
A person steps on it, and the lamella sags under the influence of his weight. After a certain period of time, the laminated floor will have crevices in the joints of the panels, it may begin to creak and subsequently go out of working condition.
Recall that the lamellas are interconnected with the help of locking elements, forming a solid sheet on the floor. Locks are divided into types: Click and Lock. 

Both types of locking systems require a carefully leveled base for installation.
Consequences of laying laminate flooring on an uneven floor
If there are significant level differences in the base, unevenness, the shelf life of the laminated coating will noticeably decrease. When walking on a laminate, it is on the locking elements that the load increases with an uneven base.
The result will be a loosening of the adhesion between the panels, the occurrence of gaps between the panels. Moisture is easier to penetrate into the cracks. The coating begins to creak, some lamellas may rear up.
Above major changes in the level of the base, panel locks are often damaged. Very soon, the coating will have to be dismantled, the base leveled and re-layed, either completely or partially replacing the failed panels. 
As you can see, laying laminate on an uneven floor, concrete or wood, has serious consequences. Therefore, even before the start of installation work, we check the differences visually and the evenness of the base - using the building level. If damaged areas and serious deviations in height are found, it is necessary to take careful preparation grounds.
Permissible floor unevenness when laying laminate: 2 millimeters per 1 meter of floor.
Can I level a laminate floor with underlay?
Today we see a large assortment substrate materials:
- natural cork;
- coniferous plates;
- foamed polyethylene;
- extruded polystyrene foam.
 Using a cork backing
 The instruction, purchased with the substrate, contains information about the maximum height differences it can level in order to avoid harm to the operation of the laminated coating.
You can learn more about substrates in our other articles.
The substrate under the laminate is mounted on the base immediately before laying the laminated flooring. The slats are connected to each other by locks, but they are not attached to the substrate and the base in any way, the coating is mounted as a “floating” floor.
The underlay is able to smooth out minor flaws in the base left after leveling, but does not provide a complete leveling without preparing the subfloor.
If the base has serious differences in height levels, significant depressions and tubercles, surface damage, it must be prepared and leveled.
Do-it-yourself leveling of the floor under the laminate
More often than others, concrete bases and a plank base are common, each of them needs a special approach to the leveling process.
Before laying laminate flooring, make sure that the underlying surface is level, firm and dry. If this is not the case, level out by eliminating irregularities, dismantling the old coating that cannot be repaired, and removing the baseboard.
How to Lay Laminate on an Uneven Concrete Floor
The material used to level the concrete floor under the laminate can be a cement screed, self-leveling compound or expanded clay - if a dry screed is performed. As a result of leveling, it is necessary to obtain a solid, smoothed surface with minor irregularities, no more than 3 millimeters.
 Checking the surface evenness
 The subfloor must be cleaned, waterproofed, for example, by spreading a dense polyethylene film, after which the screed is poured. Installation work with the laminate begins when the screed is completely cured.
Before laying the cover, make sure that concrete base completely dry. To do this, cover the floor with cellophane overnight or simply put the jar upside down. If condensation has formed in the morning, then you still need to wait until the screed is completely dry.
How to check the evenness of the floor before laying the laminate?
The evenness of the substrate for the laminate flooring is checked by applying a long level to the surface, while differences in the height of the plane of the substrate are revealed.
We carefully examine the surface of the base: are there any cracks, shells and tubercles that can reduce the quality of laying the laminated coating.
If there is an old coating on the concrete base, it must be removed.
Let's start leveling the floor.
You can pour a cement screed. You can perform a dry screed. On your own, it will be easier to level with self-leveling compounds.
When diluting the components of the leveling mixture, proceed exactly according to the manufacturer's instructions.
The prepared solution is poured onto the base. A spatula or a special device in the form of a mop will help distribute the solution evenly. 
In order for air bubbles to come out of the solution, it is necessary to walk along its surface with a special roller with spikes. It is necessary to wait until the leveling layer has dried, this period is determined by the variety, brand of the mixture used. After that, we spread a layer of waterproofing on it.
 Leveling the concrete base
 If a dry screed is performed during the preparation of the base, small-caliber expanded clay is poured onto the waterproofing layer. The expanded clay layer should be leveled using a level, then GVL (gypsum-fiber sheet) slabs are laid out on this layer, they adhere to each other, for which screws and glue are used. We get a surface of almost perfect evenness and strength. This method is also called: dry leveling laminate floors.

Installing laminate flooring on uneven wood floors
The cycle of work on preparing the base begins with a thorough inspection of it, in order to detect cracks, creaking or rotten floorboards, and uneven areas. All identified problem areas must be corrected without fail. Below is a link to an article detailed description for leveling hardwood floors.
Creaking boards, having discovered, are firmly strengthened to the lags. Sometimes it is necessary to partially dismantle the plank base, replace the floorboards and more firmly fix the log.
Advice: It is better to fasten the floorboards to the logs using self-tapping screws, and not with the help of nails. They should not be overtightened to avoid warping the floors.
The found cracks and pits are closed with putty. If the plank base has too large irregularities, or there are too many of them, scraping the floor will correct the situation. Scraping the floor is done using a scraping machine. It is expensive, so it makes sense not to buy it, but to rent it for a while. 
Floor cycling is a very noisy, dusty process; it is not easy to do it yourself without having the skill. There are more easy way leveling the wooden floor with your own hands under the laminate - lay sheets of plywood on it. 
Instead of plywood sheets, it is possible to level the floor under the laminate OSB plate. The leveling process is similar to laying plywood sheets.
The process of leveling the floor with plywood sheets and installing the laminate can be seen in the video:
Before laying the laminate flooring, it is imperative that you first lay out a layer of the substrate on the floor.
Video: laying laminate
In this article, we tried to consider in detail and get answers to the questions:
- Can laminate flooring be laid on an uneven floor?
- how to lay laminate flooring on uneven wood or concrete floors;
- how to level the floor in the apartment under the laminate.
We really hope that when you meet with the fact of an uneven subfloor, you will not be at a loss, but will confidently solve this problem. 
Laminate is a floor covering that has recently replaced many materials. Price category and variety structural drawings satisfies the needs of any category of consumers. Good attitude towards this product finishing works in the process of preparation and installation will thank you for a long service life. One of the main requirements is a perfectly even concrete or wooden base on which it is placed.
Why you should fix uneven floors
The main material for the manufacture of laminate are sawdust, so it strength characteristics not designed for additional loads. uneven surface floor leads to deformation lock connection laminate, as a result of which the joints begin to run apart. The panels gradually swell and become unusable. It is impossible to lay a laminate on a concrete floor even with the slightest bumps, tubercles and height differences.
The presence of depressions also negatively affects. In such places, the panels bend, making not very pleasant sounds when walking. In addition, any unevenness leads to the formation of cracks in the canvas.
Leveling a wooden floor
You can eliminate the unevenness of the wooden base yourself by choosing the method that is most suitable for your conditions:
- lay plywood;
- remove defects with an electric planer or grinder.
Before starting work, carefully check all wood flooring. The boards should be dry, and there should be no signs of decay. Even the slightest hint of such defects requires a partial replacement of the floor. Otherwise, the boards may bulge, which will lead to deformation of the laminate.
Level the floor with plywood when there are a lot of irregularities or there is no grinding tool. The material for the base must meet the requirements of moisture resistance. Plywood flooring has several advantages:
- light weight;
- the ability to perfectly level the surface;
- reduces labor costs;
- withstands heavy loads;
- affordable cost;
- not demanding during operation.
Sheets of plywood are not laid as a whole, but are sawn into pieces so that there are no long seams. First, fixing rails are installed to prevent displacement of the sheets, which are laid with a spacing of the seams. And the plywood itself is better to miss oil paint thus enhancing the water-repellent effect. For fastening, self-tapping screws are used, the caps of which should be deepened so that they do not come into contact with the laminate.
Choosing the second method to eliminate floor irregularities, first deepen the heads of screws and nails. Only then sand until the surface is completely level.
Using PVA glue and sawdust
This method for eliminating the unevenness of the wooden floor has been tested by time and professionals. Prepare a not very liquid composition by mixing sawdust with PVA glue. Fasten the guides strictly according to the level on the floor, and fill the space between them with the mixture. And so two or three layers, waiting for the previous one to sit down. After complete drying, lay the plywood sheets, fixing them.
At first glance, a concrete floor is an excellent base for laying laminate flooring. However, in the course of work, unforeseen problems arise. Rather, they will have to be felt at the stage of operation of the floor covering, the service life of which will decrease when the base is uneven. You can check for unevenness using the building level. The allowable difference ranges from 2 mm to 3 mm. Correction is required if the barrier is exceeded.

This type of floor base is most common in apartments and is distinguished by the most big amount defects:
- influxes of concrete;
- cracks;
- plane drops;
- potholes and chips;
- detached areas.
Each of these shortcomings requires its elimination. And the methods used to level the floor depend on the specific flaw.
- A small number of concrete tubercles can be cut down with a chisel or cut down with a grinder. The use of a conventional cutting wheel will cause it to break. For concrete, you will need a special circle that is used when working with tiles. Large influxes can be eliminated by using a perforator.
- The depressions existing in a small number are leveled by filling them mortar. With significant defects in the screed, the most correct solution is self-leveling floors. Numerous and various imperfections can be leveled in this way. First you need to clean concrete pavement from the remnants of the old clean floor. Potholes, cracks, chips are filled cement mortar. Large influxes go astray, small ones can be left, they will fill with a screed. Treat the prepared surface with a primer. To be sure, walk around the perimeter of the room and mark the level of the subfloor on the walls. When kneading the solution, keep in mind that the mixture should be thick. Then it will not spread, and the possibility of the appearance of new irregularities is excluded. Let the first layer dry. On final stage prepare a self-levelling compound or, if possible, buy ready-made. The consistency should be such that the solution spreads naturally, creating a perfectly smooth surface. You can lay the laminate only when everything is completely dry.
- When laying panels on concrete floors, dust appears. It's not scary when installation work, but the problem occurs during the operational period. Firstly, dust from the screed settles between the joints and subsequently penetrates into the room. Secondly, its particles interfere with the tight fit of the panels, which again leads to deformation. Therefore, when installing a laminate floor, follow the advice of specialists.
Recommendations for laying laminate on a concrete base
To remove dust from the screed, treat its surface with a primer, preferably in several layers. It is recommended to lay a plastic film under a clean floor, which will protect against dust penetration and at the same time serves as a vapor barrier. This method is used to avoid the ingress of moisture from concrete mortar on the laminate.
Leveling a wood floor is more difficult than a concrete floor. technological process and longer in time. One of the most simple ways to eliminate irregularities of any kind of floors, a leveling substrate device is used, but this is possible provided that the errors are very small. The attached instructions for each type of material indicate what size errors the product can eliminate. The leveling ability depends on the thickness of the substrate and its density. Can be used for uneven concrete, wood flooring, linoleum floors, plywood, etc.

Substrate types:
- polyurethane;
- cork-bitumen;
- foamed polyethylene;
- natural cork.
Each of the listed materials is laid on the surface of an uneven base. If the subfloor is concrete, it is recommended to pre-lay a layer of polyethylene. The surface itself must be thoroughly cleaned even of small debris. First, the first row of the substrate is laid immediately before the installation of the laminate boards, and each subsequent one overlaps by about 30 cm. Secure the seams with adhesive tape or adhesive tape. Neither the laminate nor the floor is attached to the substrate.
All types of such leveling materials have excellent characteristics: sound insulation, strength, softness. Therefore, it is desirable to lay an additional layer of the substrate on the leveled surfaces.
Replacing linoleum flooring with a more up-to-date laminate is carried out according to the generally accepted principle. When the floor is even, you can safely lay the canvas on top. But if there are irregularities, you have to rip old material, clean up pollution, and then carry out the whole range of activities, as described above, depending on the type of rough foundation.
Do not speed up the process by ignoring the above recommendations. The result may be partial or complete dismantling of the laminate, additional financial costs, spent nerves and time.
Video: how to lay the laminate yourself
Laminate flooring is a modern, aesthetic and durable floor covering, presented on the market by a large number of manufacturers and options that differ in design, appearance, performance characteristics and price.
Why You Shouldn't Lay Laminate on an Uneven Floor
Often buyers ask the question of whether it is possible to laylaminate flooring for uneven floors. The answer is unequivocal - it is impossible, and for several reasons:
- with minor irregularities, the laminate can “play” under the weight of a walking person, and in best case the panels will simply disperse at the junctions, forming gaps, and the lamellas will have to be constantly additionally adjusted to each other;
- deflection over larger irregularities can lead to a break in the locks of the laminate, and then it will be possible to get rid of the gaps that arise during operation only by replacing the damaged panels;
- significant base defects, such as large chips, cavities or swelling, lead to a break in the panels themselves, which irreversibly spoils appearance floor covering and may cause injury.
How to prepare floors for leveling
Before how to install laminate flooring on uneven floorsor level it, make sure there are no serious defects: large cracks, cavities, swelling and chips on the concrete base, significant deflection of the lag wooden structure, traces of dampness or mold, as well as other damage. Operation of damaged floors can lead to the appearance of extraneous sounds when walking, damage to the finish coating or be dangerous to life and health.
Preparing floors for leveling
Universal ways to level the floor
Before how to install laminate flooring on uneven wood floorsor a concrete base, you should get rid of the defects found, however, leveling methods vary depending on the design and material of the floor, as well as on its curvature. Modern technologies provide and universal ways leveling floors for laying laminated panels.
Laminate underlay - an easy way to deal with small bumps
Underlay for uneven flooring for laminate flooringperfect for those who are faced with minor flaws in the base. Modern roll materials made of polyurethane, polyethylene foam, natural cork, as well as bitumen-cork and bitumen-rubber mixtures, depending on the thickness of the coating, allow leveling unevenness up to 5 mm on running meter(at allowable value of this indicator 2mm/r.m.).

Underlayment for uneven laminate flooring is perfect for those who are faced with minor flaws in the base
It should be noted that with an increase in the thickness of the bedding layer, it is necessary to increase the thickness of the lamellas in order to ensure the reliability of the locks and their strength. Ifunderlayment for uneven floorsis not able to cover existing flaws, other alignment methods should be used.
Dry screed: how to level floors quickly and without excess dirt
The device of a dry screed is a more complex and time-consuming method than using a substrate, however, it allows you to bring even a very uneven floor to one level, get rid of permanent slopes. Bulk materials used in this method (usually expanded clay) have excellent vapor and moisture permeability, which will prevent moisture from lingering in the structure for a long time.
Dry screed is suitable for both concrete and wooden bases, however, the methods for preparing them are different. On concrete floor large cracks, chips and depressions are sealed. wooden base cleaned of excess debris, and then covered with chipboard sheets. At the end preparatory work by bubble or laser level beacons from metal profiles are set up, marking the height of the backfill, and then the granular material is poured on a level with them and distributed. Subsequently, gypsum-fiber sheets, drywall or plywood are laid on an already leveled surface in 2 layers with offset joints, after which they should be glued with a special adhesive composition and connect with screws.
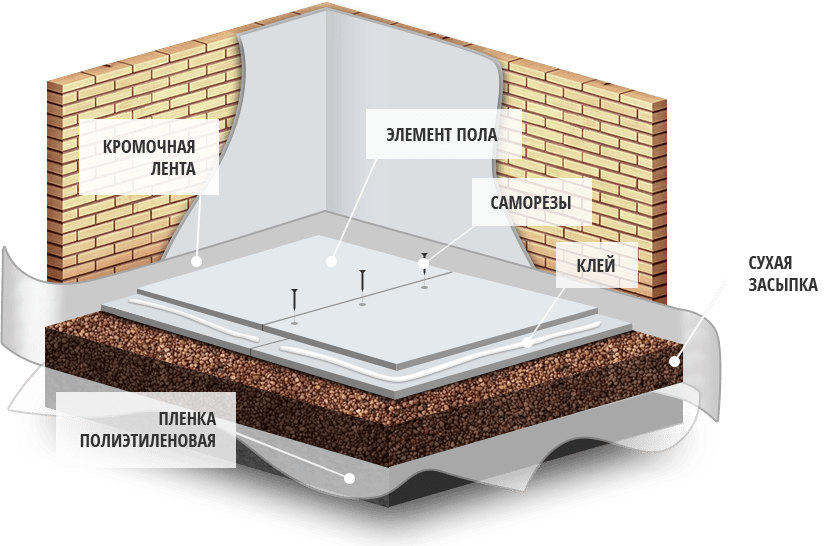
Dry screed is suitable for both concrete and wooden bases.
Methods for leveling concrete floors
Two more methods are suitable for leveling the concrete base, however, their significant drawbacks are the inevitable use of water and the need to wait for the composition to set and gain strength. Depending on the mixture used and the method chosen, this time ranges from several hours to several weeks.
Cement screed - a time-tested method
Device cement screed- a method known for many decades to obtain the ideal level of floors in rooms for any purpose, even with significant differences in the heights of the base.
Rack beacons are set at the desired floor height (it is recommended to use thin metal profiles, which subsequently will not need to be removed), the original surface is cleaned of small debris and dust, after which it is poured with cement mortar (the mixture can be made by yourself or purchased ready-made), which is distributed flush with the lighthouses. When the solution seizes, to obtain more smooth surface you can additionally level it with a grater. Depending on the brand of cement, the installation of the finish coating can be started after 14-28 days, when it gains strength.

Cement screed - a time-tested method
Self-leveling screed - a modern way for those who do not want to wait
Self-leveling screed is a more modern, quick and easy way to make the floor even. The algorithm of actions differs slightly from working with cement mortar: it is recommended to pour the leveling mixture from the highest point of the base, and after pouring and spreading it around the room, it must be rolled with a special aeration roller to remove air bubbles and avoid cavities.
A significant advantage of this method is the relatively short setting time of the mixture, which is several hours (indicated on the packaging of the mixture).
The principles of leveling a wooden floor are fundamentally different from how a concrete base is brought to the required level. Wooden floors can be leveled with materials such as plywood, OSB or chipboard. The safest, strongest and most durable is the first of them. For residential premises, sheets with a thickness of 13 mm or more are used. Work execution algorithm:
- The wooden floor is checked with a long bubble level. In areas where the boards protrude especially strongly, it is worth pulling them to the lags with long screws, and hammering the nail heads that have come out. You can also cut off protruding elements with a hand planer or power tool.
- sheet material is laid out over the area of \u200b\u200bthe entire room in order to try it on, cut off excess parts, make cuts for risers and other obstacles.
- Sheets are marked around the perimeter and in the center. The points where the screws will be screwed in are recommended to be set with an indent of about 2 cm from the edge of the sheet, 15-20 cm apart. In the marked places, holes are drilled with a diameter smaller than the diameter of the self-tapping screws.
- In order to avoid creaking and other extraneous sounds that appear due to small debris (chips, chips, etc.) under the plywood, it is recommended to carefully sweep or vacuum the floor before installing the sheets.
- Sheets are attracted to the base sequentially, it is more rational to start from the corner of the room farthest from the entrance.

How to properly install laminate
Even when installing on a perfectly flat floor under the laminate, it is necessary to lay a substrate, which will significantly reduce the noise when walking, and will also allow you to distribute the load on the floor in a more gentle mode. On plank floor the substrate is laid along the floorboard, and the panels themselves, on any basis, spread across the substrate. The sheets of the underlying material are connected to each other with adhesive tape (both fixing along the entire joint and point fixing is allowed), and do not require additional fixation on the existing floor.
When the leveling layer is completed and the underlayment is laid, you can begin to lay the laminate. Recommendations for correct styling panels:
- thoroughly clean the floor before starting work;
- between the walls and the surface of the floor covering, it is necessary to leave a temperature gap of 10 to 20 mm in size so that the laminate can “float” freely during thermal expansion;
- in rooms of considerable size, gaps for thermal expansion must be arranged every 10 m along the direction of the panels and every 8 m across;
- wedges for fixing gaps can be purchased in specialized kits for laying laminate or made with your own hands from the remnants of a board or plywood;
- for lamellas that will be laid along the wall, it is worth carefully sawing the locks from the side of the temperature gap, for this, manual and electric jigsaw, or a hacksaw with fine teeth;
- panels are laid out in strips and connected on the side in a manner corresponding to the type of lock;
- the seams on the short sides of the lamellas are run apart at a distance of at least 30 cm from each other in order to avoid joints in the form of a cross - this increases the strength of the joint, helps to avoid breakage of the locks, and makes the connection more durable;
- ready-made strips of panels are usually connected assembled, but some manufacturers use lock designs that allow laying several rows in parallel, which greatly facilitates installation, and the possibility of this method of assembling the coating is indicated on the package;
- to connect the final elements of each row, as well as all panels in the last row, it is recommended to use a mounting bracket designed for laying laminate.


Many people dream of having laminate flooring in their house or apartment. And at the present time this is not a problem, since at the moment there is a large amount of diverse material. You just have to go to the store and choose the laminate that you like best.
But buying doesn't end the job. After all, the main task is laying the laminate. Of course, you can turn to special companies and pay a round sum of money for this, or you can try to do it yourself.
If you still decide to lay the laminate yourself, and you have a wooden floor in your house, then most likely there may be such a problem as an uneven floor during installation. In this case, you will have to level the surface, and after that, lay the laminate. Since the problem with an uneven floor is quite common during installation, I would like to talk about this point in more detail.
The maximum difference should not exceed 2-3 mm. If the difference is greater than this level, then the surface irregularities should be eliminated. Otherwise, over time, the laminate will begin to bend and “play”. This will reduce the life of the laminate flooring.
Leveling a wooden floor under a laminate
There are two ways to level an uneven floor:
- Grinding machine or electric planer;
- Plywood flooring.
Before leveling, the floor should be well inspected and checked for strength. If you find rotten boards, it is best to replace them before laying the laminate. Otherwise, after a while, you will have to disassemble the entire laid laminate.
When leveling the floor in the first way, care must be taken that there are no obstacles on it for grinder, namely nails or self-tapping screws. If necessary, hide all protruding hats. Then sand the surface of the floor until all irregularities disappear. You can measure the surface using the building level.
If you don't have a grinder handy, you can use the second option is moisture-resistant plywood flooring. Many people think that plywood can be replaced with a chipboard sheet, but this is an erroneous opinion.  Chipboard is not recommended for a simple reason: formaldehyde compounds are used in its manufacture. And if moisture gets on the sheet, it will start to bubble and release formaldehyde. Such exposure can lead to serious consequences for human health.
Read only on the website How to paint the ceiling water-based paint without divorce
Before making plywood flooring, you need to install wooden rivers on which plywood sheets will be attached. a good plus there will be lubrication of plywood with oil paint based on drying oil, for greater moisture resistance. Then carefully lay out the plywood on the slats and fasten with self-tapping screws.
Also one of the frequently asked questions is: How to lay a laminate on an uneven concrete floor? There are no tricks with leveling the concrete polo. This is done elementarily with the help of a cement mixture. To work, you need a wide spatula.
Apply cement mixture on the surface and smooth with a spatula. We bring to the desired level and wait for complete drying. That's the whole job of leveling the concrete floor. In addition, a concrete base is best suited for laying laminate flooring.
After you have prepared and leveled the floor under the laminate, we begin to lay the substrate. Do not refuse the substrate, as the life of the laminate will be very short. In addition, the substrate serves as sound and moisture insulation.

There are several types of substrate:
- Polyethylene. The most demanded and popular substrate. It has good sound insulation and high moisture resistance. Very easy to install.
- Cork. Probably one of the more expensive ones. It also has excellent sound and moisture insulation properties. Perfect for uneven floors. Very high quality material that resists rotting and deformation.
- bituminous cork . The substrate consists of kraft paper and bitumen, and its surface is covered with cork chips. This crumb absorbs sounds quite well, and the bitumen does not allow water to penetrate, thereby preventing decay.
- Styrofoam. Good material for laying laminate flooring. It has good moisture resistance and high noise absorbing effect.
- Combined. The substrate consists of two materials: polyethylene and expanded polystyrene. The substrate itself consists of two dense layers of polyethylene, between which there are polystyrene foam balls.
- Special. Possesses high quality, reduces footstep sounds to a minimum. Possesses natural ventilation. Easy to install and takes a lot of time. But there is one small minus - the price.
Read only on the website How to make a do-it-yourself dog house
To lay the substrate under the laminate, you will need some tools: adhesive tape, tape measure, ruler, knife and pencil. It is best to fix the substrate sheets with adhesive tape.
We lay the laminate with our own hands
Before starting work on installing laminate, you need to create a suitable environment for work. The temperature should not be more than 30, and humidity from 45 to 70%. It is important to follow the instructions when working in order to avoid errors during installation. Let's analyze all the work point by point:
- First of all, we prepare the surface. It needs to be well cleaned of debris. For this case, a vacuum cleaner is best suited.
- Then lay the first substrate. The film can be corrugated, in which case the corrugated surface should look down. And if there is foil on the film, then it should be located up.
- The second row of the substrate must be laid, shifted from the junction of the mat of the first row by 40 cm, then the seams of the mats should be glued with adhesive tape or adhesive tape.
- The substrate must be applied to the walls, but not more than 5 cm.
- Once the underlayment has been laid, the laying of the laminate can begin. The first panel should face the wall with a spike, the next one is inserted into the groove of the first panel at an angle of 45 degrees. So you need to continue until the end of the first row.
- The second row is assembled in the same way as the first, and then inserted into the locks of the previous row. To avoid gaps between the panels, you can adjust the boards with a hammer, while protecting the laminate from impacts with a metal clip. Each completed row ends with the insertion of a wedge.
- You can also make panel connections stronger. To do this, you need to use a special adhesive for laminate. When working with glue, after each row, you need to wait a little until the glue dries completely, wait about 10 minutes. If during the connection, the glue leaked onto the gun, immediately wipe it off.
- AND last step will mask the gaps that have formed between the panels. In this case, we use a sealant. We apply it, let it dry and carefully remove the excess with the help of the skin.
Read only on the website Eurolining - the best facing solution
This completes the laying of the laminate. When mounting a laminate, there are no intricate details, so it is quite possible to cope with this work on your own.
There are several simple and important rules care of the laminate, which must be carried out. this will significantly increase the life of the laminate.
Basic rules for the care of laminate:
- Do wet cleaning only with warm water;
- Wipe dry the coating after cleaning;
- Do not apply detergents, V which contain abrasive elements;
- It is forbidden to use household chemicals, which contains acids and alkalis. These compounds corrode the varnish:
- Do not use on stains metal brushes or grids.
Need to know! Laminate does not like water very much. With a large ingress of liquid during cleaning, the laminate will inflate, and its locks will disperse.
 To keep the laminate in excellent condition, wet cleaning should be done no more than 2 times a week. For cleaning, use only a soft cloth that needs to be wrung out well. It is also recommended to add detergents specially designed for cleaning laminate to a bucket of water. They do not leave streaks and wash grease stains well.


