Stretch ceilings different options. Stretch ceiling in the hall - modern design with the best examples. Aesthetic appearance
Economy is a philosophy, principle and engine of progress. Under the economic slogans, new technologies appear, ingenious methods are being developed to reduce the cost of labor, money and an important factor - time. For the sake of economy, sometimes the strictest requirements of building codes are forgotten, which prohibit gluing floor ceramics on a previous coating of a similar material. However, it was she who made the craftsmen think about the problem of "is it possible to lay tiles on tiles." And since they had to “break” their heads, the way out was found - a reliable way to build a new coating on top of the laid tiled floor.
Economic prerequisites for maintaining coverage
The idea that a hard, even, impermeable ceramic floor can not be dismantled before changing the coating could not but arise from prudent craftsmen, since:
- dismantling will take a lot of time and effort;
- along with the tile, fragments of the cement-sand screed will probably break off. It will need to be filled in whole or locally again. with plywood or plasterboard flooring, it will also become completely unusable with the consequences of a complete alteration. And the polymer preparation also needs to be updated;
- dusting will be significant. Before repair, it will be necessary to vacate not only the premises itself, but also adjoining rooms. Even if you cover furniture and equipment in neighboring rooms with polyethylene, it is not a fact that the contaminated finish will not suffer;
- rubbish removal, cleaning;
- construction is coming new screed with the acquisition of materials, with the expenditure of labor and again time waiting for the hardening of solutions or binders.
No wonder that the amount of complications persistently whispered the idea of refusing to repair. But if the old coating calls for rework, means to minimize costs had to be found. Those. get the opportunity to lay ceramic squares, hexagons and rectangles on probably not very presentable predecessors. The task was to remove purely technical obstacles to the implementation of the plan.

Sometimes it becomes necessary to lay tiles on a wooden floor. Due to the fact that wood tends to change dimensions with the instability of temperature and humidity, this may seem impossible. Let's tell you how to do it right and avoid trouble in the article:.
What are the difficulties?
There are good reasons for the slightly outdated technological decree, according to which ceramics had to be unconditionally destroyed before laying a new coating, for good reasons:
- the draft base should be monolithic, and not composed of separate, insufficiently large elements;
- the rough surface must be distinguished by the porosity and roughness required for reliable adhesion of the adhesive to it, which is not characteristic of ceramic products.
Solidity will not cause concern among the owners of the floor with a well-placed previous tile, usually quite new. If the ceramic coating with the underlying base really creates a single whole, it will adequately fulfill the load-bearing function. Otherwise, an unnecessarily large load will fall on the bonding layer located between the old coating and its base. As a result, the elements of both coatings will break off.
With porosity, everything is more difficult. This is the main snag for those who thought about the question "is it possible to lay tiles on tiles." The main advantage of building ceramics is high density with a minimum number of pores that can absorb moisture.
Moisture absorption or scientifically its absorbency coefficient is directly related to the number of pores. For interior tiles, it varies from 0.5 to 3.0%. Moreover, in the 3% case, it is supplemented with top glaze, leaving the back side porous to optimize adhesion. But the glue needs to penetrate through the miniature tubules into the body of the substrate, gain a foothold in it and attract the finish coat to itself. This means that you just need to open or create pores, and at the same time increase the roughness. How?
In order to increase the porosity and provide the necessary roughness for bonding, three options were invented:
- Cleaning the top layer of the supporting ceramic floor with a grinder grinder.
- The formation of notches, preferably combined with the previous tool.
- Use of Concrete contact marked CERESIT ST-19, enriched with acicular quartz, or its counterpart with ordinary sand. There are analogues with the brand Knauf, Bolars, etc. After applying these priming materials, the surface acquires the required roughness, so that it will be possible to use ordinary tile adhesive, such as CERESIT CM-11.
Best if all three effective method will be used together. Then the grip will definitely be excellent.
Even a flawless tile installation will not look perfect if you do not pay enough attention to the tile seams at the final stage of finishing. Learn how to choose a grout for tiles and how cement and epoxy options differ in the following material:.

Contraindications for such work
The means have been invented, but their use is not always feasible, which must be taken into account even at the stage of the idea's inception. The following contraindications determine whether tiles can be laid on tiles in a particular case:
- The tile was laid on low-quality adhesive, as a result of which the predominant part of the elements completely or partially peeled off from the base. The same could happen due to non-compliance with the instructions of the adhesive manufacturer or if the proportions are violated. To identify the indicated cause, a kind of diagnostics is carried out using the wooden handle of any of the tools. By simply tapping, we find out whether each tile responds equally to it. We hear a ringing, which means that there is emptiness inside, a rattling is heard - it has completely peeled off. Only a dull sound will convince you of strength and reliability.
- The floor is uneven. In general, for laying tiles, differences of 4 mm per 2 m of the lath applied to the surface are acceptable, because. primer and binder will play the role of a leveling layer at the same time. But if there are more violations, we pick up a puncher.
- The tile is very old and covered with a network of cracks, in which, no doubt, many years of dirt, indelible fat have accumulated, fungi have divorced.
- Communications pass under the old ceramic coating, and they forgot to build revision hatches for them last time. We dismantle such a floor, “without waiting for peritonitis”, and arrange everything according to the rules.
- After the floor in the equipped room will be higher than general level floors. Such an excess is highly undesirable, because ceramics are placed mainly in bathrooms, showers, and kitchens. In a word, where it is supposed to make the floors lower by 3-5 cm, so that accidentally spilled water does not have the opportunity to freely drain outside the room.
If the listed obstacles are not identified, you can proceed to the preparation of the floor and to the laying following it. Work should be started if the floor temperature is not lower than +5ºС, and in the general room it is not less than +10ºС.

The process of building tiles on top of tiles
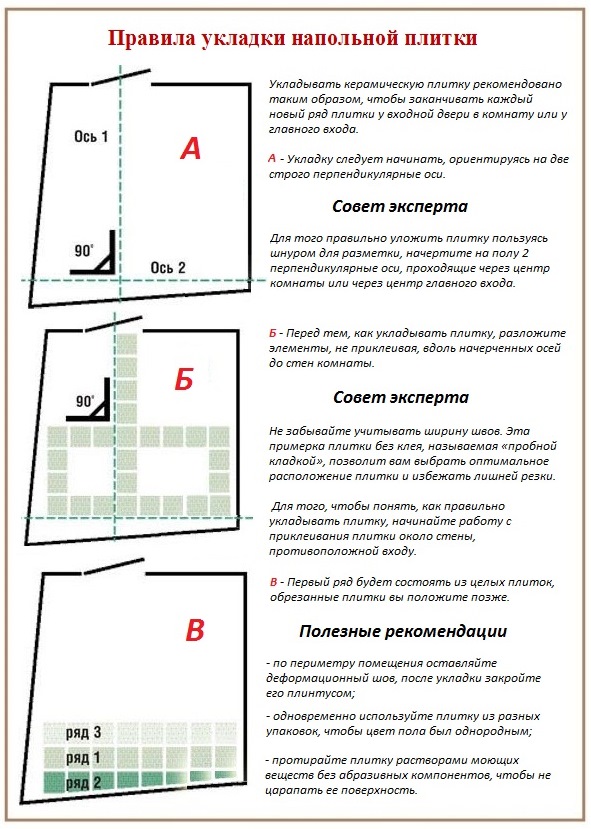
Fundamentally, the described scheme differs from the standards only in preparation. First, according to tradition, a small plan is drawn with all design features premises. Then a fitting is carried out with the layout of the material “dry” to see how the ceramic floor will look like, in order to place the cut pieces of the tile in places remote from the view. The layout of the tiles must be done so that the seams upper elements relied on solid tiles. Those. you need to shift the upper seams relative to the lower ones or try to ensure that there is a minimum number of matches.
- We carry out a thorough audit with detailed tapping of the elements in the center and in the corners. We carefully dismantle the identified unreliable tile with a chisel and a hammer, fill the bare area with cement mortar. Waiting for freezing. The curing time of the mortar is proportional to the thickness of the cement-sand filling. 10.0mm will cure in 1 week.
- We clean the crumbled seams with a chisel, fill it with tile glue or the same solution that was used to fill the sections.
- Cleaning up glossy surface grinder tiles, choose a grinding wheel with medium grit. It is also desirable to make notches.
- We carefully wash the old ceramics first with just water from dust, then with soapy water. If there is old dirt and greasy spots add soda to water. Finally, rinse several times with clean water.
- We process the old ceramic floor with Betonokontakt Ceresit ST-19. Apply it evenly, spread it with a brush or roller. The material is sold in finished form, packaged in buckets of 15 liters. Approximately 300 gr. per m². Before applying to the floor, it is recommended to cover the associated structures, pipes, parts with polyethylene. Otherwise, random blots and smears Pink colour will be difficult to remove. We are waiting for drying for 3-4 hours. If we plant the tile on tile adhesive, it is not necessary to moisten it before laying.
- Apply the adhesive to the thickness specified by the manufacturer small plot gender. The glue quickly loses its elasticity, therefore we treat it with an area of less than 1 m².
- We glue the first tile with effort. Until the glue begins to set, its position can be adjusted. Similarly, we stack the elements surrounding it. Along the perimeter of each of the tiles, a expansion joint must be left for linear expansion. Its value depends on the size of the elements, usually it is 1-4 mm. For the formation of seams we use plastic crosses.
- After a day, the grooves around the tile will need to be filled with a suitable polymer cement composition or a solution of equal parts of sand and cement.
Tile adhesive should harden naturally without artificial heating and ventilation. It is also not necessary to moisten the coating planted on the glue after laying.


It is extremely important to strictly follow the instructions of the material manufacturers, not deviating one iota from the instructions. With scrupulous observance of the rules, after 3 or 5 days it will already be possible to safely walk on the finished surface. And to the questions of neighbors-colleagues-acquaintances "is it possible to lay tiles on tiles" to give an honest affirmative answer.
Video examples of installation
Ceramic tiles are one of the best materials for decoration of premises with special operating conditions. Such cladding is not afraid of exposure to high humidity, temperature extremes, abrasion load, in itself is very attractive in appearance, easy to clean. In a word, for kitchens, bathrooms, bathrooms - it’s better not to find it. And what is even more important - it is quite possible to cope with the process of laying it yourself.
Why does it make sense to try to do the cladding with your own hands? It’s just that even if the laying surfaces are perfectly even, you will have to pay about the same amount for the services of the master as the material itself costs, and this is even at best. Such expenses can be completely avoided. By getting to know our instruction article how to lay tiles on a wall, the reader will have a clear understanding of all stages of work, from surface preparation and tile selection - to grouting. And for sure he will be convinced that there is nothing supernaturally difficult in performing such a finish.
Preliminary steps
Preparation of surfaces for finishing
It's completely pointless to start facing works on an unprepared wall. Some novice home craftsmen naively believe that the layer ceramic tiles will reliably hide all the “ugliness” of the surface, and as a result you will get a straight beautiful wall. They are sorely mistaken!
What does the preparation process include?
- It is essential to get rid of old finish walls. Will not, for example, hold adhesive tiles on a painted surface. Or even their small fragments are completely excluded. If previously there was a tile on the wall, then after its dismantling, all sagging and drops of hardened glue should be removed.

- Be sure to check the quality of the plaster layer, if any. All problematic, crumbling areas are removed immediately. It is necessary to tap the entire area, to identify places of instability, which are also subject to removal. And most often it happens that if an exfoliating area is found in one area, then everything else will be pulled from it, that is, the plaster has to be knocked down completely.

- In no case is it ignored if traces of their biological damage are found on the walls - mold spots, fungal colonies, etc. Antiseptic priming is carried out on all surfaces without exception, but if this microflora has already settled, then you will have to carry out a preliminary “treatment” of the wall

- There should be no gaps or cracks on the surfaces. If they are identified, appropriate repair work for their quality workmanship.

- The wall must be flat, that is, it must be a plane, and not a twisted, littered, protruding or concave surface. On the aligned walls, the tiles fit without problems. Yes, there are methods for leveling walls with installation ceramic cladding. But, believe me, not even all experienced craftsmen they love to do it, because this task is extremely difficult. And if a newcomer has a "debut", but there is nothing to even think about it. It will be much easier to align - and the finish will definitely turn out to be of high quality.
There are many ways to level, and some of them, for example, using moisture-resistant drywall or gypsum fiber plates - are not so complicated and do not require much time.
Prices for moisture resistant drywall
moisture resistant drywall
How to independently align the walls for decoration?
Do not be afraid of this task in advance. There are many technologies available that are quickly mastered even by beginners. Moreover, the laying of tiles does not require the ideal smoothness of the surface - the correctness of the geometry is enough. are discussed in detail in a special publication of our portal.
- Ceramic tiles are most often installed in rooms with high humidity, so you should think about reliable waterproofing. IN more this applies, of course, to the floor, but it also makes sense to provide for walls waterproofed"belt" at least 100 ÷ 200 mm high from the floor along the entire perimeter. In addition, it is desirable to reinforce with waterproofing sections of the passage through the walls of water and sewer pipes, the area around water outlets.

And in frankly “wet” areas of the wall, for example, around a bathtub, washbasin, shower stall, etc., it is generally better to perform waterproofing solid. Approximate dimensional standards for these sections are shown in the illustration:

- Finally, the wall must be carefully primed with a compound. deep penetration. This measure will completely remove dust from the surface, eliminate the phenomenon of moisture absorption. That is, the wall material will not take water from the tile adhesive, allowing it to harden in optimal conditions. Achieved best performance adhesion. In addition, many primers also have antiseptic qualities, and such preventive treatment will never become superfluous.

If the absorbent qualities of the material are high, then the primer treatment is performed twice, always waiting for the first layer to dry completely. As a rule, the primer is applied immediately after finishing preparatory work. But if for some reason there is a significant time gap between this stage and finishing, then it would be desirable to apply the primer again - a day before the start of the installation of the tile. So a quality result will be guaranteed.
Wall primer prices
wall primer
Drawing up a project and choosing the necessary tiles
It is clear that these two issues are closely intertwined. In this publication, we will not analyze design approaches to choosing the interior of a room - we will focus only on some practical aspects.
Planning the location of tiles on the walls
Of course, the owners must already imagine what they want to see in the end. Surely familiar with the approximate range of tiles presented in the store. That is, they just have to “fit” the selected collection into the specific dimensions of their premises.
Here "by eye" should not be relied upon. The best option is to draw up a graphic diagram for each of the walls separately. Especially if it is not supposed to be a continuous cladding with one type of tile, but with decorative inserts or friezes, or with division into sections. Some material manufacturers offer online programs on their official websites that allow you to optimally place tiles on walls. If this is not possible, you will have to sit on your own or in a graphic editor, or simply over paper diagrams.

- In horizontal rows, you can start with a whole tile from one of the corners, that is, the cut edge will fall on the opposite side of the wall. Naturally, in this case, the least noticeable angle is chosen. But you should immediately figure out which fragment will remain in the corner? If it is too narrow, then it will be very difficult, if not impossible, to remove this area accurately. And on the front side of the room, that is, attracting the eye of the incoming, such an arrangement will also look very ugly. Therefore, it often makes sense to choose such an arrangement to start from the center of the wall - AThenfrom it is laid to the edges with the same trimming on both sides.

It all depends, of course, on the size of the wall and tiles. It often happens that the alignment seems to be optimal when the vertical axis of the wall coincides with the center of the tile, and then there is a wiring to the sides with, again, symmetrical trimming along the edges.
Undercut edges are easy to hide by laying solid tiles from a corner on an adjacent wall. If in inner corner If two cut edges converge, then this can also be solved by grinding one of them. Works well on outside corners. decorative corner. More details will be discussed later.
- They also show the necessary "creativity" when planning vertical rows. So, the laying does not look particularly advantageous, which under the ceiling will end in a narrow section. It is better to plan a solid tile for this place, especially since its upper edge is very often covered by a suspended or stretch ceiling.

But it is quite possible to start a narrow section first from the floor - there it is hardly noticeable, and the cut edge of the tile will become completely invisible. visible in the corner between the floor and the wall. To be more precise, then this bottom row is generally recommended to be laid out last, so no problems with precise trimming are foreseen. All this will be shown below.
However, other circumstances may influence the choice of the starting horizontal line. These can be features of the design project (for example, the use of contrasting rows or friezes), and the placement of plumbing fixtures. For example, it is always recommended to place tiles near the bathtub so that the horizontal seam is hidden below the rim by 20÷30 mm. This will not violate the aesthetics of the installation, and will bring the vulnerable seam out of the most “wet” area.

- When planning the placement of rows, vertical and horizontal, do not forget about the thickness of the tile joints. Let this not seem like a trifle: when using not very large tiles, but on a large wall, the difference is considerable.

Excessively thick seams when laying on the wall are most often not required. Usually limited to gaps of 1.5 ÷ 2 mm. Moreover, after grouting the joints with a fugue, the visual effect of the thickness will change somewhat - the gaps will appear wider.
- It is clear that when drawing up schemes, it takes into account the number, size and location of inserts - friezes, borders and other decorative elements. If a fully-fledged plan for each of the walls is constantly at hand, then there is much less chance of making a mistake during the laying process.
Some nuances of choosing ceramic tiles for walls
With tiles designed for walls, it is much easier than with floor tiles. The indicators of its strength, abrasive resistance, roughness, etc. fade into the background, since they do not play a decisive role here. You can concentrate on decorativeness and, of course, the quality of the material.
We will not talk in detail about all the intricacies of the choice - this is a separate issue. But several important points nevertheless should be emphasized.
Prices for ceramic tiles
ceramic tile
- There is a wide variety of formats available for sale. But you should not immediately chase the tiles large sizes. Firstly, it does not look appropriate everywhere. Secondly, when laying it, a lot of waste can remain, and since it is usually not cheap, it turns out to be expensive. And thirdly, the installation of such a cladding requires a certain amount of experience, and a novice master may not be able to cope with the task - any mistake will be in sight.

If the first independent laying of tiles is ahead, then it is better to proceed from its average dimensions, for example, up to 300 ÷ 400 mm along the long side.
- should have a water absorption of no more than 3% - this is usually indicated on its packaging.
- If wall cladding is planned in unheated rooms or even on the street, then you should look for a material marked with a snowflake pictogram - it is not afraid of freezing.
- Without fail, all purchased packages of tiles of the same type are checked for the same batch. The fact is that the same article, but released in different shifts, may slightly differ in tone of color. Visually in the store, this is most often not noticed. But after laying on the surface, even a small difference can spoil the overall look.

- Of course, they try to purchase tiles as much as possible high grade. Even at the factories, products are sorted, and products with shape distortions go on sale as second- or even third-rate. With them, you can be exhausted when laying.
- Manufacturers also sort tiles by caliber. It is clear that they always try to approximate the dimensions finished products to the stated standard. However, the specificity of ceramic production does not yet allow achieving a unique match in the size of all tiles without exception. On the packaging of the tile, its caliber can be indicated - an alphabetic or numerical designation, and a plate with its decoding can be attached.

It is clear that the tile of the most accurate caliber has more high price. But all preference should be given to her, since unjustified savings can lead to unsuccessful finishing, and in eventually total costs will be clearly negative.
- In any case, it will not be possible to do without tile waste. And sometimes it becomes impossible to acquire the missing quantity - the desired batch may not remain on sale. That is, the stock is made in advance. Usually they start from 10% - with a competent layout and high-quality cutting of the material, this is enough. If a diagonal layout is assumed, then the stock can be increased to 15% - there will be more waste in any way. But we note right away that contacting diagonal mounting without good work experience - not recommended. Therefore, in this article, intended more for beginners, it will not be considered.
- Feel free to ask the store to check all purchased tiles - there is no guarantee that they will not be damaged during transportation. Yes, and explicit marriage sometimes comes across.

- Even first-class tiles of the same batch and the most accurate caliber should still be carefully sorted into several groups at home. The highest quality, with perfectly matching dimensions, is best set aside for facing the most visible critical areas. The tile is a little worse - push it "to the periphery". And the one with the most significant size distortions or with minor defects should already be used for cutting to fill sections along the corners or the floor.
- The number of tiles is usually calculated by the piece. This can be done if a qualitative scheme is drawn up. And even more so, you will have to do this when you plan to use several varieties to create a special decorative interior.
But in the case when it is supposed to cover the entire area with one type of material, you can also use the calculator, which is located below. There it will be necessary to indicate the area of \u200b\u200bfinishing, the dimensions of the tile and the width of the tile joint. Reserve 10 or 15 percent will be taken into account when choosing the layout principle.
Repair of an apartment often involves replacing the tiled floor with a new one. Many are horrified by the prospect of dismantling the old coating - a huge amount of work, hard labour and mountains-mountains of construction debris, dirt and dust. I wonder if it is possible to lay tiles on old tiles , because it allows you to skip the most unpleasant stages of repair.
Unfortunately, no one dares to give an unambiguous answer to the question whether it is possible to lay tiles on tiles or not, without first examining the old floor. Too much depends on his condition. In this article, we are going to consider the question of whether tiles are laid on tiles at all, and how to do it competently.
As you know, tiles are laid on a rigid and durable base, so it would be logical to assume that before deciding whether to lay a new tile floor on top of the old one in your particular case, it is necessary to inspect the old coating for adhesion old tiles with a base.
We note right away that experts do not recommend re-coating tile coatings that have been in operation for a long time, since they are in a certain risk zone: they are subject to various kinds of damage - cracks, chips, etc. Under these conditions, it cannot be ruled out that the new floor will not last long.
When using this technology, the floor height increases and may well be higher than the level of the threshold, which in certain cases, say, in the bathroom, is devastating. Therefore, it is so important to pre-take all measurements /
Assessment of the condition of the old tiling
Some defects in old tiles, such as cracks, chips, or loose parts, can be immediately detected even with a cursory inspection. However, and this is the mistake of many beginners, visual inspection is not enough. As practice shows, the absence of visible defects and the reliability of the coating in appearance are sometimes not the same thing. The old floor must be carefully examined. Armed with a wooden mallet, the surface, element by element, is tapped. Poorly glued can be distinguished by a characteristic ringing or rattling sound.

If there are too many such elements in the floor finish, then the question of whether it is possible to lay tiles on old tiles does not arise at all. There can be no two opinions - dismantling is necessary, followed by the installation of a new coating according to general rules.
The old coating is also removed if any communications pass under it. This is especially true in cases where there is no access to them such as a hatch and another.
Suppose you are lucky, and there are several tiles with a defect. What will be the sequence of your actions?
Preparing the old floor for the new
These works are carried out in several stages.
Coating repair
Putty or hardened mortar is removed around the problematic old tile and, prying it with a crowbar, lift it as carefully as possible so as not to violate either its integrity or the foundation under it. Mix a small amount cement composition and fill in the voids. Then carefully primed.
If you managed to successfully remove the tile, you can re-fix it in the old place. The only thing you need to know is that you can proceed to the subsequent stages in about a day.
Surface treatment
Tiles are usually smooth, so the new floor will not adhere well to them. This means that at this stage the main task will be to obtain a rough surface, and the more grooves where the solution gets, the stronger the new one will hold. You can go over the finish with a grinder to partially remove the top layer or make notches in 10–20 mm increments, etc.
However, this option is not suitable for every type. For example, neither a drill nor a grinder will “take” a glazed one. Besides mechanical way quite laborious and dusty.
 A more modern and reliable way to roughen is to use a primer like "Betonokontakta". They have excellent adhesion to any material, even if its absorbency is low. These are acrylic mixtures containing cement, sand and various fillers. Using a primer of this type provides the most effectively prepared surface for a tiled floor. In addition, the process itself takes a record short time.
The surface is thoroughly cleaned and above all from dust. To do this, use a heavy construction vacuum cleaner. Next, using detergent, remove the remnants of dirt, grease and other things. The floor is washed with water, dried with rags and left to dry from residual moisture for a couple of hours.
Then a pre-mixed primer is applied. By the way, it is advisable to repeat the mixing from time to time during the priming process. The material is applied with a roller or brush over the entire surface. The pinkish shade of concrete contact helps to ensure that no untreated areas remain during processing.
If necessary, the adhesion of the primer can even be increased by adding quartz particles to the mixture, resembling a needle in their elongated shape. Such a solution works even on a glass surface.
The primed floor becomes rough, somewhat reminiscent of coarse sandpaper. The laying of the finish is carried out after the primer has completely dried, that is, after about three hours. Exact time drying time is indicated on the package.
The treated surface may not be smooth enough or have other flaws, which is highly undesirable, therefore, additional alignment may be required.
 replacement-tiles-4
IN in general terms installation of a tiled coating on a tiled floor has the same technology as a conventional one. Among the most important nuances note two:
- a spatula is chosen with a comb about 1.0–1.5 cm high;
- the direction of laying the new tile is opposite to the existing one, so that the new seams do not coincide with the old ones.
It is also important what adhesive compositions are used in this case, whether it is possible to lay tiles on cement. In this matter, it is worth listening to the opinion of professionals.
- The adhesion of tile adhesive is much higher than that of cement mortar. It saves time and does not require special knowledge and skills.
- Adhesive composition for floors with a lower tiled base, it should be distinguished by plasticity and high adhesion, for example, Ceresit CM17 or Vetonit Renovation and others. All of them are intended for the device of especially strong and difficult floors. True, these adhesive mixtures more expensive, however, only they are guaranteed to ensure the strength, reliability and durability of the new floor.
Stretch ceilings are one of the ways to beautifully decorate a living space, office or common area. The modern design of stretch ceilings will create a delightful interior.
This technology has been known for a long time, the Egyptians used wet linen fabrics for the manufacture of stretch ceilings, which, after drying, were reduced in size and stretched tightly.

The Romans used silk for this purpose. Such a ceiling consists of a frame and a material stretched on it, mainly PVC or polyester with polyurethane coated(without joints and seams). There are various design ideas for stretch ceilings, let's look at some of them.

Any pattern can be applied to the stretch ceiling, the material can be different colors and textures: mirror, matte, leather imitation. The shiny ceiling visually enlarges the room and, in addition, the lamps installed in it will perfectly enliven the interior. Design of stretch ceilings of the room with mirror effect below:

Apartment dwellers multi-storey buildings Most of all, stretch ceilings are valued because of their resistance to leaks from upper neighbors. Such a ceiling, installed in a medium-sized room, can withstand about 100 liters of water. True, then the water still pours out ...
Some designers are especially fond of stretch ceilings, as they allow you to create interesting shapes and combinations. For example, create a design of two-level stretch ceilings that makes the room visually huge.

PVC stretch ceilings
Since PVC stretch ceilings appeared in the seventh decade of the last century, this branch of production and technology, due to the general boom in the chemical industry, developed very quickly.

Modern tension materials for interior decoration do not emit toxic substances and are not flammable. Asian manufacturers quickly captured this technology, but the quality of their products was much worse.
When choosing materials, special attention should be paid to their quality; you can buy material that is not only technically unreliable, but also dangerous, since during a fire it can easily catch fire and release toxic fumes.

materials good quality during a fire, they curl up and emit much less smoke. Stretch ceiling design photo 2017 modern ideas:

Film for stretch ceilings should be selected from reputable European manufacturers. The quality of the film is very difficult to check, but better ones are known to have a shiny surface.

You should not buy wide film, in Europe film is produced up to 2.2-2.4 m wide, and in China - 3 m or more. Narrow films (1.3-1.5 m wide) are most likely produced on outdated equipment, so you should not expect good quality from them either.

Modern design of stretch ceilings
When measuring, it is necessary to add a film margin of 10 to 20 cm to the length and width of the ceiling, to a side longer than 7 m it is recommended to add at least 20 cm of film margin.

Installation of the ceiling begins with the installation of temporary profiles on one wall, then a profile is installed on the opposite wall, then on the wall between them and against it. Later, in order to obtain the best material tension and to avoid waves, the attachment points may change slightly.

Further installation is carried out in chronological order, starting from the middle of the wall and ending at its corners. First, the largest planes are installed, then the smaller ones.

Aluminum profile
The installation of such a ceiling requires High Quality aluminum profiles. good profile should not sag, and a poor quality profile can be bent with two fingers. Perforated tape must be flexible and durable. Rigid tapes can be painted with the same color as the film, for example, with automotive paints.

More important thing: when buying material for a stretch ceiling, you need to make accurate measurements and think about how it will be mounted. ceilings rectangular shape not difficult to make, even a beginner can handle them. And if the room has a non-standard shape and vaults, then it is better to invite a specialist.

After accurate measurements, the order is sent to the factory. Only companies equipped modern equipment, can fulfill the order qualitatively. Stretch ceiling design ideas:

Installation PVC coatings on stretch ceilings is not very difficult. Along the walls you need to install profiles and heat the room to 50-60 degrees for 10-15 minutes. The material is well connected to the profiles when it is in a flexible state.

The most reliable connection method is a harpoon system. After cooling the room, the material shrinks and stretches well along the ceiling. Such a system is also convenient because it does not take up much space, 5 cm from the main ceiling is enough.

Stretch ceiling with diffused lighting
Materials that transmit light look very beautiful on stretch ceilings. It is very popular to install color adjustable LED strip lighting under the ceiling.

It does not take up much space and creates a cheerful, sometimes romantic climate in the room. When installing a lamp or making holes in the plastic for a different type of lighting, be sure to attach an additional reinforcing PVC layer. The design of the stretch ceilings of the room in this way will make the room cozy and truly "home".
The backlight intensity can be adjusted by changing the distance from the light source to the film: more diffused light will be when the light point is higher than the film.

Ceilings without joints
Stretch ceilings without joints are also popular. According to experts, such a shell was created after the elimination of defects and shortcomings in PVC technology.

The only drawback of this technology is that the surface is only matte, glossy, unfortunately not. The material is made of polyester and coated with polyurethane. It is dense enough that any pattern can be applied using advertising production equipment.

Installation of such a ceiling in a rectangular room is quite easy, you do not need to additionally heat the room. With the help of special tools (blades), the material is pushed under the profiles (which must be installed around the entire perimeter), and the excess is cut off at the edges.

The distance between the main ceiling and the stretch ceiling is from 1 to 4 cm. Wall or ceiling wallpapers are often made from the same material.

Film connection in the middle of the ceiling
The width of the material can be from 4 to 5 m, so for the average size of the rooms, connections are not necessary. If the width of the material is not sufficient, it is necessary to combine two pieces on one profile.

Thus, an almost invisible connection will be obtained. At the joints of PVC films, a very small gap remains, which is covered with a special overlay. The design of two-level stretch ceilings looks even more spectacular, and masks all joints.
Operation and maintenance of stretch ceilings
Ceilings do not require complex Maintenance and cleaning. Dust and dirt from the surface can be removed with an ordinary damp cloth. More attention should be paid to translucent backlit ceilings.
Before starting the installation of the stretch ceiling, it is necessary to thoroughly clean the main ceiling. In some cases, experts recommend making a double ceiling, one of which will trap loose dust from the main ceiling.

Drafts and permanent high air currents are harmful to stretch ceilings, they can damage the material of the profiles. This is quite rare in residential areas and should be taken into account where the ceiling surfaces are quite large.

Stretch ceiling design photo 2017 modern ideas

The ceiling space is an integral part of the interior. Today, stretch ceilings are in great demand, because they allow you to bring originality and beauty to interior design.


Peculiarities
Today, designers very often use stretch fabrics when decorating rooms, as they attract with variety, allowing unusual and creative ideas to be realized.
Unusual design stretch ceilings gives the room a special atmosphere, makes it cozy and stylish. This detail of the decor can transform the room, become its highlight.


Modern stretch ceilings have many advantages.
- Attractive appearance. Each version of the stretch ceiling is unique and elegant. Even after several years, he retains correct form, beautiful texture and rich color performance.
- Long service life. Manufacturers of stretch ceilings give a guarantee of up to 20 years, which will not only allow you to enjoy an attractive appearance, but also save cash without thinking more about repairing the ceiling.
- Reliability and safety. Tension webs are made of durable and reliable materials which are completely safe. The design of such a ceiling allows you to protect the room from flooding, since the material is able to withstand huge loads.


- Acceptable price. The undeniable advantage of the tension structure is the affordable cost. Other cladding materials are more expensive.
- Zoning of the premises. By using original design stretch fabric, you can zoning the room. The design can include an amazing print to highlight the center of the room. The ceiling in several tiers will allow you to divide the space into several zones.
- Rich variety. Designers offer a wide range of stylish and original designs, allowing you to choose an unusual option for the implementation of various styles.
- Ease of installation. There are two ways to attach the tension structure to the ceiling. Professionals carry out its installation very quickly.


Types and designs
The stretch ceiling is presented in the form of one continuous flat canvas. Using a special profile, the web is fastened to the base of the base ceiling. Today, various design options are presented, which differ in external indicators, and are also represented by different textures.
The canvas acts as the main structural element of the stretch ceiling. Two material options are on sale: PVC and fabric.
Until recently, only fabric canvases were used. They are presented in large formats, so the installation process is quite fast due to the lack of the need to weld several canvases.


PVC significantly expands the possibilities of creating tension structures, because this material can be painted in any color, it also conveys various textures and effects. The PVC sheet is characterized by strength, durability and practicality, as it protects the room from leaking from above. It can withstand a lot of water. Using PVC, you can create geometric structures of varying complexity, giving the interior uniqueness and originality.


Depending on the design, ceilings can be single-level or multi-level. The choice of the number of levels depends on the tasks assigned to the designer.
The canvas in one level is mounted a little lower from the base of the base ceiling. This design is the simplest. She is suitable for various premises, even for rooms with low ceilings.


If the base ceiling has irregularities or the customer wants to decorate it in an unusual way, then you should pay attention to multi-level options. They are characterized by the complexity of the design, while not limiting the flight of the designer's imagination. Such designs are ideal for rooms with high base ceilings.
The multi-level option allows you to solve many tasks:
- to make zoning of space;
- use several textures and colors at the same time;
- decorate the ceiling complex figures and forms;
- create the desired visual effect.


The main types of stretch ceilings differ in their characteristics Therefore, it is worth choosing not only for aesthetic reasons, but also for practical purposes.
- Matte models are characterized by a smooth surface. One gets the impression that the ceiling is lined with painted plaster. The matte surface prevents glare and does not reflect the light of the lamp. On it, all the seams remain invisible. Matte ceiling will bring beauty and elegance to the interior.
- Glossy or mirror options are in demand for decoration of small rooms. The presence of a mirror coating allows you to visually raise the ceiling. Regardless of the color version, the glossy finish perfectly reflects light, making rooms brighter and more elegant.


- Satin solutions are distinguished by a slight pearly sheen. The room takes on a subtle glow, creating a relaxing environment. This option is often used to decorate bedrooms and children's rooms.
- Fabric types are in demand in the design of cold rooms. They are distinguished by the use of a simplified installation system, because for their fastening there is no need to pre-heat the web.


- Metallic ceilings attract attention with a pronounced sheen of metal. Such canvases look spectacular in various styles. They give the interior style and originality.
- Textured ceilings perfectly imitate the surface of various materials. Canvases that convey texture look beautiful and attractive. natural stone, suede or velvet. Such an element of the interior is always bright accent, stylish highlight.


- Photo printing options have become possible for ceiling decoration thanks to the use of modern technologies. Options in satin or matte design are in great demand. Exquisite prints can be applied to textiles or film. Textile options have a web width of up to five meters, so they are solid, without the use of connecting seams.
Both options are available in a wide range color solutions and textures, allowing you to create amazing interior designs.


Styles
Stretch ceilings are great for creating an interior in various styles. Their choice depends on the personal preferences of the owner of the apartment or house. Among the wide variety you can choose best option for decorating the living room, bedroom, children's room, corridor, bathroom or kitchen.
Classic is always in fashion, so many customers prefer this particular style. A matte ceiling is an excellent choice as it adds a soft shimmer to the interior. A good option for the epitome of the classics are satin options. The glossy model made of PVC looks great. Light, pastel colors are very popular.
The ceiling should be a few shades lighter than other surfaces. Multi-level products look elegant and stylish.


lovers modern direction often decorate rooms in modern style, which is distinguished by the clarity of forms and lines. Buyers usually prefer canvases of the same color without spectacular prints, but with a glossy finish. Delicate shades are welcome.
Fusion style allows you to create exclusive ceiling using spectacular colors and original drawings. Often when decorating ceilings, options with photo printing are used. Ceiling coating can simulate the surface natural stone, marble or genuine leather.
Multi-level options with smooth lines fit perfectly into the chosen style direction.


For embodiment ethnic style decor in sand and brown tones is ideal, and the texture of the ceiling covering can be varied. In ethnic style, single- and multi-level options can be used. Exquisitely look paintings with paintings.
Emphasize the interior in the style of minimalism will allow monophonic ceiling covering with gloss. Satin options look beautiful in pastel colors. Minimalism does not tolerate frills and decor, so it is better to use plain options.


For interior design in high-tech style thanks to its exquisite brilliance, it is ideal glossy ceiling. When choosing a color, you should give preference to gray tones, although the snow-white version also looks win-win. At the request of the client, a spectacular pattern can be used as a decor.

original ideas
The original, exclusive design of stretch ceilings allows you to decorate the room, give it charm and uniqueness. The dimensions of the room do not matter, since you can create a spectacular ceiling even in the “Khrushchev”, where it will become an exquisite decoration.
Light structures of stretch ceilings are practical and functional, so they are very often used by designers in the design of residential projects.


To create cozy atmosphere without unnecessary details, before choosing, you should familiarize yourself with the different design solutions. Luxury options will allow you to choose the most profitable solutions for the decoration of a certain room.
For example, glossy mirror designs ideal for rooms with low ceilings, as they make rooms visually more spacious. You can use options both plain and with a pattern.


For creating beautiful ceilings in the studio, photo printing is ideal. With its help, you can draw up original and stylish design options.
- Stretch ceilings with drawings on floral themes look gentle and elegant. Luxurious flowers allow you to bring romance and beauty into the interior. home comfort. To give the print brightness and showiness, you should choose the right lighting.
- Canvases, decorated with ornaments, give the interior completeness. They look great in a variety of styles.


