Laying paving slabs step by step instructions. It's as easy as shelling pears: the technology of laying paving slabs on sand with video instructions. Mapping and marking the track
For masters who carry out laying paving slabs do it yourself step-by-step instruction will help save the budget for arranging walking paths and parking lots near the cottage. The technology is the same for tiles made of concrete and polymeric materials. Work should be carried out in the summer in the absence of precipitation.
This coating allows you to completely avoid concreting and other "wet" finishing processes, but only on soils with normal bearing capacity. If the site is located on a fresh embankment, undermined and problematic soils (for example, dusty sand or pure clay), has a difficult terrain, it is necessary to concrete the base to provide a rigid underlying layer and uniform distribution ground loads.
On sands, gravel, rocky soil, sandy loam and loam, it is enough to remove the arable layer and replace it with non-metallic material:
- paths - sand;
- parking - crushed stone 5/40.

Crushed stone parking lot.
To exclude mutual mixing of soil with inert materials, it is necessary to line the bottom of the pit with geotextiles and start this nonwoven fabric on side walls. It is necessary to compact with a vibrating plate layers of 10 - 15 cm maximum thickness, as in the photo below.

geotextile layer.
A vibrating plate with an electric or gasoline drive will be needed in the further stages in any case. Therefore, it is either rented or made by hand. You will also need a tool:
- the rule is special, made from a board, ordinary plaster 1.5 - 2 m;
- rubber mallet - for laying paving slabs (TP) and mounting curbs;
- level - preferably a laser one, but a bubble one will do, on difficult terrain - a hydraulic one;
- hard brush - needed to fill the seams at the last stage;
- LBM ("Bulgarian") - used for cutting cladding elements;
- cord - marking the route, slopes;
- trowel and shovel - backfilling and leveling sand.

Tool for paving TP.
Important! Crushed stone is laid in its natural state, the sand is abundantly moistened, it is not necessary to spill it from a hose / bucket, so as not to create with my own hands top water in this technogenic layer.
On a complex terrain, terracing is first carried out with retaining walls made of gabions or monolithic reinforced concrete. Otherwise, lateral soil movements will break the geometry of the tracks after a couple of years of operation.

Even on flat areas, a slope of paving slabs is necessary, since the material is waterproof, and the gaps between the paving elements are not enough to quickly divert storm and flood runoff. Between the curbs and tiles, it is desirable to mount storm trays, and integrate storm water inlets under the vertical drains of roof drains.

Technology of paving paving slabs
It is important for the home master to understand that the quality and resource of the coating garden paths completely dependent on soil conditions:
- clay soils swell unevenly, breaking the geometry of sidewalks and parking lots;
- problem soils sink over time;
- on slopes and without contouring with a curb, the tile spreads.

To fix the base, the tile will have to be completely dismantled.
When buying non-metallic materials, it is worth considering:
- in parking lots, crushed stone fraction 20/40 is preferable, depending on the intensity of traffic and operational loads, with a layer thickness of 30 cm or more;
- crushed stone 5/20 with a layer of 10 - 15 cm is enough for paths;
- sand is better to choose river or washed quarry with minimum percentage clay;
- when compacted with a vibrating plate, the compaction coefficients are 1.7 for sand, 1.3 for crushed stone, therefore, when buying, the volume of the pit must be multiplied by these figures, otherwise there will not be enough material.
Paving slabs must provide the required quality of the exterior of the tracks and the durability of the coating. Therefore, the lining is chosen according to the signs:


Hyperpressed paving slabs.
Important! Vibrocast products are cheaper, because they are easier to manufacture, have an original configuration, and reduce the finishing budget. Hyper-pressed tiles are difficult to split, damage, this option is optimal for parking lots that are serviced by snow plows in winter.

Vibrating TP.
Layout and layout
Unlike load-bearing structures the marking of the backyard space is most often combined:
- curvilinear and radius forms are used to increase artistic value;
- straight tracks are marked with cast-off cords;
- roundings are outlined directly on the ground according to patterns or large-sized compasses (a rod tied with a cord to the central peg).

When marking, the following factors should be considered:

Chernozem contains organic matter, which rots under the tiles and shrinks. Therefore, the loose arable layer must be removed, used on the beds, in landscape design or take it off site. The resulting layout is called by professionals a "trough", in which further paving operations are carried out.

Important! The roots of adult bushes and trees are dangerous for paving slabs, so they are either uprooted or routes for pedestrian traffic are laid at a distance of 3 m from them.
Drainage and bedding
TP should be laid on a rigid base with drainage properties, since part of the storm drains is discharged through the gaps between the tiles. However, natural drainage is not enough to handle all the water in the heavy rain and divert waste roof drain when walking a path near the house or lining the blind area with this material. Therefore, several conditions must be met:


If an arable layer of more than 40 cm is removed and a TP 6–8 cm thick is chosen for cladding, the thickness of the underlying layer increases sharply so that the paths rise slightly above the soil adjacent to them. To save the budget in this case, you can use in lower level the underlying layer is cheaper materials than crushed stone, river sand - sandy loam or loam. They also need to be compacted with a vibrating plate to a similar surface condition.
The curbs (curb stone) are much higher than the tiles (20 cm), therefore, along the paving contour, it is necessary to make a trench of the same width with a depth of 25–30 cm in order to place the curb on the mortar layer.
![]()
Trench for curb
Important! In places where storm drains pass, another trench will be required, since the height of these elements varies between 13 - 41 cm, depending on the design and material.
Installation of curb stone
Without curbs, the sidewalks will lose their shape, as the tiles on the sides will “creep”. The curb stone must be laid along the cord, taking into account the longitudinal and perpendicular slopes of the decorated areas on cement-sand mortar. The ratio of ingredients is 1/4 (cement / sand, respectively. The technology has the form:
- a mortar is laid in a trench with a trowel;
- the curb is installed on it and upset with a mallet along the cord;
- outside and inside in 2 - 3 places, the mortar is laid in a slide on the side surfaces of the curb just below the sand layer on which the tile will be mounted, as in the photo below.

Paving is possible in a day or two, after hardening with cement stone.
Advice! Regardless of the size of the storm trays, it is better to mount them along the curbs along with them at the same stage. These elements are also installed on a solution that takes time to harden.

paving tiles
There are methods for laying TS on a cement-sand mortar (for operation in difficult conditions), dry mix (1/5 cement, sand, respectively) and clean river sand. Practice has proven that when adding cement to a dry mix, the developer does not additional benefits does not receive, but the maintainability of the coating is sharply reduced and the budget for finishing increases. Therefore, in 80% of cases, paving slabs are mounted on dry sand using the following technology:

Advice! Installation curb stone at the ends of the tracks is not always possible. To prevent the spreading of paving elements in such a site, the last two rows are mounted on a cement-sand mortar.

Methods for adjoining TP to the ground and screeds.
The nuances of laying paving slabs
Problems with paving usually arise when making curved sections. The simplest option on radius paths is to lay rectangular elements, as in the bottom photo:
- the tile is oriented with the long side in the direction of travel;
- work starts from a smaller radius;
- each element is displaced relative to its neighbor;
- transverse and vertical seams are arranged in a wedge.

Rectangular TP on corners.
If the developer has chosen a collection of tiles with a complex configuration (for example, "clover"), the paving technique changes dramatically:
- the seams are displaced at 45 - 60 degrees along the length of the winding section;
- the surface is filled with solid elements;
- pieces are stacked near the curbs.

The Luch technology is less commonly used, when a rectangular format TP is oriented perpendicular to the curbs.

At complex radius intersections and large areas, the direction of the seams can change to increase the artistic value of the composition.

Decorating a complex radius intersection.
Thus, it is easiest and cheapest to pave paths, recreation areas and parking lots on the sand with cast or vibropressed paving slabs along straight routes. On radius sections, the above recommendations should be taken into account. For problematic soils, a rigid concrete sub-base should be made.
Advice! If you need repairmen, there is a very convenient service for their selection. Just send in the form below detailed description work that needs to be done and offers with prices from construction teams and firms will come to your mail. You can see reviews of each of them and photos with examples of work. It's FREE and there's no obligation.
Paving slabs in the design of the territory of a private house is always a winning option. Work on laying it is not cheap, but this is not a reason to give up the dream. Learn how to lay paving slabs with your own hands - embody the chosen design, saving a decent amount.
Arguments in favor of paving slabs
Advantages of paving slabs:
- Big choice colors and forms;
- Reliable and durable;
- Easy to install;
- Creates a neat and well-groomed look.
This type of decoration is very attractive - the whole yard is transformed, and the design possibilities are completely unlimited. You can lay out any pattern you like, using colors, shapes and paving methods.
Choice of clinker tiles
The laying of clinker tiles looks especially beautiful or clinker brick. Even one batch of this material, due to firing, has different shades, which allows you to lay unique platforms and paths. The laying of such bricks is also called clinker paving stones. Retro style always relevant and looks very solid.

Laying - step by step plan
The only disadvantage of paving slabs is the high cost of both the material itself and the work on its laying. But if you study the technology of the case, you will see that there is nothing complicated about it. Lay paving slabs with your own hands on small area interesting activity that saves the budget.
Tools for the job
The set of tools and devices for work is quite simple:
- Shovels;
- Rake;
- Rubber mallet;
- Wooden boards;
- Corners and channel;
- Level;
- Bulgarian;
- Master OK;
- Homemade rammer;
- Construction fishing line or nylon thread;
- Steel bars.

This entire set can be found in any garage, so there should not be any difficulties at the stage of selecting tools.
Consumables
Having prepared all the materials, you can proceed to the practical part.
Planning and marking work
Laying paving slabs begins with a layout on paper. In order to realize your design project, you need a diagram of exactly how each element will be located. This is a color scheme and the way you are going to lay the tiles - in rows, in a circle, etc.

After that, the preparation of the territory and marking begins, the technology of which requires the use of steel rods, a strong thread and a level. For DIY work, this set is enough to outline the contours of the site, heights and slopes. Pegs (rods) are placed in the ground, and the thread helps to mark the height. It is necessary to outline the slopes so that the water leaves the house. If you lay the tiles in this way, you will protect the foundation from moisture, but you should not make excessively sharp slopes and fractures.
Bedding preparation
Now you need to decide on the removal of excess soil, since the tile laying technology involves the installation of a litter (pillow) under it. Excavation is done in such a way as to bring the entire surface, together with the litter, to one level. For curbs, you need to dig appropriate trenches.
How to make a bedding:
- With dense soil - a layer of sand of 5-20 cm;
- With loose soil - a layer of gravel 10-15 cm.
Experts recommend even on dense soil to arrange bedding using gravel and crushed stone. This will help to avoid deformation of the paved surface. If you put a tile on a poorly prepared surface, subsidence is not ruled out.
As a cushion for laying clinker or ordinary tiles it is best to use triple bedding:
- Geotextile (optional);
- layer of coarse gravel;
- Small gravel;
- layer of sand;
- Sand-cement dry mix.

Layers of gravel and rubble are carefully compacted, covered with sand and spilled with water. The last step is repeated until the sand stops shrinking. Properly executed technology will create a reliable foundation for any masonry. Professionals use special vibrating plates for ramming, but doing the work yourself can get by with a simple rammer made from a handle and heavy tiles. The use of geotextiles is not necessary, but it prevents the germination of plants.
The last layer for laying is a dry mixture of cement and sand, which can be bought, but it is cheaper to make it yourself. To do this, you need to take cement and sand in a ratio of 1: 5 and fill it as the last layer of bedding by 3-4 cm. The easiest way to distribute this mixture is with a rake, and level it with wooden planks and channel.

Border
The border helps to give the entire site a clear geometry and a complete look. In this capacity, tiles are sometimes used. bigger size. The border keeps the entire structure from sprawling in different sides, especially if we are talking about small areas.
It is correct that the tile is placed not lower, but 3-5 mm higher than the curb.

The elements of the curb themselves are installed on liquid solution M100, the sides are spilled with this composition and covered with sand.
masonry
The main task when laying tiles is to minimize the gaps between the elements. It is correct to work diagonally, laying each tile close to the previous one. The whole process takes place away from you, without disturbing the even layer of sand with cement.
Laying tiles can only be started a day after placing the curb.
A mallet will help put each slab in its place, and if it does not lie down as it should, then you need to lift it and add sand and cement with a trowel. Upon completion of the paving of the entire territory, it is necessary to adjust the position of the tiles, which have become out of level.
For the final compaction of clinker or stone blocks, it is recommended to use a rubber-coated vibrotamper. This stage will give the surface an ideal look, however, this is not a mandatory step, but it is desirable.

It often happens that some elements will have to be cut with a grinder, especially when the seme requires complex lines. But it will be correct to lay all the whole tiles first. It is not worth cutting by eye, you need to clearly draw a line, attaching each element to its intended place.
Final stage
After eliminating surface defects, all cracks are filled with a carving mixture of sand and cement. Excess must be washed off with a hose with a spray nozzle, and the cracks should be moistened well. The mixture between the tiles can sag a lot, then it needs to be added a little more. Such thoroughness is not in vain, because the joints take on a considerable load. Therefore, do not skip this step, even if you are doing your own styling for personal use. It is important to use clean sand, not contaminated with dust, impurities and salts. When filling cracks with dirty sand, the site may begin to overgrow with weeds.
Immediately after laying, it is impossible to walk on a paved surface - you need to wait 2-3 days.
Whatever tile you choose, by doing the work yourself, you will save a good amount. This is much better than saving on the quality of the material, limiting your desires. Paving stones made of stone or clinker tiles look great, creating a stylish design. Paving technology for different materials does not differ, therefore, according to the described scheme, you can lay any tile with your own hands.
Most likely you were also looking for:
More recently, the territory of a summer cottage or garden adjacent to the house was ennobled with concrete or asphalt paths. To date, dacha owners and country houses Increasingly, durable, affordable and great-looking paving slabs are being used.
With its help, you can make paving paths, places for recreation or parking, ennoble the area in front of the house. The technology of laying tiles is quite simple and does not require special skills. Therefore, after studying the step-by-step instructions and the video lesson, you can make a path in your garden with your own hands.
Characteristic qualities of paving slabs
With the help of such material, you can make it convenient to move and beautiful paths. Many choose paving slabs solely for their visual appeal. However, it has many other advantages:
Before starting work, you must determine the type of material. At the same time, those who will do the laying for the first time should be aware that it will be quite difficult to work with the following types of plates:
- "paving stones";
- "rhombus";
- "brick".
Application of similar tile shapes requires certain skills.
Types of paving slabs
Currently construction markets We offer two types of paving slabs:
Vibrocasting provides for a large load, which allows it to be used in playgrounds and parks. If you want to complement the design of the country or suburban area and at the same time get durable and high quality track or a platform, you can opt for this type of material.
Having decided on the type of material and having studied the video instructions, you can safely proceed to laying paving slabs with your own hands.
Laying paving slabs: instruction, video
Depending on where the plates will be installed, the material for their installation is selected. It could be mortar, gravel or sand. For work, you will need to prepare the following materials and tools:

After preparing the tool, you can proceed to the preparatory work.
Site preparation
High-quality tile laying involves the most careful preparation do-it-yourself site. For this, first of all, a plan is being drawn up future tracks and markup is done.

Experts recommend to facilitate the device of the base use guides. To do this, before starting work with your own hands, you need to install boards whose height will correspond to the height of the "cushion". With their help, it will be easier to remove excess sand or mixture.
Step by step instructions for styling
Immediately before starting work, it is necessary to decide according to which scheme the plates will be laid. There are many such schemes. Paving slabs can be laid out in the form brickwork, columns, Christmas tree or come up with your own.

Upon completion of work on the finished track or site you can walk with a vibrating saw. With its help, you can better compress the material and make its surface smooth.
When laying paving slabs or paving stones, it is recommended to follow some expert advice:

With paving slabs on your suburban area can be self-equipped a walking path or a wonderful area for relaxation.
Laying the material with your own hands is within the power of even those who have practically no experience in repair and finishing work. Step-by-step instructions and a video lesson will help them in this.
Paving slabs in the country or in the yard country house able to perform more than one decorative function but also utilitarian. In order for it to look beautiful and withstand the load on it without problems, it must be correctly laid.
Many homeowners prefer to have hired professionals take care of the process, believing that they will perform all the necessary operations as well as possible. But some people do not trust hired workers, and prefer to do all the important manipulations on their own.
How possible is it to lay paving slabs with your own hands? It is quite possible to do this, the main thing is to have step-by-step instructions at hand. It describes in detail the sequence of all upcoming operations and the order in which they are performed.
Laying the yard with paving slabs: preparation
Before starting work, you need to carefully consider them and draw up a plan. This will guarantee a long and reliable service life of the manufactured coating. Laying out the entire yard with tiles is not very rational and cost-effective. 
But paths are necessary on any site - it can be quite difficult to do without them. Therefore, it is necessary to calculate the required number of tracks, their size and configuration, so that they connect the residential building with various outbuildings and other buildings.
Then, in any weather, the homeowner and his household will move along neat clean paths. Yes, and green spaces will suffer much less.
Why paving slabs? This material is increasingly being used both in industrial construction and in private.
The benefits of such pavement obvious. Installation work is not particularly difficult. The tile does not "float" during the heat and does not burst from severe frost.
She looks beautiful and is not capricious in care. The tiled area passes moisture well, which is useful for both soil and plants.
Step by step instructions for laying tiles
Important notes that will help you lay the tiles correctly

Do not start work immediately after the rain, especially during it. The soil and pillow should be well dried out. In order for the tile not to start to spread after a while, the humidity indicators should be minimal.
Laying paving slabs: work progress
To carry out the work you will need - cement, curb, sand and tiles directly. Required tools - pegs, as a rule, tamper, broom, nylon thread, rubber mallet, trowel and level.
We start with marking the site, or rather, with determining the contour of the future path. 
The site is marked with wooden pegs, which are connected with a nylon cord. It must be correctly tensioned exactly to the level, as it will become a guide when laying tiles.
To properly equip the base, you will have to cut and remove a layer of turf, then level the resulting surface, moisten and compact with a special rammer.
- If the soil is dense enough, then often it does not need such manipulations. Plant roots and stones found in the ground should be removed.
- If the soil is not removed, then the path will be, as it were, slightly raised above the surface of the site. The consequence of this may be its washing away with rain or melt water.
- The resulting compacted bed is covered with gravel or crushed stone 15-20 cm high.
- If the path is intended for the movement of cars, then this figure should be increased to 40 cm. (Geotextiles can be laid under and on gravel).
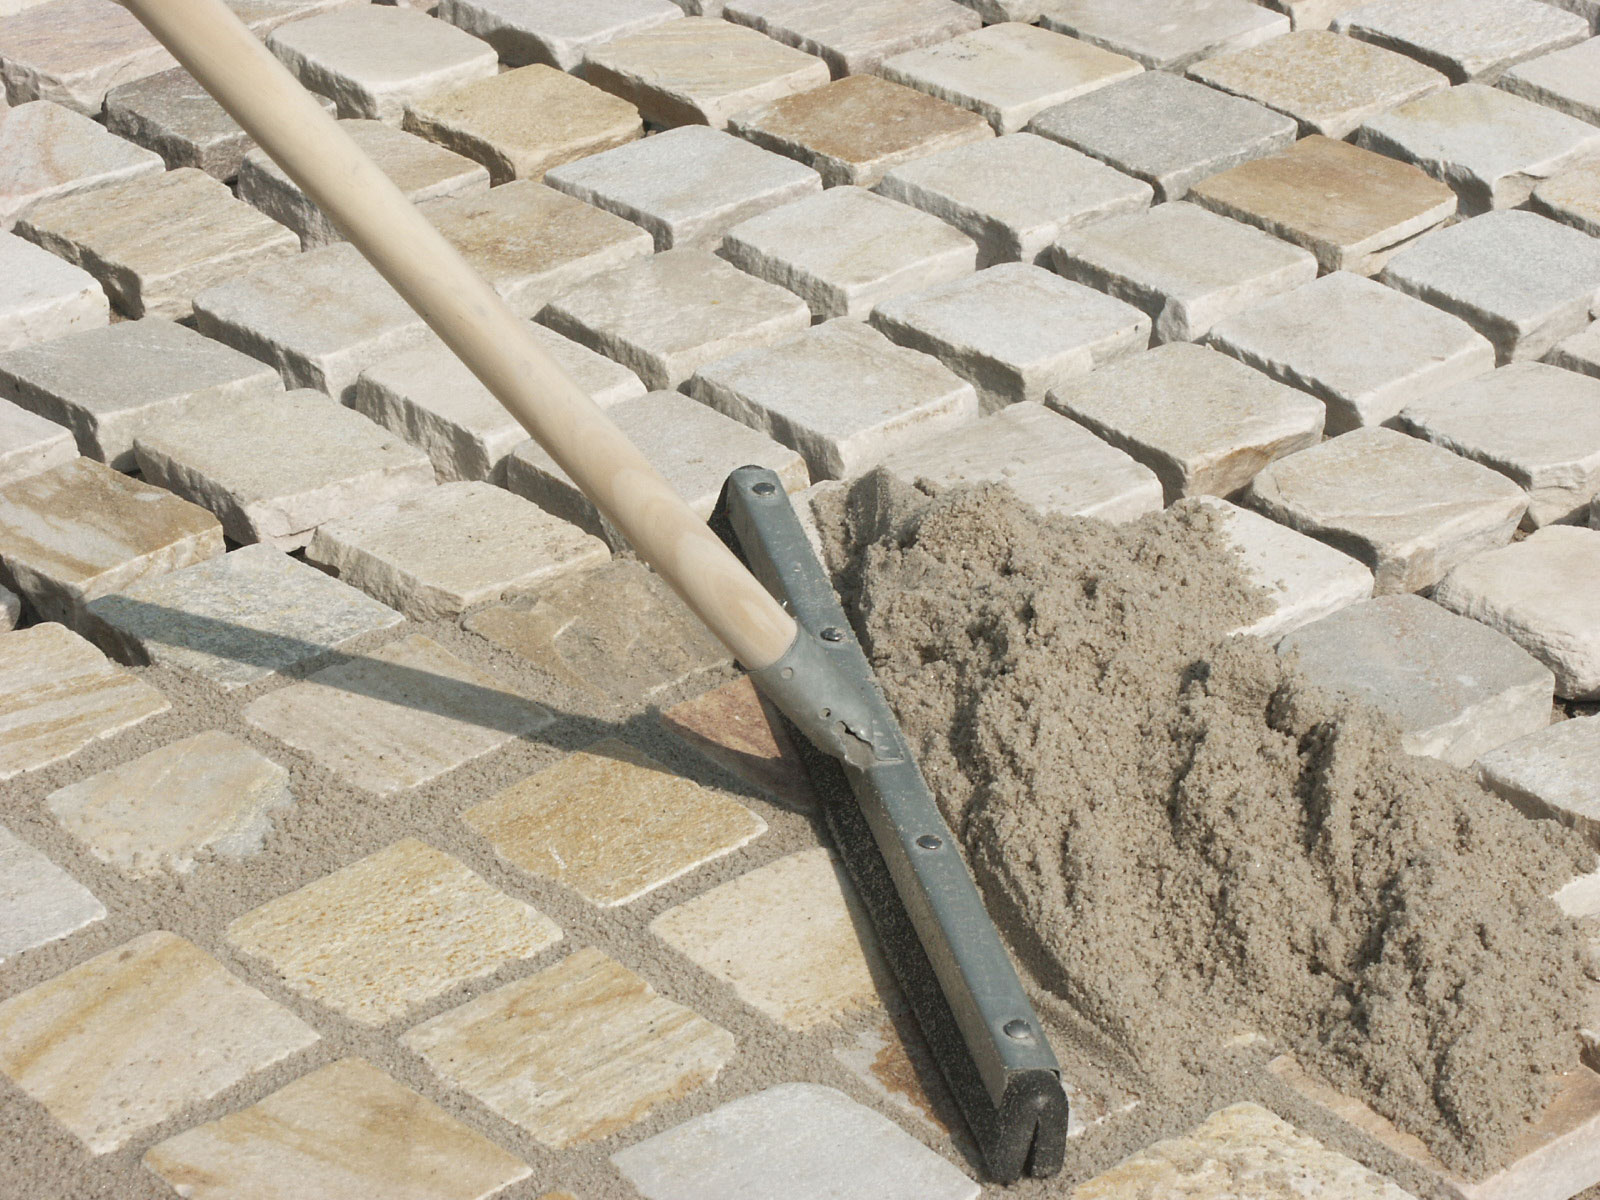
- For leveling, sand is poured on top - its thickness should be approximately 2 cm.
Border for paving slabs
What is a border for? Its purpose is to prevent the tiles from spreading and highlight the path. Is it mandatory to use it?
No, often when laying out the tracks with tiles they do without additional finishing. The base under the curb must be carefully leveled. It is best to place it on a special concrete lock. For paving slabs in a private area, it is quite possible to use a plastic border.
Substrate preparation: options for laying paving slabs
The bases for paving slabs can be different - there are three types in total. Depending on the type of base chosen, the way the tiles are laid also changes.
On the sand. The space between stretched cords or curbs is covered with sand. The thickness of such a pillow should be 5-6 cm. The sand is well soaked and left to dry, after which it is leveled and compacted. The tile is placed on slightly damp sand (never wet).
On concrete. There can be two options here: when the concrete base is already available, and its device specifically as a substrate for tiles. This method is considered not very rational. 
The point is that the cement monolith retains water (does not let it through). It accumulates between the tile and the base - when severe frost freezes, causing deformation of the track.
On a cement-sand pillow. On the prepared base (with the soil removed, leveled and rammed), another sand layer of 3-4 cm is poured, a reinforcing mesh is placed on it. Next, a mixture of cement and sand is placed on it in a ratio of four to one.
Technology of laying paving slabs
Tiles should start to be placed from the very bottom point in the upward direction. Competent masonry should be carried out in a way “from oneself”.
In other words, while doing the work, the specialist moves along the already laid path so as not to endanger the prepared base. If a circular tile installation method is used, then activities begin in the center of the pattern.
Individual tile elements should be placed diagonally, not in even stripes. So it will be easier to align them in the process. First, a rope is pulled along the width of the future path, along which the initial row of material will be aligned. Every two or three times the correctness of the horizontal is verified by the level. 
The tiled element is placed in the place prepared for it, and brought to the correct position by soft tapping of the hammer.
If necessary, sand can be poured under it. A gap of 2-3 mm left between the tiles is usually quite enough for moisture to escape. In order for the gap to have one value over the entire distance, special crosses can be used. But in practice, they usually do without them.
Laying turnkey tiles: grouting
In order for a do-it-yourself path to be beautiful and durable, you will have to take care of proper processing seams. They are usually filled in two passes.
First, dry sifted sand is applied to the freshly made path. Using a brush or broom, it is leveled over the surface and swept into the seams.
The next layer that should be poured onto the track is a sand-cement mixture or sand. He is treated in the same way as the first.
Then, with a sprayer or with the help of other improvised means, the path is moistened quite intensively - until puddles appear. If there is a border, then the distance between it and the tile is covered with a mixture too. You can purchase a mixture for factory-made seams.
In order for the paving slab track to serve for a long time, you need to know how to properly care for it. Such a coating does not need any special procedures: it should be regularly swept and washed occasionally.
Then she will retain her original appearance and remain elegant for as long as possible. In winter, you should protect it from damage by not using rough metal products - shovels, ice axes and crowbars.


