Laying paving stones in the country: analysis of the correct technology for paving paths. Paving stones on a suburban area: photo ideas. Installing the curbstone and completing the base layer
Paving stones or paving slabs are practical and durable material, which is widely used to create a durable pedestrian pavement. From it are obtained beautiful sidewalks, squares, neat garden paths and blind areas around the house. The paved seating area in the garden will remain clean and comfortable at any time of the year. A wide range of shapes and colors allows you to choose the material for every taste and for every need. As for laying paving stones with your own hands, there is nothing supernatural in this, and with due diligence, any hardworking owner will be able to cope with this work.
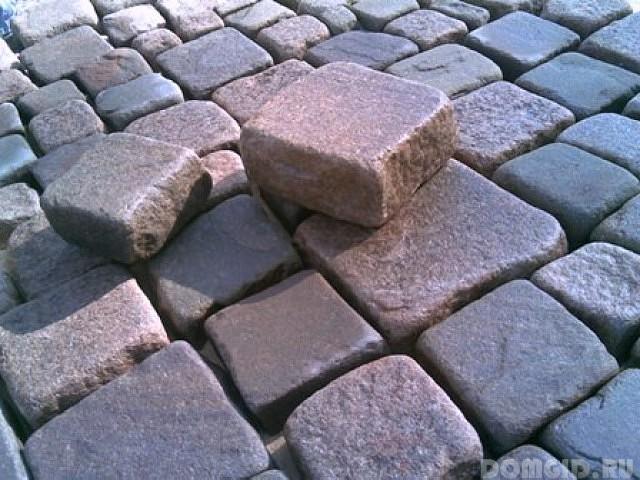
First of all, we offer to get to know the object of discussion better and find out what paving stones are. This construction material, created specifically to cover roads in the early 19th century. Initially, paving stones were used not only for sidewalks, but also for the roadway, since there was no better alternative, but with the advent of asphalt, the situation changed. Today, in some cities of Europe, you can meet the very old paving stones made of natural stone, but in rare cases it was made from durable soaked wood. So, in Lviv, an unusual wooden paving stone is still preserved. Modern industry offers a lot of options for materials for the production of paving stones, however, to this day, products made from natural stone are of the highest quality and most expensive.
Initially, paving stones had a strictly rectangular shape, but today you can find rounded and even figured products. As for the color, it may vary depending on the natural pigment added to the raw material. Of course, elements made of natural stone have the appropriate color. They are made from especially dense rocks: granite, basalt or marble. Granite is considered the most popular due to the availability and relative ease of processing of raw materials. Paving stones, depending on the processing method, can be chipped, sawn or chipped-sawn.
![]()
But most often on the streets of the city you can find concrete paving stones, since this is the most economical and practical material. It is made of high-density concrete, which, after kneading, is subjected to vibrocompression, resulting in paving stones of the same shape and size. The elements are clearly adjusted to each other, resistant to temperature changes and heavy loads.
There is also clinker pavers, for the manufacture of which special high-strength grades of clay are used. Such products are very similar to red bricks, because they are made of the same material. Very beautiful paved compositions are obtained from clinker paving stones, it withstands serious loads and can serve for a very long time, retaining its color and shape.
What are the benefits of laying paving stones with your own hands:
- The most important advantage of the material is strength and reliability, so if you built stone house, which will stand for at least a century, it is reasonable to ennoble the site with garden paths made of stone paving stones.
- Paving stones do not pose a risk to the health of people, animals or environment. It is a completely natural material that does not emit harmful substances during operation.
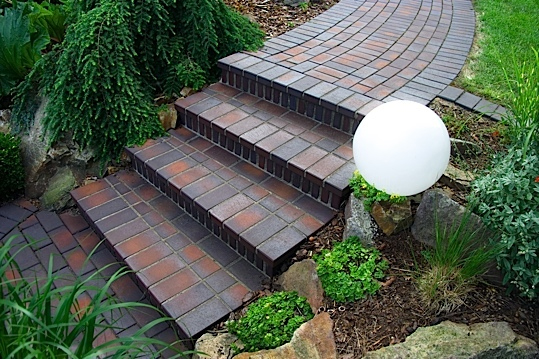
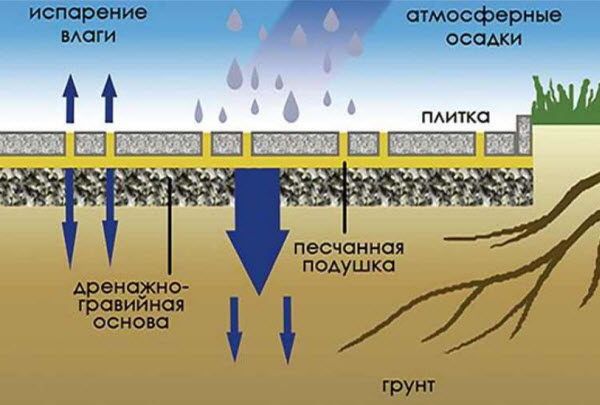
- Comfortable use - in the case of garden paths, the main problem is the formation of puddles and pollution after rain. In the case of paving stones, water will seep through the tile joints into the ground through the drainage pad, preventing the formation of puddles.
- This is an extremely durable material - products from artificial stone they will last at least 30 years, not to mention the paving stones made of natural stone or clinker clay, which, as practice shows, is perfectly preserved for several centuries.
- High wear resistance makes pavers an ideal covering in regions with especially frosty winters.
- It's absolutely universal material which can be reused if necessary.
- In case of damage to any element, it is not necessary to dismantle the entire coating - it is enough just to replace this element with a new one.
- High aesthetics and natural appearance allow paving stones to easily fit into any landscape or become original binding element exterior of a house with a plot.
- The technology of laying paving stones with your own hands is quite simple, you just need to familiarize yourself with the theory, prepare the right tools and materials and strictly follow the instructions.
Unfortunately, this wonderful material also has its drawbacks, but they can’t be called serious. So, for example, the cost of some types of paving stones will make even wealthy owners think about it, but it is fully justified by the comfort of use and the durability of the coating. If you still buy natural stone paving stones, get ready for the fact that you will need special equipment to process it. Also, the installation of any pavers requires the creation of a drainage cushion, and this work takes almost as much time as the laying itself.
How to lay paving stones
When laying paving stones in the country with your own hands, it is extremely important to follow the technology, since not only the appearance of the coating depends on it, but also its durability. And the main condition quality styling is the creation of a flat and dense base. To do this, you need to properly level the ground, removing all roots and plants, filling in all the holes and cutting off the bumps, and then treat the surface with an electric or pneumatic rammer. If it was not possible to get such a tool, a rammer can be made from a thick log.
It is also necessary to prepare special tools that will help you make an even and tight laying of elements:
- Master OK;
- mallet (wood or rubber);
- pegs;
- vibrorammer;
- cord;
- building level;
- fine river sifted sand;
- cement not lower than M400;
- metal pipe of arbitrary diameter;
- watering can or hose with a spray nozzle;
- rake;
- whisk or broom.

To determine the required number of tiles, carefully consider the layout of the site, taking into account the location of all paved sectors.
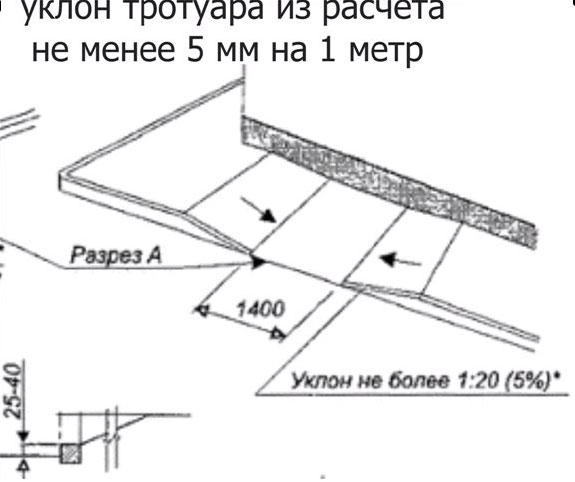
Helpful Hint: All paved surfaces should have a slight slope of 5mm/1m². This necessary condition for self-removal of rainwater from the surface. Otherwise, moisture will stagnate and eventually wash out the drainage under the tile, causing the coating to collapse. And, of course, the slope should be directed towards the sewer drain or just from the house to the club, lawn or garden.
Step-by-step instructions for laying paving stones with your own hands:
Helpful Hint: Start laying tiles from the most visible area that is adjacent to the threshold. Adjust each tile with a mallet so that it is flush with neighboring elements. Check the levelness of the surface every 1.5-2 m, allowing differences of no more than 5 mm. A chopping cord stretched in advance between the pegs will help you paving evenly and accurately.
Summarize the above information video about laying paving stones with your own hands:
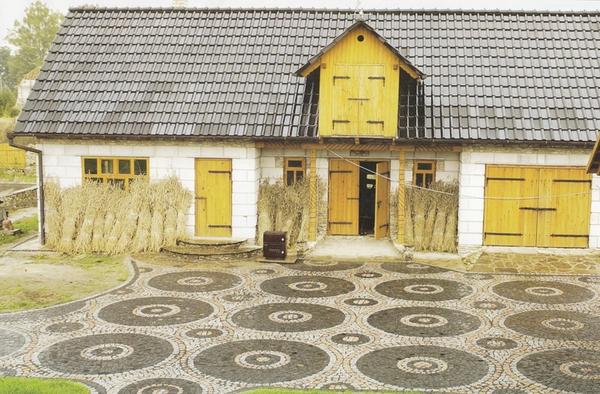
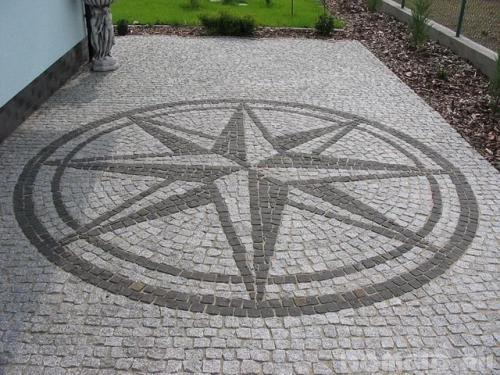
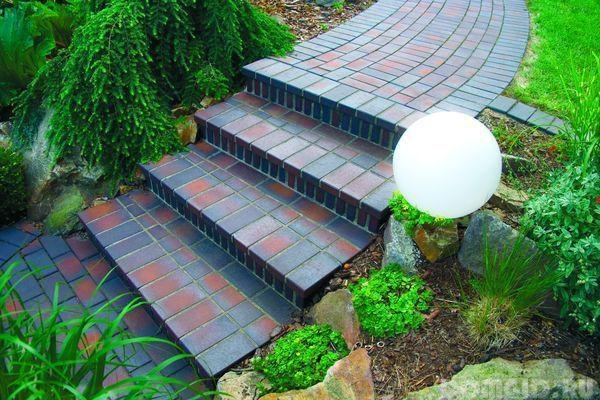
Paving stone laying: photo
![]()
Paving slabs are used in the design of paths in the courtyard of a private house, the area around the pool and various kinds sites. Eco-friendly, durable, has excellent aesthetic properties, can be a suitable addition to the country house and ennoble the site and garden. Paving stone is pavement from granite or basalt, which is intended for laying sidewalks, pavements, garden paths. For large roads, sawn and polished paving stones with a square shape and a smooth surface of equal shape and size are used, pavements are laid from roughly processed and unprocessed granite or basalt. On less loaded sidewalks and roads less dense limestone, slate, concrete can be used.
Currently, many varieties of material are being produced, and it is possible to find the most suitable option. Paving slabs differ in the way they are made. For example, vibrocasting is used to produce durable coatings, which withstand heavy loads and in operation will be no worse than asphalt. Such tiles are used in places with high traffic: squares, parks, on sidewalks, etc. There is also a vibrocompression method, this is how tiles are made for parks, public building areas.
Advantages
- High durability, low wear. Paving stones of times ancient rome, paved with granite slabs can still be used.
- Resistant to washout and drainage due to laying paving stones on a sand bed.
- The ability of individual elements to interact relative to each other preserves the integrity of the pavement when the soil changes and high loads.
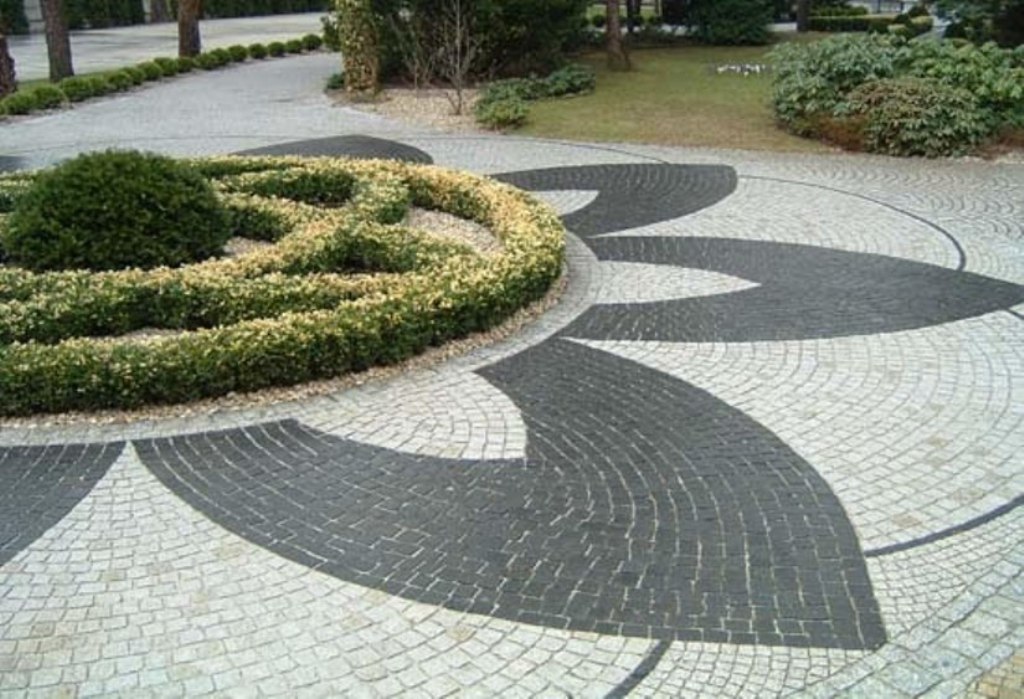
- The structured paving pattern looks great from an aesthetic point of view.
Flaws
- The high price of materials, high labor costs for its laying when using skilled workers.
- Tendency to subsidence and poor drainage, which can lead to the accumulation of water directly in the sand base and wash out the pavement.
- A rather high noise level and low driving comfort on pavement are relatively concrete pavement and asphalt.
Laying technology
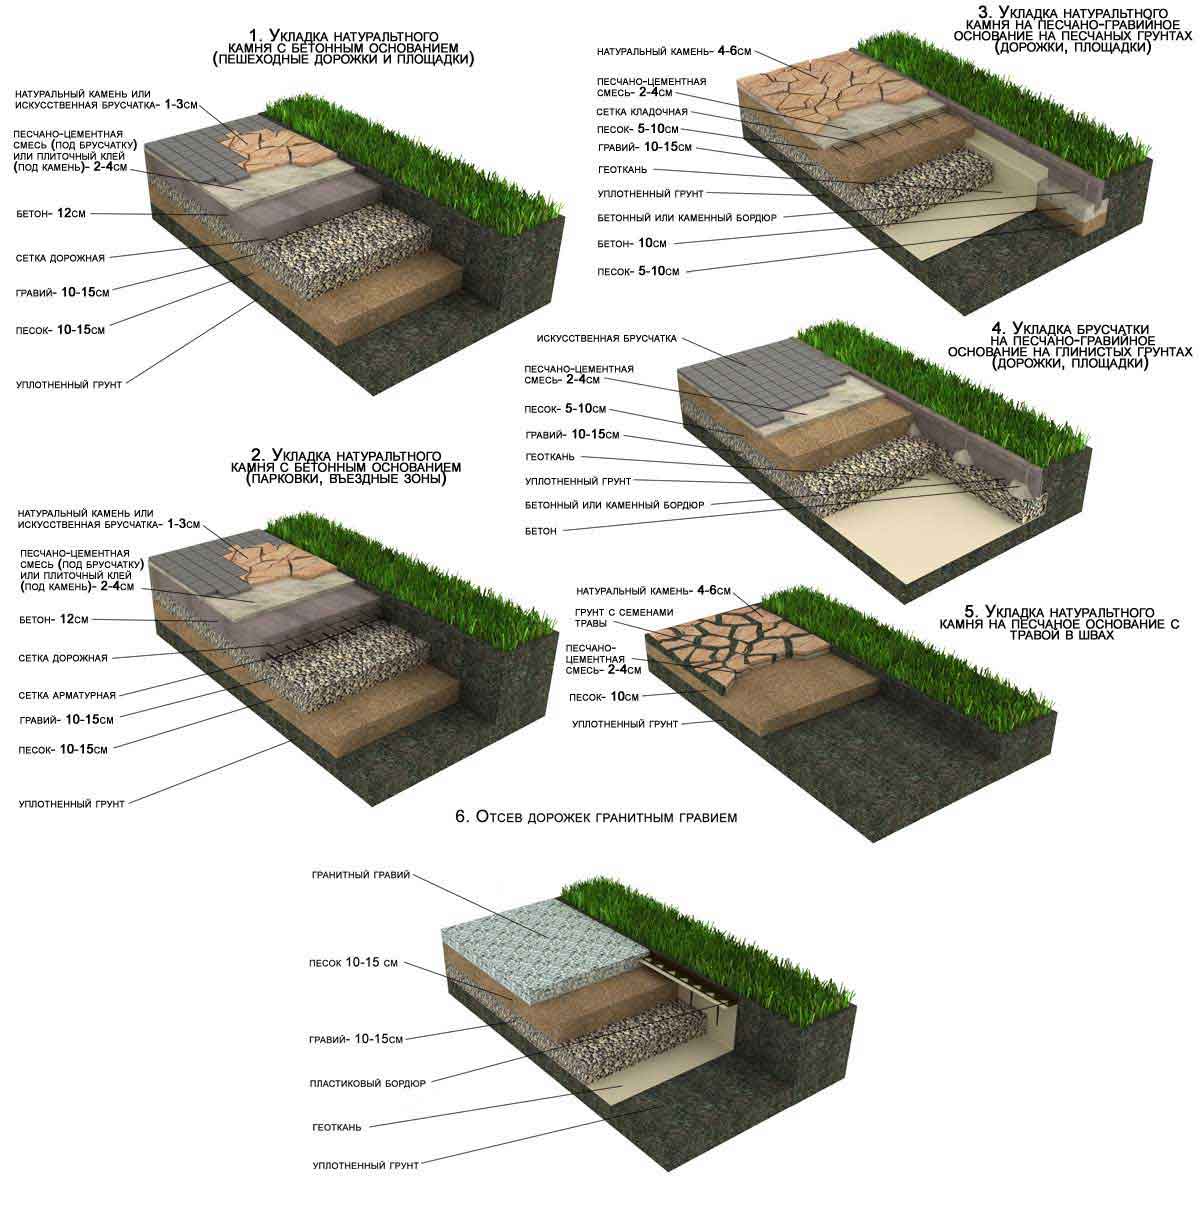
Installation of tiles is made on a concrete, sandy or gravel base, the choice of which depends on the expected load. If there is no need to drive a heavy truck on the pavement in the plans, it is not advisable to use a concrete base. Chernozem, clay soil will require concrete base for laying, on sandy soils, you can use a sand-gravel cushion.
There are many options for laying schemes and options. Paving stone is a tile rectangular shape, which is usually placed brickwork, herringbone or column.
The popularity of paving stones is explained by its properties: ease of laying, durability, the possibility of using it for decorating garden paths. At the same time, the operation of the tile directly depends on the quality of the installation, which is a rather difficult task for a beginner, therefore it is recommended to contact professionals who, taking into account the cost of all materials, including tiles, can perform turnkey this work with foundation preparation from 1500 rubles for square meter, and if only work is paid, the cost will be about 1000 rubles. The price of work when laying paving stones on a finished base, respectively, is two times lower.
To do the laying on your own, for example, sand is used for a path in the garden, cement-sand dry mix, but in any case, a pillow of sand and gravel is used.
So, to lay the paving stones with your own hands, you need to do the following sequence of steps:
LOCATION MARKING
Materials: gravel / crushed stone, geotextile, cement, sand, paving stones.
Inventory: trowel, cord-ordering, rubber mallet, level, watering hose with a diffuser, a rake, a broom, a rule, a channel.
1. Determine the purpose of the site ( footpath, parking area for vehicles, etc.).
2. We measure the area of the site, transfer the dimensions to the plan, calculate the number of tiles for laying and raw materials for the base (gravel / crushed stone, cement, sand).
3. We determine the movement of water flow, it should go from the path to the lawn or into drainage wells, create a slope of the sidewalk at the rate of 5 mm per 1 meter, transversely or longitudinally. For clay soil, we make drainage in the deepest part of the trench.
4. We mark with wooden pegs the future path of the sidewalk around the perimeter, we stretch the ordering cord between them at the desired height.

SUBSTRATE PREPARATION
5. We take out the sod to a depth of 20-30 cm, while certainly removing all weeds and plant roots. We roll and tamp the earthen bed, using a home-made tool, tying handles to the edges of the log, you can rent a vibrating plate or a road roller, which will speed up the process.
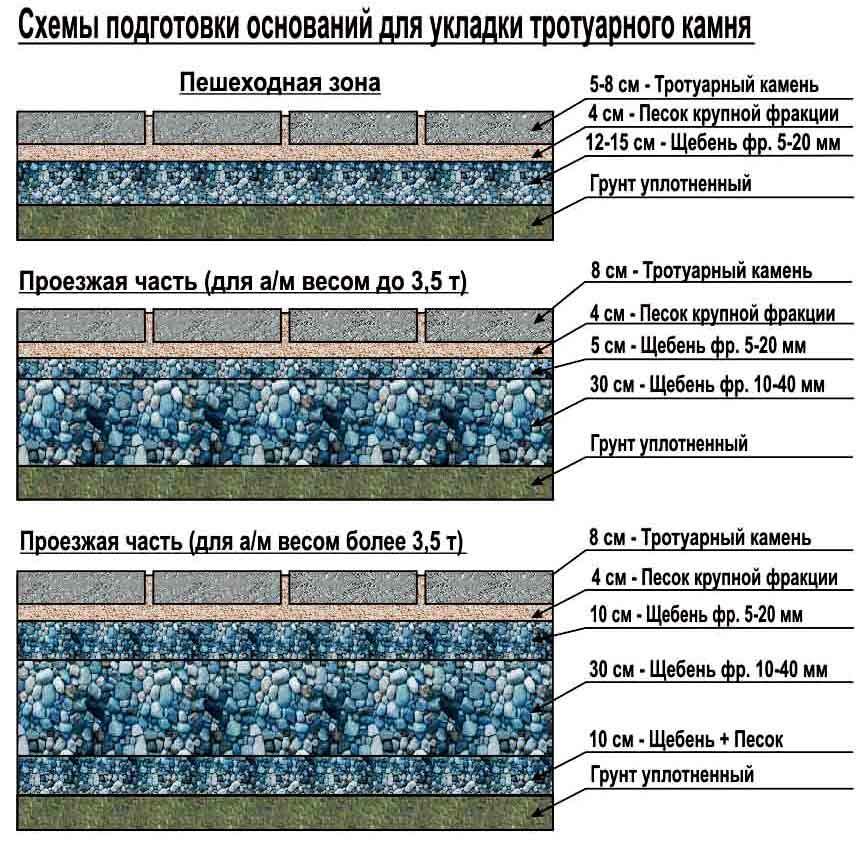
6. As a base, it is recommended to use gravel or crushed stone, the size of the fraction is 20-40 mm and building sand with a fineness module of 1.5 mm. A layer of gravel is laid with a thickness of 10-15 cm for the pedestrian zone, for the passage and parking of vehicles and heavy equipment - 15-20 cm. After that, this layer is compacted with a vibro-tamper machine. If it is planned to arrange a fence of paths from side stones, we make grooves for them, which are also rammed and fill the bottom with sand by about 5 cm.
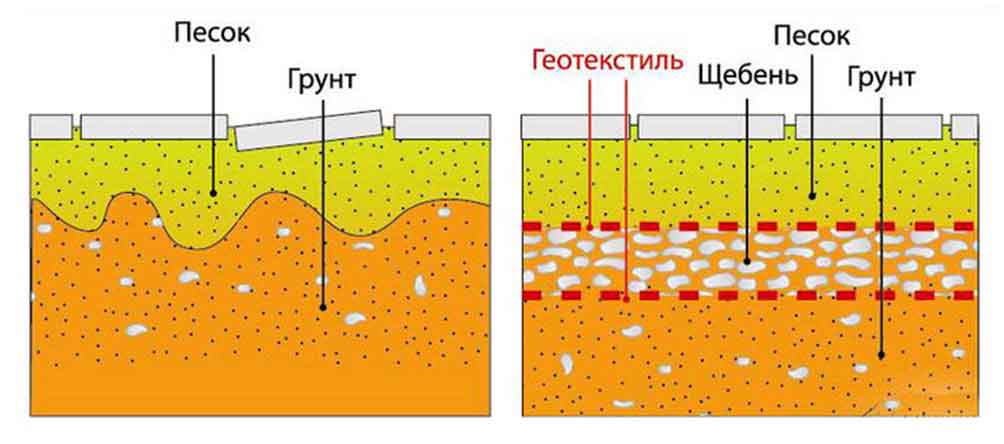
7. Then the geosynthetic material is laid.
Geotextiles make it possible to perform the function of a separating layer between loose materials of the road base (soil and crushed stone, crushed stone and sand), excluding the possibility of migration of finely dispersed inclusions from fine-grained layers to coarse-grained ones, which, in interaction with water, expand when frozen and, like a sponge, break open road surfaces.
8. When the base is ready, you can start preparing the cement-sand mixture, which is prepared at the rate of 1:5, respectively. This mixture is laid on the base with a layer of 30-50 mm, leveled and compacted.
INSTALLATION OF TILE ELEMENTS
9. Having decided on the pattern, we stretch the cord along the chamfer, put the tiles diagonally away from us so that they fit snugly against each other, use the level and wooden hammer to ensure greater evenness and accuracy of laying.
10. After laying, we sift the gaps with a cement-sand mixture in a ratio of 1 to 8, the finished surface is cleaned of the mixture residues and watered big amount water.
When cutting paving slabs it is split, after being cut with a grinder, so that a large amount of dust is not released. High quality paving slabs will last long years, while its appearance will not change and will not deteriorate.
Laying methods and schemes for various loads
Ways to properly lay paving stones depend on the material and purpose of the road surface, sand and stone remain mandatory. Considering what loads are expected on the coating, they select the type of material and the laying pattern.
FOR LIGHT LOAD
After the marking work, a geotextile base is laid, which is sprinkled with a 15-25 cm layer of crushed stone, a layer with a slope is formed using a rake, and compaction is performed by manual tamping.
The second layer, consisting of geotextiles, sand (a layer of at least 10 cm), is watered and curbs are installed around the entire perimeter, which can be used as lean concrete fixed with a cement-sand mortar.
Laying of stone elements of pavers is carried out under a slope close, a small gap is allowed between the turning points, which is filled with sand. A row of paving stones is compacted with a rubber mallet. Upon completion, the surface is washed with a stream of water.
The second method is suitable for arranging pedestrian roads with a large area. This approach practically does not differ from the first method, it is important to take into account the only difference - when laying the secondary layer, instead of geotextiles, we use a cement-sand mixture and lean concrete.
If the site has a complex sandy soil, its displacement may deform the tiles and then a more complex masonry is offered, which guarantees greater durability. In this case, a concrete pad will serve as the basis, this is when the base is covered concrete mix 80 mm thick, and then a cement-sand mixture 40 mm thick is applied, which is also compacted, followed by tiles.
We tamp the tile with rubber or wooden mallet on the same level, and in the center are slightly convex, so that water flows better.
AT HIGH LOAD
The methods and schemes for laying paving stones, which are used for arranging large roads, as well as on problematic soil, differ from the first two. First, a 20 cm layer of crushed stone is poured onto the ground, a wooden formwork is arranged. Next, reinforced concrete (3 cm thick) and a mesh are laid, everything is poured with concrete. Then a dry cement-sand mixture of no more than 5 cm is sprinkled, the paving stones are leveled and laid, the gaps are covered with sand and the excess is washed off with water.
When it is necessary to ensure the extreme use of tiles or paving stones, reinforced concrete screed, on which a layer of mortar 25 mm thick is applied, or tile adhesive can be used, which is more reliable, but more expensive, then tiles are laid.
WHAT HAPPENS WITH POOR-QUALITY PAVING
Do not lay tiles in rainy weather without a special canopy, do not sprinkle the tiles with sawdust.
In a well-laid tile, water does not remain, but goes into the seams (1 mm), which also prevent the coating from deforming from temperature changes.
The soil, the base of the road surface, must pass water well so that it soaks into the ground, and the slope (1 cm by 1 m) should not allow water to remain on the tile.
There should be no gaps between the tiles; for this purpose, the seams are swept fine sand or solution and carried out with a vibrating plate, in addition, grooves are needed to drain water from downpipes.
From this video you can learn how to lay paving stones yourself
Arrangement of the territory of a suburban area provides for the construction of paths. Difficulties usually arise when choosing a material, because every homeowner wants them to last a long time, it was safe to walk on them, and besides, the paths should have an attractive appearance and decorate landscape design.
Advantages of paving stones
In most cases, tiles are used in the construction of paths, the most attractive option of which can be considered sidewalk paving stones. Among its advantages:
- long service life,
- environmental cleanliness,
- the possibility of partial repair by replacing individual fragments,
- a variety of shades, textures and shapes of paving stones, which allows you to implement original design ideas.
In terms of reliability and strength, it far exceeds such a common road surface as asphalt.
The trading network today offers several types of paving stones:
- chopped, having dimensions 50X50X50, 70X50X50, 100X100X100, its cost may vary depending on the size and shade,
- chipped-sawn, more expensive, its upper and lower surfaces are processed thermally, and the sides have a chipped surface,
- fully sawn, having a surface subjected to heat treatment,
- granite paving stones, which are mostly used for the construction of suburban paths, its dimensions: 10X10X5 cm, tiles 5X5X5 cm, 20X20X5 cm, 7X7X7 cm are less common.
When buying granite paving stones, you should pay attention to the radioactivity class indicated in the documents - on the territory of private estates where people live, it is recommended to use first class material, if the paving stones have a second class of radiological safety, then it is suitable for the construction of industrial or household facilities, if the material has a third class of radioactivity, then it cannot be used in residential facilities.
A special place in this series is occupied by clinker paving stones, which are distinguished by excellent anti-slip properties, easy cleaning, and the ability to operate for at least a century. It does not absorb oil and gasoline, to repair the track you just need to replace individual fragments with new ones or simply turn those that were already in operation to the other side. The high demand for clinker pavers ensures its attractive appearance, wide range of colors.
When buying a tile, you should slightly increase the calculated amount - when cutting the material, part of it will go to waste.
How to store purchased paving stones
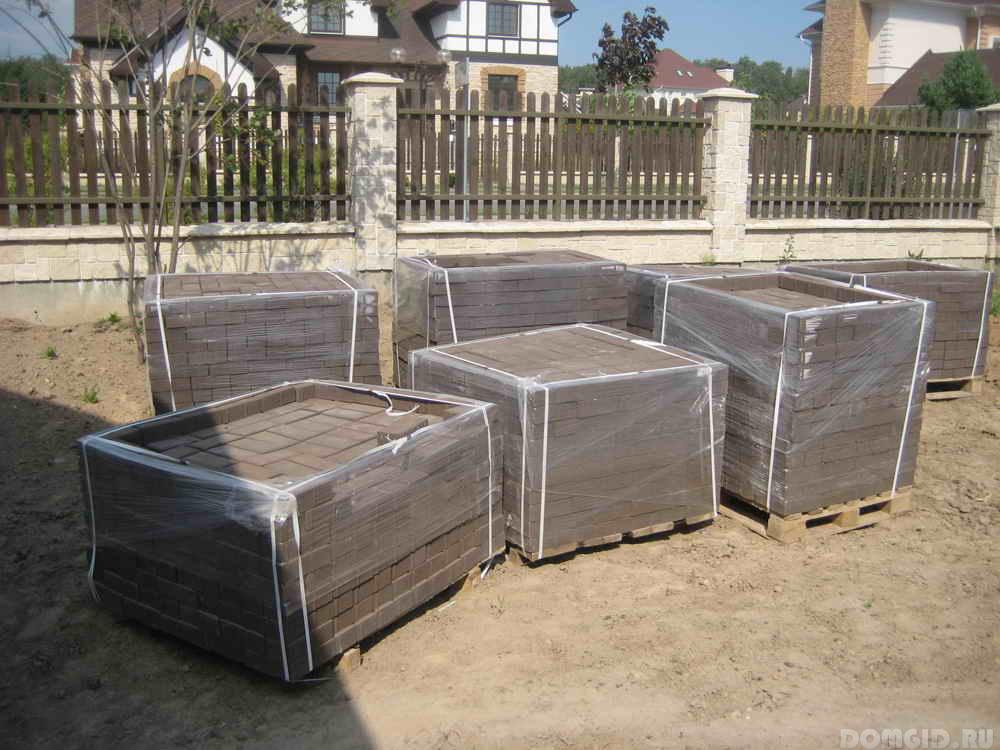
In order for the material not to lose its decorative qualities even before laying, the following recommendations should be observed. Paving stones should be stored on pallets located on a platform of asphalt or reinforced concrete, which will not sag from a heavy load, for example, during rain. If you have to install pallets on the ground, then it is not recommended to lay more than 10 rows of tiles, in addition, it is advisable to cover pallets with material from rain with a moisture-proof film.
Materials and tools that will be required for work
To complete the work you will need:
- building level meter length,
- 2 and 6 m pieces metal profile section 20X40 mm,
- wooden pegs and metal pins,
- kapron cord,
- rubber mallet
- rubber mallet for laying paving stones,
- trowel,
- roulettes 2 and 10 m long,
- heavy metal corner and a clamp with which it will be possible to fix the tiles before cutting,
- a broom for cleaning the seams between the laid tiles.
You will definitely need to get a grinder and a steel disc with a diameter of 230 mm for cutting concrete and stone.
How to prepare a site for laying tiles
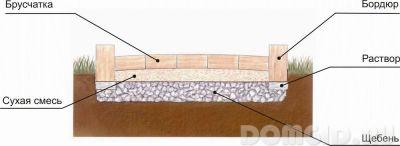
High-quality preparation of the site for laying paving stones - a stage of work requiring special attention. First, the site is marked, then a multilayer pillow is prepared. A layer of geotextile fiber is laid in place of the removed top layer of soil. Next, a 15 cm layer of gravel is poured. On top of the gravel - 10 -15 cm of sand. Make a cement-sand screed with a thickness of at least 2 cm.
Before laying the paving stones with your own hands, you should install fragments of the curb. It is customary to install the curb on a sand-cement mortar, but practical experience shows that it is better to first install it on a dry sand-cement mixture. If necessary, it will be possible to move the curb stone and fit it close to the last row of paving stones. Before installing curbstones, it will not be superfluous to make sure that they are even - it is not uncommon to find defective products. If irregularities on the curb are found, then such a fragment is best used in areas that are not very noticeable. You can also cut the stone if you need shorter pieces.
How to lay paving stones - we prepare the base of the track
Paving stones can be laid on sand or on a sand-cement mixture. Although it is often possible to observe that paving stones in squares and sidewalks in the city are laid on clean sand, when building paths with your own hands, it is still better to use a mixture of cement and sand for laying - using such a mixture will prevent sand from being washed out from under the tile.
You can find a lot of recipes for preparing the mixture, the proportions of the components in them can be different, from 1:1 to 1:8, you really should start from how the mixture will be prepared - if using a concrete mixer that allows you to get the perfect mixing of the components, then you can take for 7 parts of sand 1 part of cement, if you work with a shovel, it is best to use classic version and for 4 parts of sand take 1 part of cement.
The sand used for laying can be both dry and wet, anyway, the mixture will not have time to set during the day, if errors are found, they can be corrected.
It is most convenient to mix the components near the installation site, you can use a metal sheet for this, you can mix directly on the ground.
How to lay paving stones correctly - we observe the slope
To prevent puddles from forming on a paved path or site, you will need to observe a slope, it is from 5 to 15 mm per 1 m. You can slightly increase the slope, but in no case should you make it less than 5 mm per 1 m. the matter is not simple, therefore, if the slope is not observed, puddles will form in every smallest recess on the paths.
How to lay paving stones by level
In order for the surface of the track to look neat, you will need to use a level when laying the tiles. Its use will allow you to get flat surface, while the tiles are laid without gaps. Rather, they will be, but their size will not exceed 3 mm - they are formed by restrictive ribs on the tiles. The disadvantage of this method of laying will be a very slow progress of the work.
Tiles should be positioned in such a way as to avoid cutting them as far as possible.
An alternative way to mount the track can be laying on a cord. In this case, one of the ends of the cord is attached to a nail inserted into the seam between already laid tiles, the other is attached to a metal pin driven into the ground. If the sections are large, then you can pull the cord between the steel profiles.
In order to speed up the process, one should not resort to pulling several cords at the same time and laying rows with a ladder - it will be more difficult to control the quality of work, the possibility of defects will increase, it is best to lay tiles row by row.
In order for the paving stones to sit well on the pillow, it is not strongly tapped with a rubber mallet. This procedure should not be taken lightly - insufficiently recessed paving stones can subsequently sag under the influence of the pressure exerted on it. But you should not overdo it either - it will be enough for the tile to go deep into the dry mixture by 1 cm, or into the wet mixture by 2 cm.
Strengthening curbs and backfilling masonry
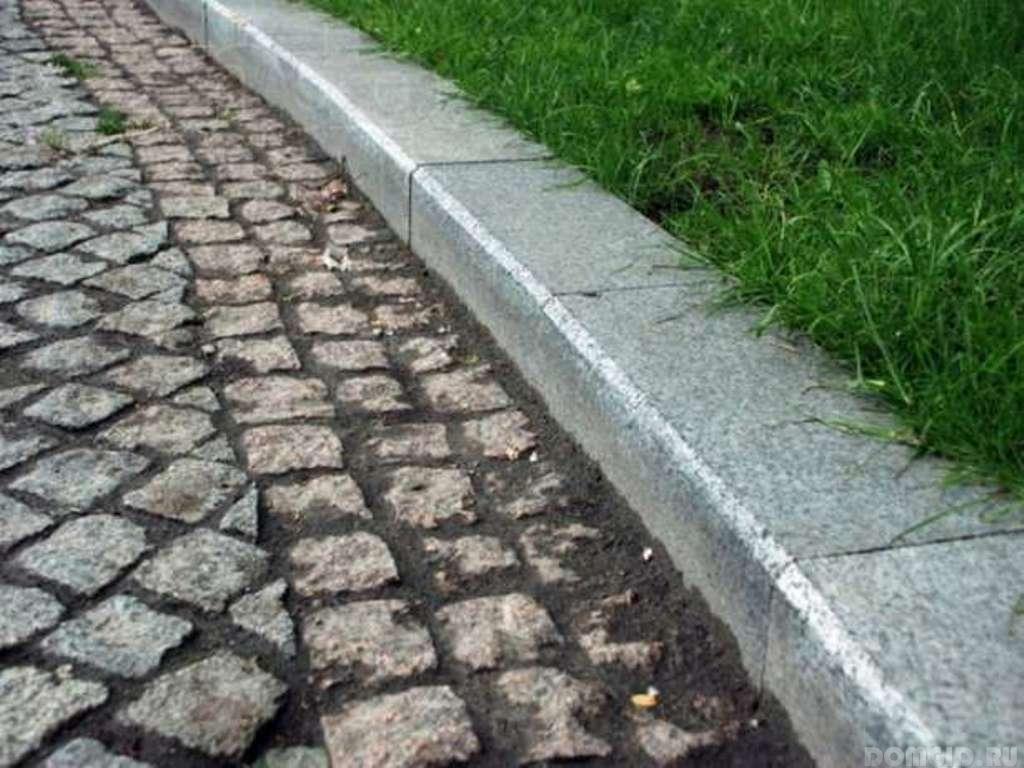
You can start reinforcing the curbs with concrete after the paving stones are laid. The curbs are strengthened from the outside, and the level of the upper part of the concrete must be below the upper edge of the paving stones. This will make you fall asleep concrete pouring soil.

When the masonry is settled, it is covered with a dry mixture of sand and cement and carefully swept. In this case, the seams between the tiles must be completely filled with the mixture. To prepare the backfill, sand and cement are taken in a 1: 1 ratio. Excess cement should not remain on the surface of the pavers after sweeping - otherwise the grooves between the tiles will be filled with mortar, which will significantly reduce the decorative effect of the masonry.
If you are tired of the dirt on the garden or personal plot have you thought about building garden path. durable and affordable option- laying of paving slabs - paving stones. Have you thought about how to make a path from paving slabs with your own hands in the country or at home? It's not quite easy... Even after purchasing a tile, you are left with a choice: what installation method to use, what technology to use? It is proposed to consider the option of building a garden, country or backyard path with your own hands completely manufacturer's instructions and recommendations paving slabs. When choosing a tile for a walkway, do not forget about the fence of the house. must be in harmony with the surrounding elements.
Earlier in the article (do-it-yourself garden paths photo), the easiest way to independently lay paving slabs of paving stones, do-it-yourself pavement construction at low cost was considered. The option presented in this article is the exact opposite: only following the rules and instructions.
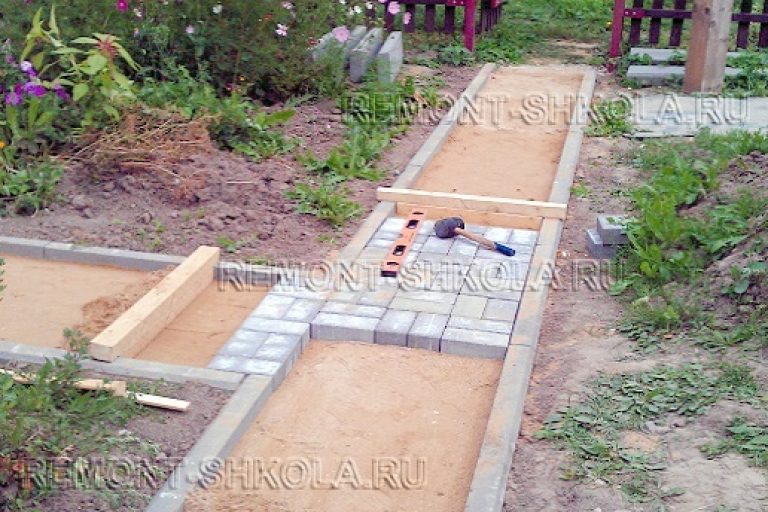
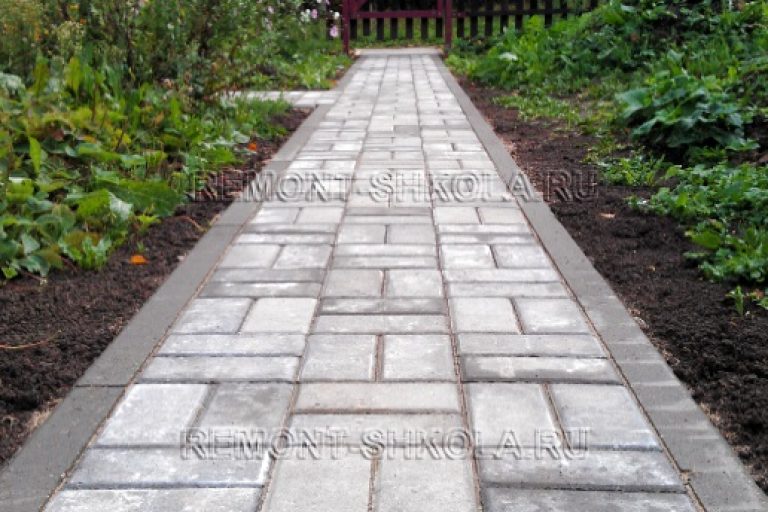
The manufacture of a pavement path begins with its layout on the ground. The approximate width of the building depends on your desire, and the exact width and length of the size of the tile itself.
During the construction of this pavement used ordinary gray paving stones with dimensions of 200X100X70 mm and a curb stone (sidewalk curb) with dimensions of 1000X200X80 mm. The total width, taking into account the curb stone, was 76 cm.
Required tools:
- bayonet shovel;
- shovel;
- level - 2 pcs. (2m and 1m);
- rubber mallet;
- stakes with twine;
- log for ramming the earth;
- watering can (hose with water);
- leveling devices - 2 pcs.;
- capacity for mixing concrete;
- brush with hard bristles;
- Bulgarian.
When you have determined the width of your future garden path, you can move on to planning on the ground. Before starting the main work, free up space for work from foreign objects and dense vegetation.
Drive in two pegs at the beginning of the track and two at its end. Pull the string between the pegs, ensuring its strong tension. When adjusting the height of the strings, keep in mind that the plane between the strings is the plane of your future track!
Use the building level to set both strings at the same level in two planes (along and across).
The distance between the strings is equal to the width of the planned path (the width of the laid tiles and two borders) plus 15 - 20 cm (indent from the borders 7 - 10 cm on each side).
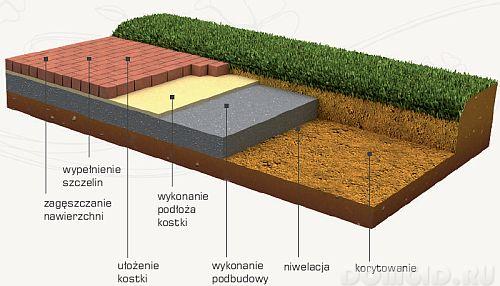
After cleaning the territory of the track and breaking down its coordinates on the ground, we proceed to remove the soil. First question: how to dig deep The distance between the plane of the track (stretched string) and lower level the removed soil consists of: a carrier layer (crushed stone) - about 15 cm, a leveling layer (sand) - 3-5 cm, and the tile itself.
For information: V this case(with a tile thickness of 7 cm) this distance is 25 - 27 cm. Do not forget that the top mark is a string, and we measure 25 cm deep from it.
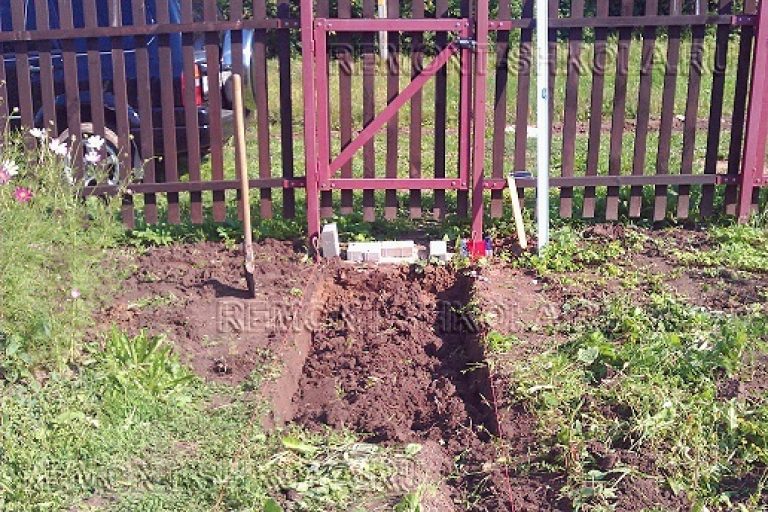
When removing soil, use both bayonet and shovel shovels. Part of the removed soil will later be used to sprinkle the curb stone from the outside, part to the layout of the area, part to be removed from the territory of the site.
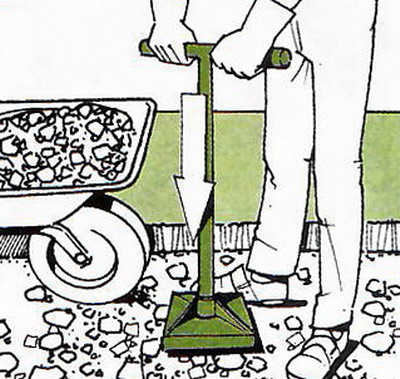
At the end of excavation to the desired depth, it will not be superfluous to walk over the entire surface of the bed of the track with a rammer (the most affordable option is a wide log with a cross handle).
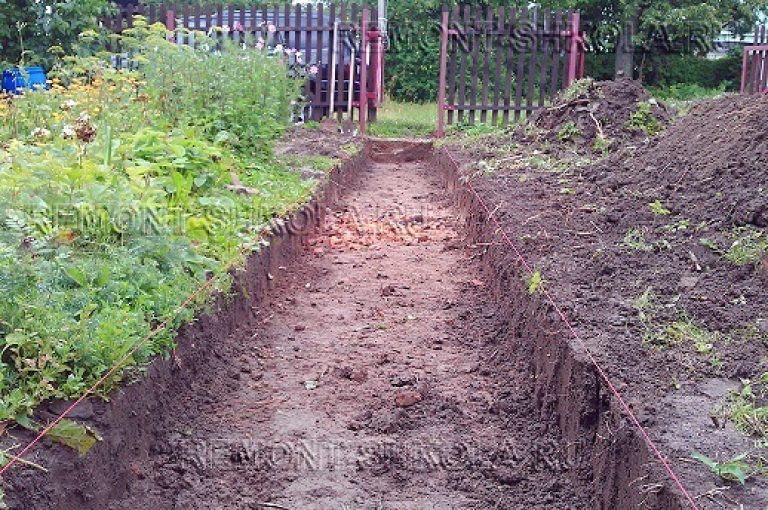
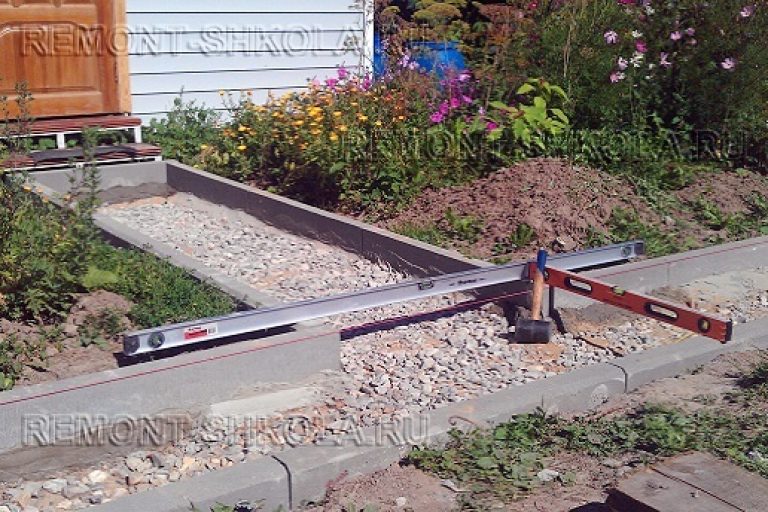
3. The device of the first part of the carrier layer - alignment
The next stage in the construction of a garden or cottage path is the construction of the carrier layer - the main part of the foundation.
First of all, we lay a leveling layer of crushed stone 5-7 cm thick, which in fact is part of the foundation's bearing layer. It is on it that we will install the curb stone.
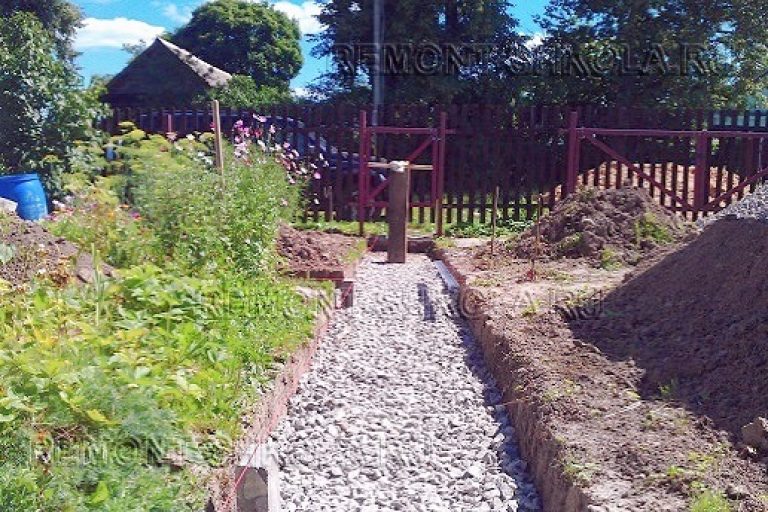
Evenly distributing the crushed stone over the entire surface of the bed of the backyard path, we make sure to ram it. We control the level of rubble by measuring the distance from it to the twine. It should be equal to the height of the curb stone.
At the end of tamping, the leveling layer is sprinkled with sand and spilled with water. It is desirable to do this, since the sand penetrates between the crushed stone and makes the crushed stone layer monolithic.
4. Installation of the curbstone and completion of the base layer
Now you can start installing the curb stone - garden border. To do this, remove the previously installed pegs with twine and reinstall them closer to each other in width. Now the width between them is the width of the row of tiles laid on the tracks plus the installation gap - about 0.5 cm (in this case, 60.5 cm for the main part of the track and 80.5 for the additional one).
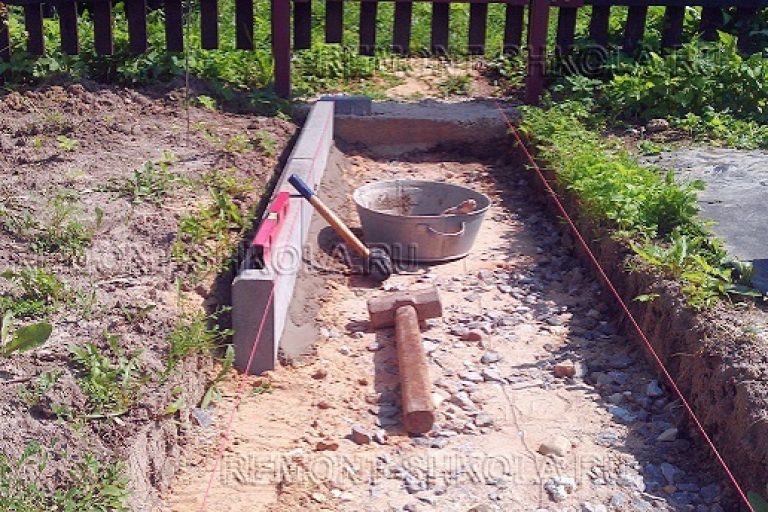
Stretched and aligned in planes, the twine is a guideline for installing a curb for garden paths. The inner upper edge of the curb stone almost coincides with the twine.
Sprinkle some sand under the base of the curb if you need to raise the curb to a distance of up to 1 cm. Level the sand, spill and tamp.
Use a heavy hammer or sledgehammer to compact the rubble, lower the curb up to 1 cm if necessary.
To install and fix curbstones, use concrete (crushed stone, sand, cement, water).
When exposing a curbstone, use a building level to control its correct position. All curbstones must be in the same plane with adjacent curbs in the same branch, with adjacent curbs in a parallel branch, and stand clearly at an angle of 90 degrees to the ground surface.
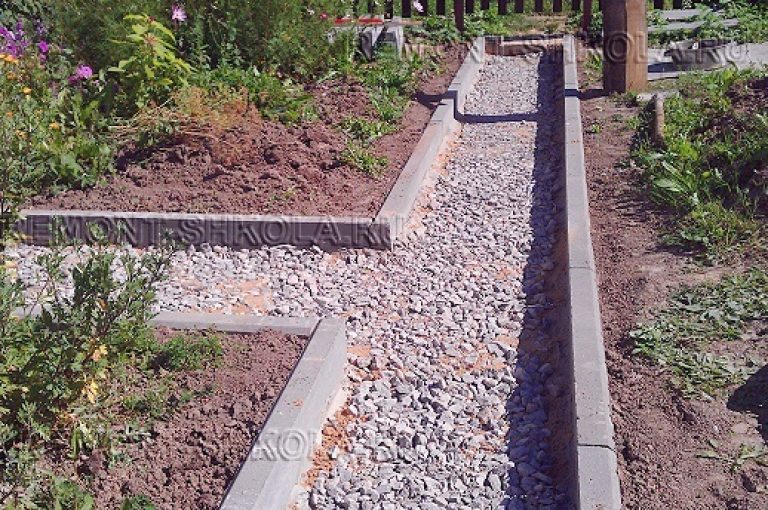
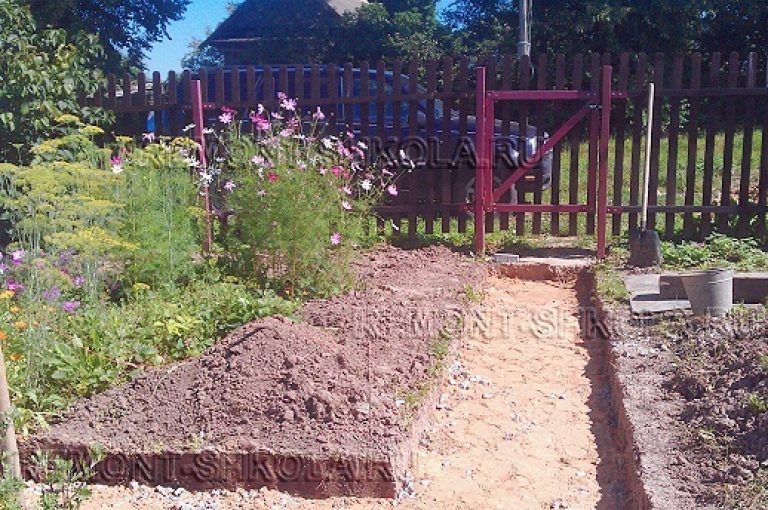
After installing the curb stone, it is necessary to complete the installation of the bearing layer of the foundation of the path. To do this, you need to raise the height of the carrier layer by another 10 cm. Therefore, we add crushed stone, while layering it with a rammer.
After the installation of the carrier layer of the foundation of the country path, the distance from it to the top of the curb stone (path plane) should be about 10 cm (3 cm - a leveling layer of sand and 7 cm - paving stones). First you need to lay a leveling layer of sand.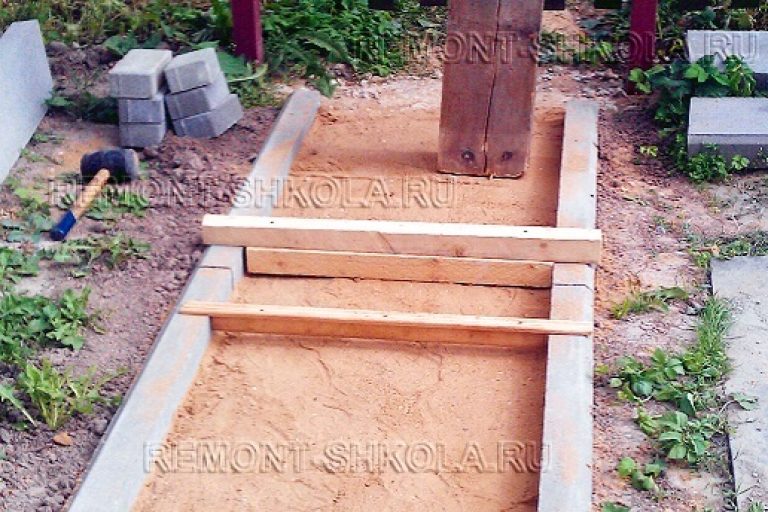
The guides along which the layer of sand is leveled in our case are curbs. We make two simple fixtures with different heights of the lower bar (No. 1 - height 4 cm and No. 2 - height 6 cm).
Important: The height of the planks depends on the thickness of the tiles! If the thickness of the tile is not 7 cm, but 6 cm, then the height of each lower bar increases by 1 cm. Etc.
Scatter sand over the entire surface of the base layer. We level with the help of plank No. 1 4 cm high. We ram the entire surface.
As a result, we obtain a relatively flat surface of the leveling layer of sand with a distance from it to the top of the curb stone of about 5-6 cm.
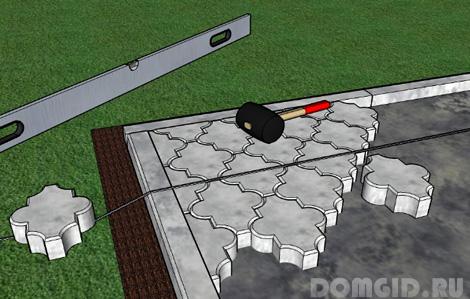
6. Laying paving slabs on a paving stone path
How to lay paving stones with your own hands. There are several options for choosing a starting point to start laying tiles when constructing a structure. Where to start laying tiles? The most correct option seems to be the choice of the starting point for laying the tiles, depending on the important visible elements. In this case, this is the intersection of the lines of motion.
Advice: the beginning of laying can also be made from the bottom to the rising point, from the optically important border or other significant visible elements - a porch, an entrance, etc.
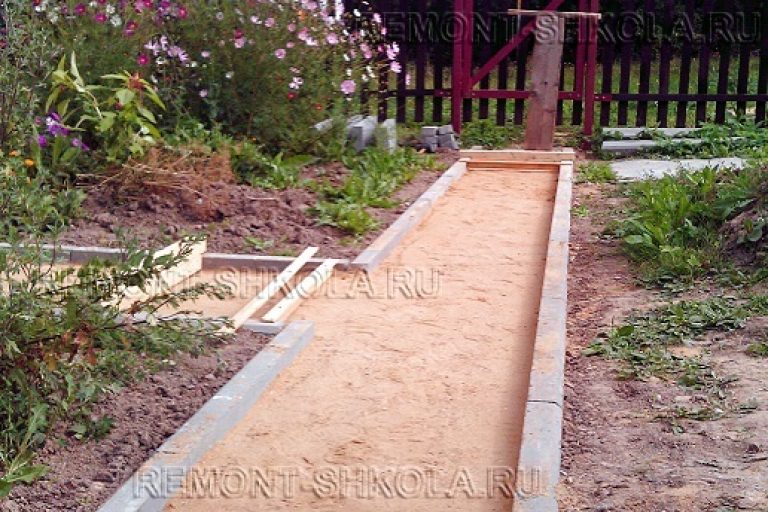
Use tool #2 - (height 6 cm) to create a smooth surface of the leveling layer. Move the device along the curbs as if on guides, removing excess sand.
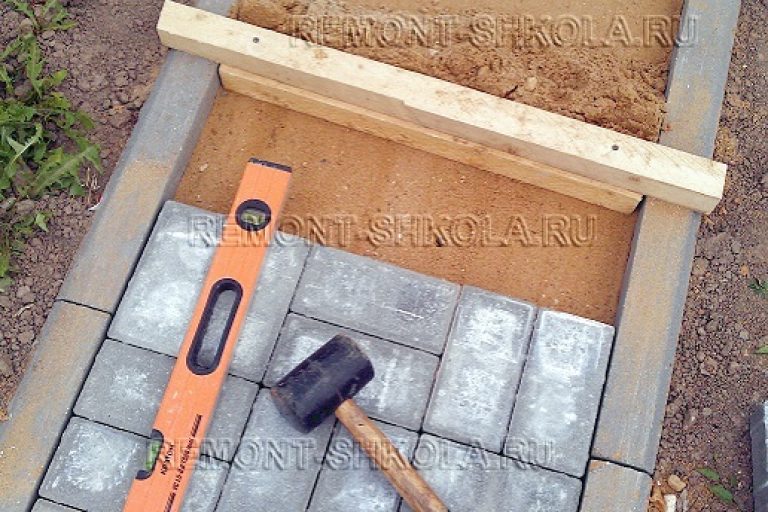
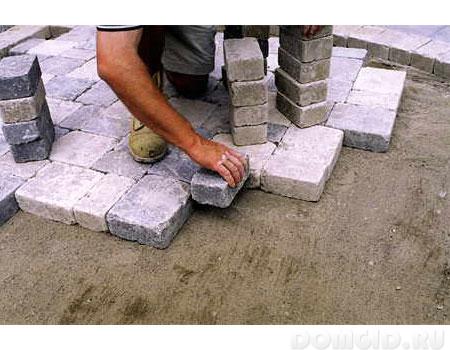
Lay tiles starting from the center. By using rubber mallet sink the tile into the sand to the level of the curb stone. Drown the tile about one centimeter or a little less. Further tamping will eliminate minor irregularities. Control the plane of the tile with a spirit level.
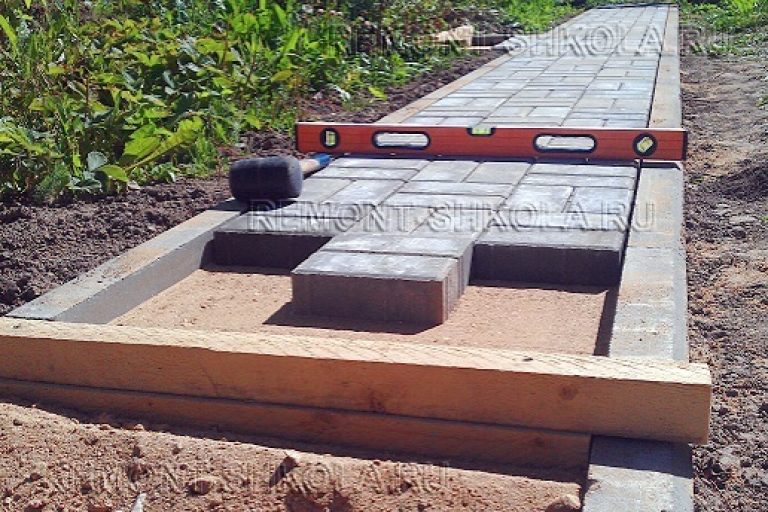
go on laying paving slabs until the entire surface is completely filled with tiles. At the end of the paving stone path, if necessary, use a grinder with a diamond-coated wheel to cut the curb stone to the desired length.
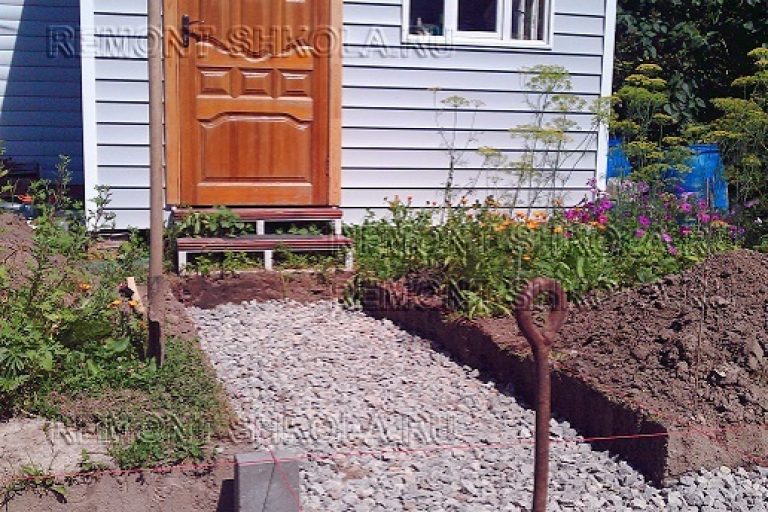
7. Sealing and sealing
When all tiles have been laid, tamp the entire laid tile with a hand tamper. Sprinkle the entire surface with dry, sifted river sand and use a brush to mark it over the entire surface, rubbing the sand into the tile joints.
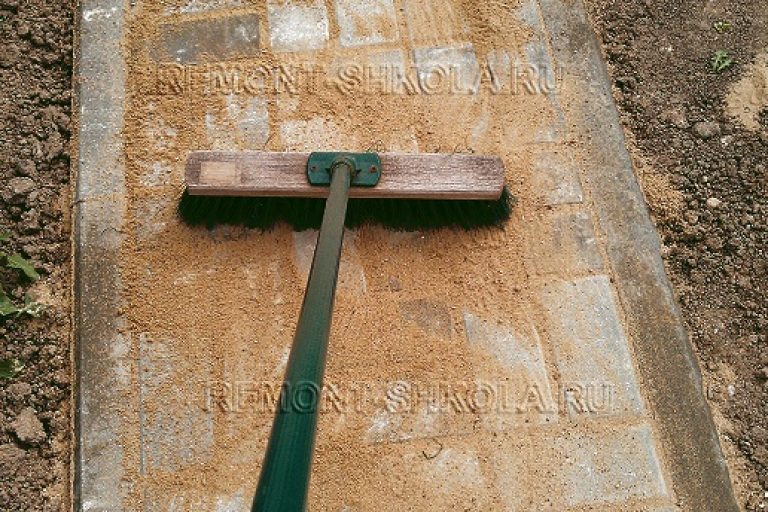
Next, re-walk the tamper over the entire surface. Use the sand brush again. After that, the remaining sand does not need to be removed immediately, it is recommended to leave it for a while. The sand will bind the entire tile together and make the surface of your walkway monolithic.
After removing the remaining sand, consider that you have made the pavement path in full.

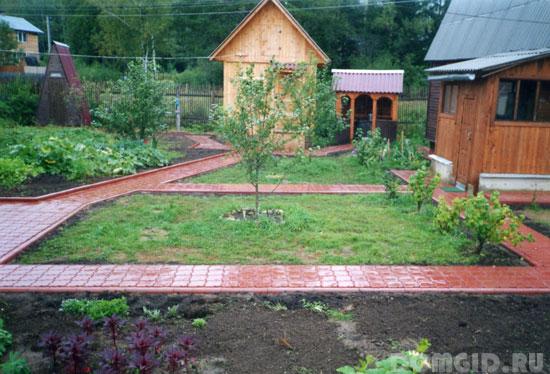
General view of the finished paving stone garden path
Additional useful information:
With confidence in the stability of the soil, it is possible minimization of material and time costs at work:
- minimize the leveling layer of crushed stone (up to 2-3 cm);
- reduce the bearing layer of crushed stone as much as possible (up to 4-6 cm), for this, in the process of excavating excess soil, leave the soil in the central part to the height you need;
- reduce the leveling layer of sand as much as possible (up to 1-2 cm).
When constructing the carrier layer, be sure to pay attention to high-quality ramming, layer-by-layer sand spillage and high-quality sand spillage.
When sealing and sealing tile joints, use not sifted sand, but sand mixture ( cement-sand mixtures M-150 M-200, the cost of a bag is around 100 rubles). Perfectly calibrated sand and cement will help you get the job done quickly and reliably.
construction do-it-yourself garden, country or backyard path in this way (in accordance with the instructions and recommendations of the tile manufacturer) is quite time consuming. However, such a structure is real and at the same time you can be sure of its strength and durability.
setPostViews(get_the_ID()); ?>
- Types of paving stones and its main properties
- The device of paths from a stone blocks
- Preparatory stage
- Preparation of the base for paving stones
- Curb stone installation
- Laying paving stones on the path
After the house is built and the laying of all underground communications is completed, landscaping of the infield begins. One of the stages of this process is. The most popular paving material is paving stone. Since it can be artificial and natural, this allows it to be acceptable to buyers of different income levels. Due to their aesthetic qualities and high strength, pavement paths have been used for more than one year.
The area in front of the house, paved with paving stones.
Types of paving stones and its main properties
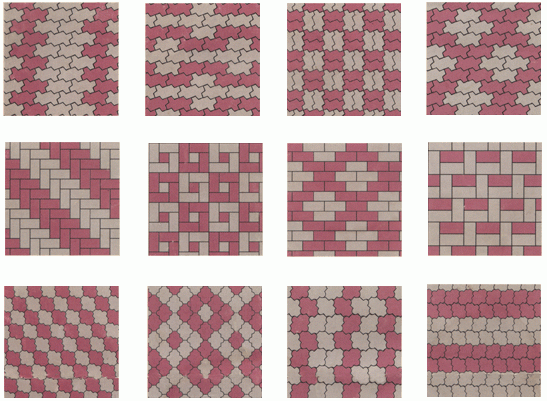
Schemes of possible patterns for laying paving stones.
Paving stones can be concrete, clinker, and also made of natural stone. Concrete pavers are made from high-density concrete, which increases its strength. Get this tile in several ways. Technological process, based on vibrocasting technology, produces paving stones various colors, forms and with high quality surfaces that do not need additional polishing.
The use of vibpropressing technology makes it possible to achieve the ideal geometric shape tiles combined with high strength and excellent resistance to temperature extremes. But its surface has a slight roughness. That's why ready product subjected to additional grinding and polishing. Clinker pavers are made from special plastic clay, which is fired at high temperatures. Tiles can be various forms and color, has increased strength, high resistance to frost, as well as to chemical and mechanical influences. The most durable and durable stone blocks are considered. Only natural materials are used in its manufacture: granite, marble, basalt. To give the necessary shape to the stone, a stone splitting machine and a stamping press are used.
Back to index
The device of paths from a stone blocks
Back to index
Preparatory stage
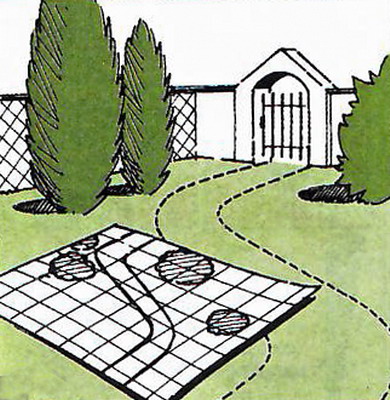
Site plan with traced buildings, fences, shrubs and future paving paths.
Before proceeding to the main stage of laying the track, it is necessary to decide on the material that should be combined with the architecture of the building and its decoration. Garden will look good if the house is lined ceramic brick or siding. When finishing the basement of the building natural stone paved paths made of the same material will be a great addition to it. Tracks are not only decorative element homestead, emphasizing her style, but also the shortest way to important objects in the country. Therefore, the direction and location of the walking route will need to be harmoniously linked to the official purpose.
To make beautiful and high-quality once and for all, you must adhere to the following rules:
- the coating device must be made of quality material and in accordance with its technological process;
- it is better to make the entrance road straight and wide, and arrange the walking paths so that they allow you to admire beautiful areas garden;
- the width of the main paths should be 1 ... 1.5 m, walking - 60 ... 80 cm;
- to prevent stagnant water on the path, it should have slopes: longitudinal - from 3 ... 6 cm per 1 m and transverse about 2 cm per 1 m. Elevation of the coating above the lawn by 1 ... ;
- do not make the coverage too wide, sometimes it is more appropriate to lay out in the country. It is calculated as follows: from the middle of the slab, measure the average step length of 60 ... 63 cm and lay the next coating. In this way, pave the required length of the track.

With the help of a hammer, a peg and a rope, the boundaries of the paving stones are determined in accordance with the desired shape.
IN preparatory stage it also includes drawing up a plan of the site, on which its borders, buildings, gates, gates, large shrubs and trees will be visible. Then, on the diagram, you need to designate the places for paving future tracks. Further, according to the drawn plan, we determine their direct location on the site. Armed with a hammer, pegs and a rope, we determine the boundaries of the paving stones in accordance with the desired shape. Now we move on to the main stage of arranging tracks in the country.
Back to index
Preparation of the base for paving stones

Along the marking lines you need to remove upper layer land, with observance of the slope.
Required set of tools:
- Rubber mallet.
- Measuring tape.
- Flat shovel.
- Broom.
- Pegs.
- Construction thread.
Construction Materials:
- Sand.
- Paving stones.
- Border.
- Drainage.
In order for the pavement path to have a flat surface, the dug trench and its walls are well leveled and carefully rammed.
Along the marking lines, it is necessary to remove the top layer of the earth to a depth of 20 ... 25 cm, observing the slope. The soil removal depth and slope are determined using a construction thread. In order for the pavement path to have a flat surface, the dug trench and its walls are well leveled and carefully rammed. Next, a drainage layer is laid out on the bottom. For this, crushed stone, broken brick, fine granite or other similar materials with fractions of 20 ... 40 mm are used. The main function of such drainage is to prevent the layer of sand between the tiles from being washed away by water. Many manufacturers recommend using geotextiles as drainage. Falling asleep a gravel layer, it is not necessary to withstand the slope. It will be enough to level and compact the trench well. As a tamping tool, craftsmen use homemade tool. To do this, a handle is nailed to the cut log. If opportunities allow and the amount of work to be done is large, then a professional tool is purchased.


