DIY railroad models. Garden train: landscape decoration and household helper. Design or drawing
The text of the work is placed without images and formulas.
Full version work is available in the "Files of work" tab in PDF format
Introduction 3
Chapter 1. General information about railway modeling 5
Chapter 2 railway 6
2.2 My experience of creating a model of a railway at home 7
2.3 Sociological survey "Railway modeling" 8
Conclusion 9
List of sources and literature 10
Apps 11
Introduction
Do you like to meet and see off trains? Perhaps you are delighted and admired by a train passing by, the power and strength of the locomotive, which pulls loaded wagons, amazes you. However, you do not yet have the opportunity to connect your profession and life with the railway. Then you will be interested to know that there is such a hobby that will allow you to have your own train with wagons, stations, rails and the world around you. This is railroad modeling.
Railway modeling is not such a simple hobby as it might seem at first glance. In order for the result of studying railway modeling to be pleasing, it is necessary to have sufficient knowledge in general issues of railway engineering, strive to acquire new knowledge in this area, apply various techniques and technologies, choose material for creating layout or model objects, be able to use the tool correctly and, Of course, do not forget about safety.
In our work, we want to collect such information and offer our own version of the layout of the railway.
We believe that our study will help to arouse interest in technology, will contribute to the development of imagination and fantasy in children, perhaps it will help someone decide on the choice of a future profession.
Research problem: find out how to organize the work of creating a layout of the railway at home.
Object of study: railroad layout.
Subject of study: conditions and technologies for creating elements of the layout of the railway.
Purpose of the study: Describe how to make a model railroad at home.
Research objectives: to study the literature on the topic; research modern methods and technology for building a model of the railway; describe the layout of the railway, created at home.
Research hypothesis: it is assumed that if you execute certain conditions when creating a railroad layout, this will give the layout maximum realism.
theoretical significance We see the work in the fact that the conducted research will contribute to the development of students' interest in technology in general and in railway modeling in particular.
Practical significance of this work lies in the fact that the collected materials can be used by teachers and students in additional classes on the world around us and technology. Also, the research materials may be of interest to those who want to do railway modeling.
Research methods: study of special literature; generalization and systematization of the material; observation and recording of results, photographing.
Brief review of used literature and sources. Teme railway modeling devoted to a huge number of practical and theoretical manuals, catalogs, reference books and periodicals. We have at our disposal a selection of the periodical "Railroad in Miniature", which describes in detail the instructions for creating layout objects. A lot of general information about railway modeling (history, development, modern achievements, the most famous models and technologies for making models) is collected in the three-volume edition The Art of Railway Modeling. "Models of Railways" edited by Barkovskov B.V. is one of the first domestic publications on railway modeling, this book is very popular in our country, it is not for nothing that it is called the “Bible of Modeling”. Here are general information about this hobby, its types, production technology and storage of layouts and models. This topic is also widely discussed in Internet communities and forums.
Chapter 1
"Modeling" is the production of a model that reproduces geometric shapes nature, linearly reduced in all planes and repeating the texture of the outer surfaces of the original. The word “model” itself is French, meaning the likeness of some object in a reduced form. Thus, modeling is usually called a large-scale reproduction of an existing or pre-existing object.
Today, no one can confidently say what was in the beginning: a real steam locomotive or its model. According to some reports, the English engineer Richard Trevithick, before building his first locomotive, tested its reduced copy. In any case, it remains undeniable historical fact that at the beginning of the nineteenth century, the railway model came into our world almost in parallel with the real railway.
The development of railway transport in Russia contributed to the development of railway modeling in the world. The construction of the Trans-Siberian Railway at the beginning of the 20th century became a worldwide phenomenon. At an exhibition in Paris in 1900, a model of the Siberian Express, which is classic example large scale models.
Today, model railroading occupies an important place among the most popular hobbies around the world. People of different ages and professions are fond of creating copies of rolling stock and entire railway complexes - models.
In the first half of the 20th century, three ways of development of railway modeling were outlined. The first of them is large-scale, includes museum and exhibition models high class, made by professional layout designers; the second - student, which is popular in our country and has a great educational value; the third way is small-scale amateur.
Student modeling introduces students to the technique of railways. This type of modeling does not aim at a strict scale reproduction of the rolling stock and other elements of the railway. His main features— this is a large selection of the scale of models and their arbitrary shape.
Amateur small-scale modeling includes the construction of miniature models-copies of railway rolling stock, as well as the construction of mock-up complexes for these models, reproducing, as it were, the railway as a whole. This type of modeling can be home or club, i.e. individual or collective.
Chapter 2 General recommendations to create a layout of the railway
A railroad layout is a layout that recreates railroad objects in miniature. The layout may contain a model of a railway station, part of a haul, access roads, a locomotive or wagon depot, urban infrastructure with railway tracks, natural objects along which the railway line passes.
The first thing we need to decide when we decide to create a layout of the railway is the scale. In railway modeling, the concept of scale is closely related to the standard size. The standard size is characterized by scale reduction and model track width. There are several basic standard sizes of model railways, you can get acquainted with the main ones in the appendix (Appendix 1).
Having studied in the literature various instructions to create models of railways, we have compiled an approximate sequence of work on making a model of a railway at home.
Make a sub-model, a platform on which all the elements of the layout are attached and the rail track is laid. For a simple layout, you can get by with a plywood sheet of the right size.
Apply markings of paths, roads, location of buildings and more.
Lay substrates to simulate a ballast prism.
Lay the rails. Before that, you need to buy a sufficient amount of rail material.
Develop wiring diagram and mount it on the breadboard.
Carry out ballast dumping. Imitation ballast - required element layout. The ballast can be sized among aquarium soils or other household bulk materials of a similar type.
Make a relief (hills, mountains, river valleys, etc.).
Paint the bases under various elements of the landscape (grass, sand, forest soil).
Label roads.
Build and install buildings.
Apply grass cover and other vegetation.
Place figures of people and vehicles on the layout.
Deciding to create our own model of the railway, my dad and I subscribed to the magazine "Railway in Miniature" (Appendix 2).
Since we decided to create a simple layout, we settled on wall version. For the mock-up, strips of plywood 30 cm wide were used. Using wooden bars, they were attached to the wall with self-tapping screws.
In the online store with dad bought rails and arrows. They were nailed to the layout with small carnations (Appendix 3).
Screened river sand was used to simulate the dumping of ballast. Dad applied glue, and I poured sand (Appendix 4).
Grass was made from sawdust dyed with green gouache and glued to the layout (Appendix 5).
The station building is flat - dad sawed it out of a piece of plywood, and I painted and painted the windows (Appendix 6).
The station building is large. I worked as a burner, screwdriver, chisel, hammer and stationery knife. The walls, floor and ceiling are plywood pieces held together with toothpicks. To give realism, the roof was pasted over with black paper (Appendix 7).
We also bought traffic lights and glued them onto the layout. Dad connected the wires, we put locomotives with wagons on the layout, and I checked how it all works (Appendix 8, 9).
The layout is ready, but this does not mean that nothing else will change in it. We are planning a lot of improvements and improvements. So there is a lot of work to be done! (Annex 10)
2.3 Sociological survey "Railway modeling"
It became interesting to me, but are my classmates, friends and acquaintances familiar with this occupation? Do they want to get involved in railway modeling and will they be interested in my work. I conducted a survey (Appendix 11) and got the following results:
Conclusions: Interviewing boys and girls aged 6 to 9 years, I found that:
A lot of people (74%) like trains.
Few have a railway at the moment (31%), but the majority would like to have their own railway (58%).
Few people are familiar with the concept of "modeling" (21%).
Respondents want to know how to create their own layout of the railway (63%).
Consequently, the research topic is really interesting and relevant for most of my classmates, friends and acquaintances. I will definitely introduce them to my research and share practical recommendations.
Conclusion
In our research work we formulated the problem - to figure out how to organize the work of creating a model of the railway at home. During the research, we considered general issues, principles, possibilities and methods of building models of railways at home.
Our observations helped to verify the correctness of the hypothesis put forward: if certain conditions are met when creating a model of a railway, this will make the model as realistic as possible. Our layout is small world railroad.
Held sociological survey helped to make sure of the necessity and relevance of the topic presented in the study. We hope that our recommendations will help you create your first model of the railway, and you will feel the magic and magic of the world of small railway models.
List of sources and literature
Barkovskov B.V., Prokhazka K.I., Ragozin L.N. Railway Models / Ed. Barkovskova B.V., - M.: Transport, 1989
Railway in miniature - M .: Eaglemoss Edishins LLC, a selection of magazines for 2014-2016.
Moskalev L.M. The art of railway modeling. [In 3 vols. Vol. 1]: History. Initial skills / Moskalev L.M., Myasnikov A.G., Ragozin L.N. - M. : Railway business, 2011. - 256 p.
www.railmodel.ru/ - site about the creation of a home railway.
ANNEX 1
|
Type designation |
Main scale |
Scale meter value, mm |
Width track, mm |
APPENDIX 2
APPENDIX 3
APPENDIX 4
APPENDIX 5
APPENDIX 6
APPENDIX 7
APPENDIX 8
APPENDIX 9
APPENDIX 10
APPENDIX 11
Questionnaire for research work
Maksimenko Dima
How old are you? ______________
Do you like trains? Not really.
Do you have a toy railroad? Not really.
Do you know what "modeling" is? Not really.
Do you want to have your own railway with small trains, stations, houses, trees, tunnels, cars, tractors, people? Not really.
Do you want to learn how to make a DIY railroad layout? Not really.
And the construction of the sub-model began. I bought plywood 9 mm and 4 mm, aluminum profile and chrome legs, as many as 6 pieces for stability. Sawed, drilled, screwed.
The initial stage of construction of the model. Purchased legs, plywood, aluminum profile.
We fasten the aluminum profile to the plywood with self-tapping screws and get a frame for the sub-model.
We strengthen, the place of connection of two sheets of plywood and the place of attachment of the legs.
We fasten the legs to the frame, reinforce the corners and get the actual sub-model. The weight of which was 12.1 kg.

This is what the sub-model looks like, very similar to a tennis table.
I'm looking forward to posting my future scheme movement, previously drawn on paper. Looking ahead a little, I want to say that in the future the traffic pattern will change a little. When you see it is real in volume, and not on a flat paper scheme, things might turn out differently. Therefore, initially think over your scheme correctly, draw it if possible with a flatbed ruler or in the WinTrack program, and then there will be fewer errors.
We make the frame of the future slide turning into a bridge.

We continue to build our slide.
We continue to build, at the same time we are trying to fit the bridges bought in the store.

We are starting to build a railway descent. When building a slope, strictly adhere to the standards of descent in degrees, otherwise the train will not be able to climb your hill. Also keep in mind that different locomotives have different traction. If possible, experiment with locomotives. I put rails on sawn-out radius plywood blanks and drove different trains up and down, changing the angle of inclination of the blank in such a way that the weakest locomotive could calmly climb the hill. And only after that fixed the descent and ascent.
The locomotive is ready for the descent-ascent test.

Necessarily after applying PVA glue on wooden details, firmly press them to each other, put a heavy load or clamps.
There have been changes in my traffic pattern. For some reason, the idea of a section of the railway came up, such as a light metro on concrete supports - pillars.
Bought in a model store: round sticks - future concrete supports, slats - future flanging, and in office supplies, wooden rulers were bought for the pedestal itself, on which plywood with rails will be laid.

Here it is the future section of the overpass, yet without sides.
The future silhouette of the model of the railway appeared.

We carry out sea trials of rolling stock.
Since I want to see at least some result as soon as possible, I started to form the relief of the mountains from papier-mache. Take paper, newspapers - cut into strips, grease with PVA glue and glue to plywood, layer by layer, letting the layers dry. Approximately 3-4 layers. When it all dries out, you will have a fairly solid base of the slope. (Although according to the rules, you must first finish everything preparatory work, and only then take on the finishing, but I can’t do that, so sometimes I will violate the sequence of construction - the result is important)

This is how the stages of applying layers of papier-mâché look like.

We glue the side to the overpass and paint it. At the same time we are preparing papier-mâché for grass stickers. We paint the paper slope with paint that matches the color of the grass, so that when gluing the grass, the paint hides our small mistakes.
This is what a refined monorail looks like. Rails glued, gravel poured.

Here you can see the wires for the future block of the site. Do not forget to put a dielectric (plastic) rail separator, in the photo it is black between two protruding wires, in the future the wires are carefully soldered to the rails.

Carefully solder the wires to the rails and paint the rails dark brown. matte paint, it gives them no longer toy look. Painting the rails is hard work, but it's worth it. In the background, unpainted rails are visible - the difference is obvious.
For greater realism, paint the railway bridge.

Made of special paper imitating brickwork, we make the support of our monorail.

We sow grass and add gravel to the railway bridge.
Add overgrown grass or a small shrub to the grass.

This is how the transition from the monorail to the embankment turned out.
Materials and tools for building a railroad model.

First of all, you can't do without glue to build a layout. Glue is needed a lot and different. I used three types of PVA glue. PVA JOINER is good for gluing the wooden parts of the layout, it dries quickly and holds tightly, one of its minuses is a yellowish tint. The second PVA SUPER glue is perfectly white, it also dries quickly, and when dried, it gives a glossy layer. The third PVA TEX glue dries for a long time (but sometimes it is very necessary) perfectly white, when dried it gives a transparent, matte layer.
Also, you can not do without special adhesives: glue for models, dichloritan, super moment, universal moment.

Various model paints are also needed, I used acrylic "Star"

You will also need brushes, both for applying glue and for painting models.

To simulate the embankment of the railway, branded gravel powder is used - pay attention to the scale, for each scale there is a different size of gravel.

Don't forget to buy weed, it happens different types and compositions. simple grass made of sawdust, the one that is more naturally made of flock. And of course you will need a floccator, it can be electrostatic and simple. An electrostatic flocator is needed for gluing grass under static, from the received charge, the grass reaches for the flocator and sticks in this position, it turns out more naturally. But you can do without it in the lid of the jar, holes with a diameter of 4 mm are made, and by shaking out of the jar, sow grass. Cheap and cheerful.

To clean the rails, you will need a branded cleaning bar, it is necessary to clean the rails from paint, glue and dirt.

We buy different types of trees, some will go to the foreground, others to the background.

construction layout railroad
You can buy paper that imitates various materials: brickwork, pavement, etc.

We begin to glue houses, structures for our layout. When gluing the houses, pay special attention to removing burrs; when photographing close-ups, they stand out especially. Well, be careful with glue when applying a large amount, it can remain on the model, and spoil the impression very much. I also recommend buying models of people, without them the layout becomes not so interesting.
We continue to build a model of the railway. Let's talk a little about the electrification of the layout.

An important part of any railway layout is electrification, signaling and control. The picture shows a two-color traffic light (red, green) on our layout, it will perform the function of permission - prohibition of the departure of the train from the block section if there is another train ahead. The traffic light is connected to the automation unit, which will give a command to brake or depart the train, with simultaneous switching of the traffic light signal.

Traffic lights have various mount: there is built-in or on the finished support. To whom it is more convenient: to put and fix, but the support is visible, or to drill a hole and carefully fix it. Do not forget that any electronic unit can break or burn out and you should consider the possible dismantling and replacement of this unit or traffic light.

Night lighting of buildings, lighting of streets and stations looks very nice. If you do this, then think over and prepare your layout in advance.

All buildings for mock-ups have the possibility of electrification, by attaching a house to a mock-up, outline its outline and drill or mill a hole so that you can insert a backlight.

Ready-made holes for lighting houses on the layout. Both incandescent lamps and LEDs can be inserted into the houses, paws give a large angle of illumination, but are less durable, LEDs give a smaller angle of illumination, but are more durable.

We are preparing the road.

We sow grass and shrubs, put houses and a railway crossing on the marked places. Attach trees and cars. Very important point When you plan block sections, be sure to take into account the length of your train, if you have different trains in length and you do not take this into account, then there may be various problems: a long train may not stop or stop where you planned.
The compositions and trains on your layout will be different, and later you will want to change the composition, so think over the length of the braking and acceleration section.

Locomotive at the crossing.
Electric locomotive at the crossing.
Well, it's just handsome - motor car BR 642
For greater beauty, we put passengers in our motor car BR 642

We glue the BUSCH material imitating the asphalt surface.

With asphalt, the layout began to look much more natural than the idea of expensive painted paint.

We glue the bushes, attach the trees, but do not fix them yet, in order to imagine the future picture of the layout. In the future, it is desirable to sprinkle the roots of the trees with grass, or simulate the hilling of a tree in order to hide the plastic roots of the trees.
Hobbies are different: someone quietly and calmly collects stamps or candy wrappers, fitting their entire collection into a thick album in the top drawer, someone plays golf on Saturdays, and someone chooses an entire art direction as a hobby and devotes it all of my life.
This is exactly what can be said about lovers and fans of a railway or railway miniature, because to create crafts of this kind, one desire is not enough - it will take a lot of time, effort, careful collection of information, sometimes resources, and financial investments, and, of course, skills, so that as a result you get a real miniature railway of your own.
A miniature railway is a subject of interest not only for children, but also for adults, and adults even more and more often. Almost every child had a children's toy in the form of a railway station with rails, steam locomotives and wagons, and if it cost more, then the kit included various railway signs, a semaphore, figures of drivers and other interesting details.

It’s interesting to play this, but I always wanted more, for example, so that the railway network would be more developed and contain many branches and turns of the rails, so that train models were inertial or moved by themselves, and you could control them using the remote control, so that there were many additional elements: tunnels, bridges, roads with vehicles, trees, people, etc.
To make such a toy, or rather, not a toy, but a real mock-up of a railway with your own hands, you need to work hard, and not all children have such an opportunity, so you will probably need the help of your parents. It’s good if they share your passion for railway miniatures and help in creating crafts. An adult lover of railway modeling, of course, is easier in this regard.
As for the directions in which there is a miniature railway hobby, they are separated by several:
- some simply collect only toy rails, trains and all their accessories;
- others also collect, but already scale models;
- still others are engaged in the manufacture of railways in miniature, recreating entire historical stations and railway stations, laying a real railway network from different directions ways, engaging in the actual reconstruction of certain objects;
- someone is trying to miniature copies actually existing or existing locomotives and trains in the smallest detail;
- and one more interesting view railway modeling - a park or garden railway, for the creation of which a very large scale is used, therefore such a model of the railway can even be used as an attraction and transport people in it.

A bit of history
A miniature railway is not a tribute to fashion and not a new phenomenon, because the history of railway miniatures and modeling goes back more than one hundred and fifty years. For the first time, the model of the railway appeared, like a toy, in the nineteenth century (in its second half). Germany, represented by the manufacturer Märklin, took over the provision of the necessary industrial volumes. Their miniature railways were of such high quality and good that even the royal family ordered such a model for the Winter Palace.
Based on the scale of the railroad presented in the German-made miniature, scale standards for railroad modeling were later adopted. By the end of the nineteenth century, America joined the cause, for the first time in the world, launching on the market electric model railway (manufacturer - Carlisle & Finch).

Almost until the middle of the last century, both an ordinary toy in the form of railway rails with a train, and an ideally exact copy or a miniature railway were perceived in the same way, however, after the toy ceased to cause such a stir, and modeling began to take shape as a serious hobby, gradually finding more and more more fans.
Therefore, the manufacturers tried to please their new admirers - adults who were eager to assemble a full-fledged miniature model of the railway. To do this, they began to produce more advanced models, where the rails could be folded into a full-fledged railway track in miniature, where locomotives and wagons had many parts and elements, which also included various buildings, road paraphernalia and signs, semaphore, etc.
In our time, there are practically no global giant firms left that would be engaged in such production, however, there are many small successfully functioning companies specializing in the production of certain models of trains or additional accessories, without which a miniature railway is impossible.
Scales, accessories and other nuances
To make a model of a railway, you must understand many nuances, for example, on what scale a miniature railway is usually made, what types of kits and configurations of crafts can be obtained, whether a diagram is needed and where to get it, what to do with components, necessary details and various accessories, etc.
Scale and size standards for railway modeling are very different. The most common are sizes bearing the symbol TT and NO.
The TT standard size - from the English Table-top trains - means that the model of the railway is carried out on a scale of one to one hundred and twenty (1:120) with a gauge of twelve millimeters. Such a miniature railway is also called a twelve-millimeter railway. All mobile models of trains are also made in it - this is done by supplying electricity along the rails, although it is possible to connect an electric locomotive through a contact network.

A large number of models and various accessories for assembling railway miniatures of this size are produced by:
- German companies Berliner TT Bahnen, Tillig;
- there is little choice European manufacturers Roco and Piko;
- Jago pleases fans with rare models of vintage locomotives;
- Russian firms "Peresvet" and "TT-model";
- American PossumValleyModels, GoldCoast (some models of wagons and locomotives).
Another common size is NO. The name comes from the English abbreviation HalfZero or half zero. The model of the railway in this case is produced in a scale ratio of one to eighty-seven (1:87). There is also a standard size 0, in which the scale is taken twice as much, that is, 1 to 45. And here we get half of zero, but we use latin letter O instead of it in the notation.

A miniature railway in this scale is considered the most popular and widespread in the world due to the fact that it can be made without the use of complex devices, moreover, these models of railways are large enough for detailing, but at the same time quite convenient and compact to place the layout in the house or apartment.
A miniature railway of this standard size is also mobile: energy is supplied from a contact network or along rails (in the case of electric motors in locomotive models). Plus - you have the opportunity to use additional interesting elements when creating crafts:
- a smoke generator device that will run on oil and create a smoke effect over diesel locomotives or steam locomotives;
- installation of a sound decoder in the rolling stock - you can play any sound files that imitate noises and sounds of train traffic, etc.;
- signaling devices, which stands for signaling, centralization and blocking.

Various other sizes also exist. For example, the large-scale G standard, which she has been developing and producing since 1968 and is still engaged in German company LGBT. This is the clearest example of an outdoor garden railroad. In general, the larger the scale at which a miniature railway is built is chosen, the more detailed the prototype should be repeated, the smallest details and elements should be taken into account.
Do it yourself or buy?
Today you can find many thematic forums, special publications dedicated to railway modeling. You can purchase various elements separately and put them together later, mounting your own railroad layout.
However, first of all, you will need to decide on the available free space. Can you allocate half or even an entire room for the layout? If not, then you will first have to deal with the construction of a mock-up or equipment of a special place. To do this, you can use at least a separate table or make a retractable / folding tabletop, which will be used only for your project and nothing else, which means that you do not have to fold and remove the layout every time.
There are also options for modular layouts, which consist of individual blocks, cantilever structures (you can attach mock-ups to the walls like shelves) and lift-ups (easily stows away under the ceiling).
It is also better to take the appropriate scale for an apartment, for example, with a size of 1:87 you will not do much, because you will need a space of one by three meters at a minimum. It is better to stop at 1:120 or 1:160 scales, since designing a layout in an even smaller Z size (1:240) will require a lot of skill, effort and financial investment.
To create your own miniature railway, you will need to come up with and think through it to the smallest detail. future view. Perhaps you should start with the simplest scheme, for example, make only one rail ring and a locomotive with several cars. Over time, you will add additional tracks, trains, semaphore and signs, station and buildings, figures of people, etc. to the project.
Experienced craftsmen already know how to create whole detailed landscapes - mountains and plains, bridges and tunnels, forests and fields, miniature streets, numerous forks in the paths, depots and other interesting things.
Even for himself simple project better make a diagram. Just try to draw what exactly you want to create. If your plans are to create a railway of a certain historical era, then you will need to thoroughly study all available information on this topic, find archival photographs, copy them, etc.
Also detailed diagram will be needed for the manufacture of models of steam locomotives and wagons. You can use the drawing diagram of a particular machine by looking for its photo. Just divide the real dimensions of a particular train by the scale you need and you will have a ready-made construction plan.
Step by step work plan
- Provide space for the project and make a sub-layout (a simple configuration can even be placed on a plywood sheet).
- Transfer the scheme of the future railway miniature to the mock-up (draw how the rails will pass, mark the forks and turns, roads where you will place buildings or structures). For a complex rail arrangement, the scheme can be designed on a computer in a special program.
- Laying rails. Rail material can be bought at a specialized store or you can make them yourself. Since current flows along the rails in moving roads, craftsmen make them from thick copper wire rolling it up rectangular section on manual machine. Sleepers are made of thin bars, which are also cut on the machine. The tracks are attached in two ways: they are either glued or nailed to the base with small studs, you can then solder the rails to the same studs or also glue the rails to the sleepers.
- For a mobile model, it is necessary to additionally develop an electrical circuit, and then mount it on a breadboard model. Homemade blocks are usually taken as a power source, you can also take a factory one. Do not forget about safety rules - the output voltage cannot be high, use a power supply unit up to sixteen volts, and if the model is small, then six to nine volts will be enough. The electric motor for the train can be purchased at the radio store or removed from any toy. Conduct electricity to the engine from two rails. To distribute electricity throughout the base, stock up on connectors and copper wires. Think over all the details before wiring - where the semaphores and traffic lights, barriers will be located, whether the lights will be on, etc.
- Backfill and lay the ballast, selecting it in size among aquarium soils or any household bulk materials.
- Think over and make a relief and a landscape. To make your layout look like a real one, be sure to complete beautiful landscape. You can use professional materials such as trowel-mass, forest floor, meadow powder, different layers of the earth, crushed stone, sand, gravel and other interesting accessories from well-known manufacturers. If you choose more budget options, then to simulate the mountains, it is quite possible to get by with building foam, which is then easy to paint in any desired color. Hills, fields, vegetation and other decor can also be recreated from plywood, building plaster, fiberglass, papier-mâché, wood and others finishing materials. To paint the details, use acrylic paints.
- If there is no time and desire to bother so much, then many elements can be taken to the layout and ready-made, for example, from toy sets, in which there are figures of trees, and dummies of grass or bushes, animals, cars, signs, people.
- With buildings the same situation - either use ready-made options, or build your own from cardboard, wood, plywood, papier-mâché. Use photographs of real stations and other buildings as references.
- Add the necessary components: draw roads, paint the grass, arrange the figures of people and put the trains on the rails.
Passion for railway modeling can start with a gift set with a railway and trains. Such a hobby, although it requires considerable effort and expense, undoubtedly helps to develop, think, create and not stand still.
Toy railroads are inherently associated with childhood. Many of us at a young age once had a plastic or iron prefabricated model railroad. And those who could boast of a foreign-made model were considered lucky.
In modern times, the hobby of toy railroads has grown into a major modeling industry. Moreover, this business is already more focused on an adult audience than on children.
Trees, houses, roads, cars, relief surroundings were added to the main attributes - a track and a locomotive with wagons. And a table with a full-fledged model of the railway, with many details and trifles, is already a real art.
Abroad, such products cost from 2 thousand dollars, but in this article I will tell you how to make a full-fledged model of a toy railway with your own hands.
Table
You will need space for the layout. Ideally, this should be a separate table, but you can get by with a small table, or just a fenced-off area on any suitable surface. It all depends on your desire and scope. I recommend starting with a small area, like part of a table, and then, if inspired, make a large layout. It is better to start small than to immediately take on a large amount of work and throw it halfway.
starter kit
The thing without which it will not be possible to make a model of the railway is the railway itself. Or rather, a set of rails, a train and a power system for it. Here, alas, there are no alternatives - it's all you need to buy. It's good that there are plenty to choose from in the market today.
sketch
To know what you are moving towards, you need to have a goal in front of your eyes. Make a rough sketch on paper - where what should be, and what it will be general form your layout. Surf the Internet, look at the numerous models of railways and take note of what you like - bridges, crossings, houses, stations. You can make a model of a station in the Wild West, or you can make a station in the center of a modern city. But be sure to decide before you get to work. And make markings on the table so as not to suddenly discover that the track goes beyond the boundaries of the table, or that the barrier will cling to a passing train.
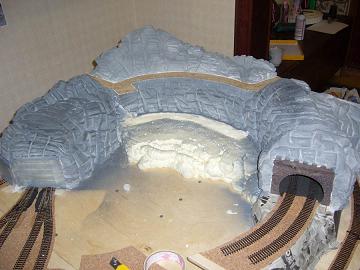
Mountains
The presence of a mountain, with a tunnel through which the train will pass, will be the decoration of the layout. To create a small mountain you will need polyurethane foam, plywood, knife, alabaster and sandpaper.
First, think over and, if possible, draw a sketch of the future mountain. Then knock down a small box of plywood or other suitable material above the rails. Make sure that the size of the box will allow your train to pass freely through the tunnel. Then start applying foam around the box, with pauses of one and a half to two hours, to allow the layers to dry and not sag under their weight. After you apply the foam of the desired volume, leave it to dry for a day, no less.
In a day, pick up a knife (more convenient - a clerical one), and start picking the mountain - cut off the extra pieces, giving it the shape you intended. Cut out hollows, crevices, try to make it as natural as possible.

Then you will need alabaster. Dilute it with water, and cover the entire mountain with a thin layer up to 3 mm. It dries quickly, so dilute it in small portions. Then again wait a few hours until everything hardens - it is better not to use a hair dryer.
Now you need to paint over the mountain in gray. To do this, buy a can of primer in any auto shop, the color of a gray stone, and you can paint your mountain. Just test the paint on something else first to make sure it's the right color for you.
Next, use sandpaper and rub the mountain in places to remove layers of primer in some places. This will give the mountain a more naturalistic look, so that it is not a uniform color, but a shade from light to dark gray. You can repeat painting and sanding several times until you get something that suits you. You can also paint individual pieces of the mountain white or black for more believability.

Finally, take green paint and tint the pieces of the mountain also in the color of greenery - this way it will be even more naturalistic. Only the paint should be a believable, "mossy" color.

Your mountain (or slide) is ready. Congratulations, you've already done a lot of work. Next in line are the rest of the relief details.
Here everything depends on your imagination, size free space and suitable parts you have. Fill in the unoccupied tabletop with, for example, fake turf that is sold in stores. Toy houses, figures of people, transport, railway crossing, train station, bridge, trees - these are all the details that will decorate your layout. Many of them can be found in Lego bricks, or just individually in toy stores. Train modeling firms also sell great kits, but be prepared to spend a lot of money if you do.
You can make layout on big table, with many details, relief terrain, electric running and a real town in miniature. But you can also do small model- battery train small area landscape and several decorative elements.
Whatever option you choose, the model you made will be an adornment of any home and will be of interest to any company - both children and adults.
A lot of articles have been written on the topic, but I decided to write my own and below I will explain why ...
I will say right away that until recently I had no experience in building a mock-up of a railway. Searching for the necessary information on the Internet gave little. Some articles “bypassed the basics” and immediately “jumped over to difficulties” such as: “and now we will make mountains” .., or the proposed layouts were super complex: it was immediately suggested to master the Autocad program. In other articles, the emphasis was on some trifles like: “ You will need a hammer...“That’s all the valuable information. All found articles did not meet our goals and objectives. I had to do everything full-time ask and pry in stores and, of course, from lovers.
Family tradition
Let's go back 12 years. In the photo below, in the St. Petersburg communal apartment, I play with my son Alyosha in the railroad, which my father gave me many, many years ago, when I was still in elementary school! 
Yes, you can’t say anything, the quality and reliability of PIKO has been tested by time. After all, almost every weekend my son and I assembled, dismantled, designed ... And when our family moved again, each time a box with a gift from my father was first on the list of things to move. Only we had to leave it ... and again, with my father in the village, it is intact to this day!
Goals and objectives of our future layout
Primary goal: psychomotor development of the child.
That's why number of copies , beauty (Yes, such that it was impossible to touch with hands) and unnecessary complexity recede into the background. But this does not mean that we should make a “simple circle” and “stupidly drive” a train around this circle ... In other words, we need to make the layout as functional and interesting as possible for the child.
Our tasks:
- development fine motor skills : coupling and uncoupling of wagons, loading and unloading, construction of various objects on the layout itself and many other small operations;
- development of thinking and problem solving: this is something like a puzzle, for example, you need to remove a wagon from the middle of the train (not just with your hands, of course, but with maneuvers) and leave it on sidings (so as not to interfere) or for loading and unloading. It seems elementary, but believe me, such a task can sometimes “strain” an adult a little;
- child's interaction with other players: for example, a child controls a train, stops the train and asks another player to switch the switch. Or the child drives the train exactly to the place of loading, waits for another player to load the car and then transports this load;
- the acquisition of knowledge: give an idea of various types transport and their interaction. Transportation of various cargoes (for people we will use a passenger car, for bulky cargo - a platform, etc.). “Combined” transportation, for example, we will load something into a container (right inside this container), then transport the container itself and then unload it at the point of arrival.
This list is of course endless...
The basis
Let's talk very briefly about the basis: rails, locomotive, wagons and power supply.
The most common and convenient scale is H0 or 1:87 (∼ 90-95% of all railway models). Keep in mind that it can be written as the letter "H" and zero (more correctly), but also as the letter "H" and the letter "O". The track width is 16.5 mm. Remember scale "H0» ["ash zero" or "h zero"] - search, ask, buy only this scale!
There is one more detail. As you know, there are straight rails, and there are also curved ones. So, this "degree of curvature" is measured by the radius. Those. if we assemble a circle from curved rails, then we can measure the radius. If you plan to use only a small two-axle locomotive, then there is no problem. But if you use large six-axle (two carts on three axles), then it will not be able to pass with a small radius. It's like a truck with a long trailer can't drive on a road with sharp curves. I will not hammer your head with this, because. different manufacturers may have different "curvature" markings. You just need to remember this.
It’s good if you have purchased a ready-made set, and you can assemble from it not just “ circle" or " ov al ”, and it has arrows, dead ends ... But what if you need to assemble it yourself from scratch? First you need to decide what size the layout will be (see below). Then you need to make a sketch of it on paper. And then the drawing can be done in life size. And if you already have rails, collect them directly on the drawing and outline them. With this huge "picture" you can already walk around and select the missing rails by simply applying them to the drawing! By the way, now there are flexible rails on sale, bend as you like, i.e. you can put one of these instead of 4-6 usual ones, and most importantly, this long rail can be either straight or curved according to your desire, exactly repeating all your fantasies on the drawing!
The simplest and cheapest is analog model of the railway. Everything is simple here: we let the current flow along the rails (minus on one rail, plus on the other) and the locomotive goes, because in him Electrical engine. They cut off the current supply - the locomotive stopped, changed the polarity - the locomotive went in the other direction. Recently there has been digital control. In this case, the rails are energized all the time, but the peculiarity is that a command is sent to the locomotive (along the same rails), for example, to turn on the engine, or the light, etc. Each locomotive is assigned its own unique code. If there are two locomotives (even side by side), then you can control one of them, the other will not respond to these commands. In other words, can be controlled independently different formulations. Such a system is much more complicated and its cost is much higher.
For our purposes and goals of simple, old and reliable analog control More than enough with an inexpensive power supply.
Where can I buy
On many sites that describe the construction of the layout, they offer to immediately buy a starter kit. If you don’t peck money and you are too lazy to do something with your own hands, then this is not a problem (they will do everything instead of you, and by the way ... what did you forget here?). It must be borne in mind that a child can break something during the game. In other words, the layout should not be “cheap”, but it should not be overly expensive, so that the child can only look at it. In addition, we do not need only identical cars, we need variety: a platform, a car in which the door opens (for loading), a passenger car, some kind of tank, etc. Therefore, to start, I would advise you to look for used sets, and already supplement them, if necessary, with both new and used objects. In fact such sets are "rolling around" with many. In Montreal, where we live, they can be bought at /only for registered users/ . There I bought a starter kit for only $20, compared to the regular price of 100 CAD! I have also seen many good suggestions here: /*****/ But be careful, prices are often unreasonably high! Very good prices in the shop /*****/ You can also buy online, for example /*****/ , but that's mostly for padding. By the way, when I lived in St. Petersburg, I saw a lot of things /*****/ .
DIY railroad layout
You can play on the floor, but the assembly of the railway itself will take from 30 to 40 minutes, after which you will no longer have the strength to play with the child itself. Then the rails will constantly be disconnected somewhere, while the cars will leave them .. It will be necessary to endlessly put everything back! Also, contact will often be lost, you will need to look for where it does not contact. The child will walk, step on the rails, sweep away the objects he built, or even step on the train ... But You'll be crawling on all fours all this time(like me in the photo above). I have already gone through this and it “finished me” ...
Layout size
The layout requirements were as follows:
- so that he can easily rush through the door,
- so that you can put it against the wall (when we are not playing),
- so that during the game you can walk around the layout,
- to make the layout as large as possible,
- so that the child can safely play "like on the table",
- so that we, adults, do not crawl on all fours and that we do not have to make an appointment with a massage therapist after such games.
So, we measured a couple of rooms where it was planned to play the railway, figured it out and came to the conclusion that a size of approximately 1.5x2 meters would do. In order not to complicate the design of the layout, for the time being we decided to simply put it on four stools during the game.
Let's start construction
I bought 8mm plywood. Checking again, I assembled all the rails on it and sawed off to the desired size. 
On the picture at the bottom You see how the future railway is assembled. In the same way, I assembled rails on plywood before as give her right size. The railway should be made as rich and interesting as possible (if possible), and not just a "circle" or "oval". Plan various branches, sidings. Of course, I want “there was more railroad”, but at the edges you need to leave some distance so that the locomotive or wagons do not fall to the floor when derailing. In addition, it is easier for a child to construct and play something on the edge of the layout, he can build different objects there, there may be a road, etc. 
Such a large plywood will deform both due to its gravity and due to the fact that the child will lean on it during the game. And when the plywood is deformed, the rails will deform. In this regard, reinforcement needs to be made on the reverse side. By the way, this reinforcement will also help protect the wires if you want to put any additional electrical objects (like traffic lights, lights or make arrows to switch them remotely). 
I thought for a long time how to cover this whole layout. At first I wanted to just paint with paint, but it would not look very nice. The professionals themselves, who build complex models of the railway, cover everything with PVA glue, and pour special “grass” on top. But I settled on a special vinyl mat (Woodland scenics) that I saw in a store. I don't think it's ideal, maybe even better fit some fabric, BUT keep in mind that this fabric must not accumulate static electricity!
I was assured that this mat adheres well and was advised a certain adhesive. Seeing the seller of advanced years in front of me, with a serious professional expression on his face, I certainly believed him. "Cool" scientific glue turned out to be simple PVA in our understanding! And as it turned out later, the plastic did not stick normally. So be careful, double-check the advice, even if they are given with a serious look 🙂  I additionally nailed the edge of the mat to the rails with brackets. In addition, the mat will be held by the rails, as we lay the rails on the mat and nail them through it to the plywood.
Now consider how we will lay the rails, for some reason this important point is ignored. You can immediately nail the rails to the layout, but this can increase the vibration from the train, especially since we have plywood that will not effectively dampen it and light cars can go off the rails. Therefore, a kind of bedding in the form of an embankment is placed under the rails. This "substrate under the rails" is called ballast. By the way, at first I thought it was purely for beauty, until I was explained. Ballast is often made of cork, in my case the ballast consisted of two halves, which made the task easier. First, we assemble all the rails on the layout, as it should be, connecting them with contact terminals. We try to make the joints as inconspicuous as possible. And then we plant them with special carnations through special holes in the sleepers (see photo below). 
Then we lift the rails, as in the photo below ... 
And we slip the ballast under the rails. Next, we apply PVA on the layout (but not on the rails) where the ballast will be and carefully lay it down step by step, repeating the configuration of the canvas. And pin it with pins. Be careful with the glue, I got it on the arrow, I had to switch it for a very long time so that it would not stick! 🙂 
The following is also an important point. Having laid any section, we press down carefully (!!!) rails and hammer a carnation. VERY IMPORTANT:the head of the carnation should not be pressed tightly against the sleeper! There should be a very small distance between the head of the carnation and the sleeper, approximately the thickness of whatman paper or thick paper.
In the next article, we will show you this layout in the game and tell you about future plans.
- PIKO is a German company that produces everything for railway modeling, was organized back in the GDR and is still one of the leading in the world.
- “Copy” is a term… Many people make models of railways very similar to their prototype, i.e. copy. At the same time, trains are assembled so that the locomotive and wagons fit each other in terms of time of use, place of use ...
- Remember that children can play with each other (or with adults) starting at around the age of four, meaning interaction, for example, one child “pulled up” in a car, waited for the other to load it and “drive” on. Before that, they play "in parallel", you can put it this way: "in the same sandbox, but not with each other."
Here is the basic layout of the HO railroad.
We have made a new layout. Continuation of the topic .


