The use of mdf panels for walls. Fixing mdf panels How to fix wooden panels on the wall
Most of us, and especially those who make repairs with their own hands, dream of completing it as soon as possible. But the speed in this difficult matter does not always inspire trust and confidence in quality and reliability. In fact, there is a method of renovating an apartment in short lines, which practices wall panels.
Possessing undeniable advantages, natural wood has confidently entrenched itself on the market more than 5 years ago, although it is one of the most expensive materials. Today they are successfully practiced both for the repair of residential premises and office decoration. Wooden wall panels have taken the position of the most durable, versatile and convenient finishing material with which it is possible to update any part of your home.
Wooden wall panels in the interior
Wooden wall panels in the interior do not have a clearly defined direction, as they are used almost everywhere. It all depends on your imagination and lifestyle. This material well known for its heat insulating properties and ease of maintenance. Wood in everyday life is more aesthetic and classic version, most often used in libraries, as well as classrooms.
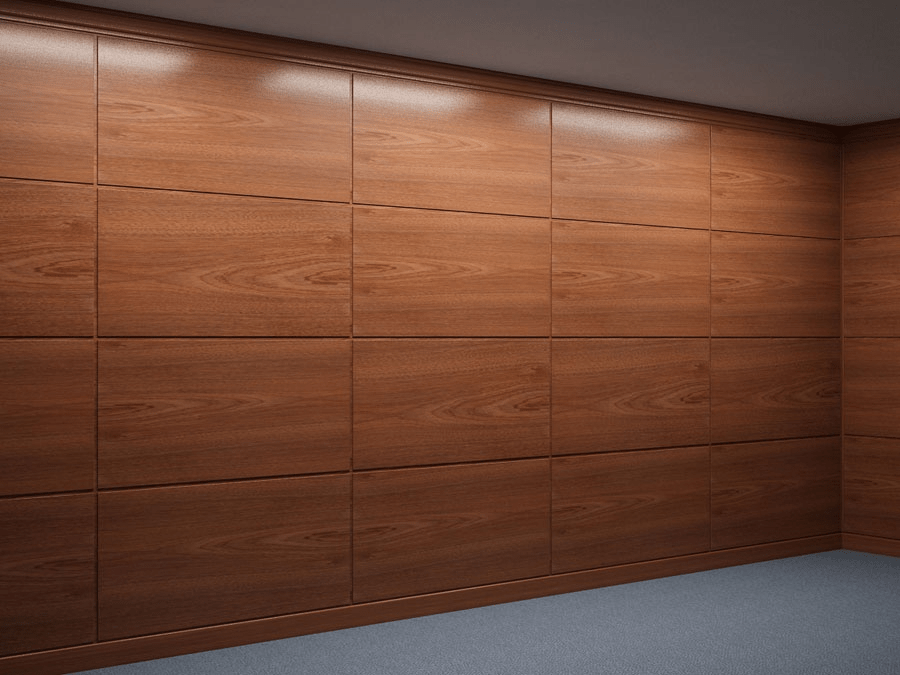
Wood panels are made from a variety of valuable species, finished with mahogany, cherry, walnut, rosewood veneer, spruce and linden. In order to give the panels a decorative wood tone, use mirror inserts, elements of artistic self made, gilding, colored lacquer, intarsia and carving.

Types of wood panels
To date, there are three types of wood panels:
- Natural wood is the most expensive type of panel. But despite this, he compensates for his cost with the appearance and multi-year term services.
- MDF - medium practical option. Fits perfectly into the interior office space and apartments. Possesses high level heat - sound insulation, and also responds positively to temperature changes and mechanical loads.
- Fiberboard / chipboard - the most a budget option. Affordable price and ease of installation attract the consumer to him, but do not forget about his fear of moisture.

Each of these types can be processed in several ways. Accordingly, depending on the chosen method, appearance wooden panel.
- Lamination - covering the surface with gloss, but before that, the material is treated with several additional protective properties.
- Veneering - the meaning of development lies in the fact that at the time of applying the top layer. Exclusively valuable breeds are used natural wood. It differs from all non-standard, attractive appearance.
- Lacquering - is best used in the processing of natural wood. Most often, varnish is used to cover wooden products. With its help, the primary image of the tree is conveyed as clearly as possible, and moisture resistance also increases.
Benefits of wood wall panels
In addition to wooden panels, there are also PVC (polyvinyl chloride) panels, they are also plastic. The technology of their production includes solid polyvinyl chloride with minimal use of a softener. Not so long ago, having appeared on the market, PVC has gained high popularity. Fire-resistant, resistant to direct contact with water, do not burn in air and durable panels, yet they have one weakness- fear severe frosts. Permissible temperature from the manufacturer is 15 °C below zero.
In turn, wooden ones have all the same, only there are a few more positive qualities.
- Wooden wall panels are a hygienic and aesthetic product that absorb sound and heat well.
- Decorative wooden panels are not demanding in their care. Their high and hygienic properties make them easy to care for. If damaged, any of its parts can be easily replaced.
- Wooden panels fit into any interior. Using a large variety of wood in creating a panel will make it as easy as possible to match it to the style of your renovated room.
- Decorative wood panels are easy to install. They are often compared to constructor assembly. Before installing the panel, it is not necessary to perfectly align the wall. The larger they are in area, the faster you will finish collecting them, and this will also help to avoid a large number of joints.
- By installing wooden wall panels, you don't have to worry about a forgotten TV cable, purchasing new appliances or an additional outlet. Any internet cable, alarm or air conditioning tube will be installed without harming the panels and the wall.
Important to know before starting repairs
By using wall panels you can hide the main flaws in the unevenness of the walls. If you think that having bought the material, you can immediately start installing it, then this is not entirely true. You need to start with the fact that this is a good reason to change old wiring. In any case, the walls need to be prepared, although we are not talking about time-consuming and expensive work, but just enough:
- using cement, cover all the cracks so that your wall does not collapse under the panels in the future;
- to prevent the appearance of mold and fungus, coat the walls with a primer.
After the work done, it is a good time to insulate your home. By filling the gap between the wall and the wood panel with styrofoam, the house will become much warmer.
Calculation of the required number of panels and their components
When calculating, do not forget to take into account the dimensions of the door and window openings premises. It is best to carry out the calculation for windows and doors separately and only then order the dimensions you need.
The number of components depends on the number of external and internal corners premises and, of course, from the specificity of the decoration of door and window embrasures.
Installation of wooden wall panels
The first thing to do before installation is to unpack the panels and leave them in the room for a day. Thus, they adapt to the humidity of the air where they will be installed.
- The next step, using the level, we check the walls for evenness.
- If necessary, align the walls of the room.
- We fix the frame of wooden panels to the wall. In this case, there are several mounting options: using mastic, glue the frame; landing on clips; using ordinary nails.
- Next, without fail, we measure the wall so that in the future each wooden panel lies flat.
- Installing the first wooden board panels from the corner of the room.
- It is important that the longitudinal groove is turned to face you.
- We attach the wooden panel to the frame with nails, and all the rest, as tightly as possible, are joined into a groove.
- In conclusion, the walls are treated with decorative molded elements.
Having dealt with the basics of installing wooden panels, we will consider four possible ways to install them. After all, each of them has its own advantages and disadvantages.

Installing wall panels with adhesives
Basically, this method is used in repairs with perfectly flat walls and the absence of special construction tools.
- In order to avoid the absorption of glue, and thereby its excessive consumption, it is first necessary to prime the wall.
- As a rule, the adhesive liquid is applied to the wall unilaterally. Using a spatula or roller, carefully apply to the previously degreased and dried wall surface.
- missed desired area glue the walls, install the panels, connecting the groove and the crest, which will save you from neglecting self-tapping screws.
If it is necessary to place a shelf or hanger on a wall panel, they usually use not a decorative zone, but a draft wall. For this you need to drill deep holes for screws and dowels. A well-chosen item and its color scheme will not only hide the usual area, but can also fit quite well into the overall interior.

Installation of wall panels with building brackets
This method is used in cases where the walls of the room are even, and the fastening process itself does not require special efforts, as building brackets are easy to use even for a beginner.
- Using the level, the first thing to do is to draw the location of the initial panel on the wall from the corner of the room.
- Install at least 4 brackets along the marking line, securing them with ordinary nails.
- We install the first panel in such a way that its comb enters the bracket.
- As a further action, we start the next wooden panel into the groove already installed.
- For the best result of the whole work, it is recommended to mark a line along which you can install the brackets, attach them and insert subsequent wood panels into them.

Installation of wooden wall panels on the mounting profile
The method used is well practiced in conditions of uneven walls, as well as in too high a humidity that does not allow the use of standard wood panel lathing.
The metal mounting profile is very similar to the profile for drywall constructions. It will definitely not get mold and is very tolerant of temperature changes and high humidity. That is why their advantage is manifested in the fact that the use of such fasteners is recommended both in the house and on the street. The installation of wall panels on metal carcass, is not much different from the layout on a wooden crate.
- First you need to clearly fix the metal rails, and then install the corner profile.
- We attach the primary corner panel to it, snapping it to the metal brackets
The current method of installing the panels prevents them from warping, and, if necessary, facilitates the rapid dismantling of the entire wall. In addition, the mounting profile, despite its price, is the most reliable, durable and strong among all.

wood wall panels price
There is no clearly set price for products in this category, since everything depends on many characteristics and factors. You may be offered a price for square meter and then some particular wall panel. Basically it all depends on the following parameters:
- panel size;
- surface treatment method;
- the amount of solid wood in the products and the type of wood;
- the presence of panel parts;
- introduction of effects (gilding, patina, etc.);
- the presence of carved elements.
MDF panels are an excellent material for wall decoration, combining such characteristics as beauty, ease of installation and affordability. This article will discuss how to properly install panels on walls made of concrete, brick, chipboard, OSB and other types of partitions.
MDF panels: characteristic features
MDF (Medium Density Fibreboard) or in Russian transliteration MDF is a board made of wood-fiber raw materials, a binder and some additives. It is made by dry (without steaming) hot pressing. The technology allows to achieve any density of the material. Empirically, it was found that for wall panels, the optimal indicator is 400-480 kg / m 3. The products are quite durable and at the same time plastic, easily withstands temperature and humidity changes, and lasts from 10 years or more.
Wall paneled with MDF panels - simple, beautiful, tasteful
Finishing panels for residential and commercial premises are narrow strips of MDF board, veneered with melamine or plastic films with a decor that perfectly imitates the texture of natural wood or natural stone, invoice ceramic tiles and porcelain stoneware, textiles or leather. There are even metallized and 3D panels on sale.
Unites all this "wealth" one general characteristics- the presence of a tongue-and-groove connection system, that is, on the one hand, there is a “thorn” along the entire bar, and on the other, a groove. This is a very convenient fixation mechanism that allows you to achieve a strong connection, as well as additional decorative effect: with a seam (similar to lining) and without a seam (solid canvas).
 Exist various ways installation of panels - vertical, horizontal, diagonal, "frame". Patterns can be combined
 - Frame - a crate is formed on the wall from wooden slats to which to attach finishing material. can be used as an analogue metallic profile for plasterboard with accessories.
- Glue. The panel is processed from the back side construction adhesive and applied to the base.
Tools and accessories
Installing MDF wall panels is not a very complicated process. To carry out the work, the following components will be required:

Installation of MDF by frame method
The advantage of this method is that the slats are attached to any type of base without prior careful preparation. The wall does not need to be leveled, the old coating removed, the paint removed. It is only necessary to prime it, make the wiring, bring out the cables and apply the markup. The markup should be considered in more detail.

First, the evenness of the wall is checked. To do this, you can use a hydraulic level, or a thread with a load at the end, popularly referred to as a "plumb line". In the discovered places of bends, marks are made in order to subsequently place small pieces of chipboard, plywood or other improvised material under the bar or metal profile - this is done to level the surface.

If necessary, a thin insulation is installed under the crate, which is fastened with plastic dowels. In the case of using mineral wool, the plates are simply inserted between the frame slats.
The logs are fixed perpendicular to the direction of installation of the panels and are attached to the wall with self-tapping screws, dowel-nails or anchors in increments of 30-60 cm.
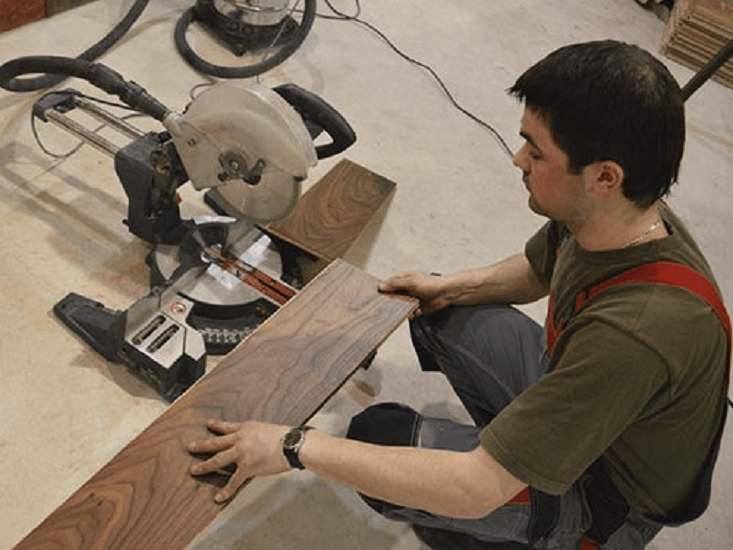
When the crate is ready, you can proceed with the installation of the panels, which must first be measured and cut into strips of the required length.

The fixing process starts from the corner. The first MDF lamella must be attached to the wall, checked with a level that there is no deviation from the vertical axis and fixed with nails or a stapler. Insert the next element with a comb into the groove of the previous one until it stops and fasten it on the other side with small nails (“driven in” at an angle of 45 °) or with a clamp.
After finishing the work, it is desirable to decorate the corners and edges with fittings. The corners are attached with glue or small carnations with colored caps.

The whole process of fixing MDF panels is covered in detail in the following video:
Installing panels with glue
If you choose this method, then your first priority is to carefully prepare the base. It must be leveled with plaster, putty, GKL or OSB sheets, carefully primed. All surface defects must be removed: pits are filled, paints and old coatings are cleaned off, soot and grease stains are eliminated, protruding metal elements cut and painted over with alkyd paint.
On reverse side the lamellas must be applied with an adhesive composition in zigzag movements, then attached to the wall and pressed. It is advisable to additionally tap on the entire surface with a rubber mallet or fist.

Lubricate the next panel as well, connect to the previous one and press. After the installation is completed, glue the decorating elements - corners, cornices, plinths.
MDF panels are an excellent decorative finishing material, which is characterized by high speed installation and the absence of the need for "wet" work at all stages of finishing.
They have panels and their drawbacks (for example, MDF, like any wood, is afraid of water and high humidity, is less resistant to mechanical damage compared to synthetic materials, work to restore damage to it is associated with a number of difficulties, etc.).
The fastening of MDF panels depends on the type of base and the desired result. The most common type of fastening is mechanical (on the base, a frame is often equipped with wooden or metal rails, to which MDF panels are attached with nails, self-tapping screws or kleimers) and chemical - using adhesives.
The latter method assumes an even monolithic base, since in this case there is no frame made of profiles or guides.
Glue for MDF - an overview of the best options
The most commonly used adhesives for MDF panels are:
- Liquid Nails . Universal adhesive, which is characterized by high adhesion, resistance to corrosion and moisture. Liquid nails do not react with bases, unlike deep-penetrating adhesives.
- Mounting (or building) foam. It is characterized by various properties such as thermal insulation, sound insulation and high adhesion.
- Universal construction adhesive. A wide group of products, divided into many segments and areas of application. For MDF panels, it is necessary to use only those adhesives that provide adhesion to the base materials (brick, concrete, drywall, tiles, etc.) and wood (MDF consists of small sawdust).
The most popular adhesive for MDF panels is liquid nails (TYTAN or TITEBOND Multi).
In addition to the economic effect, when choosing an adhesive, it is necessary to take into account the specifics of working with it (time for primary fixation, final drying time, method of application, service life, essential tool and materials, etc.).
Mounting MDF panels on glue - instructions
Consider the technology of mounting MDF using the adhesive compositions indicated above.
Liquid Nails(similar— universal building adhesives). The thickness of the adhesive layer is only 3-5 mm, so the base on which the panels will be glued must be perfectly even. Otherwise, the panels will repeat all the irregularities of the walls or peel off in places of loose fit.


Therefore, before gluing the MDF panels to the wall, it must be leveled.
- Degrease the surface, remove all contaminants, putty crumbling areas.
- Before starting work, you need to make sure that there are no irregularities using a building rule, a long level or other tool.
- The glue is applied in wave-like movements or in another way (for example, in dotted large drops) so that it is evenly distributed over the width and length of the panel. The pitch between the adhesive strips determines the force with which the panel will adhere to the base. That is, for example, when installed in places of greatest load, the frequency of application can be increased. Usually this is 10-15 cm. If the manufacturer specifies a waiting time before gluing, the required pause must be maintained.
- Using a building bubble or laser level launch pad installed at the desired angle (depending on the intended pattern and installation direction). Most often, vertical installation of panels is used. Start from the corner.
- The adhesive on the first panel must have time to grab the base before installing subsequent ones (the same principle applies to other difficult places adjoining, for example, internal or outside corners). The setting time depends on the type of adhesive (see instructions).
- Thanks to the tongue-and-groove connection, subsequent panels can be mounted without waiting (except for the waiting time before gluing).
Corners (internal or external), as well as horizontal and vertical junctions without a tongue-and-groove connection, are covered with decorative moldings (universal MDF corners). Glue should be applied to the middle of each side decorative corner(so that excess glue does not come out when pressed).
The main thing is not to damage decorative layer panels.
Option 2. Mounting foam.
The technology for mounting MDF panels using construction foam is in many ways similar to the technology for mounting using liquid nails or universal glue, with the only difference being that the wall unevenness error using foam can be higher due to a significant increase in foam volume.
The waiting time before gluing the MDF board to the base depends on the requirements of the foam manufacturer.
VIDEO INSTRUCTION
Basic installation errors
For liquid nails:
- Do not overexpose the adhesive before mounting the panel on the base. Otherwise, adhesion will be significantly lower.
- Incorrect application of glue - MDF panels will lose their attractive appearance if glue gets on the decorative front surface.
- Wiping off excess adhesive with a highly damp cloth may cause peeling of the decorative coating.
For mounting foam:
- For gluing, use foam with a low shrinkage coefficient and professional tools (high-quality guns for construction foam can regulate its supply smoothly and strictly dosed).
- If you do not wait for the setting time of the first panel, then during the movement of subsequent panels, the foam may collapse and not be fixed on the base.
The question is why it is impossible to glue MDF on liquid nails
Glue "liquid nails" is distinguished by its versatility. It is suitable for mounting a wide variety of building materials. And if “wood” is listed in the list of materials to be glued, then liquid nails are not only possible, but must also be used for gluing MDF panels.
Often, ordinary people can confuse “liquid nails” glue with sealants or silicones (they are applied using the same tool, the tube is very similar to the tube of liquid nails and they can be on the same shelf in the store).
However, sealants for gluing MDF panels are not recommended, since their main purpose is to fix sanitary ware and seal joints.
How to fix the MDF panels to the wall, and on what basis, - the decision must be made taking into account the features of the wall geometry, the size of the room, the presence of communications and constant heating. Despite immense popularity, wall slabs MDF is quite picky about operating conditions, so it’s not worth fixing it in the first way that comes to hand, so as not to re-lay the finish a second time.
Dimensions of MDF - panels
Often, consultants of trading companies present MDF boards as a lightweight version of particle boards, especially if you decipher the English abbreviation. Accordingly, it is recommended to fix them in the same way as in the case of using chipboard. In fact, MDF panels in terms of structure and production method differ significantly from particle board, which allows you to fasten the material at a lower cost and faster.

There are only three main differences:
- Thin MDF boards are made from recycled cellulose fiber, which contains virtually no polysaccharides - a staple food for bacteria, fungus and rodents. Chipboard uses ordinary chips filled with phenol-formaldehyde resin, so it is fixed with special tongues;
- Boards are made by pressing wood-fiber pulp with the addition of hydrogen peroxide. At a temperature of 250 ° C, lignin and part of the cellulose are welded with the remains of caramelized polysaccharides into a dense fiber mass. In thick slabs, the MDF core is additionally impregnated with polymer resin, which makes it possible to fasten without the risk of delamination of the material;
- The bending strength of the panel is only slightly inferior to plywood with greater plasticity and resistance to moisture. Most brands of MDF can be mounted on walls even in rooms with low ventilation.
The difference, at first glance, is insignificant, but it is the strength and elasticity of the cellulose fiber base of the MDF panel that makes it possible to fasten the cladding plates using end locks.

Even with a strong temperature difference, the MDF panel shows an expansion level much less than that of plastic or conventional wooden lining, so the material can be fastened with smaller gaps, which is especially important for plates of medium and large thickness.
What sizes are the most popular
For wall cladding, three size groups are used:
- Thin slabs, size group 5-9 mm thick, 153, 198, 200.325 and 2070 mm wide;
- Medium MDF panels, thickness 10-18 mm, width 2070 mm;
- Oversized slabs, thickness 19-38 mm, width 2070 mm.
There are no restrictions on external dimensions, and the maximum thickness of the plates is limited by the pressing capabilities to 40 mm. Two-layer MDF panels with a maximum thickness of up to 60 mm are also produced, used for the manufacture of reusable formwork and roofing filing. But the quality of the outer surface of such plates is quite low, so they are not used for wall decoration.
Installation of MDF panels
Pressed cellulose fibers retain heat and absorb noise much better than plastic or wood. In addition, the MDF panel has a certain anisotropy of properties, it can be cut and processed in almost any order. Mounting the panels is easy and quite within the power of even a novice tiler.
For domestic purposes, panels can be mounted in three ways:
- Lay the plates on the glue;
- Mount the cladding on a wooden or metal frame;
- Installation of MDF panels by hanging.
The latter case is used as an exceptional way of cladding walls in a house made of timber or logs. It is necessary to fix the MDF boards on the ceiling suspension profile with a small gap between the floor and the bottom edge of the board. The cladding is suspended on the profile, and as the walls shrink, the MDF sags along with the timber material.

It is clear that for wooden house it would be preferable to use narrow slabs, 190-200 mm wide, while MDF is better fasten in the vertical direction. If it is not known exactly about the planned amount of shrinkage of the wall, then it is best to fix the decorative finish with a gap increased by 2-3 cm. Firstly, this ensures that the floor will not tear the slabs off the walls in case of excessive shrinkage, and secondly, the slots will provide a normal level of ventilation and airflow between the panels and the wall.

Mounting on a metal frame
Installation of panels on a supporting frame made of galvanized profiles is recognized by experts as the most rational and reliable way to fasten any pulp and fiber materials. Even heavy plates with a density of up to 1.5-1.8 g / cm 3 can be attached to the metal frame without any problems. The metal will not lead to condensation or blocking of the walls as a result of pipe breaks, water leakage in the apartment on the floor above or roof breakage.

The assembly of the frame begins with the installation of the starting profile and side rails. MDF panels are lightweight, so it is enough to install a row vertical profiles No. 50 in increments of 40-50 cm. The use of a galvanized U-profile makes it possible to fix the MDF to the walls of the room about two to three times faster than in any other way.
Two or three drops of silicone applied to the profile will even out the load on the wall and avoid the slamming of the cladding in strong winds if there is a ventilation gap behind the decorative MDF lamellas.
Mounting on a wooden frame
The easiest way is to mount MDF panels on a wooden frame. There are two options for wall cladding using cellulose fiber panels. It all depends on the size of the room and the condition of the walls.

If a small reduction in space due to the crate is not critical, the wooden slat frame is sewn onto the walls using metal hanger holders. For small and small rooms, most often it is necessary to partially cut and knock down a layer of plaster in order to level the surface along a vertical plumb line, to make it as even as possible.

In any case, the starting bar is initially laid on the floor and under the ceiling. With the help of a long building level, the installation points of the suspensions are marked on the wall and the minimum required overhang of the side lobes of the fasteners is determined.

In the event that it is planned to install horizontal MDF lamellas, the bearing strips are mounted vertically. For the installation of full-size panels with a width of more than 200 mm, the walls are sewn up in both directions. Each wooden plank of the crate is aligned with the starting guides and fixed with suspension petals using self-tapping screws and a screwdriver.

For relatively even and dry brick, concrete or block walls, the batten can be fixed directly to the wall using dowels. In this case, the work is added, since each plank before fastening has to be adjusted for a long time with the help of washers in order to maintain a single vertical plane. But you can save 3-4 cm inner space, which is very useful, for example, when decorating the walls of a small bathroom or corridor.
Glue installation
Using a crate or load-bearing frame always eats up an extra 3-7 cm of space on each wall. The use of a frame system is considered good decision, but it is not at all necessary to fence the frame jungle if the walls of the room for the future MDF cladding panels are smooth, without serious defects and deviations from the vertical.

In this case, it is enough to clean the walls, prime them with an acrylic primer and apply a thin layer of insulating putty. The lime underlayer will help to further level the walls and improve the applicability of the MDF boards to the supporting surface.
Laying panels on the walls with glue is carried out in two versions:
- Each MDF is glued to the wall with one lamella, from ceiling to floor, with fixation along the end edge using self-tapping screws and plastic plugs;
- The material is placed on the wall horizontal stripes from corner to corner after assembly and pasting of corner and edge parts.
If the lamellas are glued directly to the wall, then the end joints are not glued or treated with sealing materials. Most often, with the help of glue, rather large panels are laid on the walls, 40-60 cm wide. This method is more advantageous from a technological point of view, since the load from the rather large weight of the MDF panel is distributed not over several clamps or brackets, but over the entire surface of the plate and walls. What does it give? Greater reliability, if the upper row of MDF lamellas breaks, the middle and lower rows will hold the entire structure.

Before fixing the MDF panels to the wall, the reverse side is covered with small portions of glue. It can be dots, spirals, short stripes. The main thing is that the adhesive material is evenly distributed over the surface of the wall.
As an adhesive, it is best to use automotive sealant, polyurethane adhesives and home-made adhesive masses based on a mixture of acetone and foam. Acrylic and polyvinyl acetate adhesives hold MDF panels rather weakly.
For your information! The MDF sticker on the sealant provides the ability to cut and remove the panel from the wall if necessary without damaging the surface. More rigid alkyd, polystyrene and acrylic adhesives can tear off part of the wrong side.
Fastening MDF - panels to the wall
The process of installing cellulose fiber panels is relatively simple and straightforward even for a beginner. If a horizontal laying method is used, then the bottom panel or lamella is installed first, directly resting on starting bar frame. It must be laid on glue, aligned with the building level and fixed with a stapler or self-tapping screw.
Before laying the next panel on the wall, it is necessary to install the corner or edge elements of the cladding, fix them on the wall, and only then proceed with laying the next parts of the MDF.
How to fasten MDF panels to a bar or profile is selected individually in each case, based on the fastening conditions and the dimensions of the material. Relatively thin, 6-9 mm lamellae are snapped into place with tongue-and-groove locks, after which the free end is sewn to the beam with staples with self-tapping screws. If it is supposed to be possible to periodically remove the MDF lining from the wall to revise the communications or wiring laid behind the decorative finish, then the panels are placed on the clamps.

Thick plates are mounted directly on the walls with glue and dowels, sealing the joints with acrylic putty and further gluing wallpaper or PVC film.
A difficult option, how to mount MDF on walls with insulation
MDF boards are much simpler and easier to handle than heavy drywall, plywood or plastic, while the strength of the panels is enough to build two and even three-layer cladding options from a fiber composite with insulation as an intermediate layer.
For example, cold exterior walls made of profiles, siding or concrete blocks are hemmed from the inside with MDF boards of HDF class, with a density of 800-1800 kg / m 3. The thickness of the plates is 25-40 mm. The laid panels are sewn together at the joints with oblique self-tapping screws and staplers, the seam itself is rubbed with polymer mastic.
The material is treated with impregnation, which provides good vapor transmission with high resistance to surface condensate. Plates are attached to the outer walls "on the cold" - with the help of steel dowels and joiner's screws. WITH inside slab sheathing is sewn with wooden or trimmed slats from the slabs.

A steam membrane is pulled over the laid thermal insulation and clogged with horizontal slats with a section of 20x20 mm. The last step lungs are sewn onto the lath crate decorative panels MDF class LDF with wood texture, natural stone or veneered.
Due to the low density of LDF, 200-600 kg/m 3, MDF panels perfectly pass steam, which is removed through the ventilation gap and the ceiling ventilation joint. In this way, the walls are sheathed in summer kitchens, balconies, verandas, any premises with frame-type walls.
Features of finishing MDF - panels
Most professional finishers prefer to work with MDF as there is no dust or dirt like drywall, installation is faster and there are far fewer problems.
The assembly and installation of MDF on walls is in many ways similar to laying laminate floors, with the only difference being that there are more options for choosing schemes. decorative design premises and a much more complex arrangement of the corner and slope sectors of the walls.
slopes
The scheme for arranging door or window slopes is no different from drywall options. If the lamellas were laid vertically on the walls, then to design a window or doorway, it is enough to cut out a panel of the required height and width and stick it on the slope plane mounting foam or sealant.
If the walls in the protection room horizontal panels, then the slopes will have to be recruited from segments on self-tapping screws and plastic plugs.

corners and cracks
Slots and gaps are always formed between the laid additional elements and the main part of the cladding. They have to be eliminated with the help of special decorative corner plates and decorative skirting boards.

All auxiliary decor is glued to Titanium or Mounting Moment for MDF, a small amount of glue is applied to the edge along the gap, after which a corner strip is installed on the joint. To prevent the decor from moving away, the corner is temporarily fixed with tape.
Sockets and switches
Every room has at least a couple of outlets and one switch. In order not to dismantle them during the installation of MDF, proceed as follows: measure the coordinates of the location of the outlet on the wall, after which a hole of the appropriate shape and size is cut out with an annular drill or a jigsaw. When installing the MDF panel, the size and position of the hole is specified and cut with a sharp knife.
It remains to install the panel, fix it on the wall, and close the remaining gap with a decorative frame.
Conclusion
The details of the process, how to fix the MDF panels to the wall, must be thought through and planned in advance, before starting work on decorative trim premises. The process itself is not particularly difficult, but in any room there are many problem areas where the fastener method has to be almost invented on its own. In this case, it is better to draw the details and the fixing method on the diagram so that you don’t have to rack your brains and waste time in the process.
In the modern world, when you need to quickly finish the walls, the MDF panel is especially popular ( fibreboard medium density). The advantages of this material are the average cost, as well as high environmental friendliness. For self-installation of MDF panels, many years of experience are not required, it is enough:
- know the features of handling the material;
- understand the principle of this type of finishing;
- be able to prepare the surface, accurately calculate and make markings.
For information. MDF is a synthetic mixture of sawdust mixed with glue and pressed into sheets. standard sizes. The material has the strength of plywood, rigidity and high quality. Products made from this material are designed to create home interior in the form of: panels, finishing, decorative partitions.
Fastening the MDF panel to the wall can be done on frame structure or glue. For the second method, the "Liquid Nails" adhesive mixture is used. When using it, it should be borne in mind that the finished MDF sheet panels have their own color. Therefore, the sales consultant must show samples of the cured adhesive mixture for selection.
There are various tools used to install MDF panels. They are used depending on the type of fastening of the structure. In addition to the standard tool kit, a level is often required, electric jigsaw and a drill with nozzles.
Important! In progress interior decoration often the question arises: "Is it possible to glue wallpaper on MDF products?" This is quite possible, however, before work, the wood-fiber sheets must be carefully primed so that they cannot absorb glue during installation.
Panel fixing methods
Known ways to attach MDF panels to a wall are frame and adhesive. The last installation sets the need for evenness of the wall. For an uneven surface, you can first put GKL sheets on self-tapping screws and glue the sheets to them.
The nuances of mounting the panel to the wall
Regardless of the installation method used, preparation almost always begins with cleaning the walls. The more thoroughly they are cleaned, the better will be the basis for finishing. However, you do not need to clean the walls to the very concrete base enough to remove old paint as far as it is removed. This is easily done by chemical, thermal or mechanical methods which are very affordable these days. With their choice should not be a problem.
For information. If the paint, when removed from the walls, stubbornly does not want to be scraped off, it can be left - this means that it has become akin to a wall.
It is quite possible to fasten wall panels to the adhesive mixture yourself, but the main thing:
- be able to prepare the surface;
- know how to glue MDF boards;
- glue MDF panels with a fit close to the wall to avoid air getting under the structure;
- check the evenness of the attached panel.
If it is decided to mount the MDF wall panels on the crate, then it is recommended to choose a convenient time for the process of nailing the crate. You should not engage in fastening the crate in the early morning, late evening, on weekends or holidays - as it is very unwise to annoy the neighbors.
The next step is priming, which protects the walls from mold. It is important to note here that an excess of primer for the wall is not terrible. But insufficient priming can subsequently affect the quality of the skin. Fungal spores, appearing in one place, can gradually spread further.

Wireframe method
Panel fixingMDFperformed by two types of methods based on usage:
- wooden crates;
- metal profiles.
Step-by-step installation of a wooden crate
The easiest way to mount MDF panels on walls on your own is to prepare 20x40 mm slats to build a frame out of them. The rails will need to be fixed to the guide profiles using self-tapping screws and a screwdriver.
For information. The convenience of modern installation lies in the fact that the joining of parts in the same plane is carried out almost without difficulty.

So, with a drill in hand and a fixed drill in the horizontal marks, you need to drill holes of the desired depth. Here the rule is simple: the more often you distribute the fasteners, the more reliable the final finish will look.
As the holes are ready, they start hammering the rails with a hammer and fasteners. The placement of the rails is planned perpendicular to the direction of the mounted plates.
Panels are mounted using:
- clamps,
- self-tapping screws,
- carnations with a small hat.
As a rule, preference is given to what is more convenient.
Important! Method using wooden crate requires protection: the use of antiseptics, staining with special paints.

The fastening of the panels begins with the usual convenient side. The first slab is placed in a corner, and the subsequent ones are installed according to the assembly algorithm of the design Lego, the so-called “mom-dad” among the builders. MDF panels are produced with a characteristic elongated tongue, thanks to which it is convenient to fasten.
Important! All sheets should be fairly tightly aligned. Even laser level not achieve alignment if there is no proper docking between them. To achieve the result, a proven grandfather method- plumb lines.
This is how MDF panels are installed on the wall. It is not difficult at all, the main thing is to be patient and show diligence.

For information. The installation algorithm for decorative MDF partitions is the same: installation is carried out based on the initial fixed panel.
Fastening MDF to a metal profile
The strength of the metal profile is durability and reliability. This is a universal part used in almost any field of human activity. To install the frame on a metal profile, you need to prepare the profile itself. The design of the crate is attached to the wall with self-tapping screws 4-6 mm. If the wall is load-bearing, then the diameter of the fasteners can be reduced. Holes in the wall are drilled in accordance with the diameter of the plastic "nest" of the fastener.
glue method
However, the metal frame and wooden frame for all their advantages, the methods are quite expensive. You can fix the MDF panels to the wall with an adhesive method, which provides no less reliable fixation of the structure. The technology for installing MDF wall panels on liquid nails is the simplest, however, you should follow the recommendations for installation.
For information. Even small finishing fastening nails will be noticeable, but using the adhesive method you can get good result- the perfect look.
Minimum layer adhesive composition is only 3-5 mm, so defects and deviations in the base are practically not allowed. Otherwise, it will be extremely difficult to achieve a result - the panels will simply repeat all the irregularities of the walls or peel off. Therefore, before gluing MDF panels, the wall must be leveled.
For use as a finish on MDF panels, a couple of coats of insulating primer are applied, followed by a coat or two of putty. After that, check that the coverage is 100%. This is done to prevent swelling and black mold. If there are hidden, unpainted surfaces, joints should be caulked to prevent moisture ingress.
Important! It is necessary to glue the MDF on the wall in such a way as to ensure a snug fit of the panels to the wall surface. The perfect adhesive for MDF panels ensures that the panel attaches securely and lasts for years to come.
There is another option on how to attach MDF panels to a wall, which combines both adhesive and frame methods.

Assembling MDF panels is quite simple: the first panel is attached to the rail, the comb of the second panel is inserted into the groove of the first. And the process is repeated. Thus, the panels are fixed to the very last, it remains only to install decorative corners.
Installing a decorative corner
Decorative corners are used purely for aesthetic purposes. They are attached upon completion of the fixation of all components of the finish. To install a corner, it is better:
- first fix with mounting tape;
- then glue firmly.
The liquid nails adhesive mixture is best suited for gluing corners, which will not damage the coating and securely fix all decorative corners.
MDF panels are beginning to gain more and more popularity. Among the advantages of this finishing method, it is significant that such installation can be carried out by one person without any help. Moreover, special experience is not required for this. You only need to first familiarize yourself with how to do it right MDF mount panels to the wall.
Video


