How to make a potbelly stove with your own hands drawings. How to increase the efficiency of a potbelly stove without the help of a specialist and serious financial investments. What is required for work
Often, heating technical spaces turns into a huge problem. Electricity is quite expensive, as it leads to considerable heating costs. The best way out in such a situation is the use of alternative energy sources.
A variety of stoves are used to burn coal, firewood and other fuels, including a potbelly stove, which is characterized by affordability and simplicity of design.

What is a potbelly
Potbelly stoves found wide application even among our ancestors due to the simplicity of design.


Let's talk about what it's made of efficient potbelly stove personally:
- from a gas cylinder - a suitable option for which plump models are suitable;
- from a flask - too best option, because there is a door here, you only need to attach the chimney;
- from a barrel - most often long-burning potbelly stoves are made from it, since the capacity makes it possible to organize a rather large combustion chamber;
- from the safe - why throw away old design if she can serve well.

Potbelly stoves, made by hand, are made of metal using a special tool.

If you are interested in how to equip a potbelly stove with your own hands, then its device is quite simple. The basis includes a container that plays the role of a special chamber from which the chimney should be removed. Ahead, doors are being equipped - prepared fuel is loaded through one, and ash is removed through the second.

The container inside is divided by a steel grate, through which air is supplied - it is through it that the ash that is formed during the combustion of fuel is eliminated.

How to create a potbelly stove
As for the instructions for creating a potbelly stove, it is not complicated. First of all, it is important to decide on the material. Prepare these tools:
- Sandpaper for processing metal edges;
- Bulgarian;
- Roulette;
- welding device;
- Drill, as well as drills.

Contact a professional who will create drawings of a do-it-yourself potbelly stove. After that, you can start welding the furnace with excellent heat dissipation.

Potbelly stove from a barrel
One of simple ways- a large stove from a barrel. It should equip the grate, chimney, and doors. Manufacturing begins with the construction of a non-combustible base. Suitable option brickwork is considered, on which you need to equip the barrel. It will take a couple of days to create it. Then we proceed to the rest of the work.

Ahead of the structure, it is necessary to cut a small hole for the door. For these purposes, you will need a jigsaw for working on metal.


The existing piece of metal is the door, to which hinges, constipation, and also a handle should be attached. Then another part of the loops should be welded to the barrel. On the other hand, a metal loop should be welded for constipation.

Below, an ash pan should be equipped with the required door, for which ten percent of the total volume must be allocated. The door is created by the method described above, but it must certainly be, because it eliminates the ash, and it also acts as a blower. Then you can start creating grates:
- Remove the lid from the top of the barrel;
- We create a grate, while using pieces of metal;
- We weld the grate inside.

We equip the necessary hole in the lid, then weld a segment of a similar diameter as a hole for the chimney. Then we weld the lid.

A mini potbelly stove made by oneself is ready, now it is necessary to equip the chimney and load firewood into the container to set it on fire.


We created a potbelly stove with our own hands, photos can be seen on the website. She has an exceptionally roomy chamber. Important to pay Special attention at the moment that a hole can be arranged in the upper part of the lid. You can use not a barrel, but a cylinder, or a small piece of pipe of the required diameter.

Structural modernization
To increase the efficiency of the potbelly stove, you can use sheet metal, which closes the structure from three parts. The metal protects the case. However, this is not all - there is a draft inside, convection occurs. In this regard, the efficiency of the furnace increases.

Another stage of modernization is the arrangement of a certain bend on the chimney. The issue is that heat is eliminated through it. By extending the chimney length with a section horizontal view, you can use it when heating the area. The disadvantage of this approach is the deposition of a huge amount of soot.

Another invention is a potbelly stove, equipped on the water. It will provide an opportunity to increase heating efficiency, as well as minimize fuel consumption. Such a potbelly stove functions with water.

In this embodiment, a converter is used that splits the steam. As a result of its functioning, a flame is formed in the chamber. It will not be possible to carry out such modernization on its own, but in the future it is quite possible.


DIY potbelly stove photo


A do-it-yourself potbelly stove is great for heating garages. With its help, it is possible to organize the heating of the dacha, in which they live on short visits, it can act as a temporary heating unit until the main heating is established.
With this design, you can not only heat various premises but also cook food. And one of key benefits This stove is that with a great desire, almost every person can properly weld a potbelly stove, doing everything himself and saving on the services of third-party craftsmen.
You can make a potbelly stove with your own hands from almost any improvised metal products. An old milk can, a piece of pipe, a barrel, sheet metal, etc. are suitable for this. A properly made potbelly stove warms up pretty quickly. At the same time, it cools down quickly, but to eliminate this drawback, it is usually enough to insulate the room more thoroughly.
Step-by-step instructions for assembling a potbelly stove from a can
To properly weld a potbelly stove, you must first prepare a suitable drawing. There are drawings of units of rectangular and round section. So, you can make a potbelly stove with your own hands even from an ordinary milk can. A diagram of such a design is shown in Fig. 1.

Figure 1. Potbelly stove from a can.
To weld such a potbelly stove with your own hands, you will not need any expensive and hard-to-reach materials and tools. The following will suffice:
- Metal bar with a diameter of 0.6 mm.
- An old milk can.
- Chimney. With a great desire and appropriate skills, you can do it yourself.
- File.
- Chisels.
- Hammer.
Some of the variations discussed below will require the use of welding machine. If desired, you can do without it. But welding allows you to get more robust design. Any specific dimensions will not be given, because in the case of a potbelly stove, everything is purely individual. Also, the dimensions depend on the capacity you have.
Work begins with the preparation of the blower. To do this, you need to cut a hole in your can slightly below the neck. Give it a rectangular shape. Finish the edges of the resulting hole with a file. Cut a hole in the bottom of your can so that in the future the chimney pipe enters it quite tightly. To do this is extremely simple:
- First, prepare markings at the bottom of your can, where the chimney will pass in the future. Make the hole diameter approximately 1.5-2 mm smaller than the diameter of the future flue pipe.
- Take a hammer and chisel. Use them to make a hole according to the previously prepared markings.
- Take a file and straighten out the resulting hole. It is most convenient to use a file with a round section for this.
- Push the flue pipe firmly into the hole. If it does not enter, you will still have to work with a file over the hole. The pipe should go in pretty tight.

Figure 2. Potbelly stove from a barrel.
Next, you will need to take a metal rod and bend it into a snake. In the future, the snake will serve as a grate. Bend the finished grate so that later it can be inserted into the neck. Align the inserted grate already inside the container. On this do-it-yourself potbelly stove is ready.
If you wish, you can make a reliable stand for it. And if you make a blower damper, you will get a do-it-yourself potbelly stove with the ability to control draft. The shutter is extremely simple.
So do the simplest potbelly stove you can do it yourself without any problem. This does not require any special materials and tools. You just have to install a homemade stove where you need it and connect the chimney. Such a home-made unit will properly heat the room until you want to replace it with a more advanced system.
A guide to making a potbelly stove from a pipe
This option will require the use of welding. Such a potbelly stove is going to do it yourself from a cut metal pipe. The scheme of the unit is shown in fig. 2.
If desired, it can also be made from old barrel. Everything is done in a similar way. First you need to take the reinforcement, make a grate out of it and weld it to the body. The diagram above shows that this potbelly stove is equipped with two doors for the combustion chamber and the blower with its own hands. Such a stove can be used not only for quick and high-quality heating of the room, but also for cooking.

Figure 3. Brick screen.
It is very fast heating that is one of the most important advantages of such stoves. However, their main drawback follows from this - they cool down rather quickly. Metal is not the best heat accumulator. However, you can easily eliminate this shortcoming. You just need to overlay the potbelly stove with bricks with your own hands. This material, unlike metal, accumulates heat very well and retains it for a long time.
The only drawback of the design is that it will take a long time to warm up the room. But you can easily get rid of this disadvantage. You just need to create a special brick screen with ventilation holes. Such systems are used in baths. You can get acquainted with the scheme of such a brick screen in fig. 3.
The diagram above shows that the brick screen is installed at a certain distance from the stove body. This is not random and an informed decision. This design ensures the most efficient and rational use heat generated by the furnace.
Screen installation guide
Having correctly made a brick screen, you will save your homemade potbelly stove from lack of rapid cooling. During operation, the stove will release heat, it will heat the brick, and the brick, as you know, is able to accumulate heat and keep it for a long time. As a result, you will already turn off the stove, and the room will be warm for quite some time.

Figure 4. Potbelly stove with chimneys.
Masonry should be erected at a distance of about 10-15 cm from the walls of the potbelly stove. Above and below the masonry should be ventilation holes. Air will circulate inside the brick screen. Warm will be discharged into a heated room, and cold - to cool the walls of the furnace, protecting them from rapid burnout.
Sometimes a brick is laid out around the potbelly stove in a checkerboard pattern or without a gap. This approach is absolutely wrong, forget about it. If you do the masonry without a gap, then the efficiency of heating the room will decrease significantly, and excess heat will literally fly away into the pipe. The chess order is bad because, if it is present, the air cannot circulate normally. The area of bricks is much less than solid.
As a result, it will cool down very quickly. The heat from the potbelly stove will simply pass through the masonry, as if through a sieve. Heat loss in such a situation is 50% or more. The room, of course, heats up pretty quickly. But it will also cool down at a very high speed. This method is well suited for new buildings in which there is no main heating yet, but the room needs to be warmed up. In finished buildings, it is better to refrain from it.
If there is no money at all, then you can not buy a brick, but even use broken products. But this option will fit only for temporary use.
Improved design of a homemade potbelly stove

If you wish, you can make a potbelly stove more complex design, using for this metal boxes or sheet metal. Get a good unit rectangular shape. The diagram of a rectangular stove is shown in fig. 4.
This design assumes the presence of smoke circulation. Thanks to this solution, fuel consumption is significantly reduced. Draft control doors can be installed. This will save even more fuel. Dampers and smoke circulations provide the most efficient operation of the potbelly stove and allow significant savings on fuel.
Thus, the historical name of this furnace has absolutely nothing to do with reality, since there is simply no excessive fuel consumption during operation.
The name "potbelly stove" was assigned to this beautiful stove only because of a misinterpretation.

It is important to be able not only to cook a potbelly stove correctly, but also to know the features of its installation and operation.
If the walls of the house are made of wood or panels, then the stove should be installed no closer than 1 m to them. The rules for the safe operation of such units provide for the mandatory installation of a smoke exhaust pipe. It should consist of one section.
If necessary, you can, of course, assemble the pipe from more than one section. But here it is important to follow the rule according to which one section of the structure must fit tightly into another. In this case, the lower must be entered into the upper. If the pipe has to be led through a wall, a thermal barrier must be installed at the passage point. It is usually made of brick. It is better not to use concrete. With constant temperature changes, it will crumble pretty quickly.
If you wish, you can buy or make additional fuel storage accessories. For safety reasons, they must be installed at a certain distance from the stove. A modern unit can not only warm up the room with high quality in just 15 minutes, but will also become an excellent interior decoration. Successful work!
Potbelly stove - perfect solution in conditions when it is necessary to provide heating of small-sized premises (garage, utility room, bath heating), spending a minimum amount Money. You can save money by using materials that almost everyone has, as well as by the ease of doing it yourself. Next, we will consider what a potbelly stove can be made of and give specific drawings.
What tool is needed?
Regardless of the selected drawing or design features potbelly stove, for work on its manufacture, in addition to materials, you need to prepare the following tools and equipment:
- Hammer.
- Bulgarian.
- Welding.
- Drill.
- Drill.
- Brush.
- Chisel.
- Pliers.
- Roulette.
It is understood that each of the listed tools is designed to work with metals.
Choose a view and get started
Let's get started:
- According to the given dimensions, it is necessary to cut out the elements from the sheet, from which the furnace will be made. Try to clean up the cut edges as much as possible.
- A part is being prepared for attaching the components of the potbelly stove - a pipe with holes.
- Parts of the upper tank are being prepared for the installation of a chimney pipe. To do this, according to the data given in the drawing, make a hole shifted to the left in relation to the center. Also, another hole is made at the bottom of the tank (shifted to the right) - it is intended for installing a connecting pipe.
- The constituent parts are welded together and a finished tank is obtained.
- The lower tank is welded in the same way. Only a hole is made to install the pipe in the center. You also need to make another hole with a slight offset - processing will be poured into it. A special sliding cover is made above the filling hole.
- The lower tank is attached to the upper one (they are welded to connecting pipe). Structural strength should be given with brackets.
- Do not forget to weld the legs to the lower tank.
- To increase the service life, the furnace is cleaned and painted.
Attach the potbelly stove to the chimney and try to heat the garage. To do this, pour fuel into the lower tank and set it on fire. When it flared up, you need to close the processing hole with a sliding lid.
Important: To paint the structure, use special heat-resistant paints.
Rectangular wood stove
This option is suitable when you need to heat a garage or sauna rooms designed for relaxation.
The features of the model, the manufacture of which we will describe further with our own hands, lies in the high heat transfer and the ability to adjust the traction force.
Our oven will measure 45x45x80. Such dimensions are enough to heat the average room. It will fit long firewood and is easy to move.
In this case, we will not give a specific drawing, and will try to explain as much as possible in words. Before starting work, we buy:
- Steel 3-4 mm thick. A sheet and a half by two meters will be enough.
- Piece of pipe. Choose from diameters from 90 to 100 mm. Length: 0.4 m.
- Rebar 16 mm. You need exactly 6.2 m.
- Five kilograms of electrodes.
- Four door hinges.
- A steel rod, half a meter long and about 10 mm in diameter.
- Seven meters of a corner with a 40 mm shelf. The walls must be 5 mm thick.
When everything you need is prepared, we begin to work with our own hands in the following sequence:
- The future walls of the structure are cut out of the sheets.
- The corner is welded in such a way that a frame is obtained. When performing this and the first paragraph, you need to remember the above dimensions of the stove (45x45x80).
- The reinforcement is cut and welded to the frame with an interval of 2 cm.
- The finished frame is scalded with tin.
- According to the diameter of a smooth bar in the pipe section, which will be the chimney, 2 holes must be made. The pipe is welded to the frame (before that, you need to make a hole under it).
- A curved rod is inserted into the chimney openings. It must be in the form right angle. A piece of round tin is welded to it, slightly smaller in size than the inner diameter of the chimney - it will be used for adjustment.
- The potbelly stove must have doors. They are cut straight out of the body. Loops are welded onto the removed piece of metal, with the help of which they are attached to the furnace.
- Bolts and handles are installed on the doors, which can be made by anyone. comfortable look. The main thing is that they guarantee the maximum fixation of the door (if you do not want to burn down the garage).
- When the work is finished, you can check the result of the work with your own hands and start heating the garage.
Important: To ensure traction, the doors are attached so that there are small gaps.
Potbelly stove from a pipe
This option implies the simplicity of doing the work with your own hands and aesthetic appearance, which will allow you to heat not only the garage, but also small rooms in the country.
Work algorithm:
- The pipe is taken and cut to the desired length.
- 2 holes are cut out in the side part: for the ash pan and the firebox. The distance between them is approximately 15 cm.
- The cut out parts of the metal will serve as doors. Their size increases with the help of welding on top of metal strips. You also need to immediately install the handles that secure the door.
- Corner brackets are welded inside the future stove (the grate, welded with your own hands from reinforcement or bought in a store, will be held on them).
- The grate is installed.
- In the circle of metal that will close the pipe opening (the upper part of the potbelly stove), you need to make a hole for attaching the pipe (chimney).
- The bottom and top of the stove are brewed.
- The pipe is welded.
- Hinges are welded and doors are installed.
- The furnace in the places of welding joints is cleaned and painted with special paint.
- The last stage is the connection to the chimney brought outside the premises.
If everything is done correctly, the potbelly stove will be able to completely heat the garage or other room without large sizes.
can stove
From any old can, a potbelly stove can be made with your own hands. For this you need:
- Can.
- Piece of pipe.
- Armature or wire.
Let's get started:
- On installed in horizontal position can, mark the location of the rectangular blower. It must be placed under the cover.
- Cut out a hole for the chimney. It can be in the bottom or wall.
- We make a grate. It is easier to make it from steel wire, which, in a bent form, is brought into the middle of the future stove and straightened. It is necessary to arrange the zigzag in such a way that it is most convenient to fill the potbelly stove with firewood.
- We attach the legs.
- We weld the chimney.
The design implies a minimum of manufacturing costs and you do not need to have professional skills to perform the work. With its help, you can safely heat the garage and other utility rooms.
Gas cylinder stove
If you have a site lying around gas cylinder- use it to create a potbelly stove.
Work sequence:
- Cut off the faucet and make a hole plug.
- Cut a hole in the bottom for the door. From the resulting piece of the bottom, with the help of scalding it with a strip of metal, doors are made.
- A lock-handle is attached to the doors and they are mounted on the cylinder using hinges that are welded.
- In that part of the cylinder, which will be the bottom, you need to make a grate. To do this, it is enough to make holes.
- A tin box is welded under the holes in the bottom, into which soot and waste will fall. Doors also need to be made in front of the box - they will be used to adjust the thrust.
- The stove must be raised from the ground with the help of legs. For their manufacture, an ordinary pipe is suitable.
- A chimney is welded into the upper part of the cylinder.
- If necessary, a hob can be arranged on the surface of the structure.
Such a stove will heat a garage or small house in the country.
A potbelly stove is a fairly simple device for heating rooms. When doing work, remember that the stove must not only heat, but also meet the minimum fire safety requirements.
Beautiful a budget option heating and cooking stove - potbelly stove. It is incredibly convenient and easy to set up and operate. It is good to have such a device in the country, in the workshop, and in many other places. A water potbelly stove can heat several rooms. On sale today there are many of the most different models, from unfussy functional to sophisticated retro. But their price cannot be called low. Therefore, craftsmen with some experience, having tools and suitable metal, can try to make an effective potbelly stove with their own hands.
 Drinking from a balloon
 The simplest version of a potbelly stove can be made from improvised materials. A thick-walled barrel, an old industrial can or a gas cylinder (of course, empty) is suitable for this.
Resourceful craftsmen use pipes of suitable diameter, disks from overall wheels and sheets of metal.
When choosing the initial tool for work, it should be taken into account that too thin metal deforms when heated strongly, and the product from it will lose its shape. Optimal Thickness material is 3-4 mm.
For comfortable and effective work to make even a small potbelly stove with your own hands, you will need the following:
 There are potbelly stoves different types but the essence is the same
 - – angle grinders, as well as special consumable to it - grinding wheels and cutting discs.
- Metal brush.
- Welding machine with electrodes, protective mask and suit for work.
- Hammer for separating slag.
- Measuring tools: tape measure, marker, chalk, metal ruler, folding rule.
- Chisel, pliers, hammer.
- Drill for metal with a set of drills.
The choice of a particular model depends on many components: the place of future placement, its size, the purpose of the furnace. For residential premises, it should have more aesthetic appearance, therefore, for indoor placement, it is better to prefer the option of a pipe segment or metal sheets.
 Neat do-it-yourself potbelly stove
 Events with balloon No. 1
Several rows of holes are drilled in the bottom of the potential firebox (sidewall of the cylinder), which will play the role of a kind of grate. An ash pan is located along it - in our case, a box made of thick metal. It must be equipped with an airtight door that prevents ash and hot coals from escaping.
On the sides of the ash pan, the legs of the structure should be welded. A round hole is made on top of the lying balloon.
The vertical part of the potbelly stove will stand on it. It is convenient to make a door from the head of the second cylinder; a branch pipe with a valve is not welded into it - to regulate the intensity of combustion. If the door hinges are located at the top, then the lid under its weight will fit snugly against the furnace opening, which will reduce air suction to a minimum.
Events with balloon No. 2
 The most important thing here is cutting out according to the markup of such a shape that will definitely fit on the first cylinder: they are connected by welding. In this part of the furnace (vertical) there will be an additional heat exchange chamber. Getting into it, the smoke lingers, not immediately leaving the pipe, but circulating for some time.
Metal plates with holes made are welded inside a vertical cavity at a distance of 25-40 cm. The holes are closer to the edge of the web circumference, and correspond to the holes on adjacent plates.
The best option- three equidistant jumpers. A vertical cylinder with jumpers on top is welded to a horizontal one, and equipped with a chimney pipe (by welding).
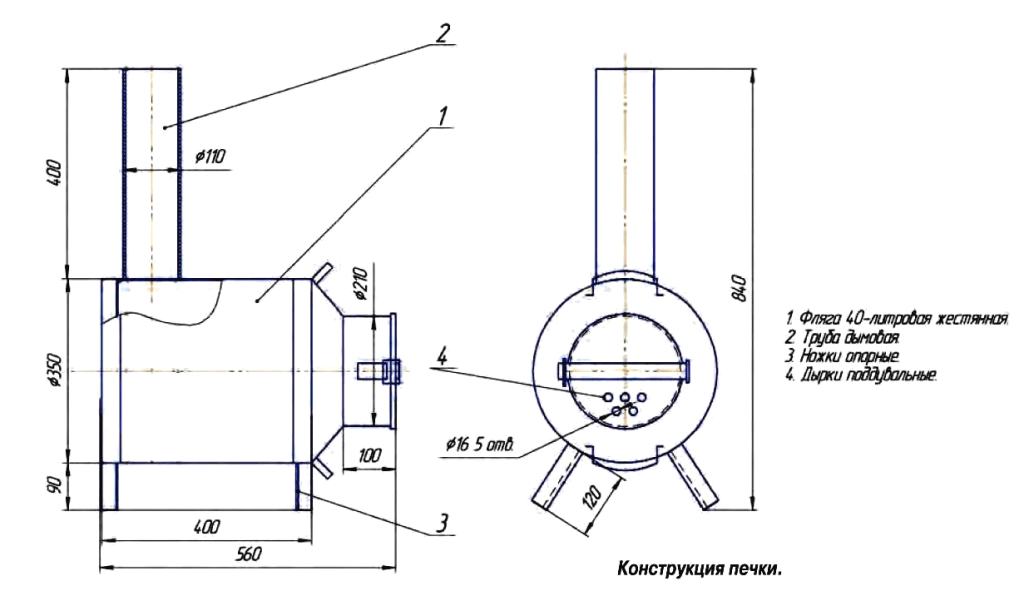
Furnace potbelly stove from a barrel
 The barrel stove is larger than the others, and it also needs more space. But it can also heat a much more spacious room.
Like the first model, a cylinder stove, it can be made both in a horizontal and vertical version.
Both are suitable for heating technical, utility and residential premises. For work you need: a pipe for a potbelly stove 10-15 cm, a sheet of metal and the barrel itself.
Model vertical
On the surface of the workpiece, the future location of the doors of the furnace and the blower, the place of the cut are noted.
 The barrel is cut in half, with each part to be a separate work. A circle is cut out of a sheet of steel along the diameter of the barrel, in which a hole is made for the chimney pipe.
In the upper part of the workpiece itself, a hole is made to align with a similar hob.
The chimney pipe is welded into the hole prepared for it in the barrel, the hob is threaded through the hole at the top and installed. It is welded to the sides of the barrel itself. The air space between them will allow the hob to retain heat longer without cooling down.
 grate(harvested round detail with holes) is welded from the bottom of the upper part. When the top panel and the bottom of this half are ready, you can cut a hole for the firebox (its doors). The opening is scalded with strips of metal, the door is equipped with a handle with a valve and hinges.
They are carefully welded to the barrel in such a way that the door moves back and forth easily, and the latch fits the hook holder. At the very bottom of the barrel, an opening is made for the ash pan (blower). The door is made and hung in the same way as for the firebox. Both halves are re-connected into one by welding.
Model horizontal –
the process of its manufacture is almost completely similar to the manufacture of a horizontal stove from a cylinder.
Easy with your own hands: oven potbelly stove "Gnome"
 A compact oven made from thick metal sheets is one of the most popular homemade stoves of such a type. It looks like a factory, intelligent and neat, and will fit perfectly into the design of any room. In size, this is a wonderful potbelly stove for: it takes up little space, while remarkably heating the room and being used for cooking.
You can make a regular the simplest corpus, dividing into an ash pan and a firebox. If you equip it inside with baffle plates, it will acquire additional heat transfer properties. Such a device will allow you to retain heat longer, and sometimes this is extremely necessary.
 Drawing of the stove "Gnome"
 To make this model, you need a thick sheet of steel (0.3-0.4 cm), a steel pipe, a suitable corner 5/5 or 4/4 cm. .
We provide you with drawings, focusing on which, you can get to work. The outlines of future details of the stove are applied to the blanks. These are its future walls, plates for placement inside, a grate. Holes are made in the front panel for the blower and firebox (rectangular).
Doors are made from the metal pieces obtained in the process: scalded with a corner, equipped with hinges and latches, mounted on front panel. On it, but from the inside, one of the prepared plates is welded. In size, it should be 10 cm smaller than side walls products.
To in cold period year to do some work in the garage or in the country, you need to organize the simplest heating. Knowing how much electricity costs today, most garage craftsmen prefer to use factory and homemade heaters operating on wood or oil mining. The purpose of our article is to provide drawings and describe in detail how to make a potbelly stove with your own hands for use in a garage or a small country house.
We select the design of the stove
Since there are enough drawings of ordinary bourgeois women on the Internet, we will offer a choice of 4 original designs, one of which will certainly suit your conditions:
- Two-way wood and charcoal stove, welded from sheet metal.
- Vertical heater from a gas cylinder with an air or water circuit.
- pyrolysis oven long burning from a cylinder or pipe installed horizontally.
- Dropper for the development of automotive and other oils.
Unit with two chimneys
Note. The heating furnace can also be built from ceramic brick, which is available in this topic. Such a heat source will fit well into the interior of the cottage, but is inconvenient for a garage due to the size of the brick building, long warm-up and lack of mobility.

Wood burning heater with air chamber at the top
- If you spend a little time in the garage (1-3 hours a day), you will need fast heating premises, and it will be provided by a vertical wood-burning stove with an air heat exchanger (option No. 2), shown in the photo. Thanks to the fan that drives air through the upper chamber, it acts like a heat gun.
- The same second option will fit for large boxes (standard garage dimensions are 6 x 3 m). Then the air chamber turns into a water circuit connected to the heating registers.
- For permanent heating standard garage option No. 1 is suitable - an efficient two-way wood-burning stove, or No. 3 - a long-burning unit. The choice depends on the material you have: the first is made from a propane tank, the second is made from 4 mm thick sheet iron.
- For those who plan to burn used oils for heating, it is recommended to cook from round pipe stove drip type(option number 4). If you wish and skill, you can upgrade it - convert it into a boiler by making a water jacket.

Double chamber pyrolysis oven
Reference. Of the popular garage homemade products, it is worth mentioning 2 more designs: the famous stove - potbelly stove top burning Bubafonya and a small heater from rims. The manufacture of the first is described in detail, the second is shown in the video:
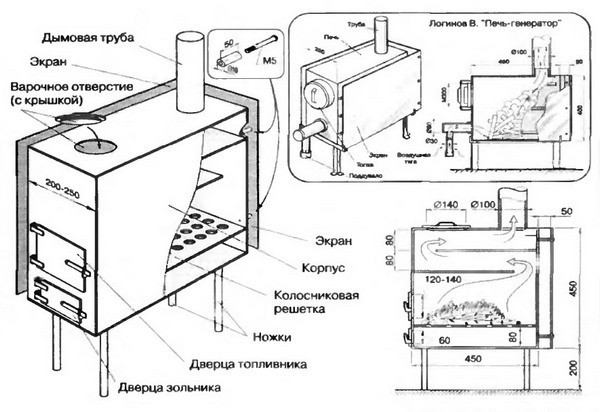
Assembling an efficient potbelly stove
It is well known that the usual iron stoves low efficiency is characteristic (about 45%), since a significant part of the heat goes into the pipe along with the flue gases. Our design incorporates modern technical solution used in solid fuel boilers - installation of two partitions on the path of combustion products. Going around them, gases transmit thermal energy walls, which makes the efficiency higher (55-60%), and the potbelly stove is more economical. The principle of operation of the unit reflects the drawing - diagram:

For manufacturing, you will need a sheet of low-carbon steel 4 mm thick, a piece of pipe Ø100 mm and rolled metal for the legs and grate. Now about how to make an economical potbelly stove:
- Cut metal blanks according to the drawing and make openings for the doors of the firebox and ash pan.
- Weld a grate from corners or fittings.
- From the cut parts, make doors with locks.
- Assemble the unit on tacks, and then weld the seams solid. Install the flue pipe and legs.
Advice. The lower partition, strongly heated by the flame, is best made of thicker iron - 5 or 6 mm.
For better heat transfer, craftsmen practice welding additional outer ribs to the body, as is done in the photo.

How to weld a vertical furnace from a cylinder
This stove-potbelly stove differs from similar units presence air chamber, arranged in the upper part and completely isolated from the firebox by a steel partition. Inside it, heat exchange fins are installed through which the heated air is blown by a fan. For supplying cold and ejecting hot streams, nozzles with a diameter of 40-50 mm are built into the cover, which is shown in the drawing.

Note. The organization of the air heating chamber in the upper zone of the firebox allows you to take the heat of the combustion products passing by it into the chimney. Because in vertical oven the flame covers the entire portion of firewood, there is an intense heating of the air flow in a separate compartment, due to which the temperature in the garage rises quickly.

The first operation is the correct disassembly of a 50-liter propane tank. To expel the remnants liquefied gas turn off the valve and fill the tank to the top with water. After the grinder, you need to cut off the cover (the cut line is the factory seam) and proceed in this order:
- In the side wall of the cylinder, make rectangular openings for the ash and loading doors and frame them with a 3 mm thick steel strip, as shown in the drawing. Cut a hole Ø100 mm for the chimney.
- Make removable grates and install them inside the body on the welded corners.
- Make the doors of the ash and fuel chambers, attach handles and hinges to them, and then install them in the framed openings.
- Cut out a circle Ø30 cm from metal 4 mm thick - this will be the bottom of the chamber. Weld ribs from rolled metal waste to one of its surfaces, and then hermetically dock it with the firebox for welding.
- Make 2 holes in the cut cover and weld the pipes for connecting the air ducts. When ready, install the cover in its original place (but now - above the heat exchanger) and carefully go through the joint by welding.

A vertical potbelly stove in a garage is capable of burning wood of various qualities and humidity, including sawdust, as well as supplying heated air to any point in the room, which is important for greenhouses. In addition, it can provide heat to radiators and registers if they are connected to the nozzles in the upper chamber cover and the system is filled with coolant.

Attention! To avoid boiling water and breaking pipes, you need to create its constant forced circulation from the pump and put an expansion tank open type. Use antifreeze as a coolant, because the garage is not heated around the clock.

Production of a horizontal heater
If standard propane tank lay it horizontally, and arrange a door at the end, you get a fairly roomy firebox, which will include meter-long logs. For better heat transfer and afterburning of the resulting pyrolysis gases, it is necessary to make a secondary chamber with partitions, as shown in the drawing.

The afterburning of combustible gases in this potbelly stove is combined with the removal of heat from the products of combustion, enveloping hemispherical partitions (cut out from the cylinder body). Well, an indispensable attribute of intense heat transfer - external ribs made of steel strips - are required. Practice shows that such a stove heats a garage up to 50 m² in medium burning mode, as described in the next video:
In production heating unit simple: doors are installed in the front, and a hole is cut in the back, where the secondary chamber is welded from a pipe or a second cylinder. In order not to take away the useful volume of the firebox, the ash pan is made hinged. If necessary, a hob is arranged on top of the horizontal part.

We make a potbelly stove at work
Diesel fuel and used engine oil are very high-calorie fuels. If you get it inexpensively, then it makes no sense to mess with firewood and coal, it’s easier to make a reliable furnace - a dropper. Its principle of operation is to burn mining, dripping into a red-hot bowl. And along the way liquid fuel has time to warm up, as it passes through the oil pipeline built into the pipe - the afterburner. The drip-type potbelly stove device is shown in detail in the drawing.

For efficient combustion of oil, air is forced into the stove using a fan, and mining flows naturally from a tank suspended from the wall next to the heater. Another option is the forced supply of fuel by pressurizing the fuel tank (for example, with a hand pump).

Both a pipe Ø219 mm and a propane cylinder with a diameter of 30 cm can act as a furnace body. Making an oil potbelly stove with your own hands is a simple task, the main thing is to make holes and slots in the afterburner correctly and lay the fuel pipe to the bowl installed at the bottom. Complete guide assembly is presented in our other article. You can get a closer look at the operation of the heater from the video:
Conclusion
It must be understood that the designs of wood-burning and oil stoves for the garage shown above can be changed and refined by you during operation. That's the beauty of homemade stoves - they are improved according to your desire. Example: garage craftsmen often make an external water circuit based on a samovar heat exchanger built into vertical section chimney pipe. This makes it possible to use water heating without intervention in the design and alteration of the furnace itself.

Structural engineer with over 8 years experience in construction.
Graduated from East Ukrainian National University. Vladimir Dal with a degree in Electronic Industry Equipment in 2011.
Related posts:


