Plasterboard ceiling with backlight in the kitchen. Plasterboard ceiling design in the kitchen. Distinctive features of a two-level ceiling
Drywall constructions help to quickly, cleanly and beautifully fix all the shortcomings of the old ceiling, and it will cost relatively inexpensively. But a plasterboard suspended ceiling in the kitchen must be designed taking into account all the features of the room: humidity, lighting, geometry, flaws in the ceiling tiles. Do you want to know everything about it? Read the article!

The undeniable advantage of the GKL is that the unusual geometry of the suspended structure will emphasize the features of the chosen interior style and help visually divide the room into several functional areas.
Why GKL

When choosing a material for finishing the ceiling in the kitchen, you need to consider several important parameters:
- It is important in the kitchen good ventilation, and especially in the kitchen-studio. Stretch ceilings are made of a thin and durable film that completely blocks the movement of moist air vapor. As a result, the smallest drops settle on the ceiling. Drywall "breathes", providing an ideal microclimate in the room.

If you like film ceilings, there is an alternative. You can decorate a drywall ceiling with self-adhesive bright patterns and patterns from the film, it will be cheaper than a stretch coating, and the effect is no worse.
- Film webs impose certain requirements on the power and quality of light bulbs. For incandescent lamps - no higher than 60 W, and for halogens - 35 W. I love bright light in the kitchen, these demands stopped me from ordering stretch ceiling.

- Drywall is stronger and harder to damage or tear. And although stretch ceilings are positioned as resistant, it is very easy to tear them when washing.
- The design of the GKL allows you to arrange a spacious niche in the corner of the kitchen and securely hide all communications.

- For private houses, GKL is preferable, as it additionally retains heat in the room and contributes to high-quality ventilation of the kitchen.
An additional plus is that a plasterboard false ceiling can be placed anywhere, for example, to build doors for access and maintenance of communications. With stretch ceilings, this will not work.

The biggest plus of drywall is the price, the cost of such ceilings is 40-50 percent lower than stretch ceilings. But this is if you take high-quality film coatings, and not fake.
Kitchen Design Ideas

Plasterboard ceilings in the kitchen, with proper placement, will help to effectively and conveniently organize the space. How to do it?
The first idea is a multi-level ceiling

For a kitchen-studio, a multi-level ceiling option is suitable, as it will help to visually delimit the space of the working and dining areas. If the room is less than 10 square meters, then you can choose the option in two levels, with curved lines and illumination from halogen bulbs along the edge of the wave.

The disadvantage of complex multi-level ceilings is that they do not look good in rooms with a height below 2m30 cm. It should be borne in mind that one level is approximately 5 - 8 cm in height. Therefore, designers recommend making out the second level of the suspended structure from the corner to the center, by sector, as seen in the photo.

Another option for low rooms is a combination of hemming and suspended structures. Part of the drywall panels is attached directly to the ceiling, and the second level is installed on hangers.
The advantage of this installation is high-quality insulation and excellent sound insulation.
Idea two - ceiling partition

Designs look nice narrow septum original geometry, which can be lowered from the ceiling. But it is not necessary that such a partition reach the floor, you can effectively divide the room into several functional zones and, with the help of small arches or partitions, half the height of the room.

With the help of curved lines and contrasting colors, it is possible to make even a small room much more spacious, without losing comfort and functionality.

Another plus of plasterboard ceilings is the ability to install any type of lighting and lighting.
The third idea is a combination of colors and textures

Plasterboard ceilings in the kitchen can be covered with any option finishing- plaster, plastic lining, film. Therefore, it is possible to effectively combine several materials of different colors and textures, creating an exclusive and unique design.
Did you know that the ceiling in the kitchen can be not only an element of decor, but also perform certain functions? This part of the room can be made useful and functional if you create it from drywall. How to do this, and how can the space under the ceiling structure do a good job in the kitchen?
Why is it worth installing a plasterboard ceiling in the kitchen?
Drywall is a building material that was invented in the United States in the 19th century. It was invented by Augustin Saket, the owner of a paper factory. Then this canvas was called a building board and resembled a kind of cake made of plaster and paper. The material was improved by engineer Clarence Utsman, who created such drywall as we see it and use it now.

On a note! In the composition of one sheet of drywall, approximately 91% of the mass is gypsum dihydrate, the remaining 9% is cardboard, starch and surfactant organic matter.


Drywall came to the Soviet Union around the 50s of the twentieth century and has been used in construction and design ever since. The material is simple and easy to use, relatively cheap and not only allows you to finish (align) the walls, but is also suitable for manufacturing window slopes. It is not surprising that drywall began to be used to create ceiling structures, including multi-level and complex ones.


The material has a large number pluses and that is why it is ideal for making a ceiling in the kitchen.

But the plasterboard ceiling has its drawbacks.
Drywall prices
drywall
- The design "eats" at least 7 cm of the total height of the ceiling, which is very inconvenient for small kitchens.
- Plasterboard ceiling installation is not a matter of five minutes. You may have to spend more than one day to collect it completely.
- After the installation is completed, the ceiling will require finishing, and this is an additional time and financial cost. Depending on the type exterior finish, the design can become difficult to maintain.
- Such a ceiling does not like moisture and will not save the room in case of flooding by neighbors from above.
- With improper installation, as well as with prolonged use, in places where the seams lie between the sheets of drywall, the surface finish may crack.
Nevertheless, despite all the shortcomings, plasterboard ceilings are one of the most popular types of ceiling surface finishes. He has many more advantages.

Types of plasterboard ceilings
Drywall is such a “plastic” material that it allows you to create completely different shapes, including in the kitchen. In order to purchase the required amount of materials, the right tools and start the installation work, you should decide how your ceiling will look like. There are several types of plasterboard ceiling structures.
Table. Types of plasterboard ceilings.
| Ceiling type | Description |
|---|---|
| The simplest version of the plasterboard ceiling. Represents flat surface without additional elements. Easy to install: the metal frame is simply sheathed with drywall sheets. Such a ceiling "eats" a minimum of the total height of the room, but at the same time allows you to hide the draft ceiling completely. |
| Medium in complexity type of plasterboard ceiling finish. The main "subtlety" is to correctly calculate the location additional levels and create a more complex frame than in the case of a one-level ceiling. This makes installation more difficult and takes longer. But on the other hand, the levels can be interestingly beaten with the help of curved lines, as well as illuminated with the help of lamps or a luminous tape. It is worth remembering that a ceiling of several levels “steals” even more of the height of the room, so it is only suitable for spacious kitchens. |
| As a rule, such a ceiling will have a very complex structure and some volume decorative element its surface. For example, a flower may bloom in the center of the kitchen, or a butterfly may appear, or even some kind of abstract pattern. Such a ceiling is difficult to install for those who do not have experience with drywall. |


Let's take a closer look at ceiling structures consisting of several levels. The ceiling in the kitchen can be made frame, diagonal or zonal.
Frame ceiling- this is the easiest way to implement a multi-level ceiling. It is a surface with one or two steps along the perimeter of the kitchen walls.
On a note! By the way, a step around the perimeter of the kitchen is a great place to organize additional illumination of the room. As a rule, the lamps look very organic there.

Diagonal ceiling- a design where the steps of the levels are located only on one side of the room and stretch from corner to corner. They are performed both perfectly smooth and wavy.

zone ceiling will clearly highlight the working or dining area. The main step will emphasize it. The rest of the ceiling space will be flat. As a rule, such a step is not large and massive.

Design Tips for Kitchens Small and Large
So that the ceiling in the kitchen pleases you long years and did not seem bulky, ugly, heavy, its appearance should be carefully considered.
When choosing a type ceiling structure from drywall and its finishes, it is important to consider several important factors:
- dimensions and height of the kitchen;
- general style of the interior;
- the need for equipment additional lighting;
- the need for decoration.
Why is it worth paying attention to these factors? The fact is that the plasterboard ceiling, with improper installation and finishing, will not just “press” - it will look very bad, and you definitely will not be satisfied with the repairs made.

Here are some tips, following which, you can very successfully work out the design of the ceiling and make it perfect.
- Use for room zoning Spotlights.
- Hide the corrugation and other kitchen communications under drywall.
- To finish the structure, use materials of light shades - beige, cream.
- In small rooms, it is better not to make ledges on the ceiling in the center of the kitchen.
- A game with color will also help to zone the room. Use various shades for this.
- In large kitchens, you can create a floating ceiling - in this case, it seems that part of the structure is simply hanging in the air (the fasteners are not visible).
Attention! Remember that in a small kitchen, bulky multi-level structures will look very bad. It is best to make the ceiling in one level or work out a frame version of the plasterboard ceiling.
Ceiling installation
Once you have decided on the design of the plasterboard ceiling in the kitchen, you can proceed with the installation.
This will require the following tools, to take care of the acquisition of which should be in advance:
- perforator;
- screwdriver;
- roulette;
- construction laser level;
- ladder;
- pencil for marking;
- putty knife.

Video - Drywall tool (basic set)
Materials that will be needed to create a plasterboard ceiling:
- drywall sheets;
- anchor wedges for the ceiling;
- metal profiles CD and UD;
- suspensions, traction;
- putty and primer, finishing material;
- sealing tape, separating tape, sickle;
- screws for metal and drywall;
- dowel;
- profile extensions, "crabs" for suspended structures, "fleas".

Also, pre-purchase lighting fixtures in the required quantity and wires for connecting them to the mains.
Installation procedure two-level ceiling.
Make up detailed plan fastening of all structural elements. It will facilitate the work and allow you to calculate the required number of fasteners and materials.
Prices for screwdrivers
screwdriver

Start work with markup. Using a tape measure, determine the lowest corner in the kitchen, from the base ceiling down, make a mark along the lower border of the first tier (this is about 10 cm). Make the same marks on the other corners. Determine the level on them using a laser level.


Connect the points indicated in the corners with one line around the perimeter of the kitchen. To do this, it is convenient to use the so-called chopping cord.

Fasten the UD guide profiles along the drawn line with dowels. Make holes for the profiles with a puncher. Remember to reinforce each profile at the edges at a distance of at least 10 cm from each end.

Attention! Before fixing the profiles, glue them with a sealing tape.

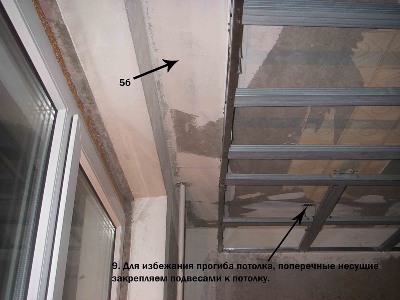
Transfer to the ceiling that part of your scheme where the main profiles are marked, fixed under the ceiling. The step between the parallel marking lines is approximately 40 cm. Make marks perpendicular to them in the places where the suspensions will be installed (the step is about 50 cm). In this case, install the extreme suspensions at a distance of 25 cm from the wall.
Start installing hangers. Screw anchors into the ceiling, fix the suspended structure and bend its ends so that it does not have free play.

Mounting suspensions (here - vibration suspensions for sound insulation)
Install the profiles on the prepared structure by screwing them to the hangers with self-tapping screws - first the edges, then the middle. In this case, fasten the profiles on one side of the ceiling, then on the other, step by step.

On a note! The length of the entire profile should be less than the length of the kitchen by about 2 cm. Short profiles can be connected using special connectors. Remember that the joints of several profiles in this case should not be at the same level.
Install jumpers between profiles using "crabs". Install jumpers in those places where there will be joints of drywall sheets.

Do all the electrical wiring, because after plasterboarding you will not be able to carry out this stage of work. Lay the wires for the fixtures and check the entire network for operability.


Advice! In order not to subsequently look for the place of installation of lamps, they can be marked in advance on sheets of drywall.
Start installing drywall. Before that, it must be processed - cut at a slight angle along the edge of each sheet. This is necessary to improve the results of puttying in the future. The glued ends of the sheets do not need to be trimmed.


Fasten the sheets, starting from the corners of the room, with self-tapping screws in increments of 20 cm. Make sure that the sheets are installed “in a run”.
Ceiling profile prices
ceiling profile


Attention! The heads of the self-tapping screws should not stick out, they should be sunk into the drywall sheet by a few millimeters.
After you have sheathed the entire ceiling, proceed to install the second level. Stretch two strands from corner to corner of the kitchen so that they intersect. This will find the center of the ceiling. It is from him that you begin to set aside equal distances in order to determine the boundaries of the junction of the ceiling levels. That is, now you are drawing a markup along which you will attach profiles for another tier.

Screw the guide profile along the marked perimeter. Repeat steps 2, 3, 4, focusing now on the second level.


Now cut the CD profile into segments of the length for which you plan to install the second level. This is the same length as the distance from the first level to the guide profiles of the second, fixed on the wall. Cut out special “tongues” on one side of the segments by cutting off the side parts of the profile.
Insert the segments into the UD profile fixed on the first tier at a distance of about 5-6 cm. Reinforce them with “flea” screws.

Put another guide profile on the hanging segments.


Prepare sections of CD profiles equal in length to the distance from the resulting mini-frame to the wall, and install them, securing them with “fleas”.
Sheathe the frame with drywall.

Advice! To save material, do not drywall that part of the first tier that will be hidden under the second.

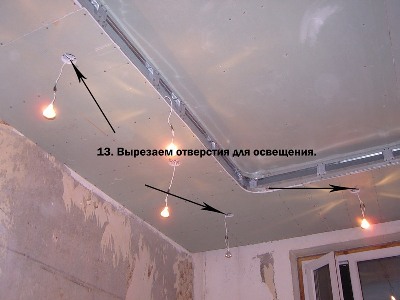
Make holes for the fixtures using a cutter of the desired diameter or reinforced stationery knife. Install fixtures after finishing drywall.
putty prices
putty

Video - Two-level ceiling with rounded sides
Ceiling finish
Now you can start finishing the ceiling surface. To do this, carefully treat with a primer and putty all the joints, also use a sickle tape and then again coat all the irregularities, including the places where the screws are screwed.
All that's left is to finish the surface. How to cover drywall so that the ceiling in the kitchen looks harmonious, beautiful and lasts a long time?
- You can paint a drywall ceiling with acrylic, latex, water-based paint.
- You can paint, or you can combine these two types of finishes.
- Looks good and.
Attention! Glossy paints can only be used if the ceiling has been completely plastered. Otherwise, all the irregularities will be visible.

Master Class. How to make a figure of low height on a plasterboard ceiling
The figure is made at the original level of the plasterboard ceiling, made using the technology described above.


Now the most difficult and crucial part of the work is the installation of cornices. To do this, we need such a tool. This is a saw in a universal miter box. It can be tilted to almost any angle. The cut is even, precise and slightly rough, which will improve its adhesion to the glue.


Plasterboard ceiling in the kitchen - one of the the best options decoration for this space. However, covering drywall better paint so that you can wash it regularly. Wallpaper and plaster do not like water, and the ceiling in the kitchen is often exposed to steam, and splashes of grease often fall on it. So choose the most practical materials for decoration, so as not to complicate your life.
– great option finishes in cases where the floor slabs on the ceiling are at different levels, have gaps, irregularities. It will also help solve the problem of laying communications and provide an opportunity to create interesting scheme lighting.
The design of the plasterboard ceiling can be any, have different shapes - straight, curved, round, oval. In any interior style, plasterboard ceilings will be appropriate, and will allow you to solve a number of both technical and aesthetic problems.

Plasterboard ceiling design in the kitchen
Before proceeding with the design of a drywall construction, it is necessary to take into account a number of specifications. For example, equipping a working area with an exhaust hood requires an air duct above it, and this must be provided. If you plan to build in fixtures, the distance between the floors and drywall should be selected taking into account the dimensions of these fixtures.
The work begins with an assessment of the size of the room and the shape of the ceiling. Then determine the number of levels and their location depending on the chosen style and functionality. Next, choose the color and method by which the ceiling surface will be finished. Final stage work on the design of plasterboard ceilings in the kitchen - choice lighting fixtures and decorative items.


When choosing a color, you should be guided general rules design:
- Best for small spaces bright hues;
- IN spacious kitchens saturated dark shades are acceptable;
- Pastel colors will suit almost any interior style and add comfort;
- Bright, harsh colors can have a bad effect on well-being and mood.
Tip: If you want to emphasize visual zoning, make a plasterboard suspended ceiling in the kitchen at different levels - above each of the zones at its own height. Spotlights mounted in the ceiling along the border separating different heights will enhance the effect.


This is the simplest design, suitable for any room. Its surface can be plastered and painted - in which case the ceiling will not differ in appearance from the traditional one, while retaining all its advantages.
Under the ceiling, you can remove communications, wiring or mount fixtures. At the same time, the visual zoning of the kitchen can be emphasized by applying different color or a different texture over different zones. For example, the ceiling above the dining table can be light, and above the work area - a more saturated tone. This will draw attention to the dining area and ensure its dominance in the interior.


The plasterboard ceiling in the kitchen will also help emphasize the allocation of zones if you install lamps into it along the boundaries of these zones. Directed downwards, the light will create a kind of "light curtain", effectively highlighting one or another part of the room.
You can turn a simple ceiling into a masterpiece if you decorate it with three-dimensional drawings. You can create them yourself - and it's easy. Having applied the selected pattern to the surface, we draw it with liquid paper and dry it. After that, drywall sheets are fixed to the selected places and painted in the usual way.

The design, made in two levels, often provides more opportunities for obtaining spectacular interior or solving technical problems that arise during the repair of such complex premises like a kitchen. The protruding parts will hide large communication elements under them, for example, air ducts, or large recessed lights.
The combination of parts of different heights will add volume and allow you to solve interior problems. Higher parts of the structure are often located in the working area of the kitchen or in the center. They may have the most different shape depending on the chosen design. Often oval and rectangular elements are combined in plasterboard ceilings in the kitchen. There are also combinations of plasterboard elements with stretch ceilings. This diversifies the interior and brings a "zest" to it.


If elements of a drywall construction are used, located in three or more levels, such a ceiling is called multi-level. More often it is used in spacious kitchens with high ceilings - from three meters or more.
This is especially true in cases where the ceiling height exceeds four meters, which is usually for old-built apartments, especially "Stalinist" ones. Not too large in area, but having a significant height, such rooms look disproportionate, and a multi-level ceiling allows you to correct the proportions and make the room more comfortable.


Such ceilings can hide large height differences. ceiling, significant defects in it, as well as remove from the eyes ceiling beams or ventilation duct. With their help, you can place accents, for example, emphasize the exclusivity of kitchen furniture.


Plasterboard ceiling in the kitchen: the pros and cons
There are many advantages of drywall constructions, we list the main ones:
- Hide wiring and communications;
- Remove irregularities and defects in ceilings;
- Help to implement visual zoning;
- Give individuality to the interior;
- Allows you to set point ceiling lights on the same level as the ceiling;
- Provide additional sound insulation;
- Do not change during the settlement of the building, do not crack;
- Provide unlimited design possibilities.
In addition to the obvious advantages, there are also disadvantages, and they must be taken into account when deciding on the ceiling finish.
- When installing a drywall construction, it is lost from 7 cm in height;
- Installation requires skills and is carried out by specialists;
- Over time, the joints between drywall boards can crack.


Properly selected lighting schemes can completely change the room, make it more spacious, highlight individual parts, focus on the main areas. Spotlights that can be mounted in the ceiling can serve as the main lighting, or be directed to certain places in the room.


An interesting option is cornice ceiling lighting. In this version, the cornice is glued to the wall with a few centimeters indent from the ceiling, and a LED Strip Light. The power and color of this backlight may vary. The illuminated ceiling seems higher, and the room itself acquires additional volume. Directional light from built-in sources can create interesting game lights and shadows that transform the interior.


Not big sizes kitchen space cannot interfere with the use of plasterboard ceiling structures. It is only necessary to choose their type and design correctly.
- With a small height of the kitchen, choose a single-level ceiling - it will “eat” less centimeters, which already count.
- A well-thought-out lighting scheme, as well as the use of cornice lighting, will help to complicate a single-level ceiling and make it more spectacular.
- Visually enlarge the room will help light colors for painting the ceiling.
- The use of glossy textures on the ceiling will visually increase the volume of the room.
Tip: If the height of the kitchen is small, but you want to have a two-level ceiling, add a wide decorative cornice to the usual single-level ceiling, placing it slightly below the main level. The backlight placed behind the eaves will help create the necessary impression.


Plasterboard ceilings make it relatively easy to create the desired design in the living room or kitchen with different options decorative finishes. This material has an acceptable price, is easily cut with a knife, withstands big weight, and moisture-resistant varieties are well suited for kitchen conditions. Drywall is often used if you want to create a multi-level ceiling design, with built-in spotlights or communications hidden in a niche under it.

The advantages of plasterboard ceilings for the kitchen and living room are as follows:
- with the help of them it is possible to hide irregularities concrete floors and hide wires, pipes and other communications;
- provide additional heat and sound insulation;
- the material is easy to process, install and further operate;
- drywall sheets, durable, resistant to mechanical damage, there are moisture resistant and refractory grades;
- such ceilings allow you to create several levels and appropriate zoning of the room;
- drywall is cheaper than many natural Decoration Materials, such as wood, polyurethanes, laminated chipboard and others.

Masters finishing works distinguish and disadvantages of plasterboard ceilings:
- there are seams between the sheets that need careful finishing to hide them;
- a drywall frame should be carried out by an experienced specialist, since cracks and other defects can occur at the slightest unevenness;
- in new buildings, it is not recommended to use such a finish, since the building is still shrinking, and the deformation of the walls can cause the destruction of the plasterboard frame.

The ceiling in the kitchen or in the living room is made of plasterboard using metal frame. For work, a moisture-resistant grade of this building material is usually chosen; it has a greenish surface color.

Varieties of designs
The simplest design plasterboard ceiling is a single-level, in which the coating occupies the entire area of \u200b\u200bthe room with one even layer. With such a simple design installation work are simplified, and the surface is perfectly smooth, it can be applied various ways decorative finishes: painting, gluing paper, vinyl or liquid wallpaper. Other advantages are the ability to integrate lamps inside, increased thermal insulation and noise protection.

Multi-level plasterboard ceilings are represented by a variety of ideas and projects, but all of them have one rule: the lower the level, the smaller it is in area. This applies to options with right angles and lines, and complex curved shapes. Each next level is mounted on the frame of the previous upper one.

The most simple idea a two-level ceiling in the kitchen - 2 zones with a direct transition: a larger area above the main kitchen space, and a smaller one, lowered by 10-15 cm - above the stove, countertop and sink. In the living room, you can originally use two levels in this way: the lower level is in the form of a frame around the entire perimeter of the room along the walls, and the upper one is in the center of this frame. It turns out a kind of rectangular recess in the middle of the room, in the transition zone you can hide the side lights, which will create additional spectacular light.

Multi-level ceilings in the living room and kitchen should be designed in such a way that the individual tiers fit together and create harmony. Too much complex structure from the heaps of three-dimensional figures may look absurd despite high costs for repairs and supplies. In the kitchen to create original interior two levels are enough, and in the living room a maximum of three.

Complex curly frames are good to use in large rooms, where there are several levels false ceiling won't take up a lot of space. Drywall is easy to cut along a curve, but rigid metal profiles are needed to install strong curved shapes. The curly frame can not only reduce the height in the room, but also visually enlarge a separate area in the room if the ceiling above it has a recess, i.e. more high level.

Kinds
Plasterboard ceilings with two or more levels are divided into simple and complex. The most common are 3 types of simple suspended structures:
- Frame - represent a one- or two-stage box with a width of not more than half a meter along the perimeter of the room. Built-in lights are usually installed on the lower levels, and hidden lights are installed in the side transitions. led backlight. The advantage of such ceilings is that there is no need to create curved profiles, all lines are straight.

- Diagonal ceilings, in which the transition between levels, most often wavy, divides the room in half from opposite corners. Plots can be asymmetrical, different in area. It is preferable to make a higher level closer to the window, and equip the lower one with built-in spotlights.

- Zonal ceilings with their levels distinguish some zones in the room, in the living room it can be the sofa area, coffee table and sections, and in the kitchen area dining table and work area. The simplest example of zonal selection is the corner of a room, where the upper protrusion is placed in the form of a triangle, its sides are adjacent to the walls.

Complex models suspended ceilings There are also several types:
- curly with their own lower levels form some kind of image, for example, a flower around the central chandelier. Most often they are located in the center of the room, but there may be various options.

- Ceiling abstractions form some kind of abstract figure with their transitions between levels. An example would be a spiral that radiates from the center of the room where the chandelier hangs, with a hidden backlight.

- Patterned ceilings represent a pattern of small items. It is quite difficult to create such a drywall construction, but the result can be a spectacular unusual design.

- Floating ceilings contain individual elements suspended from the base at a slight angle, as a result, it seems that they are floating in the air. The effect is added by side lighting.


Complex curly models can be created with or without built-in lighting, in any case visual interior in the room will change dramatically. The ceiling is the part of the room that catches the eye in the first place, so you should not save on its decoration.


How to choose
Planning a plasterboard ceiling model depends not only on the desire of the owners to make lush unusual figures or on the ability to carry out complex installation of the frame. The size of the room plays an important role. In a small kitchen with an area of \u200b\u200bno more than 10 square meters. m. you should not create a multi-level structure, even an option with one direct transition from the common area to the work area. The height of the premises in small-sized city apartments, in particular in the "Khrushchev" 2.2-2.4 m is not suitable for massive frames with several tiers. In such premises, it is optimal to make the simplest single-level model, which will hide the unevenness of the floors, provide additional sound and heat insulation.

Kitchen rooms with an area of 12-15 square meters. m. or more spacious allow you to show your imagination and make two-level ceilings. The most popular options that are made in the kitchen are zonal, diagonal, frame. The first type is relevant if the countertop and the whole work zone located on the side wall. The second and third options are good for an island stove and a centrally located cooking area.

For a living room with spacious dimensions, nothing prevents you from creating a project of complex figured ceilings, floating, abstract or patterned. But it should be borne in mind that such repairs in the room, including the installation of curved frames and additional lighting, require special professionalism. Therefore, it is better to use the help of experienced drywall specialists, which will not come cheap.

How to do
In the living room, you can use the usual grade of drywall, its sheets gray color, and for the kitchen you need moisture resistant - green. In any case, to mount the frame, you need rigid metal profiles that are attached to concrete base on strong screws with perforator dowels. The frame is installed strictly on a horizontal level, taking into account the weight of drywall sheets and finishing materials. Usually for standard sizes rooms, several transverse jumpers are installed.

For multi-level curly structures, metal profiles are cut and bent, such work should be carried out by an experienced specialist. Under their forms, sheets of drywall are also cut. All parts are fastened with ordinary self-tapping screws, which easily cut into metal and soft plaster.

Built-in lighting is mounted in holes cut out in sheets, most often small ones are used. LED bulbs and ammo for them. The work of wiring power cables for fixtures and connecting them to a common network requires the skills of a professional electrician.

To create your own design of complex figured ceilings, you should turn to the services of professionals. Do-It-Yourself Solutions and drawings often form an inharmonious interior with unnecessary gaudy heaps. A experienced designer will tell you what shapes and lines are most suitable for a given room, how best to arrange lighting and color combinations on the ceiling, how to arrange different levels among themselves. The specialist draws a drawing future design overlap, which can be further agreed and adjusted.

How to paint
The following types of paints are used in modern interior decoration:
- Acrylic types have many shades for every taste, matte and glossy. They dry very quickly, do not emit a strong smell when painting. oil paints. Therefore, during the work, the master will not experience inconvenience, and upon completion, the room can be used almost immediately for its intended purpose. Have high term service and moisture protection, suitable for both the living room and the kitchen.

- Water-based paints have good resistance to moisture, pass air and do not harm health. By adding various pigments, you can independently change their colors.

- Water dispersion varieties are best suited for kitchens with high humidity. Their merit is that smooth surface can be easily washed with a wet cloth.

- Paint on silicone base also have the maximum degree of protection against moisture. They have many colors with a pleasant and even sheen, but of all the most expensive types.

It is worth remembering that before painting it is necessary to prepare the surface and protect the furniture, floor and walls from stains. Drywall itself has a flat and smooth surface. But at the joints of the sheets, and especially if the parts have curved curly lines, noticeably protruding seams remain. It is best to cover them with a layer of liquid putty and then, after it dries, clean sandpaper. In addition, there is a special adhesive tape, which reliably closes these irregularities.

For effective adhesion of the paint layer to the drywall surface, it must be primed. Suitable primer for internal works, which is diluted with water in a ratio of 1 to 1. It is best to apply a primer layer with a soft roller, and paint only after the primer has dried.

In addition to painting, wallpapering is used to cover plasterboard ceilings. Any options to the taste of the family are suitable for the living room - paper, washable, vinyl. To the kitchen because of her high humidity and high temperatures, it is recommended to use moisture-resistant washable wallpaper. Another finishing option kitchen ceiling- this is silk plaster or liquid wallpaper.

Interesting options in interior design: new items
Relatively simple to install, but spectacular in appearance is the frame ceiling in the kitchen with spot lighting around the entire perimeter.

organic part modern interior- ceiling design Plasterboard ceilings in the kitchen change and decorate the room in which, according to statistics, everyone spends most of their lives.
Due to its qualities and properties, today drywall is used everywhere in the kitchen. It is able to withstand loads, is resistant to moisture, vapors, and easily takes bizarre shapes. Drywall is inexpensive, and its installation is carried out in a short time, for which this material is valued by builders and designers.
Plasterboard ceilings in the kitchen
Why choose false ceilings for the kitchen:
- Easy installation. frame structure and large sheet sizes contribute to the rapid transformation of the kitchen.
- Drywall is considered an environmental material that can be used in conditions of high humidity and high temperatures. It is resistant to mold, fungi, because it "breathes".
- The false ceiling copes with the task of hiding communications and defects in the supporting ceiling.
- Installation provides additional sound insulation.
- A plasterboard suspended ceiling changes the visual perception of the kitchen, expanding it.
Kitchen ceiling design features
Before proceeding with the installation of the ceiling, they are determined with the following things:
- The shape and number of ceiling levels. This should be done taking into account the size of the kitchen, the height of the walls and the configuration of the situation. Distinguish between single-level and multi-level ceilings. Two-level ones are more suitable for the kitchen, but if the size of the room is large, the number of levels is increased. Single-level is easier to work with, installation requires less material.
- Type and color solution finishing. The ceiling should look harmonious.
- Lighting. They choose lamps, their type, determine whether a chandelier is needed and how to arrange lighting elements more efficiently.
In any case, the design of the plasterboard ceiling in the kitchen should be functional, not just beautiful. Air ducts and ducts are hidden under the ceiling. Correctly calculate the height. From their locations, the marking of the ceiling structure begins. Spotlights and LED strips look perfect here.
Often in the kitchen, stretch ceilings are used in combination with drywall.
 Kitchen lighting solution
 Drywall take moisture resistant - GKLV.
The right design will help change the visual perception of the kitchen. If it is rectangular and strongly elongated, then you should not use it at the base. rectangular shapes, and it is better to choose round or oval.
Lighting helps solve this problem. The kitchen is divided into zones - cooking and dining. LED and spot lighting makes the kitchen spectacular in dark time days.
If classic version interior, then color scheme finishes are chosen soft, preferably pastel colors. Paints are better to buy matte. For techno and others modern designs use gloss paints any tones and colors.
Read also: - stages of work and design ideas
Frame installation
If they create a ceiling with their own hands, then they find a partner, since the sheets are heavy, and stock up on the appropriate tools. You will need:
- Bulgarian;
- Drill;
- Level;
- self-tapping screws;
- dowels;
- Knife for drywall;
- Plane;
- Hangers and connectors.
Work begins with marking the position of the carrier and guide profile. To do this, determine the lowest point of the ceiling under construction. This is done using a level, preferably a laser one.
In the process, provide for the height of the ceiling, taking into account the installation of fixtures. If they take point ones, then they need ventilation and the interceiling space should be at least 10 cm. If a chandelier is installed, 5 cm is enough. The frame provides convenience and reliability of wiring fasteners.
Guides are installed around the perimeter of the ceiling. The carriers are set in increments of 60 cm, but it is also reduced to 40 cm if two levels are performed or a heavy chandelier is hanging. Cut the profile with a grinder or scissors for metal.
 Drywall frame in the kitchen
 Fasten the guides with dowels in increments of half a meter. When the installation of the guides is completed, proceed to the installation of the carrier profiles. First, they are inserted into the guides, and after alignment in the hangers, they are fixed. The first one is 10 cm away from the guide. In this way, possible deformation of the drywall due to temperature differences is prevented. The rest are set in increments of 60 cm.
If necessary between bearing profiles install cross bars. The installation step is 40 cm. They are connected to the “crabs” profile. The profile is attached to the hangers with self-tapping screws.
Plasterboard cladding
After the installation of the frame is completed, they proceed to plasterboard lining. Sheets are pre-cut to size.
Cut them with a knife on drywall. It can be ordinary sharp or clerical. First, one side is cut so as to capture part of the gypsum core. Then the sheet is broken and cut to the end on the other side. Burrs are removed with a planer and cleaned with sandpaper. The holes for the lamps are made in such a way that they do not fall on the frame elements. To do this, use a cutter of the desired diameter and a drill.
 Cladding plasterboard kitchen ceiling
 The sheets are fixed with self-tapping screws so that the heads are recessed into the material by 1 mm. In the process, they monitor the correct entry of the fasteners - they are installed vertically.
Ceiling finish
When the installation of the ceiling is completely completed, begin rough finish. But before that, wipe the dust with a damp cloth and primer.
The video shows the installation of a two-level ceiling in the kitchen:
After drying, treat with sandpaper and cover the places of putty with a primer. If required, apply an additional leveling layer of putty, which will cover all defects and irregularities. After drying, sand it. Then the primer is used again. When dry, move on to decorative trim.
The ceiling is painted, pasted over with wallpaper or other materials. For painting it is better to use water-dispersion acrylic or latex formulations. Do not take glossy paints - they "give out" all the minor flaws. It should be borne in mind that places that have not been puttied will require more paint consumption - several layers.
Before applying paint, the ceiling must be primed. Coat with acrylic primer before wallpapering.
Photo gallery
Plasterboard ceiling design in the kitchen:
 Design solution ceiling in the kitchen
  The play of light is possible with drywall constructions
  Simple in execution and beautiful in the interior
  Only GKL allow you to make any dream come true
  Partial decoration of the ceiling area
  Any custom solution subject to GKL
  Simple and beautiful
  A few accents on the ceiling will make any room attractive.
  Plasterboard ceilings with several types of fixtures
  Drywall easily copes with the task of zoning space
  Several ceiling steps
  Emphasis on the center of the ceiling
  Ceiling lighting located in plasterboard ceiling
  beautiful shapes ceiling ideas
  Rectangular kitchen finishes
  The main thing is to choose the location of the protrusions
  The perimeter of the kitchen is finished with drywall
  If the kitchen allows, then more massive structures can be made.
  To increase the space, you can create a ceiling from GKL
 It will be equally interesting to know how to do


